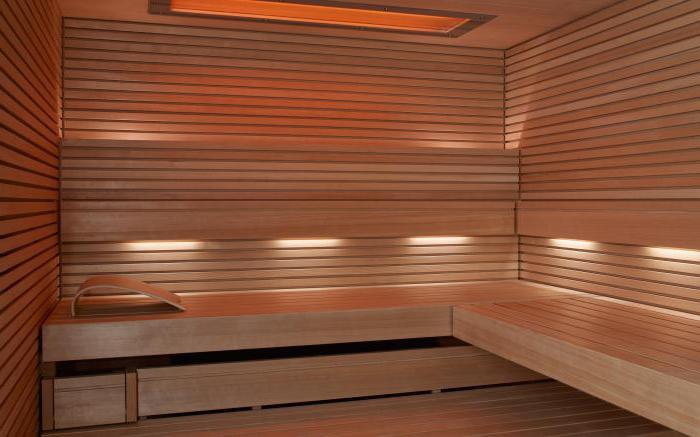
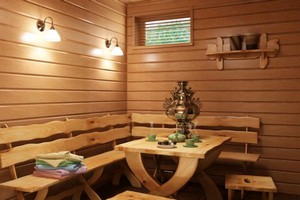
Cut the bath inside with the clap - this is the best option for interior decoration This type of room.
The lining is ideal for the needs of a bath from a bar: it is well kept warm, does not miss steam and organically fits into the stylistics of the room.
The most important plus lining is that you do not need to invite specialists to sow walls - you can do it yourself.
Certray to work properly your own hands will help you video, where all stages of work are reflected.
Before proceeding to the walls of the walls, you need to decide what tree you want to see the inner finish.
It is best to use a lining profile made of wood of deciduous breed, because Coniferous trees will highlight evaporation, harmful to human health.
To cover with clapboard, you can choose the following types of hardwood wood: liquid, oak, alder or birch.
Lipa is distinguished by the high quality of heat retention, resistant to dampness and ease of processing.
The lining from oak will be the most durable, and from alder - have a little bitter smell when cooking a bath.
Birch will cost you cheaper than everything, but it has low resistance to moisture, so it is possible to use it only if it is dry enough in the room.
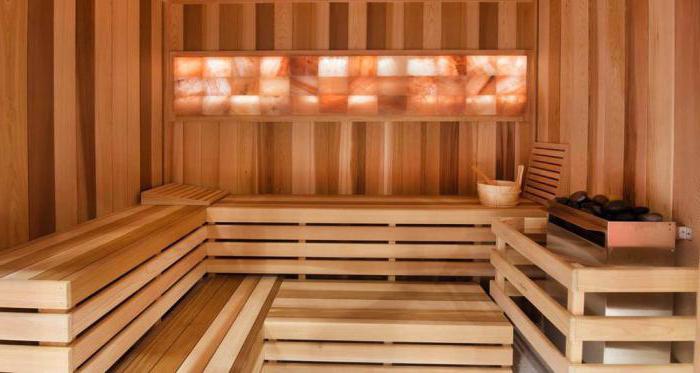
If the bath is not planned too hot, then you can draw your attention to the coniferous species of trees: cedar, spruce, pine or larch.
The smaller of the whole resin will allocate cedar, besides, this material is very beautiful and resistant to the processes of rotting.
The lining of the ate will be best maintained heat, and from larch - to have maximum resistance to moisture.
After you have decided on the material, you can enjoy the device of the walls on the walls.
Before that, it is necessary to decide how you will cover a bath from a bar from the inside with a clapboard - you can make it horizontally, vertically or diagonally.
If you wish, you can wash the bath combining the horizontal and vertical trim. The choice of direction depends on how it is necessary to have a crate on the walls.
For the pylins, the baths from the bar only fit the vertical type of lining with clapboard, because If the boards are horizontally, water will accumulate in the grooves.
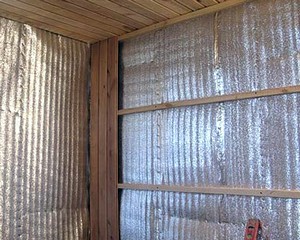
The lamp is hardened perpendicular to the future lining with a step of 50-60 cm. When choosing boards for the crate, pay attention to their thickness - it should exceed the insulation layer of the lining.
If the walls are irregularity, then you need to close them from the inside, laying down the plywood or woodworking from the tree.
If the irregularities of the walls are too strong, then the suspensions of profile systems made for drywall are used. They are fixed on the walls of the dowels, observing a step of about 40 cm.
To make a dry thing, it is better to use the construction level when working - it will help to make the location of the rivers smoothly vertical or horizontal.
Making a crate with your own hands, you can save significantly using unrestructed boards or a horn - because this material still does not see anyway.
It is much more important to perform work correctly that the lamp is durable and reliable.
Warming and plating bath
Before thinking how to strifting with a bathing, you need to engage in the insulation of the structure so that the heat is stored inside the walls.
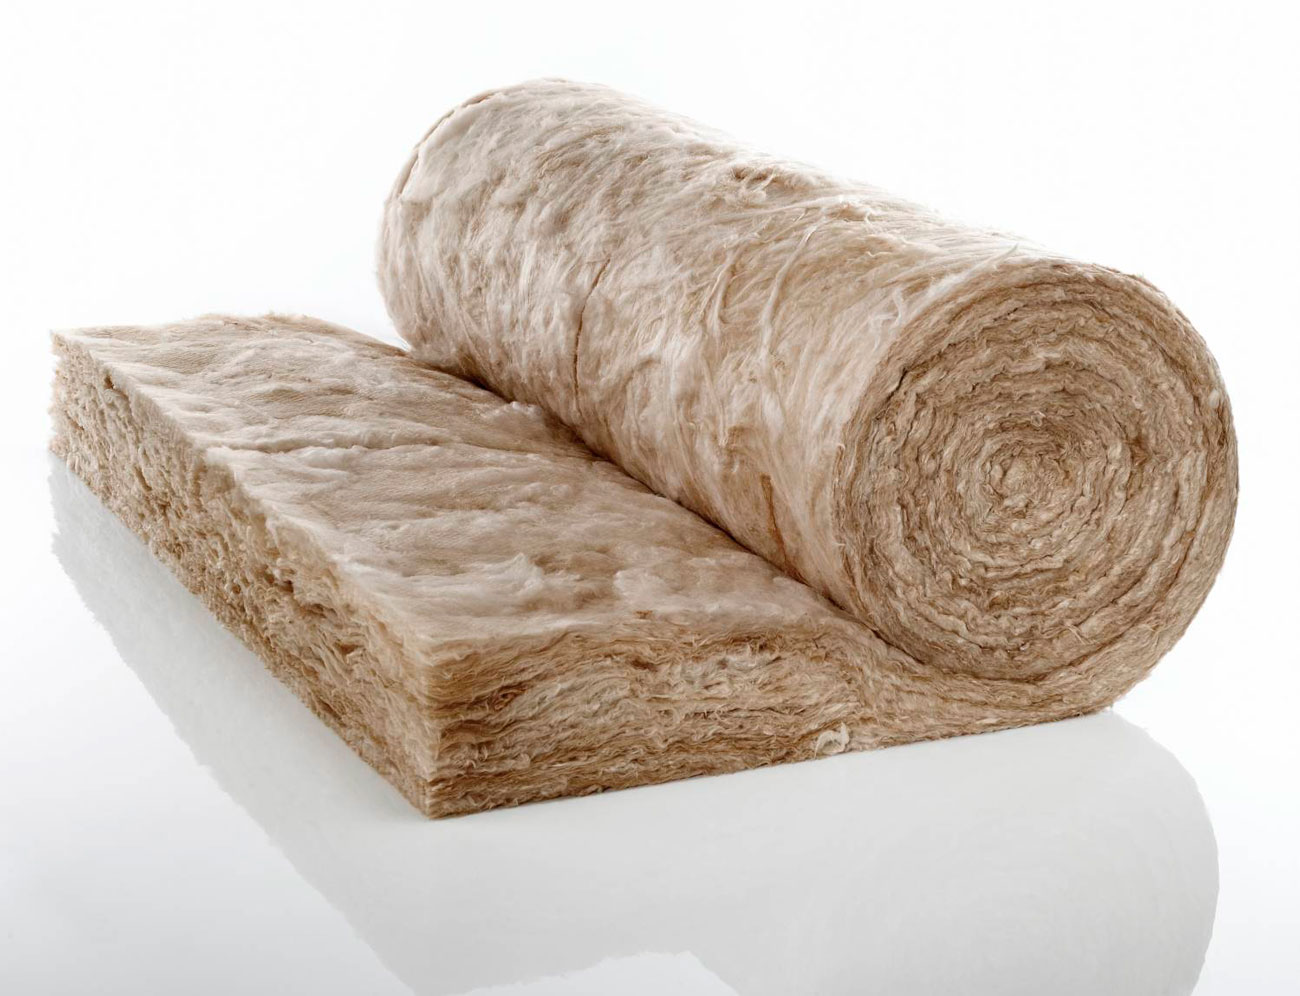
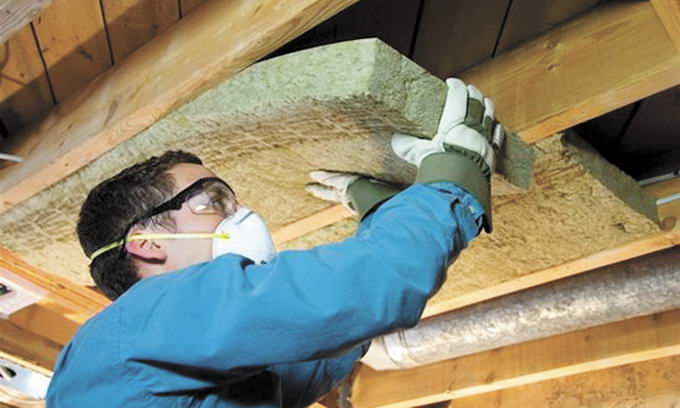
It is best for the insulation of the walls of a bath of a bar, basalt wool is suitable - it is resistant to high temperatures and their drops, and also has a composition of an inorganic material that does not distinguish any harmful substances.
In her styling, do it yourself there is nothing complicated, the most important thing is to comply with elementary safety measures and do not touch the material with bare hands, because Basalt wool can cause severe skin irritation.
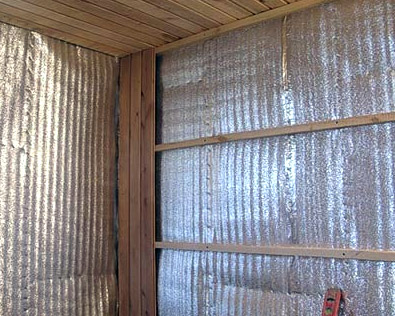
Wool slabs need to be laid in the voids between the shells of the crates so that there are no cracks and gaps, because Otherwise, through them very quickly will be warm, and you will not be able to make a bathing enough.
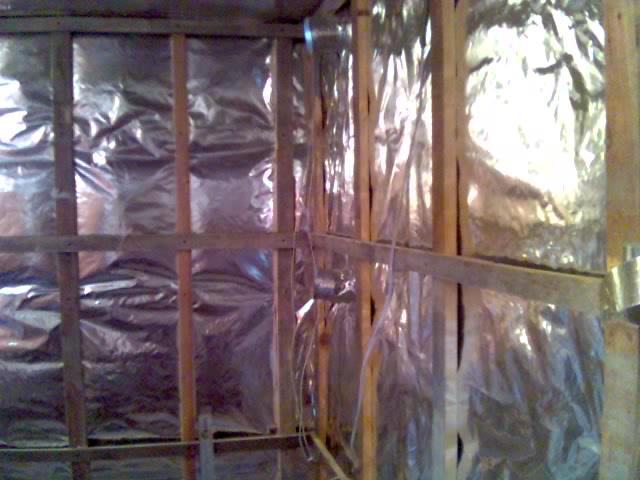
After laying basalt wool, you need to place a vapor insulation layer on top of it - it is possible to use pergamine or thin polyethylene, cross-together.
Before laying the material, make sure that it is completely solid, otherwise it will not be able to perform its functions and quickly starts to skip moisture.
Properly stacking material for vapor barrier is needed in the horizontal direction, starting below, so that the sheets are located.
When it is placed, you need to sneak the sheets with scotch for better fixation.
Internal vaporizolation is a very important stage, because it will not only protect the bath from the loss of heat, but also will save wiring safely, which can be sent if you neglect vaporizolation.
Before sheeing with a bath with lining, you need to withstand the material for some time in the room so that the boards adapt to the bath microclimate. After a day, two days can be started.
With your own hands, laying the lining is very easy - she immediately go to bed without gaps. You can lay material different waysThe only four of them, everyone has its pros and cons.
Methods of laying clapboard
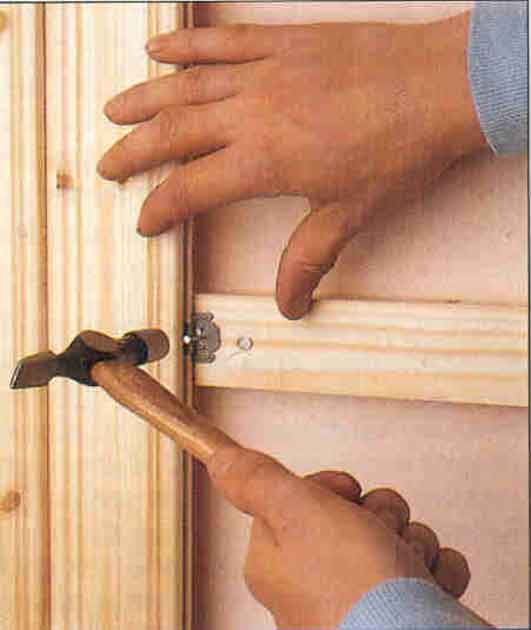
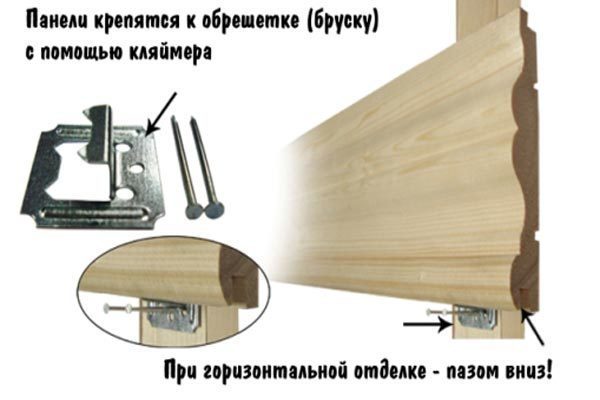
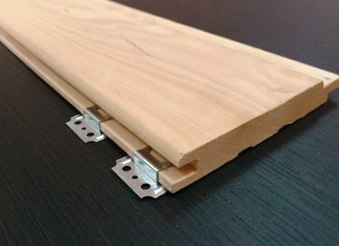
It is possible to lay the lining with a kleimer - metal clamp, which is put on the thorn of the clap, and then fastened to the crate with the nail or self-press.
This method is good in that a spoiled board can be quickly and easily replaced with a new one.
It is best to use galvanized kleimers protected by rust protects from rust, as well as self-drawing and nails.
Stainless materials will protect the walls of your bath from the brown sublishes that may appear from the use of unsuitable materials.
The easiest way to see the walls with a straight line with a straight pounding of nails in spikes. In this case, the lining is directly nailed to the grade galvanized nails.
This method is suitable for all types of material, except when the spike is too thin and continuing, because In this case, bulk and cracks may appear on the mounting places.
You can see the walls and other similar ways - oblique robbing nail in the thorn.
However, in this case, there is a big risk of damaging the walls and the ceiling, so if you are not a professional, with your own hands it is better not to do such a bath.
Durable, durable and reliable is the method of through fastening, but it has a significant minus - places and fastening material will be very noticeable, which creates an unavailable appearance of the bath.
It will be possible to close the holes using a wooden pin, but long it will not last due to severe temperature drops.
First of all, it is started to wash the ceiling, fixing the first plank of the clapboard opposite the entrance.
It is best to use a Dobochnik to carry nails, because The lining is thin enough, and it will do it with a hammer.
After the lining fastened the ceiling, you can move to the walls, leaving a distance of 3-4 cm for air circulation.
The same clearance must be left when shearing walls of walls (between the wall and material).
In order for the air to circulate freely under the material, it is necessary to secure small planks on the crate. They are attached perpendicular to the location of the lining.
To see in stages, how the ceiling and walls are trimmed, you can on the video - it will help you do this work with your own hands.
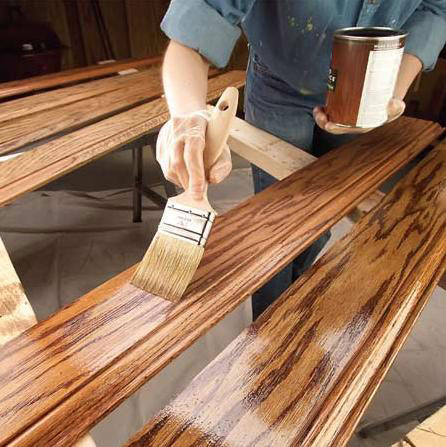
After the lining is installed, it must be processed.
To do this, the wax or special impregnation with the lacquer is suitable - it will help to protect the lining from moisture and extends its service life, and will also increase the aesthetic properties of wood, because After processing, a tree drawing will be better.
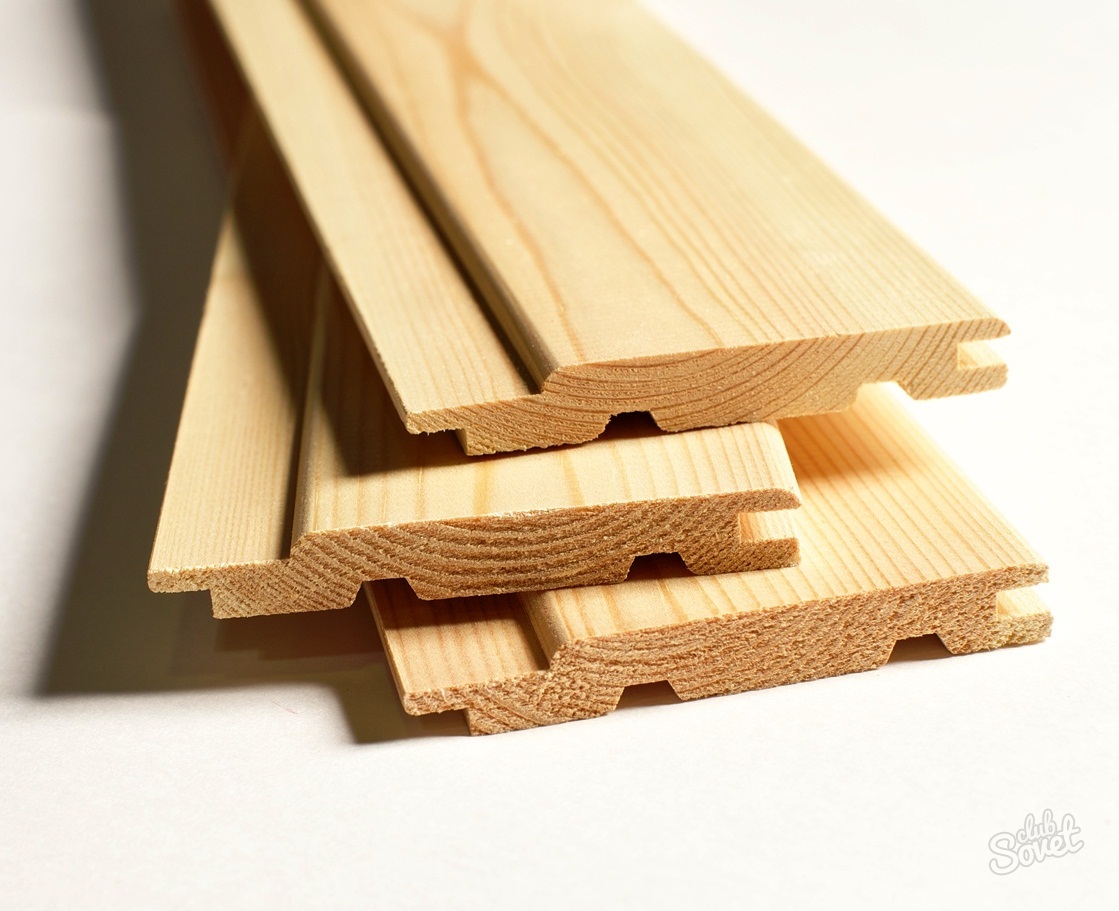
Many home masters believe that lining stands as a better material for decoration walls of the walls. It can be made of PVC or wood. The first variety is permissible to use for a fellow or rest room, while the other is more versatile, it can be installed in the premises of any destination. With the help of it, you can not only decorate, but also insulate the walls, as well as isolate them from noise. Externally, items are long wide panels that have grooves on the sides to connect with each other. The design allows you to fix the finish on one side with the help of brackets and screws, while for the eye such fasteners will be impaired. Among other things, thanks to the excellent appearance, the lining does not need additional finish.
Types of lining
Before you seen a bath inside with your own hands, it is recommended to choose a material that will lie at the base. As mentioned above, it can be plastic or wood. The first variety of products is manufactured by extruding polyvinyl chloride resin and additives. Materials used in production are environmentally friendly and fireproof, but it is impossible to install such lining in the steam room.
Wooden lining
If you faced the task of how to sheathe the bath inside with your own hands, you should initially think about the variety of material used in the work. You can buy wooden lining, with which you can make breathable walls that create natural microclimate in rooms. With increasing temperature, wood will make a pleasant smell. During the manufacturing process, the following wood breeds are used: aspen, spruce, pine, cedar and beech.
Before you sew the bath inside with your own hands, the instruction should be studied by you. From it you can understand that the wooden variety of material belongs to one of the four quality classes. Extra class, for example, is the perfect clapboard, which is devoid of bitch and other errors. Then as the most inexpensive class - C, may contain dusty swirls, as well as resin bags or short-range holes.
Classification of wooden lining
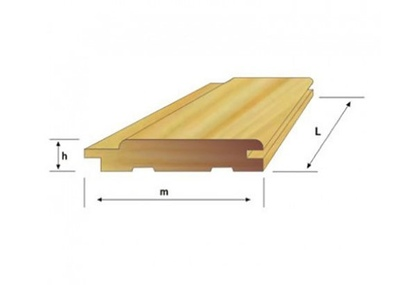
Many consumers, solving the question of how to seize the baths inside with their own hands, prefer her wooden variety. However, here will have to make a choice towards the usual profile or eurry. In the first case, the longitudinal chamfer is removed from the products. In the production process, wood natural humidity is used, the level of which does not exceed 25%. As for the thickness, it reaches 20 mm. The surface of the panel may have a roughness. The sale is also represented by Eurovantia, which has high quality and provides a unique system of compound. On the back there is ventilation holes, thanks to which condensate is not formed. Before we have a bath inside with your own hands, the photo should be considered, perhaps it will allow you to make a choice. If we are talking about Eurovantia, it, in turn, is divided into: Standard, Land House, Block House, American and Soft-Line. The largest distribution among consumers has gained a block house, the front side of which is made in the imitation of the rounded log.
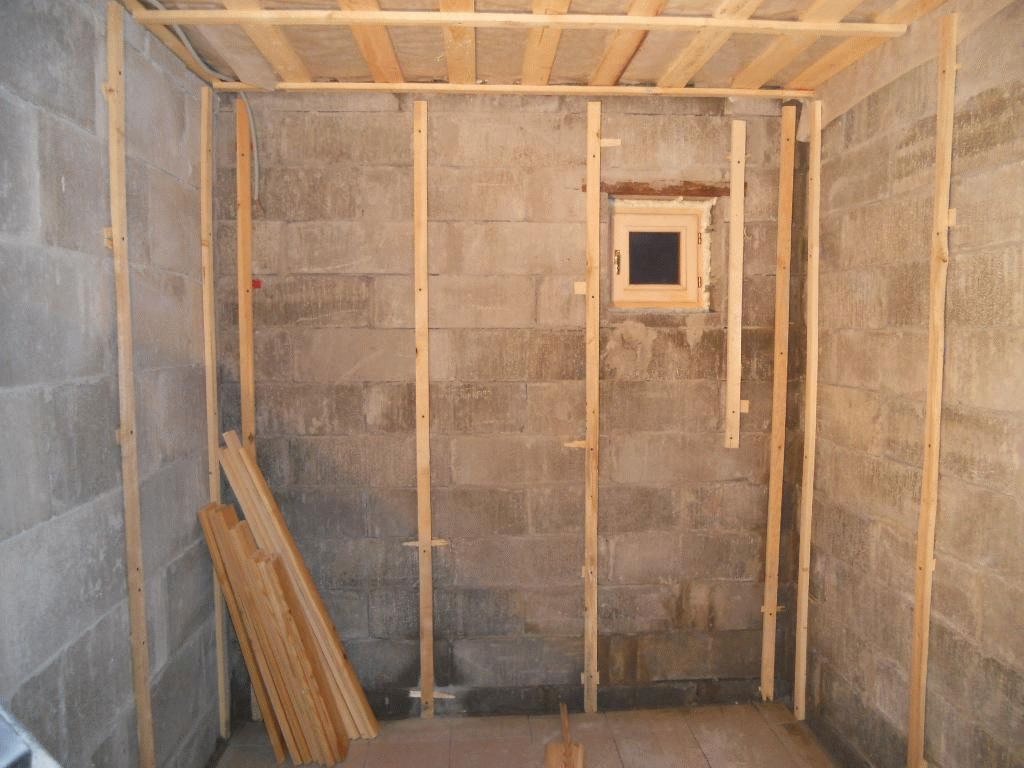
Installation of the crate
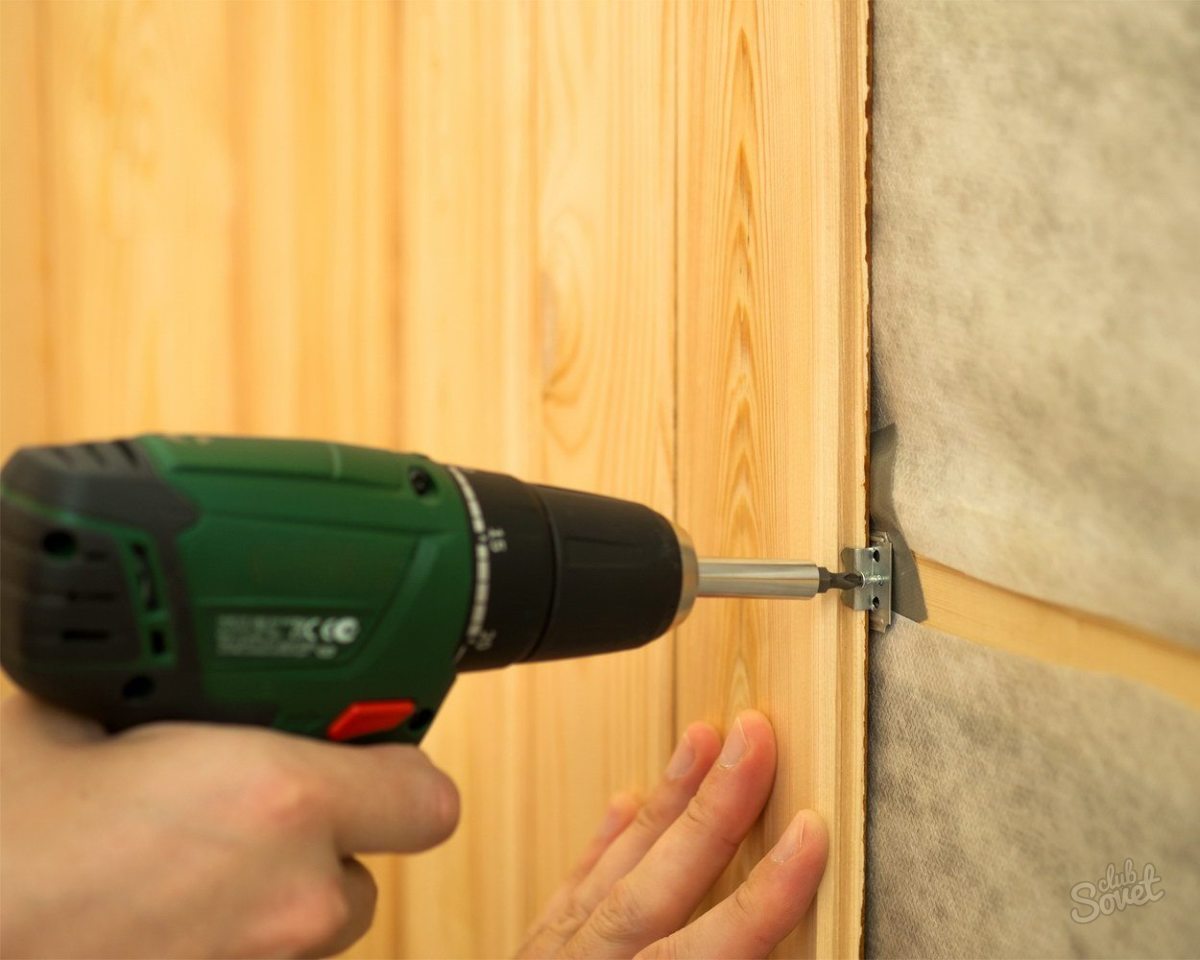
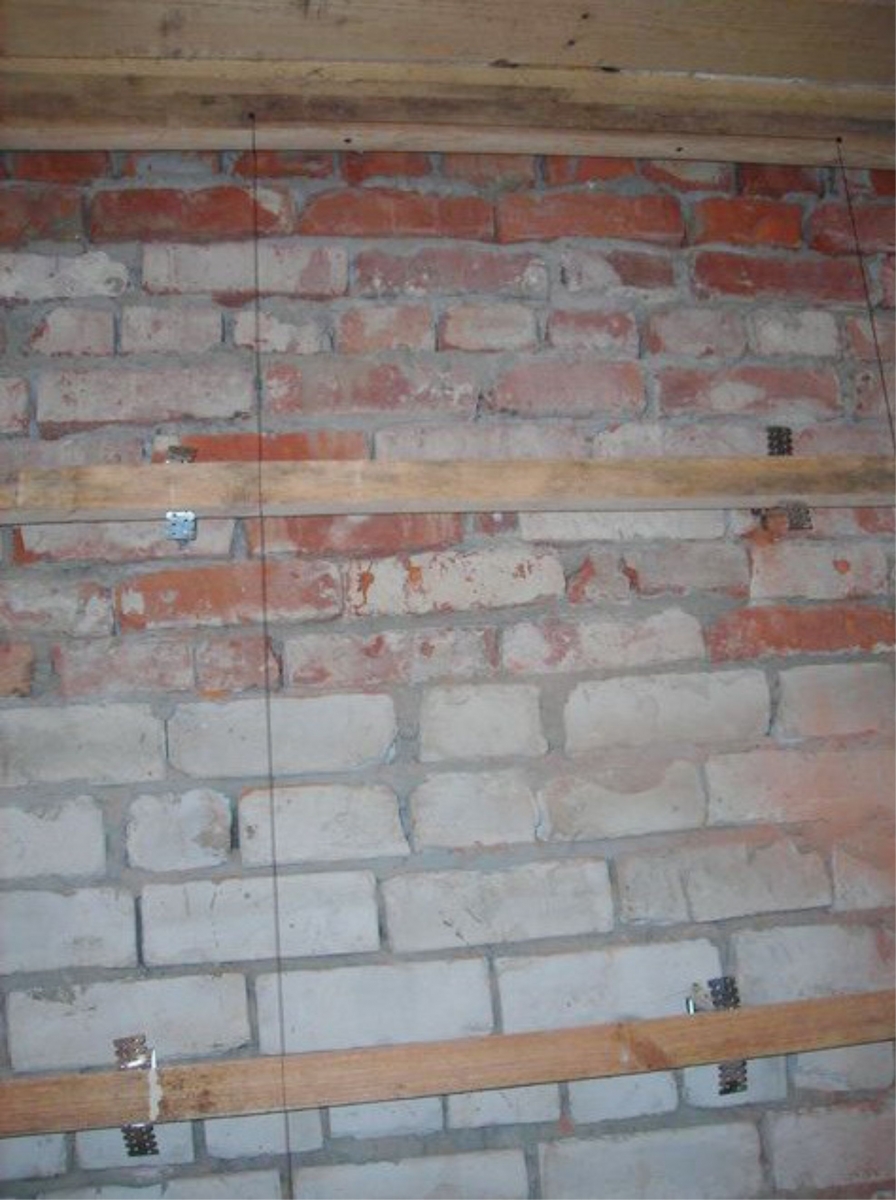
If you think about how to seize the bath inside with your own hands, step-by-step instruction You must be read. Only so you can eliminate errors. According to the technology, initially the wall is prepared by installing the root, for which wooden bars with a cross section of 20x50 millimeters should be used. The billets are cut in such a way that a portion of them have a length of 500 millimeters, and the other is 1000 millimeters. This is necessary so that the elements manage to secure the rotary. Many home masters think about how to shelter a bath inside with their own hands, a step-by-step instruction helps them in this. It describes in detail technology and provides for the installation of metal suspensions, the step between which should be 40 centimeters.
Methods of mounting clapboard
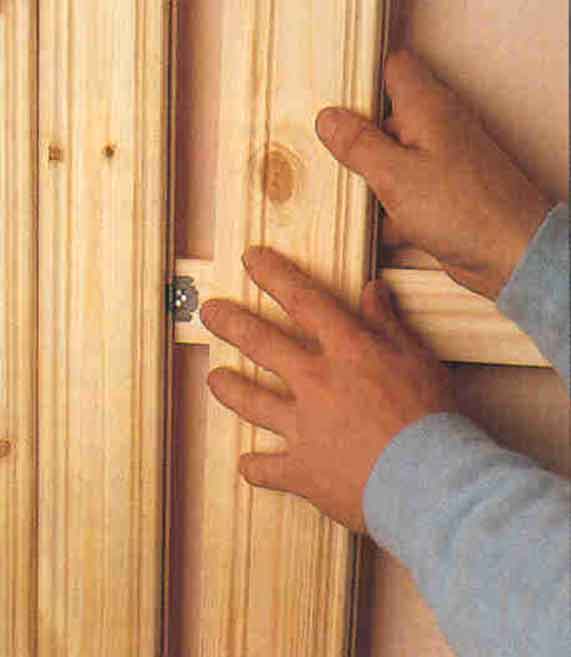
For fastening the wallboard to the wall, it will be initially necessary to equip the framework system, which consists of bars strengthened in a vertical or horizontal position. In rare cases, these items are set diagonally. However, to resort to this technology is recommended only when you have professional knowledge and skills. As the main rule, the location of the bars, which should be oriented perpendicular to the planks of the lining. If you think about how to shelter the bath inside with your own hands, the advice presented in the article is recommended to read. Of these, you can find out that frame bars should not be fixed to the wall. Between the edges of the blanks and the surface should leave the distance from 3 to 5 centimeters.
Vertical elements must be removed from each other by 5 centimeters. Under the clapboard, the distance for ventilation must remain. In order to exclude the reservation of the lower part of the wall during operation, before fixing the first rows of BRUSIV, it is necessary to apply a waterproof smear on the surface of the walls. Along the door and window openings, it is necessary to establish bars that will go beyond the door and windows on both sides. To install the lining should be mounted on the wall using brazing or screws that are manufactured in advance. This is required in order to do two holes in the wall.
Thinking over the question of how to shelter the baths inside with her own hands, the tips of the masters are trying to read. Of these, you can understand that installation work can be conducted by different technologies, depending on the fastener used. If the planks are fastened to the frame with nails, the fasteners should be installed on the oblique, feeding it from the tongue side. If the clips are supposed to be applied, their feeding is carried out on the side of the groove.
Wallowing with a displaced profile needs an inner latch that is fastened with nails, paper clips or clips. The profile is not required to deploy. There is no need to change anything in the conjunction, each nailed lining will cover the previous mount.
It is necessary to start work from one corner. Wooden lining is sometimes fastened with furniture nails with small hats, which are complemented by self-drawing for reliability. To fix the plastic lining to the framework system, you must use and the brackets are installed in the grooves. If you want to create a surface that will look as aesthetically and neat as possible, you can use a secret fitting method. To do this, on the side of the spike in the board, a hole is done in which the screw is installed during the installation. The screw of the self-press can be closed by a dust.
At the last stage
Now you should be clear how to shelter the bath inside with your own hands, it is also important to consider the fact that after the completion of the works, the protruding parts are cut off, and the surface is grouped. It is important to remember that the mount can be carried out with the help of a stapler, while the bracket is installed in the groove so as not to create interference for the spike of the next panel.
Use of kleimers

Kleimers are metal staples that are designed for thin lining with low weight. On the back wall of the groove will need to fix brackets. The upper part of the first panel is strengthened with a self-drawing, the hat of which is covered with a dust. Kleimers are installed on the wall with nails or self-tapping screws, and each next board is connected to the previous one, which is already installed on the wall. The final element can be fixed, as the first: with the help of a closed duct.
Methods of work
If you think about how to shelter the bath inside with your own hands, views this material It is recommended to first consider. Information about this was presented above. So, if you decide to purchase subtle panels, you can be fixed using clips. If necessary, the canvas are removed and installed at another place, and this is the advantage of this technology. You can start working with the left or right part of the wall, as it will be convenient. The first product should be trimmed by 1/3 and set an angle by retreating 5 millimeters from the ceiling surface. In places of intersection with vertical bars, the Planck is nailed to nails, which must be located as close as possible to the corner. The other side of the plank is fixed on a vertical bar into the removal of the clips and is fixed with the clips.
Conclusion
In order to achieve a durable attachment between the boards, you need to use a wedge, through which the master tapping a hammer. After the clutch, the board can be connected using the clip.
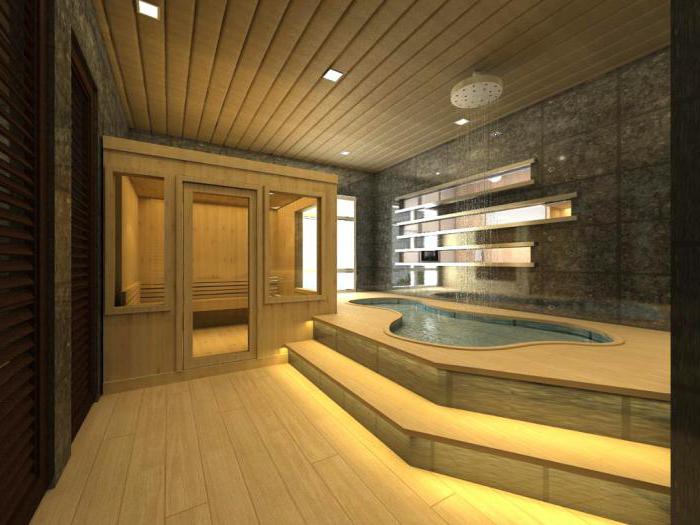
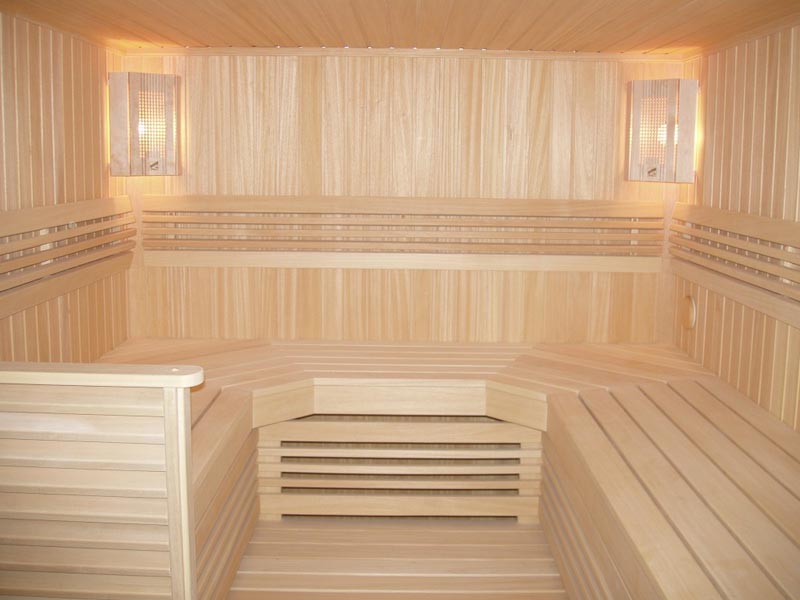
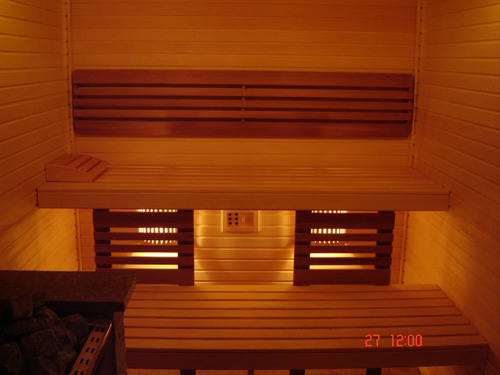
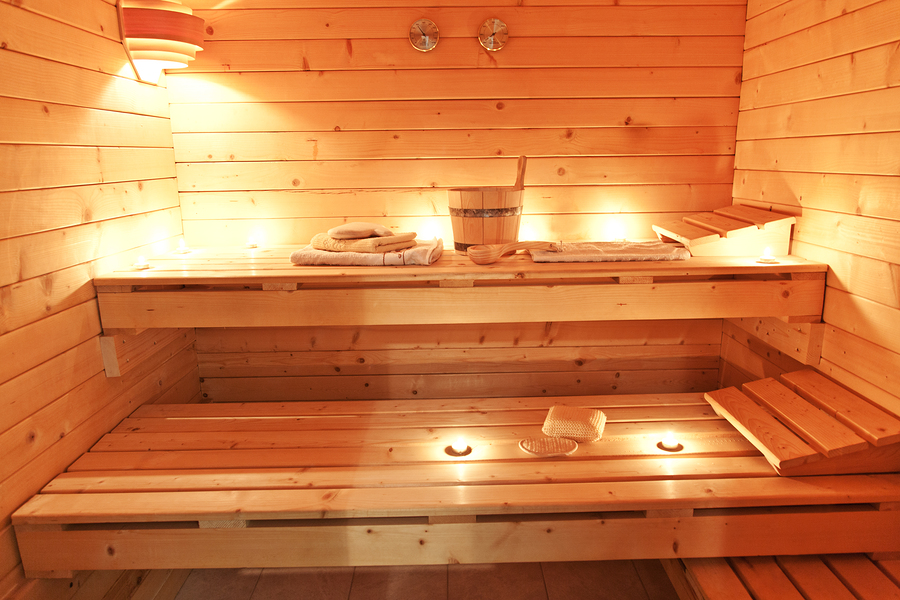
The pair is the most important place in the bath. To enjoy your stay in the steam room and feel the benefit of its impact on the body, the correct decoration of the walls is needed.
The visiting effect will further increase if the pair of steam bath is made with their own hands.
Choosing materials
To the question "How to separate the bath inside?" You can unambiguously answer that the most suitable material It is a special panel for the walls of the walls, to which the main advantages of which include:
- good microcirculation that gives the walls to breathe
- lack of condensate
- pleasant look appearance
- easy mounting
- acceptable value
Best breeds The original for the manufacture of the wallboarding has long been considered deciduous (aspen, larch, linden, alder, aspen), since the walls of them allow the room to quickly warm up, and at the same time remain comfortable for humans.
This type of material during heating does not secrete resinous substances and therefore will not harm health.
Of the listed rocks, the most preferable (and not only for the walls of the walls) is larch, but it is the most expensive material in terms of value.
Lypny clapboard preferably to process firstspecial composition (of course, from natural components) to preserve its original - almost white - color.
The lining from Osin due to its hardness is also a good casing material, but experts prefer use it for ceiling and walls.
Durable resistant to posting It is ash, with the help of a beautiful core of which you can achieve an attractive effect.
Olha, which has a solid, smooth structure and a pleasant light brown color with a peculiar pink tint, can become a decent finishing material ( especially inside a bath, folded from foam blocks).
Do not advise to take As a starting material for lining birches due to its loose structure and exposure to dryness during the workpiece.
If still, for some reason, it will be necessary to make lining from this breed, then it is necessary to take into account that it has a loose structure and in the preparation for use will be spring susceptible.
Relatively new material that professionals advise to use walls in steam road, is a lining made of african oak Abash (or Abashi).
Such a coating has a number current properties Thanks to which this material is considered almost perfect:
- low thermal conductivity;
- easyness and at the same time strength;
- resistance to deformations, no cracks and chipping during sawing and drilling;
- incompetence of rotting;
- availability on the surface of a peculiar, beautiful pattern.
This material has only one drawback - it is his pretty high cost. But it overlaps the properties that were mentioned above.
From what kind of source material is made by the lining, it must be pre-well dried and treated so that there are no roughness on it.
What can not be used in steam room?
It is unacceptable to separate Steam coniferous rocks (spruce, pine). The reasons for this are as follows:
- with a strong heating of the walls, touching them can become unexpected and rather unpleasant;
- drops of released resins can get on the skin and burn it.
It is not recommended to use such deciduous rocks such as oak and nut. This is explained by them high heat capacitywhich leads to the accumulation and retention of heat on their surface.
In the steam room, the walls of which are trimmed with a lining made of oak or walnut, usually it's difficult to breathe. In addition, accidentally touched them, you can burn the skin.
One should not cover the walls in steamy chemical materials: varnish, veneer and other similar compositions.
Hydro and thermal insulation walls pair
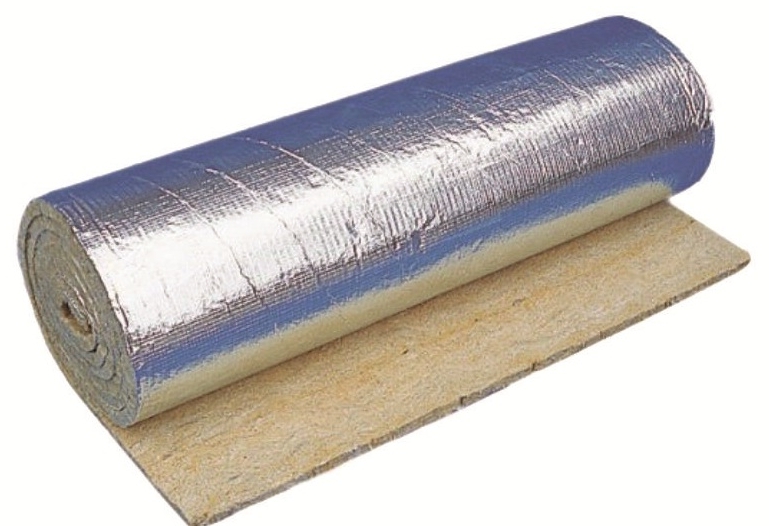
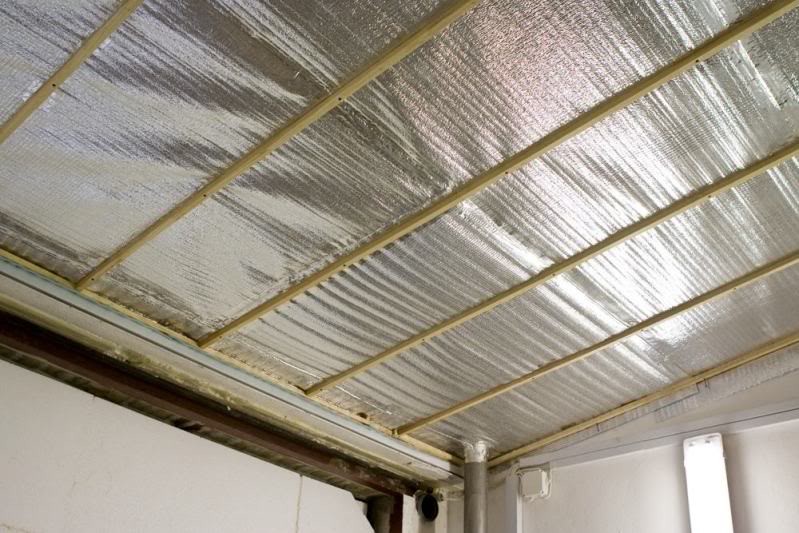
For vaporizolation Most often an aluminum foil is used, as well as foamed polymeric materials (polypropylene). The advantage of polymeric materials is that they have both pair-and thermal insulation qualities.
These materials laminated by foil not only contribute to the maintenance of high temperature in the steam room, but also oppose the accumulation of dampness and the appearance of fungus.
Sequencing:
- At the wall of the bar to attach (best of all the mineral wool is suitable for these purposes).
- To the insulation, fix the foil layer.
- Install the doom (it is necessary to create an air layer between the clap and the foil layer).
Installation of clapboard
Step-by-step guide How to enjoy the walls and ceiling with clap on video instructions:
Features of the finishing of the pre-banker
Learn more about the secrets of the bathrooms from the video below:
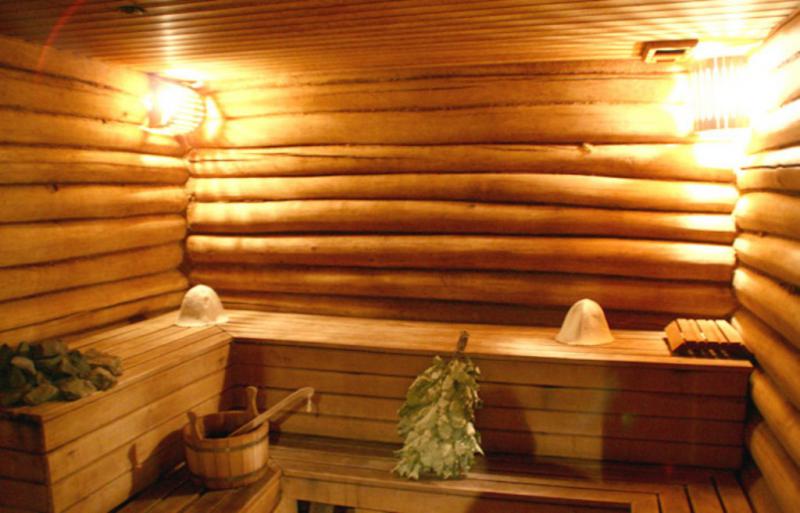
Bath has an amazing healing effect. At the same time, the important role is played by the material that is used for its interior decoration. Ideal in this regard is the clapboard from the tree in mind its naturalness, the ability to "breathe" and favorably affect the human body.
The lining is considered a popular solution when finishing the bath, as it is made from high-quality wood, well dried and processed specially. For the inner covering, the steam room is suitable exclusively wooden lining. But in the rest of the premises - a pre-banker, washing, a rest room - you can use its other types. Boards are universal, because they are suitable for finishing the floor, ceiling and walls. The surface is perfectly even smooth and smooth, which does not let out of foreign sounds, perfectly carrying heat, as well as high humidity, if it is impregnated with a protective composition. Under the lining, various communication and surface irregularities are successfully hidden. In addition, such a casing looks attractive and is considered an ideal solution for the bath "under the log". Features of the choice of lining for a bath:- Linden. Such material is a priority, and its ancestors also appreciated its quality. The tree does not react to the effect of water and steam, does not change its structure and color.
- Aspen. It is considered a good analogue of the linden, as such lining is indifferent to moisture and heat, but has a more democratic price. However, it is necessary to remember about the lack of this breed: it is possible to spread inside the wood hidden rot.
- Cedar. The material is expensive, but with this and very high quality. Due to the trim from cedar, air in the pair is filled with resinous substances, without selection to the surface of the resin, and the effect of aromatherapy is created. In addition, it is less heated than others. Be careful: at the moment there are many fakes of cedar lining!
- Pine. The material is cheap due to the ability of wood to be isolated under the influence of steam and heat resinous substances. Therefore, it is practically not practically used for the wage, but performs an excellent solution for the pre-banner and rest rooms.
Remember that the lining for the internal decoration of the bath should not contain bitch and other vices, because such a structure contributes to the rapid heating of the surface, which may cause a burn.
- stapler with brackets;
- electrolovik;
- perforator;
- drill with nozzles;
- suspensions;
- measuring tool - plumb, construction level, mounting plumb;
- a hammer;
- screws 6 cm, wood screws - 3.5 and 7.5 cm, 2 cm cloves;
- triangle.
In addition to the lining itself, prepare the heat-insulating material - Minvatu, the Bar 4 by 5 cm, waterproofing material and vaporizolation, which is perfectly proven by PVC film. Since wood is sensitive to moisture drops, it should be seen in the room and adapt to the microclimate of 1-2 days.

- Use bars that have a thickness more thermal insulation material.
- Fasten the crate in the direction perpendicular to the installation of the lining, sticking to step 50-60 cm.
- In areas with irregularities, put under the bars of crates of gaskets made from the same wood.
- When mounting the frame to the walls built from brick, stone or concrete blocks, screws and plastic dowels are used. Galvanized screws are suitable for the wooden surface.
- Protect your body, hands, eyes with appropriate products to exclude watts.
- Place the insulation mats in the intervals formed by the crate. They have from the bottom up, pressing the good one top mat to the bottom.
- Watch that no gaps and cracks are formed, as they form the bridges of cold, through which heat will go.
- If necessary, cut the top mats with a knife.
- If a log house was used in the construction of a bath, then it should be borne in mind that it is able to give a precipitate. Therefore, it is better to carry out the lining of the clapboard after that, namely, after 1.5-2 years, to exclude the deformation of the material.
- Constructive elements that are made of wood must be treated with a protective antiseptic.
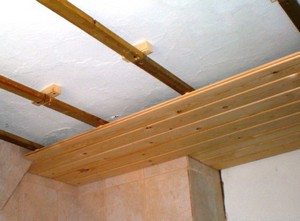
- First, the horizontal rails should be attached over vapor barrier to which the material will be fixed. We install them in 60 cm increments, controlling the horizontality using the level.
- Make sure the lining has adapted to the microclimate installed in the bath, and lacked at least 24 hours there. Work is starting from the most hard-to-reach angle.
- Place the first board so that its spike is in the corner of the wall, and the groove watched you, in the vertical direction. Remember that it is a guideline for all fixed boards of this series.
- A plank is recorded to a horizontal rail with screws so that their caps are completely closed after a decorative corner is installed. Kleimers need to be started in the protruding edge of the groove. Speak them to the raids.
- Each next board, boil the luggage to the slope, which is already fixed. To protect it from damage, adjust it with China and secure Kleimer to Raiki.
- It is possible that the last chalkboard will have to be cut to fit into width. Fasten it similarly to the first.
- Attach the rest of the material and plinths to the trim. In addition, all angles need to close decorative cornersUsing finish nails that have a copper coating. Thanks to a small hat, such a fastener is immeasured for the eyes.
- To provide ventilation in the space under the trim, and protect the material from water, a clearance, millimeters 10 should be left between the lower end of the lining and the floor.
- When the bath is trim, remember that in the car wash and the wage, the lining should be treated in a special way before mounting. But it is categorically impossible to paint and cover with varnish. To protect it from mold, black spots and insect attacks, a water-based antifungal composition is used. Previously, the lining is echoed by sandpaper to remove all roughness, so impregnation will fall in a smaller.
And finally: remember the fire safety, to do this, leave the gap between the chimney and the combustible material, which should be at least 25 cm.
His Russian sauna is a dream of many. Therefore, quite often we think about how to sheathe the bath from the inside with wooden clapboard with their own hands. This is possible if there is material, suitable tools and desire to work. For this, you can carefully read our article or view how the masters do on video.
- Bath cladding from the inside from A to Z
What to seize the bath inside?
To date, their several types: larch, oak, linden, pine, aspen and cedar.
- Evrovagona from larch -pretty rare variant of the material that can be seen by the bath. Why? It has two unique properties: moisture resistance and natural antiseptic properties. Thanks to which the wood is not subjected to rotting or eating insects. Photo shows what looks like ready bath In such a variant.
- Wooden lining from linden for bath - The best option that is characterized by good quality and affordable cost. In order for the wood for a long time and retained its integrity, it must be soaked with special impregnations. When the tree heats up, it does not become too hot, which you can not say about the coniferous rocks of the wood. The photo shows how it looks like. Deciduous trees are suitable for plating the baths much better than coniferous wood. Like, the bath is so and the steam room will be pleasant. For the bath, we offer to purchase reliable doors from Linden. Such a sauna will not like one year and will delight you with its natural color.
- Buy natural bath Cedar Lining It is very difficult, since this tree is quite rare and very expensive. Therefore, there are a large number of fakes on the market, and this is called such a material of the cedar. In the photo, you can appreciate the beauty of the cedar.
- Lining from Duba Bathroom is characterized by high strength and wear resistance. However, the price is quite high.
After you have already decided on the clap you want to buy, you need to make the exact dimensions of your future bath or steam room.
How to do measurements?
- 1) First of all, you need to measure the length, width and height of the room, where the bath or steam room will be located.
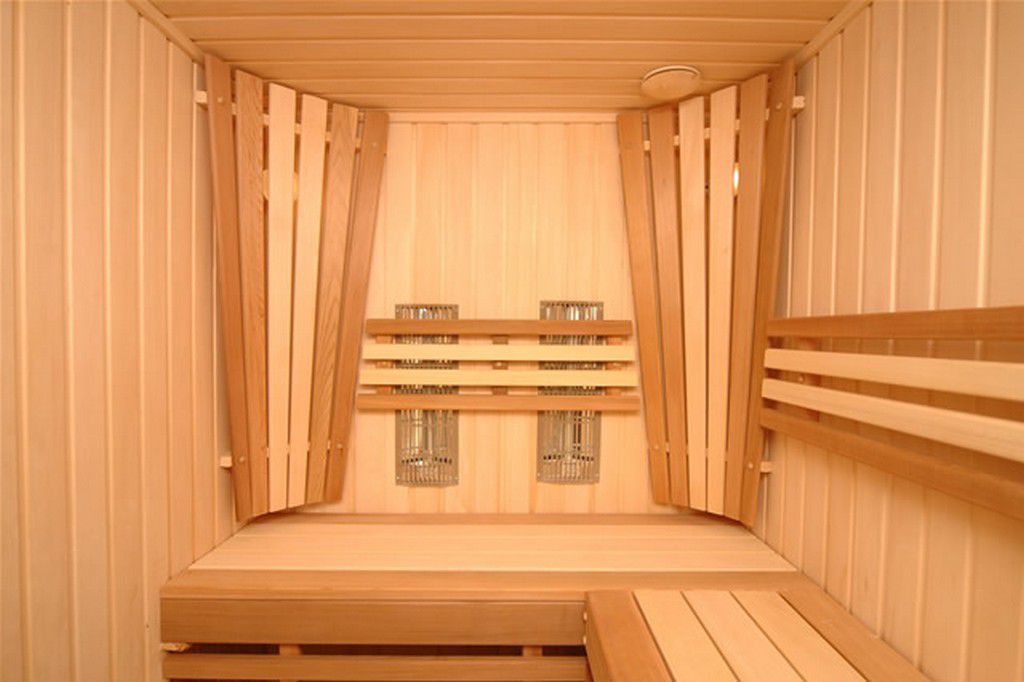
- 2) where in the steam room there will be a furnace, the walls are laid out with a natural stone or a special tile. Wooden lining is set at a distance of a minimum of 30-40 cm.
- 3) It should also be considered that the thickness will be the heat insulating layer and take into account it in the calculations.

- 4) If the height of the bath is 2.5 meters, the length is 4 meters and the width of 3 meters, then what size will Euro making? It all depends on how you want to install the lining: vertically or horizontally.
- If you decide to sew a bath or a steam room horizontally, then you need to order the longest Eurovantia, so as not to do from pieces. There is a lining on sale maximum length 3 meters. It is worth considering that with the length of one of the walls of the bath exceeding 3 meters in the horizontal version there will have to make joints. It turns out that it will not look very nice and there will be more places where heat from the steam room will go. In addition, the horizontal covering is less durable and practical, so the moisture does not flow, and the tree is going to rot the tree faster. We conclude: in large rooms and not only, better lining Install vertically. The photo shows how to get angry from the inside horizontally.
- When the lining is installed from the inside vertically - it simplifies the work. Then we take the plank only one size. You will need a lining with a length of 2.5 m. In the eventual, you first decide to strip the walls. If the first ceiling is, the length of the lining may be less. The number of route meters is calculated based on the width of the lining.
- 5) If you take the usual lining, you need to decide which width it should be. With Eurovale, the situation is easier, as it has standard width - 88 mm.
Features of the installation of eurograms inside concrete, brick or kotelts bath
Concrete, brick or kotelz bath must necessarily be insulated. It is worth a very serious approach to the choice of insulation and to assembling the frame and vapor barrier.
How to choose a warmer for a bath?
Mineral wool is considered the most common and inexpensive. However, it is better to choose basalt wool. It better withstands the effects of high temperatures.
There are minvat on sale with the already cocked foil. It is not so a good optionSo it is inconvenient to mount it. The foil surface can be spoiled during the installation process. It is also not for the use of isolon, since it presents the air propylene, which, when heated, heats up harmful substances into the air.
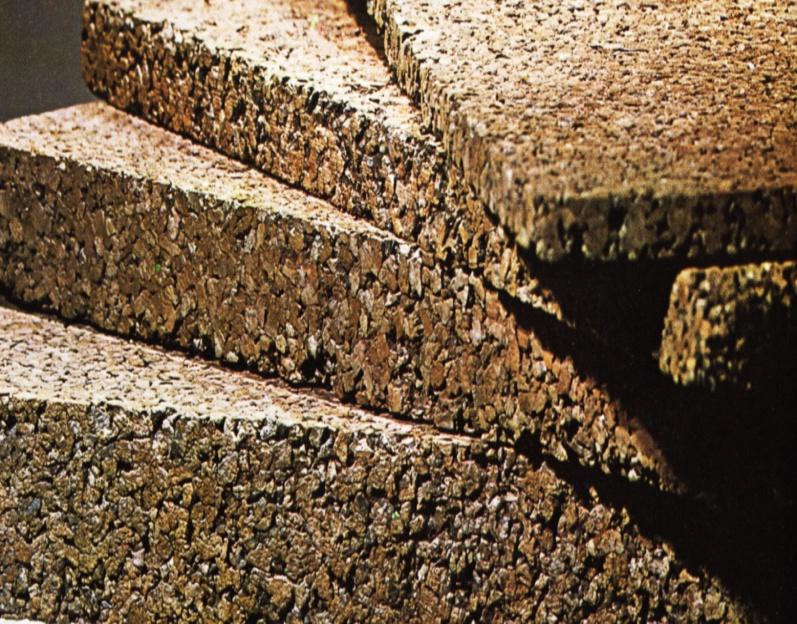
Another good insulation that can be used inside the bath is a cork engine. It is distinguished by anti-grapple, anti-allergenic and antiseptic properties And also does not burn. Its value is significantly higher than classical mineral wool.
Features installation of lining in a log bath
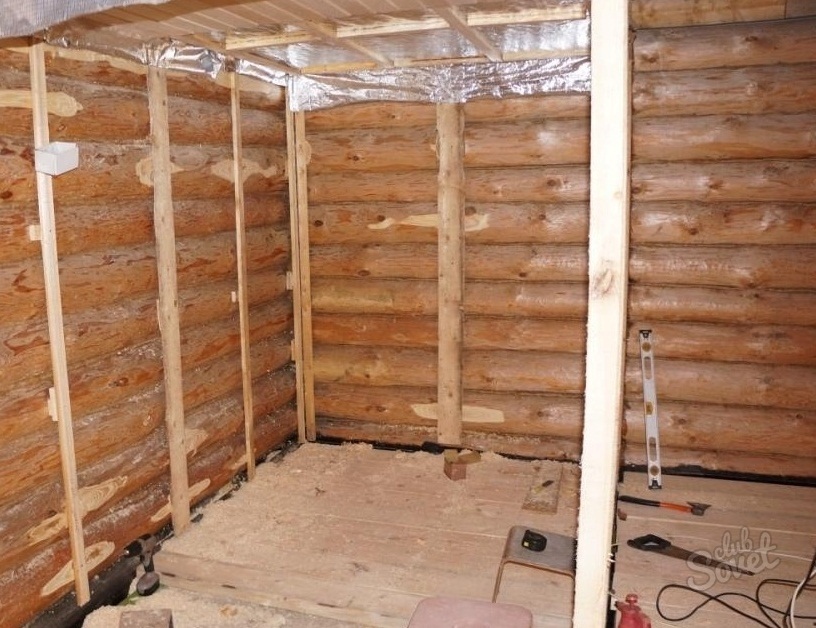
Bath from Srubyou can see as follows. First make insulation, and then nailed the lining. The question arises, but what's the bath, where inside there is no trim?
 ,
,
How to determine if you need to sheathe and insulate a log bath from the inside?
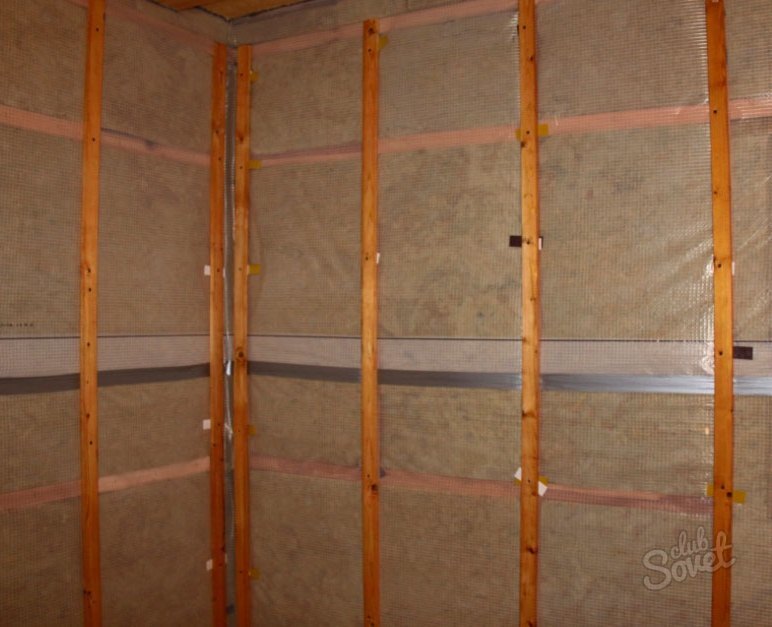
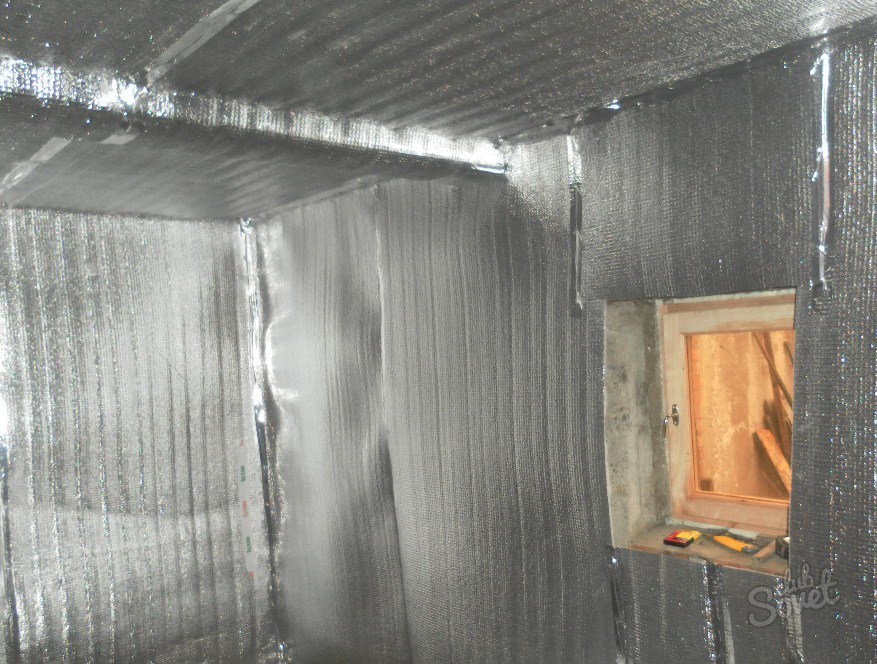
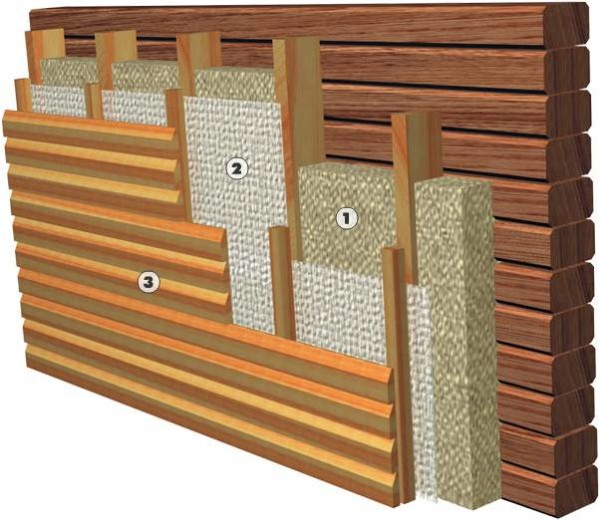
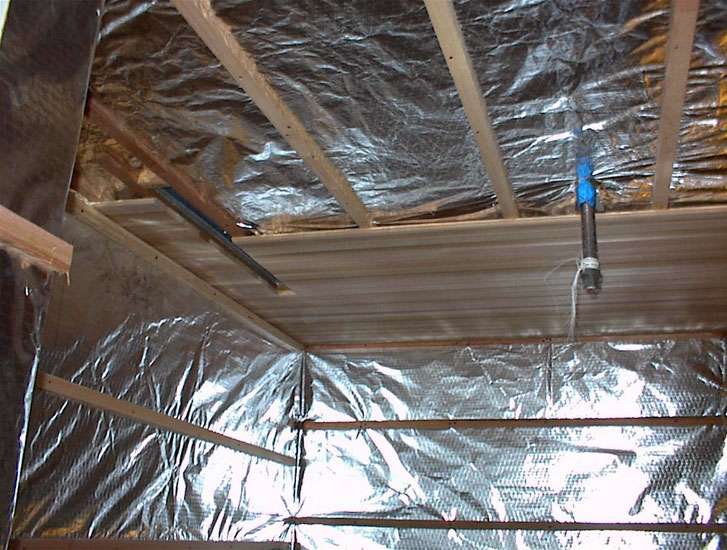
If it is made of a cut thickness less than 20 cm and there is no insulation outside, then from the inside the bath must not only be seduced, but also inspire. How inside insulation baths schematically shown in the photo.
1. Basalt or mineral wool, which is installed inside the frame of the first layer.
2. Aluminum foil, which serves as vapor barrier and is superimposed on top of the insulation.
3. Wooden trim.
Cleaning clapboard from the inside from A to Z
Stage 1: Preparation of Lining and Bruusyev
After that, you need to dry the room for the bath, and open the wall paneling you bought, and leave it for a day. It is necessary for it to absorb the natural amount of moisture. Otherwise, it can be a story or she will swell, spoiling an appearance.
Then the bars for the frame and the car itself should be coated with a special antiseptic impregnation based on water, in the event that the bars and lining not from larch.
Stage 2: Preparation of materials and tools
For the facing of the bath you will need the following materials:
- self-tapping screws for fastening the crate and the main BRUSEV frame to the wall, if the bath is a log;
- bar size 40 * 50 mm (it is more profitable to take the umbered);
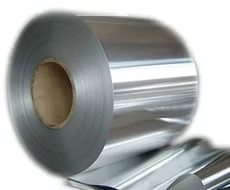
- aluminum foil, to ensure reliable vapor barrier. This is done in order not to allow steam to enter the surface of the insulation layer;
- tape foil to strengthen foil;
- nails or kleimers for fastening.
The photo shows how the tape looks like a foil
From the tools required:
- stapler construction;
- a hammer;
- level;
- drill or perforator for rooms with brick or concrete walls, screwdriver or screwdriver.

Stage 3: Communication
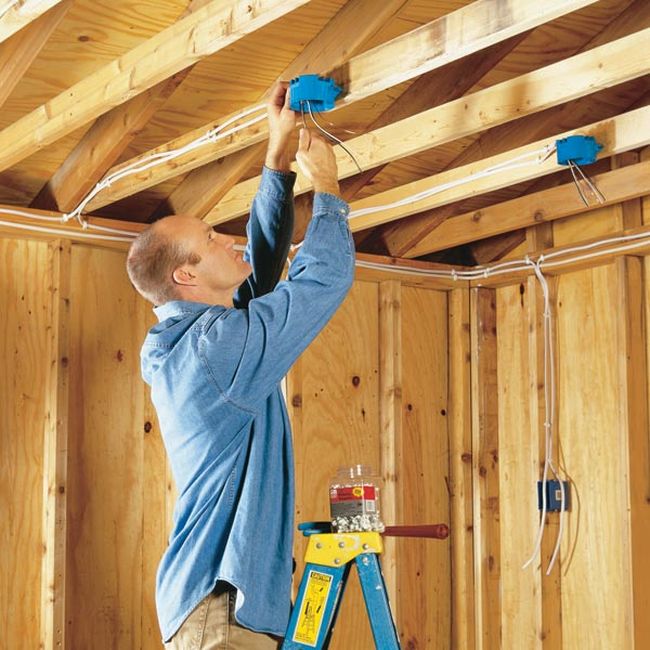
It is necessary to consider and communicate, where there should be lighting, switch and switch light.
Why is it very important to do from the very beginning? If you do not do it right away, then after you install the lining, it will be no longer possible. We'll have to disassemble everything again.
Stage 4: Installing a frame for a bath
Bath frame must comply with high quality requirements. Why is it so important? In essence, the frame and there is a bath. It must perform several functions:
- Heat insulation. If the heat does not leave the bath, the faster it heats up and remains warm.
- Parosolation. Moisture can not be skidding under the wall paneling inside the frame so that the tree is not spoiled.
- Power function. It is on the frame that attached: lining, lamps, lamps, aspira, shelves, and so on.
- Ventilation. If the frame is correctly installed, the lining will breathe on both sides. Ventilation is ensured due to the fact that the frame does not allow wooden lining to touch the foil on which condensate is collected. As a result, it remains dry and does not rot.
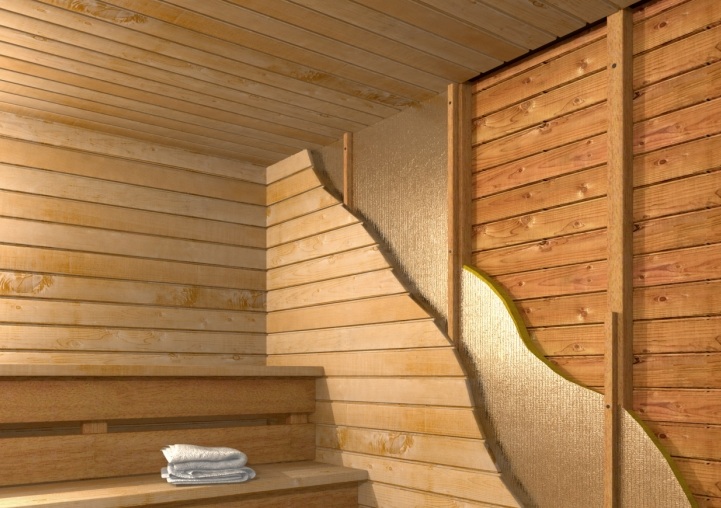
If the location of the lining vertical
A slab from a coniferous breed 50 * 50 is stuffing horizontally around the perimeter of the room at a distance of 40-50 cm from each other. Also on the ceiling.
They are reliably attached to the wall using selflessness in log Ban Or with the help of spacers in a concrete or brick bath.
If the wall is not smooth, special attachments can be used for metal profile For drywall. In the photo you can see how it looks.
After the walls were insulated, remote rails are stuffed to the main bars, to which the lining will be attached.
If you want to wash inside horizontally
The location of the main bars vertically.
The first bar is installed in terms of level. Then, in parallel, it is 50-60 cm at a distance of 50-60 cm.
After laying mineral wool and foil on these bars, remote rails are stuffed.
The frame is attached to the ceiling in the same way as on the walls.
Stage 5: Laying insulation and vapor barrier in the bath
Minvata neatly stacked between bars, so that there are no gaps.
Working with Minvata, do not forget to protect yourself, dressing special glasses and respirator.
Since a large number of steam is often assembled in the steam room, it is necessary to make vaporizolation. Most. best Material For this, the aluminum foil is considered. And for sealing joints, a special adhesive tape is used, which also looks like foil. The advantage is that it not only protects the camp from the pair, but also reflects the heat emanating from the lining. Thus, the room remains warm longer.
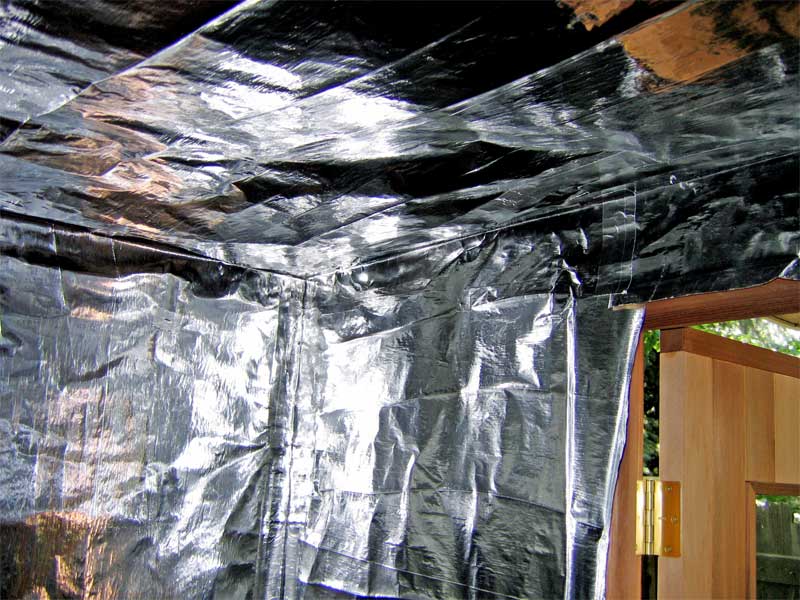
Foil sheets are tightly fitted on the surface of the Milvaty Vangest, starting below. Foil the foil should be consolidated from the same material created specifically for such purposes.
Then remote rails are nauseated to the framework to the main bars. These rails provide the required distance between the clapboard and a vapor polypoletor.
The same is installed on the ceiling.
Stage 6: Installation of Lining In Ban
First of all, you need to take a bath ceiling.
If you want to sheathe the steam room horizontally,it should be started from below after you have seen the ceiling. Planks will be placed down.
If you decide to decide the bath vertically, then you need to start with an angle. The first bar is installed in terms of level.
For fastening wooden eurograms, you can use conventional nails or special kleimer attachments. Their use helps to connect everything so that it is not accidentally damaged by the hammer.
Each lining bar is tightly clogged into the previous one, so that there is no cracks.
If you decide to buy linden linden, the "Banner" store is ready to provide you with all the necessary information and quality material. With us you can decide the pre-banker and the steam room are not worse than professionals.