- When the installation is required
- Types of chimney boxes
- Manufacture of wooden frame
- Manufacture metal box
- Control stages
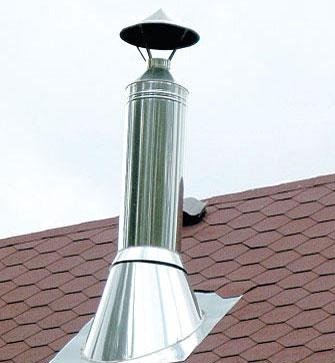
- Chimney trim
The end of the work on the organization of heating in a private house is the installation of a box for chimney on the roof. From how high quality it is made, the reliability of the entire heating system will depend on.
Metal box allows protecting the pipe and slows down the destruction process.
When the installation is required
The influence of natural factors (wind, precipitation, etc.) lead to gradual destruction chimney. For example, the brick absorbs moisture well, which gradually accumulates inside and decreases the temperature to freeze, disrupting the integrity of the material. The box allows you to protect the pipe, slow down the process of destruction and give a pipe more aesthetic look.
The main function of the box is the protection of overlapping from ignition.
Installation of metal casing allows you to extend the service life of the pipe. Additionally, the box gives a pipe more aesthetic look and avoids periodic repairs.
Traditionally, for the manufacture of the box, materials such as stainless or galvanized steel are used, since they are resistant to moisture, corrosion, temperature difference. Materials have a high service life.
A variety of color options makes it possible to choose the optimal option without reducing quality characteristics.
Some types of coating are not consistent with the chimney style made of bricks. Installation of the metal box will be the right solution in a similar situation.
On a galvanized or stainless steel sandwich, it is not possible to make a brick tube. Galvanized pipe on the background of the roof will look like a separate element. Save the position can metal box of the same color as the roof overlap.
The type of destructive tube is unlikely to deliver pleasure. Therefore, it is worth installing a metal box that will hide the consequences of destruction and suspend them.
The destruction of the pipe reduces the safety of the use of the heating system, negatively affects the functional characteristics, reduces the level of thrust. Therefore, the metal casing will be a good option to protect the chimney.
Back to the category
Types of chimney boxes
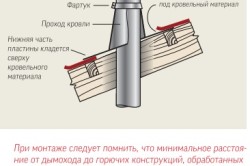
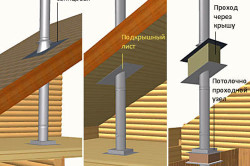
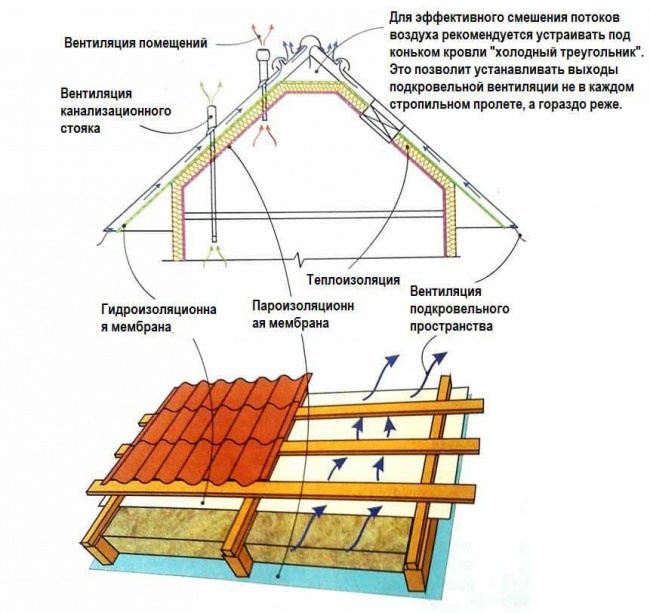
Diagram of the device of the passage of the pass through the roof.
The pipe output is a rather complicated process, since the incorrect installation of ventilation can lead to unpleasant consequences, up to a fire. Therefore, before removing the pipe, it is worth determining its design and ways, how to conduct a safe.
Many developers forget about such an important detail as a box. Under this term are understood by two absolutely different elements Roof: Device for chimney and decorative component.
The pipe that allows you to remove smoke from the room, is carried out both by the room itself and outside it. In some cases, for example, when conducting a heating system in the steam room, it is more appropriate to use the first option: it will be preserved more heat. But then to output the pipe will have through the roof. Therefore, a box is necessary.
Thanks to this device, the temperature will not affect the ceiling rafters, on the coating of metal tile and hydro and vapor barrier films. Well, if the hole is scheduled to be held during the construction of the house, in this case you can make a separate system of rafters for the discharge pipe.
The distance from the surface of the pipe to a combustible material depends on the height of the pipe, but in any case it is in the range of 15-25 cm. Then the free place around the pipe can be filled with a dense basalt cotton wool or other material, resistant to high temperature. This will not allow additional waterproofing.
Back to the category
Manufacture of wooden frame
The frame is collected from a white boards with a size of 100x25 mm, on top are fixed by boards of the same size. A part of the box that will rise above the roof is shed OSB. The box is fixed to the rafters, if it comes to the attic overlap, then attach to it. After that, it is necessary to make a roof adjoining.
Proper elimination of chimney through roofing cake involves the arrangement around the pipe rafter system.
The insulating membrane is fixed on the upper layer, from above - siding. Over the box is mounted cover from snow and rain. After installing the pipe, it will need to be replaced with a metal cap.
In order for the roof over time, it does not start to leak, the waterproofing is attached to the rafters, then pressed the crate. From the inside, vaporizolation is established: the material is nailed to the rafters and pressed the finishing material.
The result of the work becomes a wooden box that allows you to isolate the overlap in the ceiling or roofing pie. At the same time, it has a fairly high level of waterproofing.
Wooden box will protect the ceiling overlap and roofing pie from the effects of high temperatures, while providing good waterproofing. Also the box can be made of non-combustible materials, such as ceramics or metal. It can be made from the details of the professional flooring or from a solid metal sheet.
In order to make the adjuncing of the box to the surface of the roof of the metal tile, apply metal aprons with coloring. Such elements can be ordered or making themselves according to the scheme.
First you need to lay a lining carpet. The more its size, the better. Ideally, he must reach the cornice, and the occasion of the pipe should be at least 30 cm. The trunks fit to the bottom of the pipe. Then the aprons are installed: bottom and side, with a small adhesive to the bottom. The upper apron is mounted with the allen on the side. The pipe is placed in the roof.
Back to the category
Making a metal box
The metal device can be purchased in the store specializing in the sale of goods for the roof, choose a model for any chimney. It is a box with a hole for a pipe made of a thin metal sheet (1 mm thick). The casing is usually made of galvanized or stainless steel. At the same time, it combines well with different ways Helling roof: glass wool, basalt wool.
This is a roof element that closes the chimney and the ventilation pipe. It performs a number of important tasks:
- heats the main ventilation pipe;
- allows you to provide high-quality exhaust;
- when the channel is installed on the collapsed wall, it allows you to strengthen the chimney;
- performs a decorative role.
If several gas ducts are installed on the roof, then the box should be installed on each of them.
Metal box is very simple and easy to use.
The scheme of its installation is very simple, you only need to correct it to the roof and through the chimney hole to remove the pipe.
For the manufacture and mounting through the roof of the metal tile of the metal box, the material, metal sheet, screws and tools are needed: Circle, screwdriver, scissors for metal.
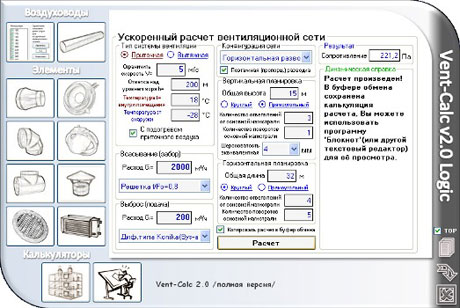
The correct ventilation system should work independently, providing a natural air movement from below up. In this way, it turns out to normalize the circulation of air masses, which is responsible for venting the house and underground space.
On the types of ventilation, devices for its ensuring and how can be done on the roof ventilation yourself - this article.
Types of ventilation
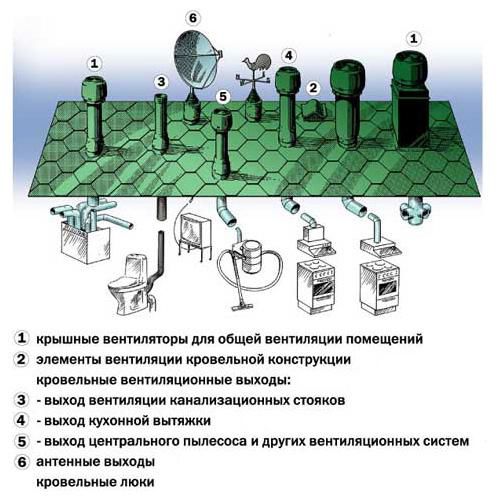
According to construction standards, each residential building should be provided for at least three ventilation channels:
- fan - to remove air from sewage.
- kitchen, basement, channel in order to remove air from the bathroom or residential rooms - these elements provide ventilation at home and normalize the microclimate in the rooms, remove the exhaust air with an increased moisture content, garnet or kitchen smells and so on.
- canal for roof ventilationneeded for venting roofing cake and attic room.
Important! Methods and installation sites of ventilation channels can be different, but most often it is customary to withdraw them to the roof.

It has been established that the natural thrust will be sufficient to ventilate the house with a height of pipes more than two meters. That is why, most often, the pipes are installed on the roofs of houses. Besides familiar round pipes Square box or mines, flat aerators or compact deflectors can be used - all these elements are needed to enhance the air flow.
The correct ventilation system is easily checked by its performance. Quality roof ventilation in winter time Must prevent the freezing of roofing cake, the formation of a land and frosting from the inside of the roof, the penetration of cold air inside the house. At the same time, in the summer, a cool microclimate should be maintained in the subcircular space, the air-hectled air should be replaced by fresh portion of air masses from the street.
Ventilation of the house and its rooms is tested by normal temperature and humidity - in the summer in the house should be cooler than on the street, and in the winter it should be kept warm.
Important! If mold appears on the walls or ceiling, condensate accumulates, this indicates a violation of normal air circulation, including the irregular operation of the ventilation system.
Elements to improve ventilation
Natural thrust based on the difference in the height and pressure of the air column is often not enough to ensure normal air circulation in the underpants space or in the house.
Insufficiency of circulation leads to such consequences as:
- condensate accumulation and mold appearance;
- rusting of metal parts and roof designs;
- crossing concrete structural elements
- rotting and drying wood;
- watering insulation, its damage and inefficiency.
All this will soon lead to impaired integrity of waterproofing and the appearance of leaks in the roof. This means that the roof will have to be repaired or change, so much more efficiently install a good ventilation system.
Special elements are used to enhance the thrust:
- Aerators look like flat plates - lining. In this device, low pressure is constantly maintained, the air in the aerator is cutting. Due to this, the difference of pressures is easily created - from the underpants space, the exhaust air is displayed quickly and easily. Elements may differ in size, as well, for different types of roofs, they will need a different amount. The installation of aerators on the roofing of the roofing between the devices should not exceed 12 meters. Installation is made on the most high Points Roofs, it is better for this to choose the insulation jacks.
- Sking Aerators necessary for scanty roofs. These elements are mounted along the ski line, ensuring the enhancement of natural ventilation of the underground space. The skate aerators are combined with any roofing materials, they are especially important for roofs covered flexible tiles. But the slope slope must be defined - from 15 to 45 degrees. On such roofs, the equipment of the skate products is initially assumed, aerators are inserted into these grooves. At the roof repair stage, you can cut a plot under the air force with a jigsaw or another element. Be sure to follow the tightness of the skate aerator, because it is installed in the center of the roof - incorrect installation will lead to leaks.
- Deflectors work on the principle of convection - wet air and steam with the help of these devices are derived from roofing pie, providing its drying and ventilation. According to the construction standards, at least one deflector should be installed for every 100 squares.

To remove the ventilation channels on the roof, it is necessary to make a preliminary calculation.

Attention! Often all ventilation moves leading from different parts of the house are combined into one mine. As practice shows, this method will only be effective with a very competent calculation and installation of all elements of the system. Doing everything with your own hands, it is better to bring three separate ventilation channels to the roof.
The error of calculations or installation will cause the kitchen smells, the "aromas" of the sewage, the microclimate and circulation of flows in the undercase.
When the roof ventilation is needed
With what any residential house Ventilation is needed, it is difficult to argue - it is always performed in the form of hearing windows, products, channels in the walls or with the help of special electrical devices that enhance traction.

But to ventilation of the underpants, not all owners belong to the required seriousness. However, there are types of roofs that must be equipped with a separate ventilation system:
![]()
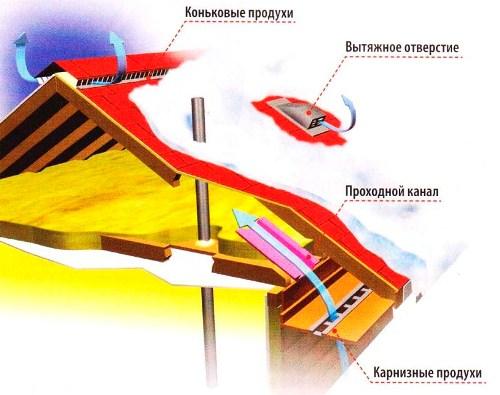
- flexible roofsThey need good ventilating due to their design features. The fact is that bituminous tile Mounted with glue, for the normal strength of the roof, the shape of the crate must be minimal. The most effective solution is a solid income from moisture-resistant plywood, shot down boards or OSB-plates. This design does not have natural gaps, the tile material itself does not pass the air - this will lead to the stress of air masses, a violation of the microclimate under the roof and even in the house. To avoid this, the gaps are performed on the frontows, along the cornice line and in the ridge of the roof. Complement the ventilation with special elements (aerators, deflectors).
- roofs of the attic type Also need enhanced ventilation, because it is supposed to accommodate people who need a sufficient amount of oxygen and fresh air. But the main function of the system in such structures - heat saving in the cold period and maintenance of cool temperature in winter. It uses natural air circulation - a warm stream is supplanted with cold, which goes below. This method allows to enhance thermal insulation that mansard roofs Running directly under the ceiling. Be sure to need a vapor barrier membrane, which will remove wet couples from the residential attic to the street, at the same time protecting the inner surface of the roof and insulation from the accumulation of condensate.
- roofs treated with metalmust have the number of air ducts equal to 1% of the total area of \u200b\u200bthe skate. At the same time, the amount and dimensions of the uniforms for the supply air must correspond to the auditory windows for the outflow. The distance from the insulation to the roofing sheets should not be less than 5 cm, so for the crate chosen the ram with the corresponding thickness.
How to install ventilation on the roof
The ventilation channel is usually paved in the walls, so the ventilation pipes are mounted on that part of the roof that rests on the bearing walls of the house. It should be understood that high pipes and boxes installed in the highest part of the roof are essentially a sail. A strong wind has a large pressure on these systems, can lead to the destruction of ventilation. Installation of pipes over carriding walls enhances the entire design. 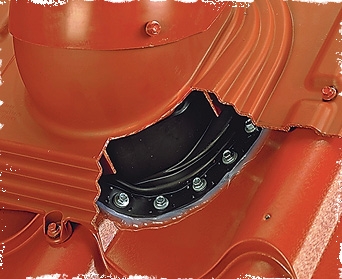
Deciding with the installation site, you can start the installation of the ventilation system:
- Purchase the necessary ventilation elements corresponding to the roof material, the size of the skates, shade.
- In the roofing material performed the hole. The pattern is applied to the roof, which usually goes in a set with ventilation elements, mooring it with a marker and cut out.
- The same cutout must be transferred to all layers of roofing cake.
- In accordance with the same template, the holes for the self-tapping screw are performed.
- The surface of the roof is cleaned and degreased.
- The gasket, going in the set, from the inside is treated with a sealant. Connect the contours of the seal with a cut in the roof and press the gasket.
- Apply the ventilation element to the seal and fixed with self-draws.
- In the passage element insert the pipe and check its verticality.
Important! The reliability of the installation of the ventilation element should testify the surplus of the sealant, squeezed out from under the gasket.
![]()
Conclusion
You can remove ventilation to the roof with your own hands. At the same time, it is necessary to comply with all construction standards and the installation rules of the system.
The weather in the house depends not only on the mood, happiness and love settled in the "nest", and from a variety of other factors - heat, comfort, freshness of air. The first block of components of a comfortable life depends on fate, but the second is exclusively from you and how correctly you will make communication in the house. Let's talk about the most popular of them in demand at any time of the year - ventilation. So how to install ventilation pipes On the roof, so that the houses are fresh and comfortable?
Video review: Ventilation system in a private house
Ventilation through roof
Before considering how the installation of ventilation pipes on the roof occurs, let's understand what the design data is needed.
Construction standards say: Any room without a window must be equipped with a ventilation channel. You can make sure that you ourselves, bypassing and carefully examined the apartment / House: Surely you will find the characteristic holes on the walls of the bathroom and the toilet room, boiler room, pantry, dressing room, and so on. In the kitchen, despite the presence of windows, the ventilation system should also be attended. However, it is important not only for the presence of such communications, and the correct functioning: installation and output of the ventilation pipe to the roof - fine science, but now you will bend it.
Conclusions of ventilation pipes on the roof most often do for such purposes:
- carrying indoor space;
- ceft ventilation;
- installation of the fan tube coming from sewage.
The owner of this house did everything right. Now and you will learn to the wisdom of building a system of ventilation
Requirements for construction
The pipe on the roof is installed so that the air leaving (spent) is removed quickly and unhindered.
The efficiency of the system is also affected by the location, and the tightness of the design, the form of section, and the height of the ventilation pipe over the roof. Any negligence in the process of mounting the node is fraught with poor quality operation of ventilation, and possibly the appearance of leaks on the roof.
Basic technical requirement to the system, which is also a test function of the node - free (samotane) movement of air inside the ventilation pipes should occur at a temperature "overboard" +12 degrees, while in the house the thermometer must be within +20, and in the bathroom + 24 degree.
According to the standards of SNiP (building standards and rules), the height of the ventilation pipe above the roof should be equal to a minimum of 0.5 m. Violation of this rule will lead to the cessation of air circulation during twist.
The optimal place for organizing the output is the middle of the roof. If the pipe is not alone, then the experts recommend that they are equidistant to each other.
Finding the neighborhood of the chimney dictates its conditions: the chimney and the ventilation pipe must be equal in height, otherwise the smoke left the smoke will return again through the ventilation.
It is worth paying attention! Start the installation of the ventilation channel is worth the compilation of the plan that takes into account all requirements for the system. The plan can also be on paper, and in a special program on the computer.

Installation of the ventilation system is better carried out during the construction of the house
Features of traction
The temperature difference at the outlet and the entrance to the ventilation pipe affects the force of thrust in the channels. If outside the winter window, the amount of reassembly air increases when summer comes, the difference tends to zero, therefore natural ventilation weakens.
This is the main reason for reducing the efficiency of the system. But there are others: the length of the channel also affects the volume of the air, including the height of the ventilation pipe above the roof.
Meanwhile, this does not mean that the lower the temperature "overboard" and the warmer in the house, the better the ventilation will function. Everything has a limit: if the channel freezes, fails. Therefore, it is important to produce insulation of ventilation pipes on the roof, as well as mines. You can make a "horse's move", placing structural elements inside insulated walls, and external - insulation. By the way, do not forget about the fragment passing through a cold attic.
The issue of warming the mine in some homeowners causes difficulties. Experts willingly share the secret, how to make a warm mine without much effort. This focus is: Route the channel near / along the chimney design, heating systems or pipes feeding hot water, then the mine will never freeze, and you will not spend a penny on the heating of ventilation.

Good Plan - Warranty Success
Installing a pipe on the roof
Before displaying metal or plastic ventilation pipes onto the roof, you need to complete the installation of the inner component, as well as fix the air ducts.
Tools and materials
The list of "devices" for work can be varied, but most likely you will need the following:
- drill;
- chisel;
- building level;
- electric jigsaw;
- scissors for metal;
- insulation;
- screwdrivers;
- marker (for marking);
- sealant;
- self-tapping screws, screws;
- sealing gaskets;
- passage node;
- rag;
- work uniform.
Take advantage of special programs
Order of work
If you install the system yourself, it is better to use a ready-made (assembled) alert that you will only need to install, and this is not such a difficult thing.
Consider step-by-step instructions withdrawing pipes.
Step number 1. Selection of space. Armed with SNiP requirements and take into account the features of the roof, determine the most optimal place to do the passage.
Step number 2. Marking. Using a marker, make a note where the node is planned.
Step # 3. Putting a slot. Cut the hole (choose the tool according to circumstances - depending on the roof material).
Step No. 4. For the same principle, make slots in the insulation and waterproofing layer.
Step number 5. Marking for mounting the node.
Step number 6. Removing dirt and garbage from the surface of the roof.
Step number 7. Drilling of grooves for self-samples according to the markup.
Step number 8. "Suitable" of the passing element.
Step No. 9. Fixing the node using self-tapping screws.
Step number 10. Installation of pipe for ventilation, fixing the design of screws
It is worth paying attention! Consider that the pipe on the roof is exposed to high wind loads, so choose products with an impressive wall thickness.

Principle of operation of the system of ventilation
Common mistakes and consequences of misses
Often, the ventilation system is installed in the construction process when it is possible to plan the output, calculate the area, choose the most optimal place on the roof, etc.
In the ready-made building to make ventilation more difficult. Internal "Transfiguration", requiring repairs, not so tragically affect the comfort of households, as an external - when you damage the roof elements: rafters, crate, etc. And the integrity of the roof is fraught with a way out due to the disruption of tightness. Households will have to or suffer from labels of nature, or redo the roof.
And what are the consequences of the wrong installation of the ventilation channel?
- low thrust;
- spread odors from one room (more often than the kitchen) throughout the house;
- moisture in the room;
- increased air humidity;
- lack of oxygen, which is fraught with difficulty breathing;
- the appearance of fungus on the walls / ceiling / floor;
- bad smell inside the structure;
- education of the coot on the kitchen;
- penetration into the house of smoke from other pipes;
- an increase in the intensity of household diseases;
- warning design elements.

And that's side effects Prosakhov
Competent installation of ventilation pipes on the roof is a pledge of a comfortable stay and good home wellness.
Installation of the ventilation pipe on the roof is the hardest stage of installation of the ventilation system in the house. The complexity of the work carried out depends on such factors as: the type of floor overlap, the system of the roofing cake, as well as the species roofing material. On how to correctly install the ventilation pipe on the roof of the house, while not to break the correct functioning of the roof itself and prevent it with a leakage, you will find out by reading this article.
Well, when the ventilation system is provided for by the project, and all the technological openings of the passage are made during construction. But what to do if the house does not have any ventilation system, and if it exists, it does not work well with its responsibilities.

You can fix this problem by installing a system of forced ventilation, but it is not quite cheap pleasure, which means not everyone will fit. Another way to solve the problem can be the installation of a natural ventilation ventilation system, which is completed with the installation of the outlet pipe on the roof of the house. Installation of this pipe is not such simple work, as it seems at first glance. Certain construction skills will be required if you want to do this work yourself.
With incorrect calculations and poor-quality installation, you can encounter such problems as:
- The incorrectly calculated length of the ventilation pipe (too short) can significantly reduce the intensity of movement of fresh air streams;
- Incorrectly selected trumpet installation may result in the reverse effect of the ventilation system;
- A poorly sealed hole, during the rain will be given to flow, which will contribute to the wetting of the insulation, and the grinding insulation loses all its heat-insulating properties.
- Bad insulation pipe with strong frosts will lead to its freezing.
Specialists advise whenever possible not to connect all the ventilation channels into a single system. Since under certain weather conditions, when the reverse thrust is formed, unpleasant odors will spread throughout the house. It will be better to make your separate exhaust for each room, it is of course a much more time-consuming and costly option, but after the time you will make sure that he fully justifies himself.
Modern types of roofs oblige to the creation of a complex system of roofing pie for them. Therefore, installation work must be carried out with special care and accuracy so as not to damage the elements of the rafter system, which can lead to the weakening of the design as a whole.
Ventilation pipe device
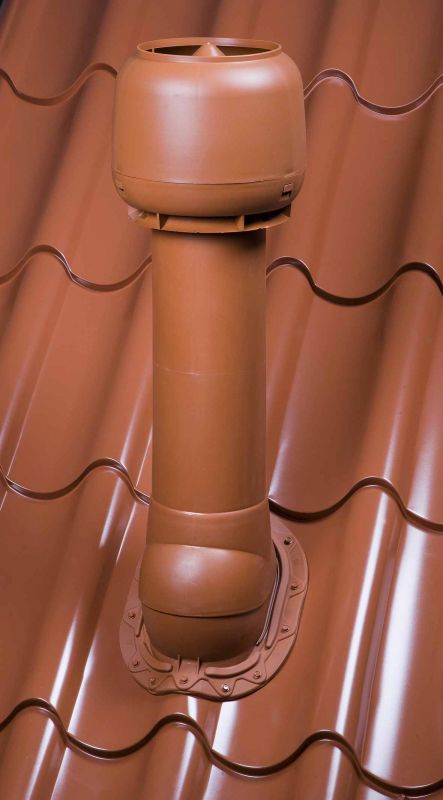
The usual version of the ventilation is a metal cut of a pipe inserted into the roof hole and fixed on it in a metal cup. A special valve can be installed in the pipe for condensate delay, and an auxiliary deflector is placed in the upper part. The pipe is completed with a protective element (peculiar umbrella), which prevents rain and snow inwards into the system.
However, in building stores you can find a more modern version of the ventilation pipe. The principle of its work is the same, but there are also differences that make their choice in favor of such pipes:
- The inside of the pipe is made of steel coated with zinc, and an external of high-quality polypropylene;
- The height of the pipe can vary from 50 to 100 cm;
- In the lower part there is a sealing ring, which allows to exclude a loose connection;
- The pipe cross section ranges from 100 to 300 mm;
- The pipe is initially insulated, which avoids its freezing;
- It is possible to equip the pipe with an additional electric fan;
- The upper part is equipped with a deflector that allows you to strengthen the craving, as well as protected by a dome from precipitation.

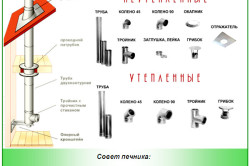
Ventation options for ventilation
Usually pipes are equipped with passing elements, due to which they are tightly attached to the surface of the roof, but there are exceptions. If your pipe was purchased without this item, it can always be purchased in any construction store. The benefit of them there is a huge amount for any type of roof and different colors.

Pipes for pipes
Roofing aerators
To prevent the formation of condensate, which contributes to the development and spread of fungus and mold, the roofing system should be well ventilated. For these purposes on the roof, special elements are additionally installed, which are called - aerators. The principle of their action is quite simple. Air will go to special technical openings installed in the roof cornily. Then naturally passing through the entire roof bottom up it will go out through the aerators located closer to the skate. It is such a simple system of natural ventilation and will be a guarantee of the lack of condensate formation under the roof.
Where to place a ventilation pipe
Place the ventilation pipes on the roof is best right above the rooms of which the air is taking place. So to achieve maximum thrust will be easier.
If there is no such possibility, then the pipes are best to set closer to the roof of the roof, and for their connection to the mines to use bending corrugated adapters. The advantage of installing the pipe in the upper part of the roof is that most of the pipe can be left under the roof where heat, and on the street only its small part, which will be well resistant to the wind.

Important! The short length of the pipe over the roof will significantly reduce the thrust of the ventilated air, and too high will require stretch marks for fixing. IN Snip It is indicated that the height of the installation of the pipe on the inclined roof should be no less 0.5 m., for flat enough 0.3 m.

The main condition for the location of the upper part of the pipe so that it is above the windband zone, since the strong wind can prevent the normal air outflow from the pipe, and even force it to go in the opposite direction.
Installation of ventilation pipe
Let's consider an example of mounting the ventilation pipe on the roof with a metal tiled. All stages of work can be positioned in the following order:
- First of all, we define the location of the pipe out of the roof. Then, according to the cardboard pattern, which comes with a marker, mark the contour of the hole, where the passage element will be fixed.
- Armed with metal scissors cut the hole in the metal tile.
- Then, according to the corresponding seal pattern, using the stationery knife we \u200b\u200bmake a hole in waterproofing. The seal is applied to the seal, tightly connect it with waterproofing and self-drawing fix it to the crate.
- At the resulting hole, install the passing element. The place around the opening is well cleaned from dirt and dust, lubricate the rubber seal and with the help of self-tapping screws, firmly fix the passage element to the base of the tile.
- The exhaust pipe is inserted inside the passage element. The level is checked for vertically and with screws is fixed firmly.
- The lower part of the pipe with the help of a corrugated extension can be connected to the exhaust channel.
For a more detailed description of the installation of the pipe, you can familiarize yourself with this video:
Important! A similar way is the installation of an exhaust pipe on the roof with another type of roof. Depending on the roof, other types of passing elements will be used.
How could you be convinced by a special difficulty in the process of installing the exhaust pipe there. The main thing is to observe precautions, working at height. For this, be sure to use the safety straps.
In contact with
Properly made ventilation output It will help to avoid unnecessary problems and protect against many damage to the roof. IN modern world There is a huge variety of roofing coatings, but we will focus on metal tile - the most common. Therefore, let's see how you can make the ventilation pass through the metal tile.
Do I need roofing ventilation?
Some may have a question: why do you need ventilation and spend additional funds when you can do without these works. The answer is obvious. First of all, ventilation supports a beneficial microclimate inside the roof. This will help each of its elements calmly fulfill its work without fear of destruction. Also, the quality of the heat insulation depends on the ventilation, if you performed these works when installing the roof, given.
Incorrect ventilation operation or in general, its absence can lead to the following problems:
- Education on condensate materials. Wooden materials, for example, rafters and beams, will prematurely collapse or overheet. And condensate on metal and other elements will cause them corrosion, and in the future and complete destruction (read the article: "").
- Moisture is formed on the surface of the roof. This may already lead to the formation of a land and destroy certain types of roofing material.
- Condensation of steam on insulation. The insulation layer will wet and subsequently lose its thermal insulation properties. This means that with the insulation may be worse than without it.
Ventilation device on pitched roofs
So that the fresh air circulate under the roof, at the bottom of the roof you need to establish the so-called products. In this case, the air movement will ensure the injection of the undercase.
What tasks should perform ventilation pipes on the roof:
- First of all, it is weathered water vapor. The absence of a water vapor will not let him be condensed on some surface and thereby cause its destruction.
- Setting the temperature of the roof. Roofing ventilation exits must maintain the same temperature over the entire roof, then icicles and toes will not be formed after the snow melting on one of the parts of the roof.
- Reducing the amount of heat after heating the roof of the sun. The ventilation will not give the underground space strongly overheat on sunny days and will maintain a constant air temperature indoors.
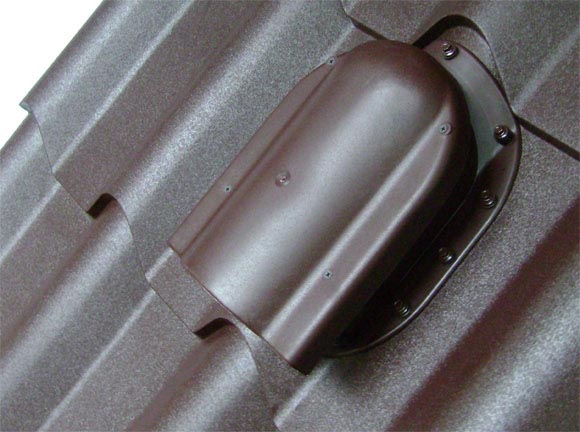
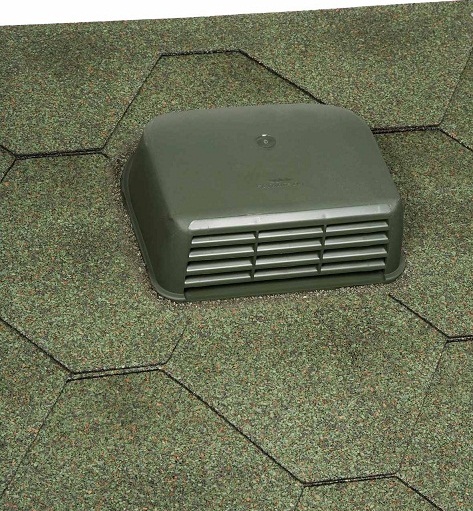
To ventilate under the roof, you need to use a deflector - low pressure roofing fan. If necessary, it can be done, it will help remove all unnecessary moisture. IN modern construction Use various elements of roof ventilation. Often the inputs for air flows close metal grafts. If we talk about air outlets, they are divided into two categories: point and continuous. Point outputs are mounted on certain areas of the roof and look like. Continuous outputs are located along the entire length of the skate and painted in the color of the roof, which is unnoticed for prying eyes. That is why the ventilation fungus on the roof is so popular.
Installation of ventilation pipes, specialist advice:
How is the installation of ventilation?
Naturally, the setting of outputs implies drilling holes in the roof. But without proper care, they can turn into real holes, which later will cause the roof. To eliminate the likelihood of the roof leakage, you need to purchase special, suitable for color to general design.
Installing ventilation pipes on the roof for metal tile includes several important moments:
- For every 60 square meters there should be one output of point ventilation.
- The distance from the skate to the point ventilation element should be less than 60 cm.
- The complexity of the roof structure increases the number of output elements.
- When installing an item, a template must be used, which is usually attached with the delivery kit.
- Holes on metal tile should be located on one scheduled line.
- With the help of screws, you should attach a sealing rubber ring, and then apply a sealant from silicone.
- A passing element is installed in place, after which the element pins are connected to the sealer loops.
- All this design is fixed on the roof with the help of screws included.
- On the side of the attic for the waterproofing layer, the seal is nailed. If the ventilation pipes on the roof pass through the thermal insulation layer, this place should be additionally selected by silicone sealants and other seals.