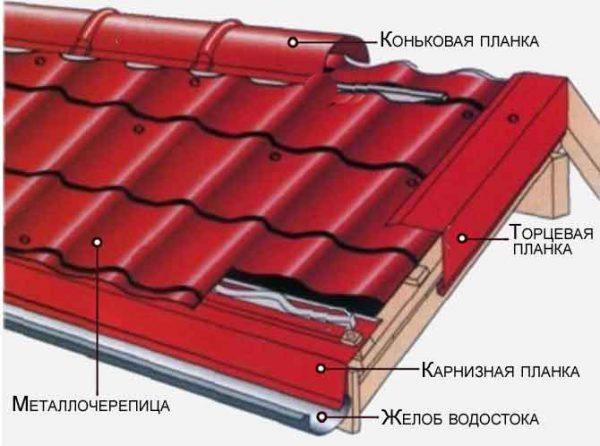
As in any important case, the main process of laying and mounting sheets of metal tiles is accompanied by the installation of a small number of additional and, at first glance, minor elements, without which the coating will work, but can quickly lose a significant part of its functions. We are talking about the side elements of metal tiles - cornice and end planks.
The main functions of the end and cornice slats for metal tile
- Protect the edge and end zone from wind and rain;
- Press the roof of metal tile finished and decorated view of the finished product;
- Strengthen the edges of the metal tile and install the barrier for insects and birds.
For your information! Despite similar functions of both planks, design and appearance the end lining is significantly different from farmery element. In both cases, the lining is made of the same material as the metal tile, are also ground, zinc and are covered with a polymer coating.
It is clear that the auxiliary elements should not be released in color or shape on a general background of a polyester coating of the metal tile. The steel with a thickness of 450 μm is easily cut, and if necessary, you can adjust the edge of the end plank when it is mounted on the metal tile cloth.
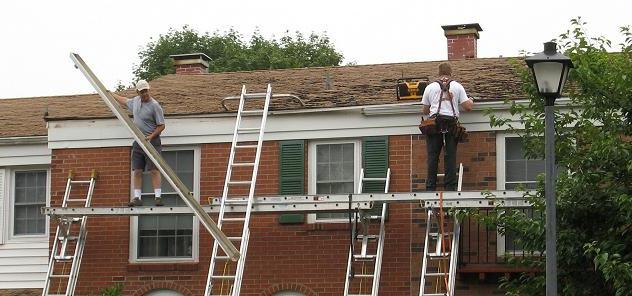
Installing the end and cornice bar on the scat from the metal tile
The main difference between end and cornice planets is the sequence of their installation. The cornice linings are mounted after installation of waterproofing before laying the first main row of metal tile. For the end plank, a prerequisite for installation is the complete laying of all sheets of metal tiles and the installation of the frontal strip.
How is the cornice plank for metal tile
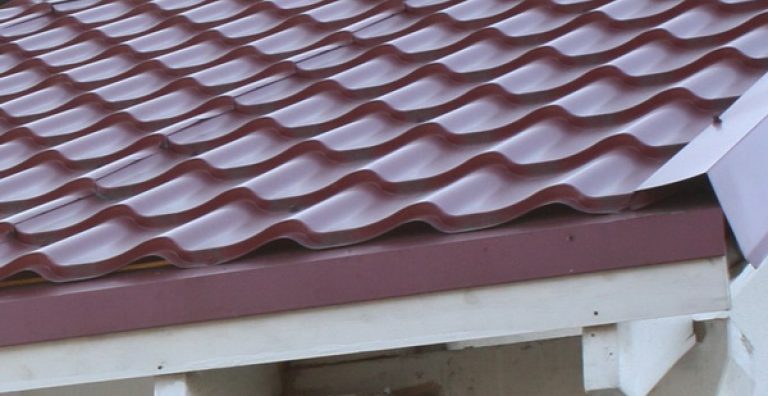
Thanks to a specific form, the cornice bar the element is difficult to confuse with a skate pad or an end strip. In the form, it resembles a chute, whose edges are curved at an angle. The two planes of the cornice bar are connected to each other at an angle of 110 o, the wider shelf has a size of 108 mm, a narrower width of 70 mm. On the bottom shelf, which, after installation on the rafter, it will have to enter the edge into the drainage chute, the beading is made of 15 mm width. This design allows you to get the smooth and hard bottom edge of the plank, preserving the line even under the pressure of the rainwater flow.
For convenience, the installation of the bar is performed in the form of fragments or segments of 60-65 cm long.
The top edge of the plank is laid on waterproofing. The lower edge is excreted into the receiver of the drainage gutter. Thanks to such a device, all moisture flowing from the roof will inevitably fall into the catchment chute. At the same time, even in heavy rain, they will not fall on the wooden elements of the crate and rafters.
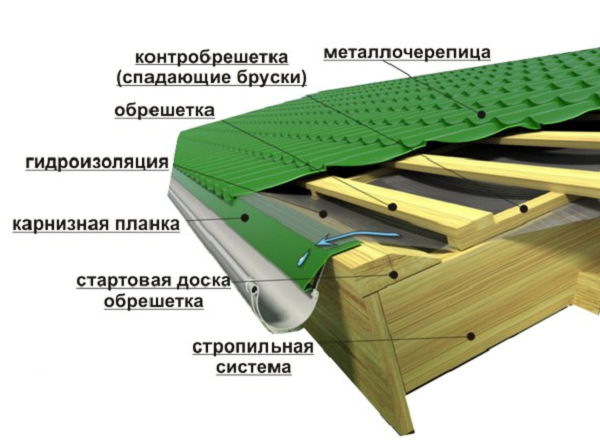
There are two types of plank installation. In the first case, the waterproofing is removed under the overlap bar of the eaves and fasten to a special drain - the dropper along which the condensate from the ventkaneke flows and does the down.

In the second case, the lower edge of the canvase of waterproofing is removed from under the cutting of the sheet metal tile on the plane of the cornese plank. In this case, condensate on the plane plank flows into the drainage chute.
Installation of the cornice bar is performed in several stages:
- The starting board of the crate or the windshield is attached to the rafters. The second part is stacked at the bottom support systemFor which the eavesber of the eaves will be relying in the future. In some cases, instead of a frontal board on the ends rafters, a cornice board is selected, to which the support hooks of the drainage gutters are attached;
- Waterproofing is laid out, the drains are installed. Next over the fasteners and the channel of the drainage gutter are laid out with separate fragments of the cornice lining. The mount is performed by self-drawing every 40 cm of length.
Tip! In order for the stuffed Planck to have a presentable view, a thin white cord is pulling along the fastening lines, along which the overall line of the cornice lining is parallel to the horizon.
After installing the cornice element, you can move to the fastening of the metal tile.
Installation of the bar for the metal tile

In everyday life, the end bar is called another wind strip. Metal profile sheet, like no other roofing material, is very sensitive to wind gusts due to the high stiffness of the sheet and its ease. The gusts of the wind, strangling in the slot of the ventilation gap between the waterproofing sheet of metal tiles, are able to draft and raise even durable nail fasteners from the crate.
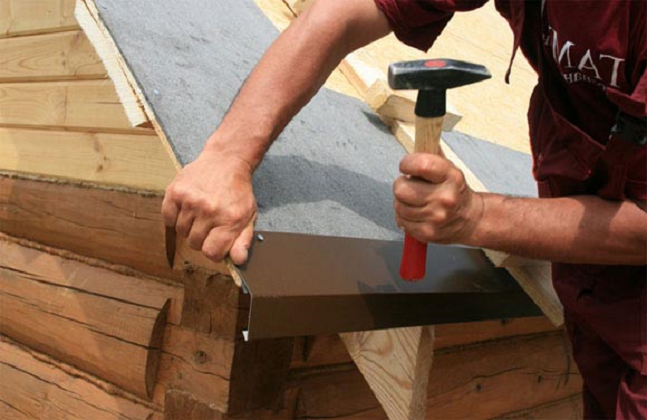
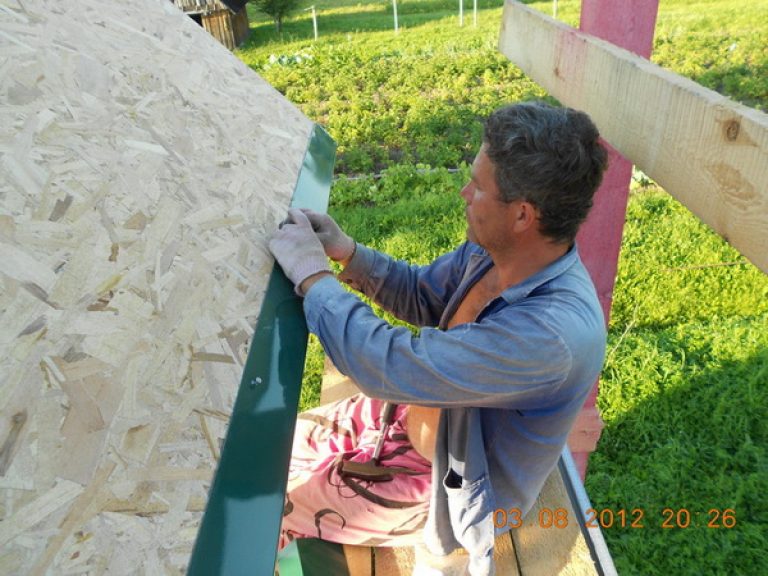
The face plank is a stamped bent corner or a P-shaped profile from fine sheet metal. Install the end bar after the installation of metal tiles is fully fulfilled.
In order for the pad reliably closed the side slit, you will need at least two lines of support for the end lining. Therefore, at the first stage, a wooden bar is stuffed along the Skat, a cross section of 40x40 mm, it is stuffed at the very edge of the end of the crate. A horizontal shelf of the end lining will be relying on the bar.
So that the end pad was sitting on a lattoster bar, the distance of the laying line of the bar from the edge of the crates is assessed by an experimental path, based on the thickness of the front board. To do this, it is necessary to apply the workpiece of the board to the end and put the timber, according to the annex that applied from above, mark the optimal location of the bar, after which it is nailed along the slope.
Next, it is necessary to choose the height of the upper edge of the front board above the level of the nailed timber. This is done so that after mounting the horizontal surface of the end plank coincided with the plane of the roofing rod and metal tile. If the front board is not aligned, the plane of the end overlay will look overwhelmed. Often, the surface of the front lining has to be repeatedly cut, so that the fastening line to the crate passed along the axis of the board.
The first segment of the end plank must be neatly cut so that the edge tightly went to the frontal board. Next, the shelf is neatly rejuvenated, after which the entire end plank is placed on the prepared base of the front-distance board and the bar. At the same time, the angular edges and a wide shelf will work as a spring, and tightly pressed to the surface of the bar and the front board.
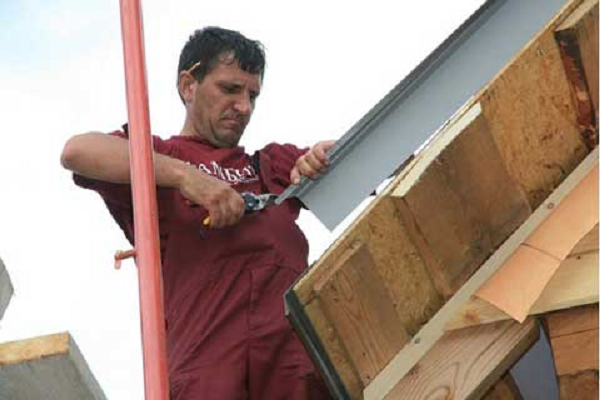
Stacking overlays start from the bottom of the roofing rod. Each subsequent element is laid out like metal tile, with an allen in 4- 5 cm on the top edge of the previous cutting line. The mount is performed by two rows of self-tapping screws. The first row is twisted into the body of the front board, the second row is attached along the horizontal surface of the lining into the thickness of the support bar. In the end, the bar is installed and also fasten with self-sides with sides.
After installation, all the lines of cut and joints, the screws of the screws should be carefully treated with an aerosol varnish, insulating the open metal.
Conclusion
The installation of end slats for metal tile does not represent much difficulty even for beginner roofers, only accuracy and excerpt in fitting the size and place of attachment of the brusade support and frontal boards are required. Any cutting sheet scissors metal tile or end-lining gives a large number of very sharp and small burrs, so it is necessary to work only in gloves, and the cut line must be processed to the withdrawal of sharp edges.
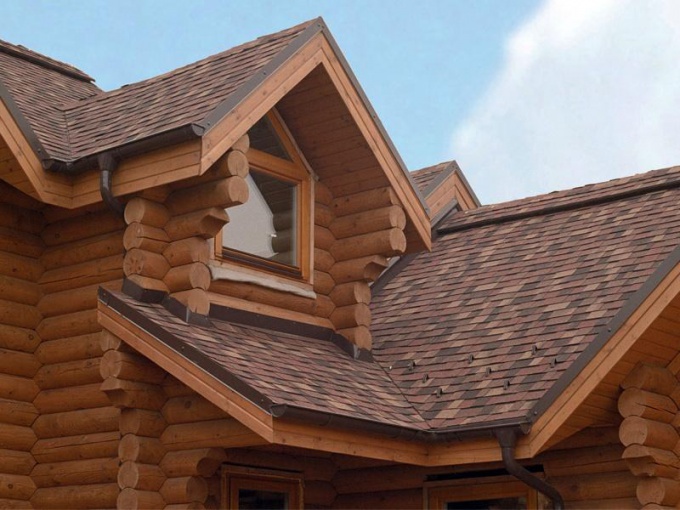
Installation of the roof is the most important and interesting view. construction work. It is very important to correctly arrange rafters and a horse, and the final installation of the roof gives the whole building an attractive and finished look.
This especially applies to the roofs of metal tile, since a variety of bright coloring and a rich appearance make the roof of a noticeable and laconic. But the final stroke of the roof gives the good elements, among which the cornese planks for the selected metal tile occupy an important place. We will find out why they are needed and how they are mounted.
The metal tile firmly conquered its niche in the roofing materials market, it is quite simple to install even an unprepared person. Included with tiled for sale a certain set of challenges, which include:
It is important for us to understand what it represents farmery Planck, as and from what it is made, what is its size and how long it serves. Functionally, this element is needed to protect against the atmospheric precipitation of the bottom board of the root and the vertical front board.
The carnice bar for metal tile is a drip, which guides flowing water in the gilt of the drain. Moisture passes a wooden frontal board, and top part Farmery slats does not allow you to wet the incise.
A plank for metal tile from the same metal as the roofing material itself, and there are several layers of coating for durability, namely:
- zinc coating is applied to the sheet;
- anticorrosive coating is applied to prevent rust;
- then the primer layer to harden the paint coating;
- coating of durable polymeric paints;
- on the back of the sheet, a protective varnish is applied.
Such a multilayer coating provides a long service of the eaves. As for the sizes, they are produced from 50 cm long to 200 cm, with the ability to order their own dimensions in the necessary quantities.
![]()
In order for further correctly the installation of the cornice bar, you need to understand the role of another challenge. They are a L-plank, its role in the installation may be important if you want to use it. The fact is that the L-Planck is attached to the frontal board and serves not only for its protection against precipitation, but also as a knot for fastening the eaves of the cornice.
It is the finishing of the cornice will be finish stage Work on the construction of the roof. Therefore, to fix this bar to the front board follows the attachment of the brackets under the gutter and drippers.
The cornice bar has another feature that does not allow moisture to penetrate into the underpants with a strong side wind. All listed functions of this non-plane with the appearance of the roofing element allow you to calculate it to the category of the parts absolutely necessary during the construction of the roof.
Features of mounting planks on roof cornily
Each work has a definite sequence that will avoid errors and will not allow them to pay for them in the future loss of quality of the task. It is also the case with the installation of a cornice bar for metal tile.
Our task is to describe the sequence of actions so as not to redo the work in the future. The procedure for operations is as follows.
- It is necessary to link the entire rafter system of the sweep with the frontal vertical board. Its thorough fit and the installation determines further work. It is attached to the corners, because the mechanical connection is not strong enough.
- At the next stage of the work, an L-profile is installed, which protects the windshield and serves as a support for the eaves of the eaves during its final finish.
- Next, we mount the blasting brackets taking into account the angle of inclination for the flow of excess moisture.
- Installation of the eavesterals is made with an outbreak of at least 5 cm in the direction of water flow.
- The lower part of the bar must fall into the chute for the normal flow of excess moisture.
- The waterproofing film should be seamless to the cornice bar, but not to perform for the dimensions of the metal tile. This will allow condensate moisture to drain along the gutter of the drain, but do not expose the film with detrimental solar radiation and wind exposure.
- Then the sheets of metal tiles are stacked. They must overlap the top plane of the cornice bar and ensure the unobstructed flow of water and the melting snow in the chute.
Fixing the carnice bar, as well as other roofing elements, is carried out using a screwdriver and self-tapping screws with rubber gaskets.
All electrical tools and power plants must be checked and working.
High-altitude work is carried out in windless weather and in good ladders or forests. In the production of roofing works, it is not necessary to forget about a clear observance of the technological sequence of work, because the violation of the procedures of operations leads to the emergence of problems in the future.
The cuts of the outline of the outlet should be protected from corrosion with special compositions.
Also need to work in windless weather to avoid injury and damage roofing material. Overalls and gloves are needed, as well as with a string of material, protective glasses are needed.
The safety regulations are not ink in paper on paper, but human blood.
Often, during construction, you just need to sit down and think a little, then seek advice to masters of your business - and the decision will come by itself, and the most important thing is in small details.
Conclusion
We told you about the fact that a slightly carnice bar for metal tile is in fact a very significant structural element in the construction of the roof. In the erection of your own home there are no small elements, it is absolutely everything. And if you save a curious look and genuine interest in the construction process, you can purchase not only invaluable experience, but also pleasure from the construction of your own home.
The roof covered with modern metal tile is a practical solution for a private cottage, cottage house or townhouses. Contrary to the beliefs of homeowners, the durability of such a roof is not entirely dependent on the quality of the roofing material. A large influence on durability, waterproofability, reliability is provided by challenges used for installation, despite the fact that their area is less than 5% of the roof surface. In this article we will tell you what a wind strap for metal tile, for which it is needed, as well as it is fixed.
Wind Plank is one of the challenges used for flooring roofing from metal tile. It is a corner of plastic or galvanized metal and performs protective and decorative functions. Distinguish the following types of windscrews:
Important! The wind strap is a corner with 2 fastening shelves than they are wider, the more reliable this diverse element for the roof protects the ot from the penetration of moisture and wind. Installation of the end element is often performed in the complex with seals repeating the waveform of the coating, for more efficient operation.
Materials, dimensions
For the manufacture of an earthen wind strip, materials are used with high resistance to atmospheric phenomena, as well as mechanical strength. The service life of the roof of the metal tile is at least 20-25 years, and therefore, there must be no less. The following sheets are most often applied:
- Steel. The most popular models of good elements to protect the ends and cornices are steel. Galvanized steel, which in the process of production is covered with a layer of paint, pourala or polyester, withstands the effect of water, is not corrosion, while it is sufficiently light and durable.
- Plastic. Polyvinyl chloride - thermoplastic plastic used for the manufacture of the cornice and the end plank. The advantages of this material are light weight and variety of color solutions. However, plastic elements are subject to thermal expansion, in addition, it is not recommended to install a heat cable for heating the roof.
Please note that the dimensions of the models of the cornice bar for metal tile are very different. This diverse element usually has a length of 1.5-2.5 m, the width of the fasteners - 15-30 cm. Steel products are made to order in the size of the buyer.
Functions
Doblyo elements in the composition of the roof of metal tiles, depending on the complexity of the design, are 2-5% of the area, but their value is difficult to overestimate. Installation of roofing without windscrews leads to penetration into the lines of moisture and wind and wind and, as a result, accelerated wear of the material. The cornese and wind bar perform the following functions:
- Protective. The main task of the carnism bar is to prevent the penetration of the roofing material of atmospheric moisture and cold wind. Due to high humidity wooden frame Removes and boosts that negatively affects the roof service. Placing in the attic room of cold air increases the cost of heating at home.
- Decorative. Installation of windscrews allows you to gently and aesthetically tinkering the front board, as well as hide from the eye "inside" rafter system. Dobornye elements are chosen to the tone to the color of the metal tile, so the skates look holistic and harmoniously.
Experienced masters claim that the challenges for metal tile can be made with their own hands. Wind strips are made from a sheet metal with a thickness of 0.4-0.5 mm. However, the homemade planks will not look so carefully.
Installation
Wind strips are simple elements, so models of different manufacturers differ except for the type of coating and thickness of the metal used. The efficiency of these tools depends on the correctness of the application. Installation of cornis and end slats is performed as follows:
- Farmers are fixed on a cornice board to roofing roofing. Before installing this challenge element on the cornily, the brackets for the drainage gutter are fixed. After that, the windbar of the bracket by 10-15 cm is fixed on a cornice board with nails or self-tapping screws in 30-50 cm increments.
- Windscrews are fixed on a frontal board after flooring roofing from metal tile. They must overlap the roofing material on 1 wave. The backstage between these elements can be more than 50 cm. Each plank is fixed to the board 4 nails or screws to avoid deformations with strong wind.
Important! The joints between windscrews should be sealed and not to skip water. To do this, they are treated with a selence on silicone basis.
Video instruction
When completing the concluding roof covering, you should not forget about the details such as drainage, cornese swelling and planks. Since a qualitative result (durable, non-pending roof) depends largely on these small, but such important elements. Consider how to install an earthen bar.
Farmery Planck
The cornisic bar (Svet) refers to the category of roof, while it performs a decorative function, and a protective role. This item retains the lower level of the crate and the frontal wooden elements from exposure also it protects the shears of roofing from all kinds of deformations. The bar for the eaves is made from metal and plastic of various shades, which is important when selecting the above-mentioned building materials to the hearing of the roof and drainage system.
How can I fix the cornice bar?
1. Due to the formation of the protrusion of the transverse timber (tightening). At the same time, for the strengthening of the attachment of rafters with carrier surfaces, special devices (jacks, nozzles) are provided. In this case, it will be reminiscent of the shape of the fungus, and such a system is usually provided for the construction of buildings from wood and frame-panel devices.
2. By making the departure of the rafter elements for the outer level of the wall. At the same time, brick eaves to the top level of farms are installed to protect against the spacious space under the roof. Such a device is used in brick and stone structures with overlapping from reinforced concrete. 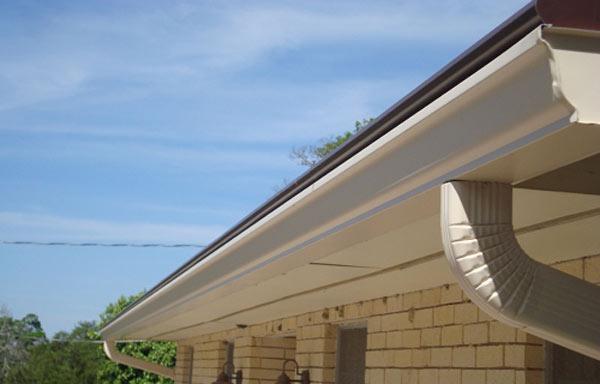
Mounting Svet Karnisa
The cornisic bar is installed so that it directs the flowing water in the gutters into the drain. When implementing, the following points would be taken note:
- Svet roofing, or the removal of this design should be at least 0.5 m. When organizing drainage through the livnets, this value can be reduced.
- Installation of the cornice bar must be done in such a way that there are no slots, holes, etc., since otherwise the attic room will be blown out. And this, in turn, can lead to significant heat loss in the house.
- Svet must be installed before the roofing sheets are fastened, while the bar must be attached tightly, without gaps. Only in this case there will be no noise from the gusts of the wind.
- Elements of the eaves should be attached to the flasure in length (range 5-10 cm).
- The bar attach to the frontal board and the eaves with galvanized nails or self-tapping screws, while the mounting step should not exceed 30 cm.
- The edges of the waterproofing layer of the cornice must be put on top of the bottom level of the crate and sweep.
 This adaptation allows you to protect the inner layers of the roof from moisture and wind exposure. The prepared diverse element is distinguished by a variety of forms, it all depends on the roofing coating. IN lately The cornice bar for metal tile is very popular, since it is precisely this material most often used to decorate the roof. And to choose the product mentioned to the projected roofing structure will not be much difficult for you.
A cornese plate for coating from metal tile acts as an important element When setting the roof. This component performs not only decorative, but also protective functions. Metal tile should be reinforced exclusively on a flat roof. Equality will determine the process of measuring the diagonals of the skates. If they are equal, then the roof is ready for overlap. The cornice bar must be strengthened after laying the metal tile, which is attached to the crate. In some cases, the bar is attached until the metal tile laying.
The cornice bar has an oblong shape and protects the frontal farmery board from moisture. Farmery Planck acts as protection against moisture in the roof space.
Fastener Fastening Technology
In order to strengthen the cornice bar, the frontal board should initially fasten. It must be fixed to the ends of the rafter, applying galvanized nails. Alternative option Can be a cornice board with a fastening in the grooves on the rapid system.
Before starting the installation of the cornice bar, you can install brackets for the drainage system. The brackets can have a fastening on the cornice board, as well as on the rafting legs. Then it is permissible to move to the installation of a carnice plank, which can be mounted and before starting the process, metal tile on the roof.
Mounting the bar can be on top of the drain attachment using the screws in the process, they should be screwed into a frontal or cornice board. The distance between the screws is approximately equal to 30-35 cm. Increasing the bar, the master must provide a navel equal to the limit of 50-100 mm.
Features of fastening the cornis
The cornice bar must be attached to the height of the tile wave, it should be placed above the crate level. The roof end corner is completely overlapping. Fasteners should be installed on top and sides. From above, the self-samples must fix the bar to the ridges of the tile waves.
After fixing, the joint is formed between the roof coating and the bar, it should be carefully sealed. Preferably, in the process of arranging roofing, install a pair, which consists of cornese and end plank.. Such a solution is subject to technology to ensure a long service life of metal tiles.
Good roof not only makes protecting the structure from influence ambient, It is considered to decorate the structure. Many people use to finish the roof of metal equipment. Well-completed installation of metal tile gives a feeling of comfort and safety.
Instruction
Installing metal equipment is needed in several points. At the moment on the market roofing quite a bit of different materials. There you can easily choose exactly what you need. It is worth noting, a lot of demand is used by metal equipment. Such popularity is achieved mainly due to a relatively low cost. Metal tile. Easy to mount, and it also does not need constant care.
Before starting roofing, it is necessary to calculate the area you are going to cover. Special attention is paid to the corner of the lid inclination. It is from him that the laying method will depend. If the angle of inclination of the roof is less than 14 degrees, the material must be installed on two waves. After that, it is already possible to move to the performance of the waterproofing of the attic.
These actions are produced in order to eliminate the accumulation of condensate on the inside of the coating. In order to make good insulation from water, it is necessary to establish heat-insulating material and a unique film. After the work related to waterproofing is performed, you can move to the crate. To do this, take the bars of the crate and pinch the counterclaims to them.
In order to protect against damage, it is necessary to attach the cornice bar below. The lamp with an attached cornice bar has a slightly different scale. After the installation is completed, you can move to the styling of the endand. At the end, it is possible to lay the metal tile itself. Sheets of this roofing material are fixed with self-tapping screws. One square meter is approximately eight self-tapping screws. When installing metal tile, be careful. Try the self-tapping screw at the same level. It will give the roof a more aesthetic look.
Sources:
- how to put metal tile in 2017
Instruction
To begin with, make a reason for the preparation. It will serve as a material that has a solid smooth surface. It is recommended to mount tile to it using nails. Use as the base the moisture-resistant plywood or the tipped board and note that the material should be selected for the base, whose humidity does not exceed 20%. Place the shelves on the places of support. The length of the board must be more than two spans between the supports. Also be sure to consider the expansion of the material that is due to the oscillations of humidity and temperature. Between the boards, leave a small gap.


