Metal tile - the most popular roofing material, successfully combining not only reliability and durability, but also aesthetic perception of the structure. Installation of the roof of metal tile requires strict adherence to technology of work.
When the installation of the roof of the metal tile is completed, remove the soft brush of the construction trash and process the sections of the sections and scratches using the paint from the canister.
From the workwear you will need:
- gloves;
- protective glasses;
- shoes with soft soles.
From the tools you need to prepare:
- screwdriver;
- stapler construction;
- a hammer;
- tape measure with rag ribbon;
- electrolovik;
- hacksaw with small teeth;
- metal scissors manual or electric carpent;
- manual disk electrooper with carbide cutting elements.
ATTENTION: When working with metal tiles, the use of grinder and any cutting devices with abrasive cutting elements are prohibited, as it leads to burnout and peeling the protective polymer layer of the sheet!
Otherwise, you not only reduce the operational properties of the roof, but also automatically lose the manufacturer's warranty of metal tiles.
Measurement and calculation of materials

From metal tile
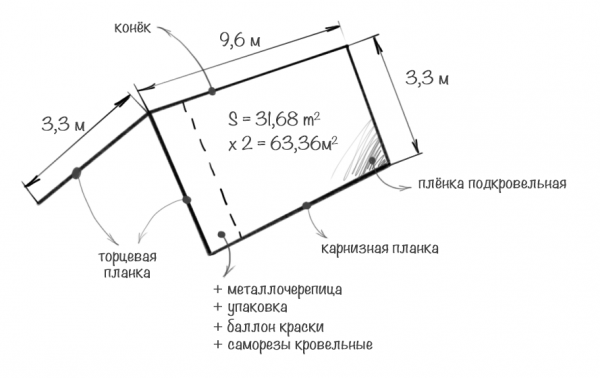
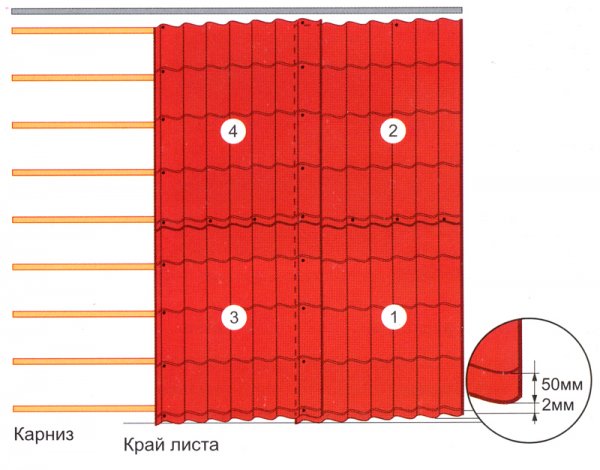
The sheet metal tile has the upper and lower cut, that is, the distance from the corresponding edge of the sheet to the ridge of the wave is usually 50mm. The area of \u200b\u200bwaves without taking into account the upper and lower cut is the useful sheet area. To calculate the number of rows of the required sheets horizontally, it is necessary to share the highest skate length or on the eaves to the housing of the sheet, taking into account the launch in one wave. The number of sheets in a row can be calculated by dividing the total length of sheets in a row on the useful length of the sheet. The total length of the sheets is equal to the length of the skate from the skate to the eaves, taking into account the sink by 40-50mm. In places of jackets of the skates, funds, the inclined horse length should completely cover all the squeaks.
When choosing a sheet length, learn that in short lengths, the coefficient of the metal expansion is less, respectively, less than the tension of the metal and the likelihood of the shank shank, breaking holes and destruction in these places of metal. Recommended by experts The length of the sheet metal tile - 4-4.5m.
To minimize waste before buying a metal tile, make a roof drawing, spread the sheets according to the resulting scheme, taking into account the joints in such a way that the waves make a single cloth over the entire roof area.
When calculating the number of rollers of waterproofing, the total area of \u200b\u200bthe roof is divided into the coiled level of the roll, taking into account the overlap 15-20 cm.
When calculating the number of insulation, the total area of \u200b\u200bthe roof is multiplied with 0.2m (recommended insulation thickness).
When calculating the challenges, it is necessary to take into account the magnitude of the horizontal adhesion in 10 cm (for the lower end - 30cm).
The amount of self-tapping screws is planned based on the rate of consumption of 8 pieces on 1m2 metal tile / 1M structural challenges.
All calculations are made with rounding to the biggest.
Rules for the construction of the rafter system
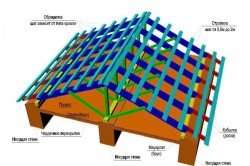
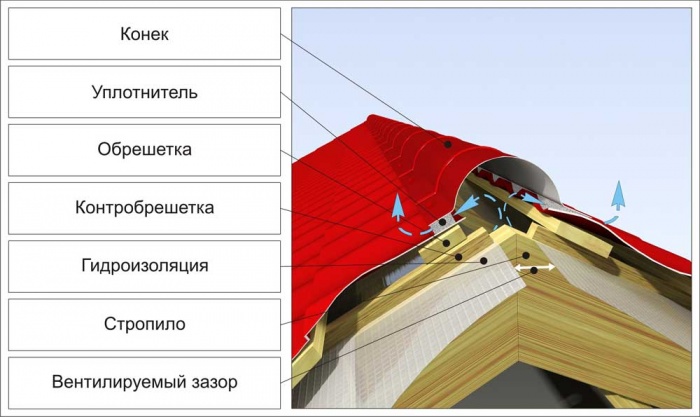
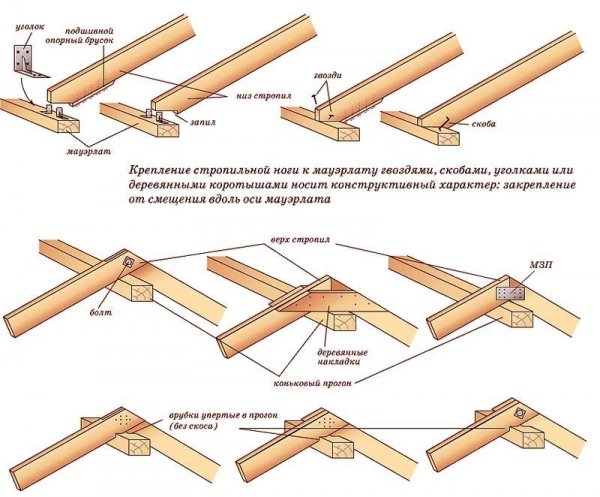
Schema hanging sump system double roof.
When planning a rafter system, the features of the roof form, wind and snow load are taken into account. For the roof of metal tile, experts recommend the distance between the rafters of 600-900mm. Wood breeds with humidity of no more than 18-22% are suitable as a material for rafters. Previously all wooden elements of the rafter design, including the crate and additional reinforcing strips, must be treated fire and antiseptic compositions.
If the roof warming is planned, to create additional intercremile ventilation in the side upper part of the rafter in 30cm, the holes with a diameter of up to 2.5 cm are drilled.
Old rafter design can also be the basis for the roof of metal tile.
Before the construction of the rafter system (including if it is carried out on an old roof), make sure that the roofs are rectangly comparing the length of the skate diagonals, check the horizontal of the eaves, skate, fesomes. Installation of the rafter is carried out with the detected errors.
For construction standards - 14 °. In the conditions of snowy winters and rainy climate, the recommended angle of inclination is 20-30 °.
Installation of cornice and frontal boards, eaves
Typically, the installation of the roof assumes the presence of either a cornice or front board.
Variants of the tiled roofs.
The cornisic board enhances the stiffness of the structure and is attached in special grooves, drunk in rafters in order to avoid increasing the height of the rafter design. If the installation of the drain suggests the use of long hooks, on the cornice board it is necessary to cut down the corresponding grooves. Setting long hooks is carried out before mounting metal tile. Short hooks are usually used if the installation of metal tile is completed. They are attached to the windshield, which is nailed to the end of the rafter. This element performs reinforcing and protective functions.
To binder cornice on the wall at the level of the lower edge of the front board, the bar is horizontally stuffed. Then, between it and the front board, the lamp is performed in the form of transverse bars, which is then fastened with a heating material (coinciding in color and material with metal tile of professional flooring, siding or sofa).
The main rule during the binder of the cornice is to ensure the free inflow of air into the underpants space due to ventilation gaps. The recommended ratio of the total area of \u200b\u200bventilation gaps and roof is 1/100, the distribution of roof gaps is carried out in proportion to the areas of its individual elements.
The ventilation gaps provide either between the panels of the binder (with the exception of sofits having perforation), or leave one solid gap between the wall and the extreme checkpoint. In order to avoid falling into the undercase, birds and insects, the gaps are closed with grille with small cells.
When laying waterproofing, it is necessary to ensure a unimpeded through passage of air flows.
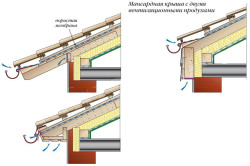
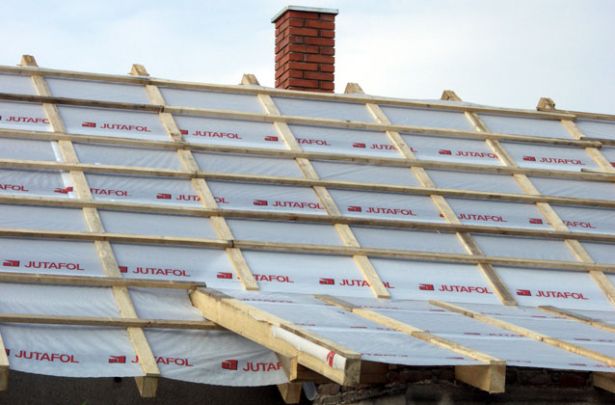
The waterproofing film protects the conditioned space from the penetration of moisture and dirt, while possessing vapor permeability. It is forbidden when the roof device from metal tile is used as a waterproofing material on a bitumen basis!
If you need to ensure the unimpeded through passage of air flows from the eaves to the ventilated seal of the roof of the roof due to the ventilation gaps between metal tiles and waterproofing, as well as between waterproofing and insulation (dual-circuit ventilation).
The waterproofing film is rolled, without turning, from the cornice to the skate of the mustache (at least 150 mm, and in the joints of the skate, at least 200mm) and fasten the construction stapler. The places of overweight must be isolated by a special tape on a sticky basis. Please note that the places of the allen are accounted for on wooden elements of the rafter design and crate.
To eliminate the tension and breaking the film due to the decrease in its size from the cold and the "Games" rafters, it is necessary to lay it with the provision of 10-20mm along the edge of the rafter. If you use the waterproofing of anti-condensate or classic type, double-circuit ventilation is needed with a 30-50 mm gap in each circuit. When using super-diffusion membranes, there are enough single-mounted ventilation - between the membrane and metal tile.
A layer of waterproofing should perform for 200mm to perform the line of walls, and over the ends cover the endboards. Fasting on the walls of such elements of the roof, like furnace and ventilation pipesmust be at least 50mm with the laying of an extra layer around.
Fitting device, installation of the lower end
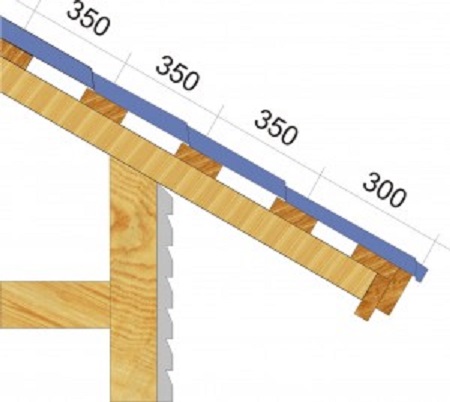
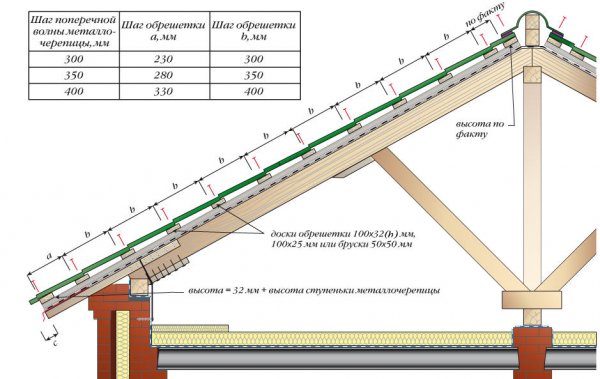
For the roof with an interconnection step 900mm for the crate, boards are suitable with a cross section of 30x100mm, and with a step of 600mm - with a cross section of 25x100mm. In the event of an increase in the distance between the rafters during the device, the larger cross sections are used - 50x100mm or 50x150mm. The height of the secting of the lower (initial) strip of the crate should be greater than the height of the remaining slats on the height of the wave of the sheet, as the top of the metal tile lands on it. It is attached strictly parallel to the eternity. The second obrestena is attached with a step of 280mm, and all follow-up - with a step of 350mm.
Place of fasteners skown Plank It is necessary to strengthen the two additional straps in 50mm increments. The thickness of the steering board should be 10-15mm more than the thickness of the rest of the cutting boards to create a ventilation gap.
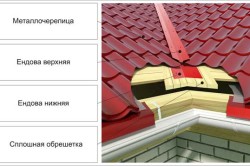
Around the protruding elements of the roof makes a solid crate. In the joints of the junction of the skate (endowes), the doome should also be solid at a distance of 300mm from the axis in both directions and coincide in terms of the rest of the crate. According to the educated boards, the groove is placed in waterproofing, on top of which it is fastened with informs with self-absorbs at a distance of 300mm apart from each other. Fall at the junction of funds should not be less than 100mm. Lower Endova should go to the cornice board.
Installation of sheets of metal tile
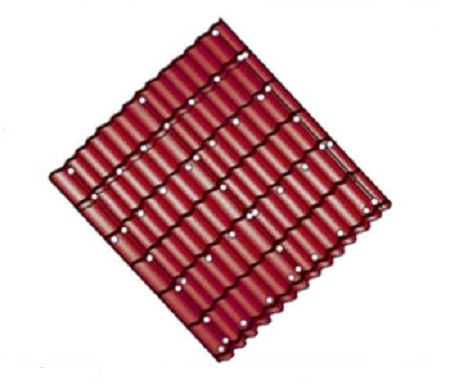
Mounting scheme of metal tile sheets.
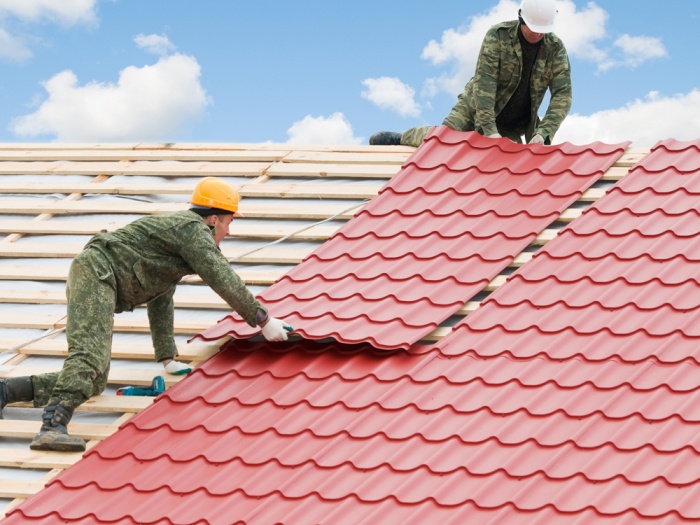
The lifting sheets of metal tile on the roof is carried out with the help of ropes on two guide lags, bonded by transverse boards. In the process of installation, the walking in the metal tile is allowed exclusively in the location of the waves and only along the contour of the crate.
Each sheet of metal tiles has a capillary groove for water drain, which when mounting is covered with the subsequent sheet. Usually begin laying from the other side where it is not necessary to cut the sheet. You can mount sheets both from left to right and vice versa with overlay in one wave, closing the capillary groove on the left side of the sheet.
Basic rules for laying metal tile
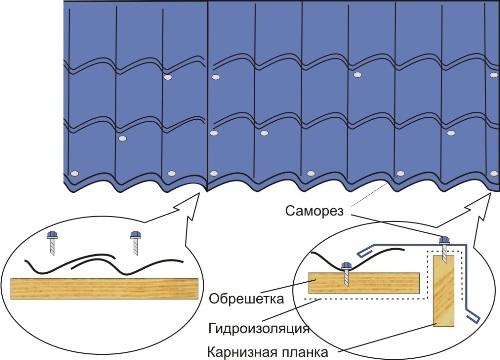
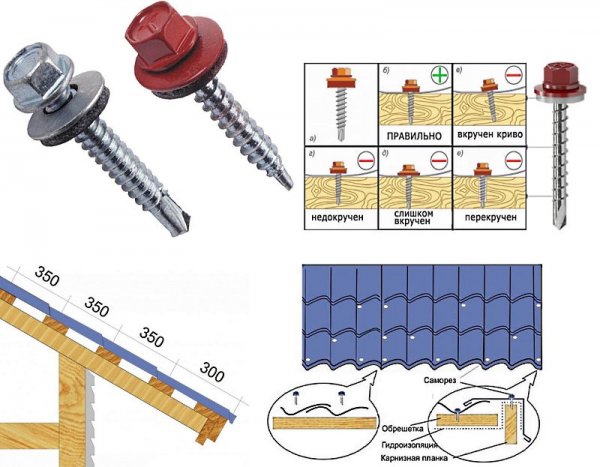
- Docking "by waves" to protect the roof from the side wind. Self-tapping screws in the place of docking screwed into the crest of the shy wave just below the stamping line. First of all, tighten the longitudinal joints.
- Docking "by rows" with fastening self-drawing in every wave.
- Regardless of how much the roof is geometrically complicated, all sheets of metal tiles are aligned strictly along the cornice line with a sink of 45-50mm. The jammed sheets should be first combined, only slightly "grabbing" the top edge of each to the crate with one self-tapping screw. Just make sure that the remaining screws should be screwed onto the correct imposition of the rectangle, and finally fasten the docked row.

For use roofing screws with EPDM gasket and protective layer standard sizes 4.8x28mm. Screwing produce in places of adjacent sheet to the crate to the base of the wave perpendicular to the crate to the state of a slightly compressed gasket, the steel chips is removed with a brush with a soft bristle.
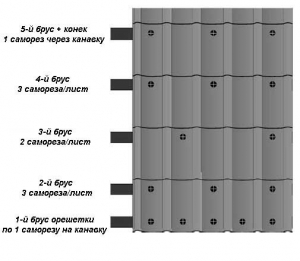
To the initial strip of the craters, the sheets are attached to the step through the wave, and to the subsequent obresitam - through a longitudinal wave into each second transverse as close to the stamping line. Sheets from the end board are attached to each wave. The skate bar is fixed to the metal tile in the crest of the wave with self-draws in 800mm increments.
The thickening point formed during the docking dock is removed either cutting off part of the angle, or a slightly rectifting the capillary groove.
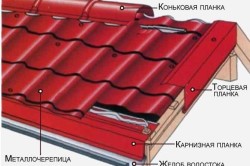
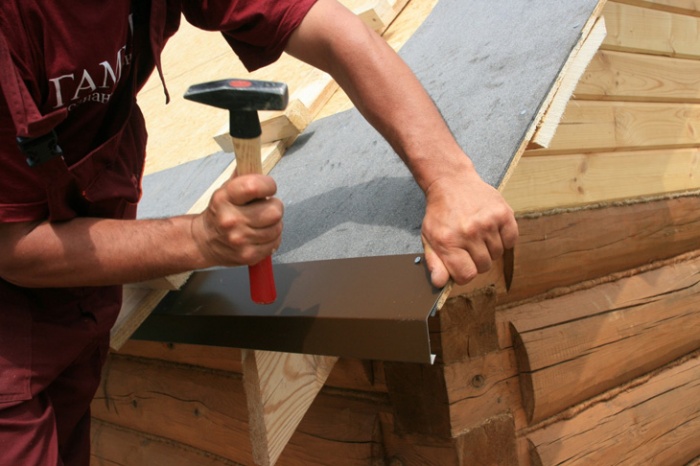
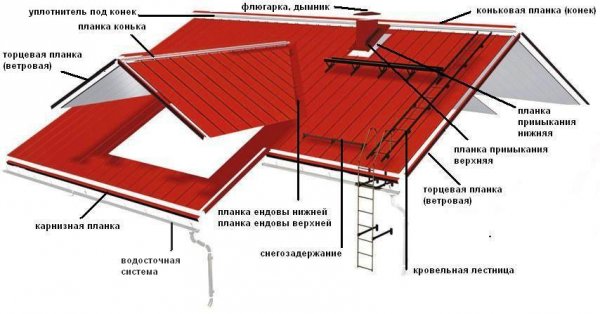
Installation of the end plank, upper endand and adjoining layers
The waterproofing layer is placed on the end board, and its edge is closed by an end plate, which is attached to the end board with self-draws from the cornice to the skate in 350mm with an adhesion.
The end plank is attached to overlapping the top of the wave ridge. If in the installation process it turned out that the bottom comb came to the frontton, you can adjust the edges of the sheet up.
By installing the upper end, observe the basic rule - the screws are screwed in such a way as to eliminate their passage through the middle of the lower end. Otherwise, the waterproofing layer will be broken. Between the ending (adjoining plates) and metal tile laid a self-insulating seal.
Installation of the skim plank and snowmobile
The waterproofing layer along the entire adjoint space should have a gap of at least 50mm for unhindered moisture evaporation. In the places of point ventilation holes, the seal will be launched. Mount the skate bar should be 100mm from the end to the end face planks With the front of the edge of 20-30 mm by mounting into the upper comb and the crate through the wave. To avoid strangling snow under the horse between sheets, the metal tile and the ridge bar is installed auction, and the ends are closed with plugs.
The installation of the roof of the metal tile is completed, remove the soft brush of the construction trash and process the sections of the sections and scratches using the paint from the canister. After 3 months of operation of the roof, check the condition of the screws, if necessary, tighten the separated.
Reliable and durable roof is a prerequisite for trouble-free operation of any building or structure, whether it is a residential building or an industrial object. One of the most widely used roofing options in last years Steel metal tile. This is not surprising and easily explained - the material has excellent operational and aesthetic characteristics, it has long been applied and has already been used and has already managed to establish itself in practice.
Metal tile - Description and properties
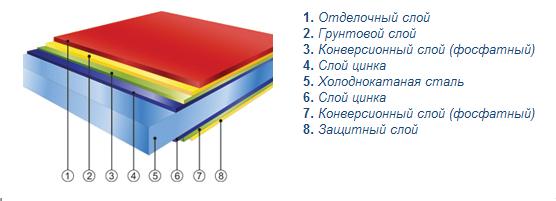
Metal tile is a modern roofing material that is usually manufactured from galvanized steel sheet by applying a polymer coating and giving a form resembling natural tile.
Each layer of the resulting material gives him certain properties:
- steel sheet (copper and aluminum can also be used). Determines the strength characteristics and the carrying capacity of the material. Metal tile from steel is more durable, in turn, from copper or aluminum has high corrosion resistance;
- protective metallic coating (most often used zinc, much less - zincaluminine, iron-zinc and other species). Increases the resistance of material to corrosion, which is especially important when used as the base of steel;
- decorative protective coating of polymers (polyester, polyurethane, acrylate and other species). Even more increase the material resistance to various aggressive factors, and also give metal cholesterol appearance. It can be performed in a practically any color variant and the most different textures (from glossy coating to a matte surface).
Despite the fact that the metal tile refers to modern building materials, it appeared and is used relatively long ago, therefore the sufficient experience of its use has been accumulated, which has proven the high performance characteristics of the material.
Advantages and disadvantages of metal tile
The widespread use of the material is due to the whole number of advantages available:
- the low weight of the material with high strength and bearing capacity;
- ease of technology of device and repair of the roof of metal tile;
- the ability to select various colors and types of material profiles;
- environmental friendliness;
- the ability to perform the reconstruction of the coating from the material under consideration without dismantling the old one;
- low cost of works on the roofing device;
- the ability to perform roofing works using metal tile almost at any temperature, including negative.

Like any construction materialThe use of metal tile does not cost without some of the shortcomings:
- a large overrun of the material when the device is complex in the form of a roof;
- high level of noise published by material, with strong wind and rain;
- low resistance to corrosion in places damage to the protective layer;
- the need for a special tool in the production of work on the roof coating device from metal tile;
- high thermal conductivity of metal tile;
- the dependence of the reliability of the roofing coating from the quality of the used sealer under the self-tapping screw.
Despite certain disadvantages, the metal tile is considered to be high-quality and reliable roofing material.
Steps of the device of the roof of metal tile
Installation of the roof of metal tile consists of several consistently performed steps of work. But before their start, you should study how to use and process the material.
Rules for work with metal tile
When working with metal tiles, loading and unloading operations should be accurately and carefully and carefully, not allowing the material to get into or damaged its protective coating.
When the coating is contaminated, only non-aggressive detergents should be used. It is also not allowed to use abrasive compositions.
If necessary, cutting metal tiles it is made by manual electric copier, with metal or special scissors. The chips appeared is removed with a soft brush. In places of section, where the bare surface of the metal is present, anticorrosive composition is performed.
Control measurements
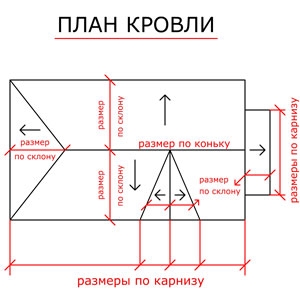
This type of measurement is made after the installation of the rafting system. Their goal is to check the correspondence of the actual sizes of the skate, since they often can be deviated from the projected. In general, the overall rectangular roof form should be held, deviations are allowed not more than 1 cm - they can be hidden through the use of volunteers.
Important size - the length of the skate or the distance from the roof of the roof until the end of the cornice sweep. It defines the number of sheets used on the skate. If the slope has a length of more than 7 meters, it is necessary to divide the sheet into several parts and put the minimum of two elements, necessarily the flashes (its value is 10-15 cm).
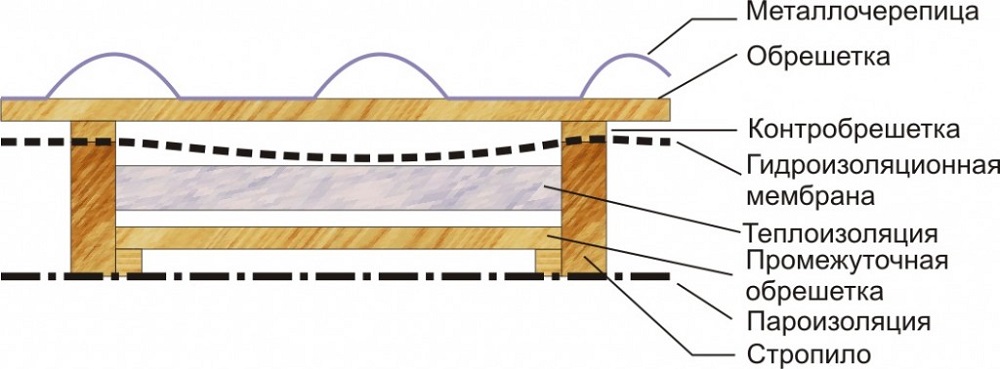
Device of crates and hydrocker
One of required conditions For normal operation, the roof of the metal tile is good ventilation of the undercase. Therefore, usually the roof design provides for the execution of both crates and counterclaims.

Between the sheets of metal springs and rafters over the insulation, it is necessary to put an anti-condensate film that performs the role of the hydrober. It is most often located parallel to the eternity, a little residual between individual rafters. The purpose of the anti-condensate waterproofing film is to skip water vapor, without allowing it to accumulate it in the insulation.
On top of the film in the direction along the established rafters are fixed by conventional nails of bars a counterbalable. Their section is usually taken equal to 40 * 25 mm. Directly above the counterclaims are attached the most ordinary laminating lamps. The step of the mounted timber must be equal to the stamp of the material profile. The board laying on the cornice is usually performed somewhat thicker (by 10-15 cm) than the rest.
Should not forget that all wooden designs The roofs should be treated with special antiseptic compositions. This will avoid the appearance of fungi and insect pests.
Installation of endanda and cornice
The device of any roof from metal tile is mandatory provides not only the protection of the material from the moisture in the form of condensate from the bottom side of the roofing coating, but also from precipitation. Especially they are dangerous for the crate located at the bottom of the design. For its protection, the roof design provides a device for a special cornice plank. It is a few ordinary wooden boards that are nailed to the brush of the brackets of the brass one to the other. Nails with galvanized coating are used for operation, the distance between them should not exceed 0.3 meters. On top of the resulting design and attached farmery Planck.
Another section of the roof, in need of additional protection, is the place of clutch. It should be located on top of a pre-mounted cornice bar with its lower edge. To fill the possible gap between the elements, any porous sealing material is used.

Installation of the ending of it is performed after installing the main roofing coating of metal tile. The pad must be fixed in top Profile nails with galvanized coating, and the distance between neighboring should be from 30 to 50 cm.
Installation of the ending of the Endament gives the roof of the finished view.
Metal tile coating device
After execution preparatory work In the form of laying the waterproofing anti-condensate film, devices of the crate and the cornice bar, should be proceed directly to the roof coating device from metal tile. Works begin with one of the ends, while it is necessary to take into account the following:
- if the installation of the material is carried out on the left side, each new metal tile sheet is mounted under the extreme wave of the previous one;
- if the installation of the material is carried out on the right side, each new metal tile sheet is mounted on top of the previous one.
Despite the bulky description, in practice it looks simple and understandable.
If a tent roof is performed, the metal tile installation starts from the middle of the selected skate, and the installation is evenly performed in both directions.
Another laying rule: the capillary groove, which is available on each sheet, must be overlapped with the surface of the following. In order for the coating to be smooth and attractive, it is aligned according to the existing cornice bar.
Applied fasteners
From the point of view of the technology used, the roofing device from the metal tile does not represent a special difficulty and can well be done with their own hands. Nevertheless, some points that should be taken into account are present. As noted above, the reliability and durability of the roof covering largely depends on the fastener used:
- the fixing sheets of the material of the tapping screw should be located in the break of the waves;
- they should be screwed into the direction that is strictly perpendicular to the location of the bars of the crates (this is necessary for the maximum dense pressing of the washer, which avoids the possibility of leakage at the fastening site);
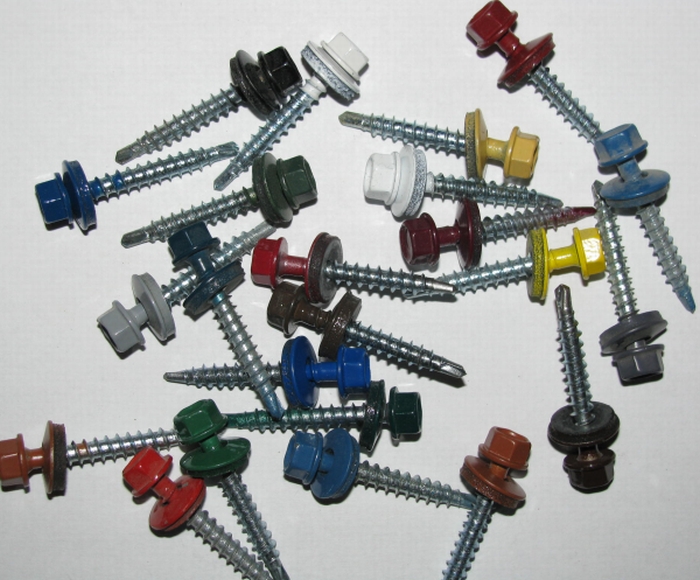
- only such tapping screws can be used, which are equipped with a specially provided by the sealing washer.
The consumption of fasteners is usually small and is 6-8 pieces per square meter of roof coating from metal tile.
Device skate
Installation of the skate is an important element of the structure that provides not only reliable waterproofing of the coating obtained, but also the necessary ventilation of the space under the roof. It should be borne in mind that the sheets of metal tiles should not adjust one to the other on the skate, there must be a sufficient gap.
The fastening of the ski bar is performed already mentioned above the screws, which are screwed through the wave in their vertex. The edges of the sheets of metal tiles in the hub of the skate are covered with a special sealing tape.
In the case of a device of a more complex tent roof of a metal tile, where the semicircular design of the skate is provided, as a rule, it is much easier to apply special chalk elements in the form of a plug for a tent roof or a simplifted overlay.
Putting from metal tile
Most of the roofing coating from metal tile is quite simple. Some difficulty represent the adjustment of the material to the vertical surfaces of the roof structures - walls or pipes. These sites should be paid to extremely close attention, as they require the use of special technology.
It implies the insulation of the coating coverage zone with the vertical surface of the adjoining bar and a special seal, usually self-adhesive. It is also recommended to additionally perform sealing with sealant.
After performing work on the adjustment device, the design of an internal apron should be obtained (it is formed by the bottom planks of the adjacent used). Then the so-called tie and sidebar is made, with which the water is removed to the eaves or in the end.
As a rule, a device of an external apron is also performed, which form the upper strips of the adjoining, and their edges are attached to the wall or surface of the pipe.
Device coating from metal tile in places of roofing
The roof breaks also represent a certain complexity in the production of work on the roof coating device from metal tile. By analogy with the adjunctions, additional special elements of the roof should be used in such cases. With an external breakfast, a cornice bar is applied, a seal must be glued between the sheet metal tile and it. In the inner break, the adjoining plank is used, also mentioned above. It must be mounted on the seal.
Installation of the drain system
The drainage system is used to remove rain and melt water from the roof in such a way as to prevent them from entering the facade, the breakdown or the foundation of the building. This work is performed on the usual technology, which uses the metal tile as the roof coating does not affect anyone.
Installation of snowstores
Snowflowers are used to prevent the snow gathering in some places (for example, above entrance doors) And to protect the drain system. The plank, envisaged by the syntheoreholders design, is installed using long self-tapping screws that screwed through the wave into its vertex. In principle, the installation of snowstores is also produced, in general, by ordinary technology, which does not depend on the material used as a coating.
Beautiful, reliable and durable roof covering is not so difficult if the metal tile is installed. Of course, this work is better to entrust a professional, but also with your own hands with proper efforts to fulfill it possible, the main thing is to know the technology of installation, which will be described below.
General rules for installation
In order to achieve positive result You need to check how the resulting "skeleton" of the roof corresponds to the project. In this case, it is desirable to check the correctness of the sizes, and if defects are detected, then correct them. One of the simplest options is to perform measurements of diagonals of the skates. If the numbers differ, it says about a small precos. If it is impossible to eliminate the skew laying, you need to make it so that the tile line coincides with the bottom edge of the crate.
Before laying metal tile, it is advisable to make sure that minimum corner tilt slopes is more than 14 degrees, and old roofing It was completely removed.
Holding the gutters of the drainage is made using special hooks that must be installed before starting roofing. Fixing fixation is carried out only with galvanized screws.
Installation of individual roofing elements is reached from below, and to prevent moisture seepage into thermal insulation material use waterproofing. From the residential premises to the roof the warm air, carrying a pair of water, protect from which only vaporizolation will help.
How to handle with metal tile
Metal tile is quite highly durable, but only as roofing material. When it is transported and installed, specific rules should be followed:
- Installation instructions The metal tile recommends that the loading and unloading of this material is very careful, and also ensure that its surface does not receive mechanical damage during the transportation process.
- Material transfer is made in dense mittens. Keep sheets follows the length of the edges. Cutting Metal tiles must be performed with hacksaw, special scissors or electric copies. In the latter case, a tool having carbide teeth will be required.
For cutting sheets, it is forbidden to use an angular grinding machine using abrasive discs.
- Before fixing metal tile, you need to check the protective layer. If there are defects, they need to be treated with special paint. This will protect the metal from corrosion. Exactly the same operation is performed at the location of the cut.
- During work with metal, as well as when cutting sheets, metal chips is formed. It is possible to remove it only with a soft brush, since other options will cause damage to the protective layer, exposing the metal. Surface pollution needs to be removed using a non-aggressive agent, and solvent-based substances, on the contrary, is not recommended to be applied. Similarly, things are concluded with abrasive compositions that can easily damage the thin layer of the protective coating.
- It is necessary to clean the metal roof without using scrap, scrapers or snow shovels that can damage the roofing material, and therefore reduce the service life of the entire coating.
- Installation instructions Metal tiles implies the use of soft shoes during work. When moving on profiled sheets, it is necessary to occur only to the breaks of the waves, under which there is a wooden bar. On the ridges to transfer weight is not recommended, as this will lead to the deformation of the material.
How to use selflessness
The first thing to be noted is the way of installation. Self-tapping screws are firmly, but so that they are only partially pressed into the sealing gasket. The attachments themselves are installed in the deflection of each wave around the perimeter of the skate, after which the sheets are fixed to the brush of the crates so that the screws are arranged in a chess order.
In the usual case, the screws should be located strictly vertically to evenly press the seal, but in the places of the adhesion it is allowed to screw them at an angle, as it makes it stronger to pull the sheets to each other.
Installation instructions Metal tiles implies consumption of up to 8 self-samples on M2, and more than 3 sams for the meter will be required for the attachment of accessories. All fasteners should be made of galvanized steel and have a special washer with sealing material. Otherwise, moisture penetration inside may occur roofing cakeWhat will lead to corrosion of metal sheets. Obviously, the service life of the roof will significantly decrease and the strength of the fastening of sheets will be not too high.
For fastening accessories, transverse waves are chosen and a step of at least 35 cm. Self-tapping screws are best twisted using a drill or a screwdriver at a low rotation speed.
Scattering sheets
This operation is performed before putting metal tile. The length of the sheets is selected based on the length of the skates. When there are protrusions, it is necessary to take into account the pitch of sheets, otherwise it may not coincide the tile pattern in the transition sites.
For stepped rods, the length of which is more than 6 meters, you can use sheets of different sizes. When it is made on the slope, then you need to consider the length of the adhesion, which is 13 cm. In the event that a larger size is required, it needs to be discussed with the supplier.
When type 1/1025 sheets are used (the second digit shows a useful width, expressed in mm), it is necessary to take into account the presence of an additional bend, which not only prevents the sprawling of the edges of the sheets, but also simplifies the installation. This circumstance is of interest when a tile is ordered, having a different length, for mounting on one slot. For the roofs of a complex configuration, the installation instructions for metal tile requires a thorough measurement. Only after it can be processed to the calculation of the number of sheets.
It is easy to calculate it: the entire length of the eaves is divided into a useful width of one sheet, for example, 1025 mm, after which they are rounded to an integer in a large side. Then multiply the result on the number of skates. It should be noted that the useful width of the sheet, located on the edge, is selected equal to its full width.
When you need to cover the tent roof, it should be remembered that the trimming of the metal sheet cannot be used on the adjacent skate, as they have a cross-corrugated pattern.
Creating waterproofing
If you ask about the roofing device for those who know how to put metal tile, they will certainly say that in addition to the coating itself, it is necessary to ensure the protection of the cold. For this purpose, a complex insulation is used, but the properties of this material are significantly reduced at moisture, so it is necessary to create reliable protection against moisture. It is performed by a two-layer, and the waterproofing is performed on top, and vaporizolation is below.
It is obvious from the drawing that it is waterproofing that allows you to delay the condensate that flows or evaporates, and does not settle on the roof structures. The material canvases spread overlap, starting with a cornese swell. The overlap value is usually 15 cm.
The material does not need to tighten between the rafters. Better if it will hang 2..3 cm below the level carrier structures. On both sides of the skate, it is necessary to stretch at least 15 cm of the film into the inflection.
Mounting technology The metal tile suggests that in the area of \u200b\u200bthe cornice, the insulation material is stacked so that the accumulated condensate can not get on the structures of the roof, and the air flow, on the contrary, easily approached the top of the floor. Near the frontal fiber, the film is placed at a distance of 20 cm from the extreme point of the wall design. After completion of the installation of waterproofing cloth, the lamp is installed. It is nailed over top of the material and is recruited from boards with a cross section of more than 32x50 millimeters.
Ventilation arrangement
Ventilation is another important element The right roof. It avoids the occurrence of rotting even if the elements of the structures were not processed by antiseptics, because due to the strong air current, the entire condensate evaporates from the surface of the waterproofing material.
Installation instructions Metal tiles implies the creation of a counterclaim due to the use of bars navigable over rafters. This is a counterclaim, which is just creating a clearance required for air between the elements of the crate and the waterproofing material, stretched over the rafted. Wet air passes through the underpants space and removes ventilation in the roof. When the horse has a simple form and does not assume the installation of any device, the air flow can go through the face of the shaped skate.
The internal structure of the eaves should be performed so as to allow air to be free to pass into the underlining ventilation gap. The thermal insulation material is recommended to be laid on the skates before the skate, and the waterproofing can not be made to the skate, leaving the gap of 10 cm. So that in this place the moisture does not hit the heat insulation, the metal tile installation is made using ventilation skate or, the "top roll" skate.
The height of the ventilation gap is worth choosing in the range of 5-10 cm.
Installation of crates
As clearly from the previous point, the lamp is stacked on top of the thick rail (counter tests) intended to ensure the smooth air passage under the roofing layer. In the process of creating the crate, you need to adhere to certain rules:
- Choose the thickness of the boards and the type of fastening elements, taking into account the height of the tile profiles. Of particular importance should be reversed on the fastener length in the case when the installation is made in the peaks of the waves.
- The minimum cross-section of the boards usually choose at least 32x100 millimeters.
- The board, which goes on the cornice, should be thicker than the rest. In the case when the tile installation of types 2 and 3 is planned, then exceeding should be 1 cm, and for type 1 - 1.5 cm.
- Those who know how to put metal tile are trying to ensure that the step is multiple the size of the sheet. The fastening of the entire design is made to the rafters using nails 2.8x75 mm, and their consumption must be 2 pieces per 1 crossing.
In the event that it is planned to use through the roof outlets, such as fire hatch, a ventilation farm, or a chimney pipe, then you need to make an additional strengthening of the design in these places.
How to lay finish coating
The first thing to be noted, speaking about laying such a material is its fragility. It is easy enough to damage, so it is better to move on laid sheets very carefully. It is necessary to attack in the deflection of the waves where the crate is under the metal.
The capillary grooves of the previous sheet should be covered as follows, and the laying of the material can begin with any edge of the roof. Installation instructions Metal tiles recommends when mounting the coating from the right roof edge to lay the beginning of a new sheet under one of the previous waves (i.e., the capillary grooves will always be right).
This installation simplifies the assembly of roofing and avoids the location of the last sheet due to transverse corrugation.
Materials need to be placed along the cornice line so that he performs 4-5 cm. Before starting work, it is necessary to push the first sheet on the self-tapping screw, which is screwed into the brain of the wave of the skate. After that, the second sheet is stacked. Then you need to make sure that all the folds are knocked correctly, and the lower edge of the sheet forms a flat line. Fixation of sheets is made in the place of the allen with the help of self-tapping screws, as shown above.
It must be remembered that the fixation is possible only after at least 3-4 sheets are implanted and bonded between themselves, after which they are aligned along the cord along the cornice.
The following sheets are mounted as follows: First, fastening to the previous sheet, and then to the crate.
Hidden fasteners
Those who know how to put metal tile can be used and a coating having hidden fasteners. Such material also requires the use of self-tapping screws that are equipped with a press washer. It is worth noting that the fastening elements themselves will not be visible, so here you can use ordinary galvanized sheets that may not be painted.
The main difference when using this technology is that the holes in the roof do not need to be performed, since the screws in the already existing one screws. The connection of the sheets is made by applying grooves and mounting protrusions to be located at the edges. Self-tapping screws are hidden by the following sheet, etc. This embodiment allows you to create a reliable and hermetic coating, which is no inferior to the roof, the installation of which was made in the traditional way.
Mounting karnis
You need to know and how to put metal tile on the cornices, as the installation technology in these places has several differences. It has already been mentioned above that the edge of the sheet should be abroad the cornisic plank. This is done so that the water falls from the roof straight into the drainage chute.
The extreme bar is thicker not just like that. It is these 15 mm that allow it to withstand a higher load and not to be fed.
Fastening sheets on the eaves is made through one wave, and the attachment nodes are located along the cornice line. Usually they are located 7 cm above stamping. If it turns out of the extreme line of stamping, it turns out at a distance of more than 13 cm, then an additional steering board is mounted having an enlarged thickness.
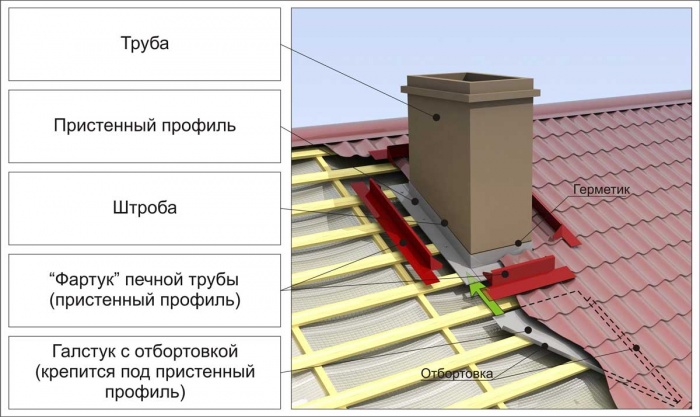
How to fix metal tile around pipes
When it is required to bypass the vertical obstacle, then you need to make water flowing down on the skates, intercepted and accredited an obstacle.
If you plan to stack the walls of the pipe, then do it before performing roofing work.
The pipe is surrounded by the shellboats so that the coating is solid. After that, the sheets adjacent to the sides of the sides must be trimmed at a distance of 15 cm from the side of the pipe, which is addressed to the skate.
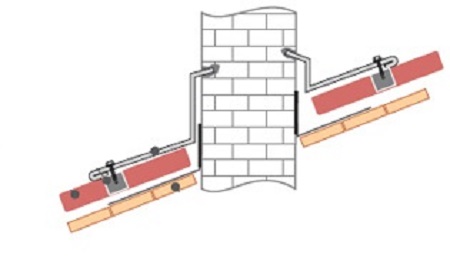
The resample itself is performed above the stamping line by about 8 cm, after which the apron is embarked on.
First of all, the layout of the adjoining line is made for the lower plank, which should be higher than the metal tile by 15 cm. Then the pipe is then performed using a grinder and the bottom plank is mounted. When it is installed, the side is placed, after which the lower apron closes the roofing sheets.
Installation instructions Metal tiles makes aligning the edges of the sheets with the help of a queen. This will allow the apron to lie down more smoothly.
The upper part of the apron is performed so that it goes beyond the line of the sheets, adjacent to the pipe for 20 cm. This element is obtained with a pointing upwards, and all its constituents are connected by the rules adopted when performing tin works.
The most common mistakes
Despite the fact that this section is placed almost at the end of the article, it cannot be underestimated, since the information provided here is no less important than all of the foregoing. The main problem of beginner roofers is fasteners. High-quality metal tile can last and 50 years old, but the usual fastener will hand over the position much earlier, so you need to choose only those samphs that are intended for use with metal tile.
Those who do not know how to lay metal tile can purchase self-tapping screws with a washer from ordinary rubber instead of the ethylene propylene rubber seal. Rubber cracks and the compound will lose hermetically, so the quality of the coating will fall much.
Mounting at the top point is possible, but not in the case of a metal tile, because in such a situation it is difficult to ensure reliable adjacent of the seal. On the other hand, if you strongly tighten the screws, you can easily refill the metal.
By summing up, you need to say that it is sufficient enough detailed instructions On the installation of metal tile, which will even allow a non-specialist to quickly understand the question. If some moments seemed unclear, then you can explore other articles posted on our website.
Okeekhet
To reliably fix the roofing coating, a solid and reliable crate will be prepared. It consists of wooden boards, determines the roof downstream. For optimal discharge of precipitation, it is recommended to install a rafter with an angle of more than 14-15 degrees. Between three extreme boards, you need to install additional jumpers. This will make it possible to give the design of the two-tie roof a greater strength and protect from strong busting winds.
The next step is to lay a pair-hydrochloric material. Pretty well established a vaporizolation of the isospan. The material makes it possible to conduct a really high-quality installation of the roof of metal tile, excluding the accumulation of moisture under the roof and the destruction of wood elements.
Before mounting, the counterbalax should prepare the brucks and boards used. It will be necessary to cover the elements by an antiseptic to maximize the extension of the service life. Then bars are attached directly to the rafters.
Step-by-step installation instructions Metal tile
Starting metal tiles after installing brackets. They are set under the level, attached to the bottom board.
A gutter is installed on the brackets, a dropper is mounted.
The droplet closes with waterproofing.
1. The first sheet of metal terrain rises (the work begins with the edge), fixed at the top.
2. Sheet screw is performed to boards with roofing screws (along the entire length and width).
3. The second sheet is carried out, it is superimposed on the first (enough adhesion to 1 lane). Fixed in the same way.
4. Laying the remaining sheets, up to the edge of the roof.
5. Work on a similar instruction is performed for the second side of the roof.
The next step is to install the skate.
For its level location, it is necessary to pull the thread between the frontones.
Completion of work
In addition to the information on how to mount the roof of metal tile, the Contractor must remember the need to high-quality closure of the end walls of the roof. To work, you will need to use OSB plates. They have a slight weight and are optimally suitable for construction. frame house. Mount the plates are necessary on the inside - attic room.
Initially, the Contractor will need to be measured and make marking on the stove, according to which it will be crossed. First of all, the lateral parts of the triangular form are harvested. After their installation, fitting the bottom and upper part. It is important to take into account that in the attic you need to leave a hole for the subsequent installation of the window. As soon as the last parts of the plates are installed, the assembly of the two-tie roof is completed. For a detailed study of all the stages described, starting from the fastening of the insulating layer and until the closing of the end walls, it is recommended to further view the included photos and video tips.
Metal tile is a roofing material having a form of profiled steel sheets with a polymer coating. It is used to cover the roofs with an angle of more than 14 degrees.
Externally it looks like a classic ceramic tileBut superior to its reliability and ease of installation. In this article, we considered what is better?
Material sustainable To temperature drops and other negative climatic influences. Its main disadvantage is low sound insulation featuresBut it is eliminated with the right job.
In this article you will learn how to make a roof of metal tile with your own hands, step by step from A to Z. If you do not know how to choose a metal tile, then.
This stage of work should pay special attention, since it will be on the crate. Also, this design provides natural inner roofing space.
- Metal troops made from wooden bar . The mutual location of the boards can be solid and shutty.
- Most often used robust structuresAt the same time, the distance between the boards () is strictly tied to the distance between the lower depressions of the tile waves, as in these places the material has the greatest strength.
- Distance Between the first two bars from the side of the skate must be approximately at 70 centimeters less than the set step.
- The minimum thickness and width of the bracket for the crate make up 25 and 100 mm respectively.
- The width of the board for the counterclaim can be two times less. The first side of the roof of the roof should be the thicker of all the rest by 15-20 mm.
NOTE!
Boards pre- calibrate One size in order to avoid the occurrence in the future distortion and irregularities in the location of the tile.
STEP of the crate
Installation of construction is carried out after Completion. The main income is attached to a counterclaim, which is associated with a rafter frame of self-drawing. At the ridge of the roof under metal tile put additional supporting boards.
Calculation of metal tileage
Count The required amount of material for the construction of the roof is done so (or use):
When counting the number of sheets in the row you need to keep in mind the value overweightwhich can reach 15-20 centimeters.
To ensure that it is better to avoid a lack of material, it is better to round all the values \u200b\u200bin the most side.
Calculation of roof
Roofing of metal tile: Waterproofing and vaporizoation
Before starting to install metal tiles with your own hands, you should take care of isolation . Protection Internal liquid spaces Provided by layers of vapor barrier and waterproofing.
Waterproofing is located between the rafters and the counterclaim and does not allow moisture in the inside of the roofing cake from ambient. Self common moisture protection materials - These are polyethylene and reinforced films. They are tensioned throughout the area of \u200b\u200bthe skate with a slight savory. It is important to ensure that the waterproofing does not intersect with thermal insulation.
Roofing pie
Parosolation is a protective layer, not missing inner space Roof moistureformed in rooms. This is the lowest layer of roofing pie, it is under rafters (it is attached to them) and thermal insulation, thereby ensuring its protection against condensate.
The roof of the metal tile must necessarily be qualitatively vaporized, in cold roofs without insulation, the installation of vaporizolation is not mandatory.
Required tools and equipment
The roof covering with metal tile begins with preparation required tools . For mounting the roof from metal tile, you will need:
- Screwdriver.
- Rail.
- Scissors for metal or other devices for cutting metal, for example, high scissors, disk saw, etc.
- Building stapler.
- Roulette and marker.
- The components of the roof and roofing cake: tiled sheets, screws, hydro, vapor-and thermal insulation materials, brushes for crate and rafters.
NOTE!
When working with tiles you can not use Bulgark And other abrasive cutting tools, as it disrupts the structure of the sheet.
Mounting and laying Metal tile - step by step
 How to cover the roof of metal tile with your own hands? Metal tile on a self-tapping screw with a gasket from ethylene-propylene rubber, which provides waterproofing plots of fasteners.
If a tile is mounted with a hidden fastening, then galvanized screws are used with a press washer.
Self-tapping screws need to be twisted with optimal force.
If the fastening force is insufficientThe moisture will fall under the hat and cause it corrosion. If the screws are tightened too much, the gasket is deformed that it will break its tightness.
- Before covering the roof of metal tile, make sure that the symmetry and reliability of the crate.
- Selfless screw in the bottom of the roof tiles, They should be strictly perpendicular to the plane of the shell boards.
- When connecting two overweights fastening is carried out in wave lifts Using shortened screws.
- Installation of tiles begins with the lower left corner of the skate, subsequent sheets are stacked on top previous.
- Selfless screw to each wave of tiles around the perimeter of the skate and in a checkerboard order In the inner fields. If a screwdriver is used for this, then it is necessary to minimize its rotational effect on the material.
Metal tile - installation with your own hands + instruction
Now you know how to put metal tile and we suggest you familiarize yourself with the most important thing - instruction On the installation of metal tile.
Installation Metal tile - Step-by-step instructions
How to cover the roof of metal tile with your own hands? The first step is.
It is on it that all other elements of the roof will be fixed. 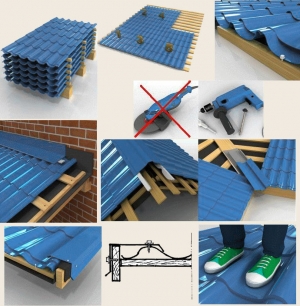 The system is constructed from wooden beams, wherein their size exceeds the dimensions of the bars of the crate.
The most important elements of the rafter are:
- Mauerlat.. This is a point of support design.
- Stropile legs. They hold on themselves and rest on Maurylalat.
- Stands. Strengthen the support of the rafter feet.
Fastening rafters to the wall is carried out using the so-called shoe. These are strips of metal that bind two structures with nails or self-drawing.
Next are set basic insulating layers: insulation, steam and waterproofing. Waterproofing film or membrane is superimposed on slinge system And fastens with her stapler. Thermal insulation is located in cellsFormed by the intersections of rafting beams, and is fixed using the striking currency in the lower plane of the rafter.
Installing timing
After completing the installation of protective structures, it is possible to start installing the crate to which, in the consequence, we will lay the roofing coating. She is superimposed on top of the rafter and waterproofing layer And attached to the screws to these structures.
Installation of metal tiles do it yourself:
- Farmeter boards attached to the frontal board, protecting roofing from wind exposure.
- When performing work, the need to ensure good natural ventilation of space is always taken into account. To do this, leave the gaps between all layers of roofing cake. The basis of natural ventilation is the possibility of free air circulation under the rod of the roof.
- The last step is installation of metal tileage. Need to take into account that sheets should protrude Beyond the edges of the crate on 5 centimeters and aligned horizontally on the cornisa line.
- Sking Planck Attached on additional two boardswhich are installed at the joints of two skates when installing the crate. Such measures are needed to ensure additional sustainability of an important constructive element to negative impacts.
metal tile painting scheme
- . They break the snow masses coming from the roof, making them fall relatively safe for building designs and for humans.
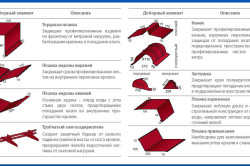
- Planks of adjoins. These products are framed by tile joints with all important designs, such as chimnery and ventilation pipes.
- Corners and endanda. They protect all the angular structures of the roof.
- Films. Used to redirect the streams of rain and melt water.
Doborny elements
- Distance between the beams of the rafter frame should not be more 60-90 centimetersotherwise the design of the roof can seek.
- When performing work, you need to wear shoes on soft sole And move along the tile, coming in its lower deflection. This will prevent the material to prevent the material.
- The absence of contacts between protective layers is important not only to ensure ventilation, but to prevent them mechanical damage With friction.
- To ensure additional ventilation can be equipped hearing windows In the attic room.
- For a smooth installation of all oblong challenges need to stretch thread and fix it between two already installed structures.
This is how the technology of laying metal tile on the roof looks. This material It has approximate service life of about 50 yearsBut without the need for repair work, the operation will take place only with the correct installation of the installation.
Useful video
Laying Metal tile with your own hands in video format:


