How to enjoy a wagon steam room, if the time of centuries the tree was the basis of the bath interior. Our ancestors used it for construction and as finishing material, without thinking, what lining to choose for the wage and how to mount it correctly.
Return to the wood is not tribute to tradition, although it's not entirely true to talk about return, the wood has never been in oblivion. The use of wood in the bath is not only economically justified, but also natural from the point of view of availability and a small cost.
Running the molding with your own hands is quite real and does not require much work. The desired result is obtained at proper choice Material and high-quality attachment.
Factors affecting the duration of operation
So:
- Long service life is provided by the wood breed, from which the lifting wagon is performed by the wagon and its quality. Here you can note the deciduous rocks to which the aspen belongs, Lipa (see), Alder, less often oak.
They have a lot of advantages, and since the density of the wood in these breeds is very high, they quickly heat up and keep warm well. The only minus marked by the practice is the acquisition of dark color from high temperature and humidity. - The coniferous tree of the tree in the steam room is not allowed, but in the plating department, it will be happy to please their owners.
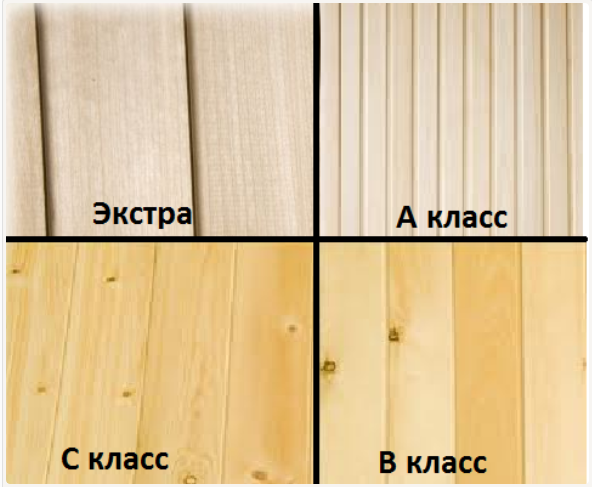
- Wood class or its backstage determine the duration of the service. Extramanent "Extra", "A", "B", "C". The first three varieties belong to the highest quality products, the lining of the wagon steam is carried out by these materials.
On their surface there are practically no bitch or places where they could be. Lining with bitch cracks in the process of operation. - You can not get around the attention of such an important factor in finishes, as a way of installation. There is a natural question, how to fix the liner in the steam room correctly, if the vertical installation of panels is presented on some photos, on the other horizontal, on the third in general, it looks beautifully on the diagonal and everywhere.
Why use the lining on a log wall
Than better finish The wagon steam wage, if the Russian bath has always been famous for a wet steam and bare slab without an additional trim. The technology of obtaining steam in the steam room is quite simple, the walls are made by massive, hygroscopic and heatwise.
Eminent artists depicted pairs with impressive in their paintings, the chicness of the bath was determined in the thickness of the church. First, the log house accumulates moisture, absorbing it, and then evenly and gradually gives.
So:
- This design has a significant minus, with whom not one owner of the bath, trying to protrude the bath in the cold season before obtaining the desired temperature.
- Wet tree mass warms up at least 4 hours winter timeNow imagine how much firewood need, and the logs themselves, with such an operation, will serve a little.
- If in the last century the tree was one of the cheap and affordable building materialswhich no one regretted, now the situation has changed much.
- The modern building of the bath does not work out without a wagon finish finish with the task of reducing the battery protest time to one hour, which will significantly reduce the flow of heat.
ATTENTION: To obtain the desired effect, the mass of the tree decreases to 1 cm of the lining, but under it there is a foil and insulation.
- To say that this is the limit of dreams of the owners of the bath. Indeed, it is easy to protrude this steam room, the consumption of firewood is small.
- But the room cools much faster than we would like, the fuel is put into the oven constantly to get the desired temperature of the Russian bath. The walls do not accumulate steam in the right quantities, it is created by steam generators or expensive furnaces. This process cannot be left unattended, it must be constantly monitored.
- High-quality lining for the wage "Breathe" together with the walls of the bath (see).
- It does not give to appear condensate and develop fungi, adjusting the humidity in the bath.
- The advantages of the lining include its durability.
- It does not rot and easily processed.
- It has warm and sound insulation, has aesthetic appearance and environmental purity.
- Finishing the wagon wagon provides an opportunity to get a surface without flaws. Under it you can hide irregularities, cracks, wires of electrical wiring.
- Here you have to add a little refinement that the lining was done in the "quarter" and "spool", but the rails shifted one relative to the second and the density of the joints was broken. Today, the construction market is filled with lining with the "Comb / Groove" profile.
Preparation and execution of work on the trim
Listening to the opinion of the experienced baths, each bath owner determines the steam room for himself to get a certain effect.
So:
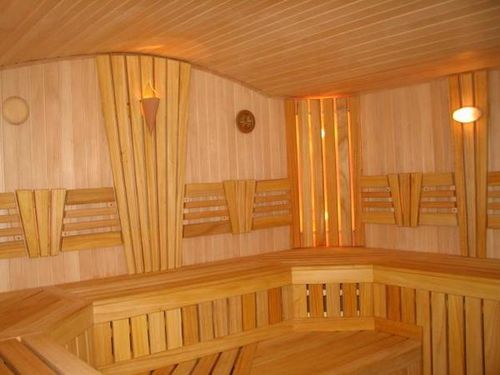
- The vertical location of the lining affects the durability of the boards. The temperature difference below and at the top completely different, which is negatively reflected on the service life of the products.
The vertical location of the lining is indispensable in the baths with dry air and high temperature, that is, working in the sauna mode. They are practically no water, so wood does not change its appearance And does not darken.
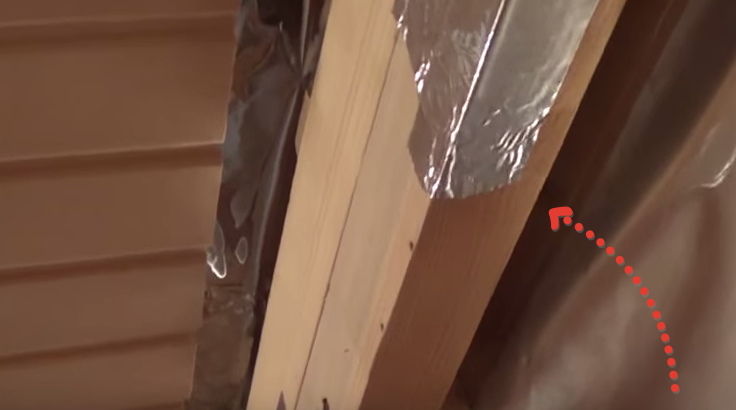
The joints of the boards are not exposed to moisture due to the lack of water splashes. For good air circulation under the clap, holes are drilled. - On video, this article presents the lining, nailed horizontally. The horizontal arrangement of the plating is made not only in order to visually increase the wall in length.
It is notity a little that in the Russian bath this location of the casing material can be considered standard, the advantages of the horizontal fastening of the lining on this will not end.
- With darkening of the floor, the lining near it changes without difficulty and special efforts.
- Water does not fall into the connection of the boards, which causes the best grazing lining and extends its service life.
- Air circulation behind the horizontal lining occurs much better, because for its attachment you need a vertical framework.
- An irresistible obstacle for mice becomes a vertical framework, which is attached to the insulation.
- Go to last advantage horizontal location Lining can be attributed to its installation.
ATTENTION: When horizontal fastening the lining the grooves is sent down.
- Incorrectly made molding, capable of equalizing and reduced to "no" both high-quality material and cheap, the price of which is satisfied with a wide range of consumers.
Preparatory work
So:
- Solving the problem, how to shelter a wagon video package gives a common direction of work and offers to start with the preparation of the walls of the walls.
- Close up all potholes, slots are installed and fixed water pipes, electrical cable.
- Prepared materials and tools for steaming steam room.
| List of instruments | Application |
| Handsman on a tree | Segment of the boards of the desired size |
| A hammer | Working with nails and semi-cuts |
| Dobochnik | Navigate |
| Screwdriver | The tool of each host accustomed to work around the house |
| Electric worker | Provides the rotation of the tool and its longitudinal axes when drilling |
| Plumbing level | Checking the surface of the sheath for compliance with horizontal and vertical sizes |
| Roulette | Measuring tool |
| crosshead screwdriver | To work with fasteners |
| Nails, Self-cuts with galvanized surface | Do not rust and do not spoil the appearance of the lining |
| Skoby | Fastening the crate |
| Kleimers | Hidden fastening clapboard |
- Prepare the entire necessary tool, the material, deciding how to lifting the wagon carin, you can begin work on the decoration of the walls.
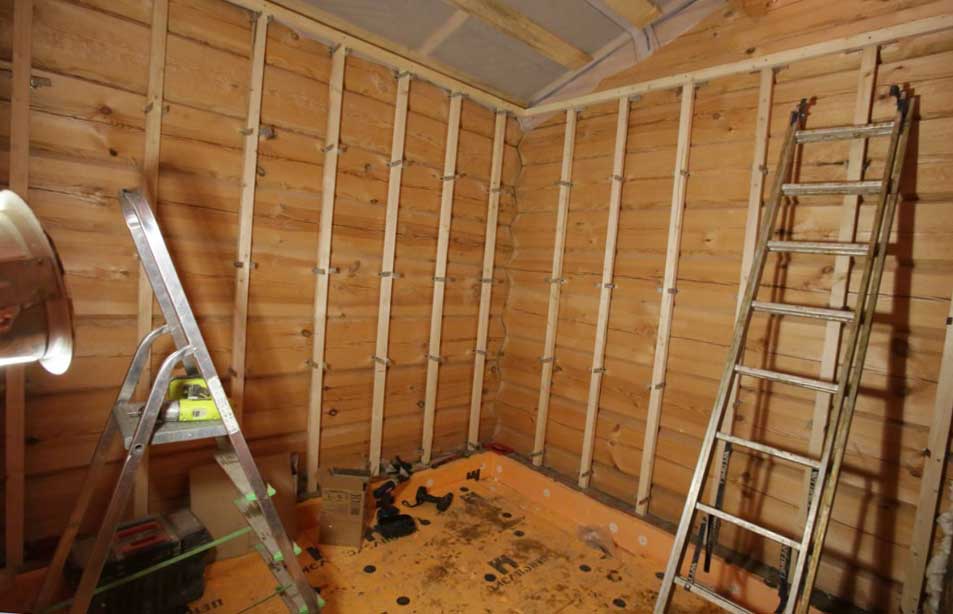
- Installing the crate in a specific sequence is performed.
- After 60 cm on the surface of the walls, brackets are fixed.
- The cuts of the brackets are fixed by the cuts.
- Applying a plumb and level, the horizontal and vertical position of the crate design is checked.
- The space between the bars of the crates is filled with insulation and is covered with a waterproofing film.
- Next fastened lining.
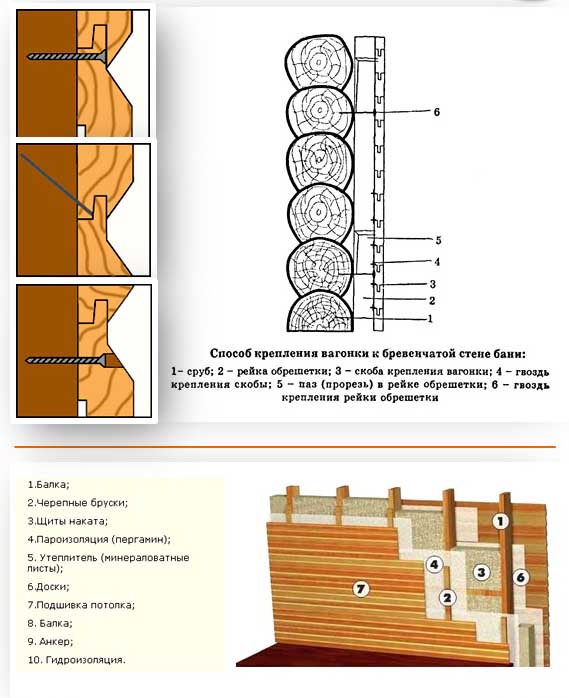
Several ways to fasten the lining
How to mount the lining in the steam room that the question that does not give rest to many owners baths:
- Kleimer mount for taking careful and beautiful walls. The advantage is the possibility of fast and easy dismantling of damaged boards. The ceiling, the walls of the steam wrapped in this way have an elegant, stylish appearance.
- One of the simple and cheap attachment methods is the following action. The panel is tightly installed in the groove of the previous one and fixed with galvanized nail, and the protruding caps of the Dobitern nails are interference, then they do not interfere with the installation of subsequent panels. The disadvantage can serve damaged boards.
- How to kill the lining in the steam room in another way? For this, there is a technique under No. 3. It is used when installing the plates of the latter in the row, as well as when assembling seats and shelves.
Here are used to be cuts that wrapped in drilled holes. Then in these holes, plugs of wood are clogged, the protruding parts are cut off the flush and the surface is grouped. - The instruction recommends the fourth way to apply for the wall of the old sample. In the boards, holes are drilled corresponding to the thickness of the cuts itself. The holes are drilled in the form of a cone corresponding to the screw of the screw.
The mounting of the board to the crate is carried out so that the surface of the screw of the screw is a single integer with the board. Grinding and stripping surface of the board is performed.
Put the point in this process will help paint or varnish applied on the lining. However, it must be remembered that in the steam room, these compositions will be superfluous and specialists do not recommend applying them there.
Selection of materials for interior decoration and decoration of the bath and pre-banner is a very important process that needs to be approached with all scrupulsity and responsibility. Offered to your attention step-by-step instruction The trim of the bath and the pre-banker do it yourself.
Lining is a trim panel. Whoever spoke to, but the lining for many years was and remains best Material In the trim bath. With the help of the lining, two tasks are solved at once: insulation and wall decoration. Walls decorated with clapped, always look beautiful and aesthetic. Among other things, the lining is incredibly practical material. Thanks to the walls of the walls of the baths will "breathe", pass the air, preventing this appearance on the walls of mold and fungus. The network has a lot of photos and video on the trim of the baths of this particular material.
We choose the necessary materials
For the bath and the pre-banner, the wood is used - lining. The most inexpensive wood material It is a pine lining, however, because of its resinness, it will not work for steam room. At high temperature, the pine lining will begin to highlight the resin and the sharp smell, because of this, there will be nothing in the steam room, it will be possible to breathe in the pitch of the resin. Usually for the steam room used wood hardwood and most often - Lipa. Lipa at high temperatures does not overheat, retains its light color, does not secrete a resin, he almost does not have a tangible smell, well and quickly dries, durable. In addition, Lipa creates a special microclimate in the bath. The table below shows the materials of the manufacture of lining.
| Material | Description |
|---|---|
| Coniferous breeds | Conifer breeds are characterized by high moisture resistance, however, it is better not to use such lining to finish directly: the resins stands can deliver certain problems. It is believed that coniferous resins are useful for a person. Inhalation, work is stimulated of cardio-vascular systemBut in a complex with high temperature, this combination will be extremely dangerous. In view of this, it is better to leave a holiday room to finish the rest room - it will suit perfectly here. As for specific breeds: - Pine. High density is highlighted by an attractive golden tint and interesting ornaments; - Cedar is an expensive version with a pronounced coniferous smell. Differs long service life, excellent texture and antiseptic properties; - fir. Well suited for the interior of the bath. It has a neutral smell and has an attractive appearance; - larch. Fills the air useful for human health substances. The material is characterized by the highest resistance to moisture and similar density. |
| Large breeds | Most often, for the inner lining of the bath, it is wood hardwood wood. Such lining is characterized by higher thermal insulation properties, which is an additional plus, and also helps to improve ventilation in the room and create the most healthy microclimate. For the manufacture of lining, wood is used several breeds: - Oak. Expensive, durable and firmly. In addition to other advantages, the material is characterized by an expressive structure and in general has an attractive view; - Linden. Such a lining has a beautiful light honey shade that does not change throughout for long years services; - Alder. Hygroscopic and beautiful material with antimicrobial properties; - ash. Pretty dense wood, stable deformation and having an expressive pattern. |
The following table presents classes and their description. It is worthwing to know that wood with a lot of bitch heats up faster, can burn. Marking is the same for all types of wooden lining.
| Class or variety | Description |
|---|---|
| Extra | Without cracks, bitch and other defects. The surface is perfectly smooth, smooth. |
| A or 1. | Surface smooth or slightly rough. There are 1 healthy bitch for 1 mongo meter (bitch diameter not more than 1.5 cm). Mogue to be cracks: hair - no more than ½ panels, no longer-length less than 9.5 cm (the flow of cracks is sent to the end of the panel), which appeared When drying - the magnitude is not more than the width of the panel. There may be shocks and resin pockets for 2 pcs. per 1 mp |
| In or 2. | Many bitch, of which there can be no more than 2 pcs. per 1 mp Current cracks of up to 1 mm wide and up to 15-30 cm long, hair cracks are allowed along the entire length of the board. The presence of wormochin is allowed (3 pcs per 1 mp) and rot (no more than 1/10 part of the panel). Lining grade in suitable for staining. |
| C or 3. | Quality is low. Many different defects. Such lining is suitable for the upholstery of technical premises or draft. |
What is categorically impossible to use a steam room for finishing?
It is impossible to separate the bath from the inside with linoleum, wood plates, chipboard, fiberboard, mineral wool, because they absorb moisture, fire hazardous and their manufacturers often sin with the use of harmful and toxic substances, whose action can be increased at times with a significant increase in humidity and temperature, which, in turn may negatively affect the sensations, comfort and health of bath visitors.
However, all the above materials are applicable to finishing the pre-banker since there the temperature and humidity are no longer so high.
Warm walls and ceiling in the bath
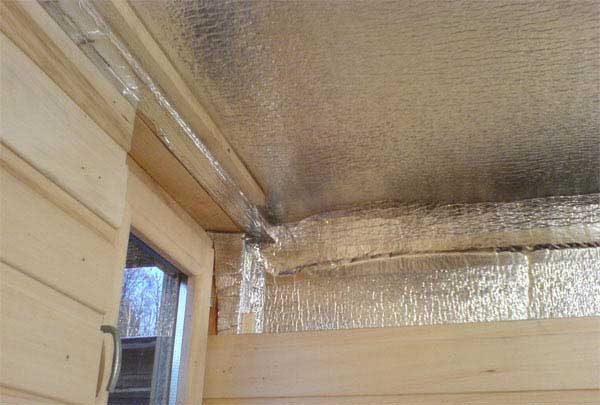
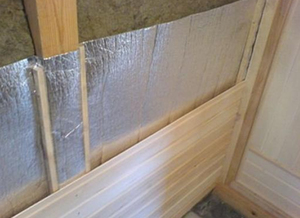
To pair to make hermetic, thermal insulation in it are performed using a mineral insulation and aluminum foil. Foil is used to protect the insulation from moisture and high temperature. Foil edges secure special scotch. Film for these purposes is definitely not suitable as it can be deformed or even melted.
The ceiling is made of 20-30 mm thick boards. Boards are attached to the beams of nails. For ventilation, it is desirable to round the edges of the boards and leave small gaps.
Preparation of walls to finishing
Bath trim technique is simple and, if desired, can master any. The first thing in the bath must be made by lining, so that the material passes the mandatory adaptation to the microclimate of the room. Then proceed to align the walls. After alignment make the crate.
You can, of course, without it, but the risk of getting the wavy walls at the same time grows at times. For in order to mount the lining to the walls without a crate, they must and are obliged to be perfectly smooth.
We wash the walls
After all the preparatory work, they begin, in fact, to the walls of the walls. Nails, like fasteners, in this case are not suitable here, because they are subject to corrosion and may then leave ugly spots and rusty flips on the walls. The lining is cut in the height of the walls of the baths and attach to the crate or already directly to the wall with special brackets or finish-nails.
Flooring in steam
The very first thing to be done when finishing the floor is to raise its level by 15-20 cm. This action is necessary for better heat savings and protection against drafts. Paul in a bath of steles from boards or from ceramic tile. Again, ordinary nails are not used here.
Video - how to seize the bath inside with your own hands
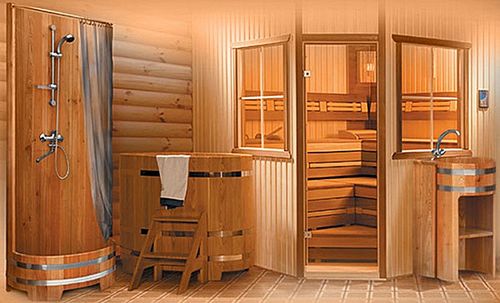
Arrangement of the Saban
The walls of the pre-tribades can be seen with pine wagon or boards. In the pre-tribbon, the temperature will be lower than in the bath itself and thanks to this, the wood from the pine will fill the air of the feet of phytoncides and a wonderful pleasant aroma of the needles. In the pre-banker can be like a washing zone and a recreation area. In the washing zone of the wall, either tiled tiles or panels of fir, pine, spruce, cedar, and on the floor are usually tiled with a non-slip surface.
What is a bath? In fact, it is a specialized room that is intended to carry out hygienic procedures in it. Inside the specified room, it is often quite warm weather, because the process of washing in the bath is connected with the impact on the human body not only hot water, but also hot steam. Or air. It depends on the type of bath.
For health, such procedures are very useful, because the heated gaseous substances have a beneficial effect on the human body, and water contributes to body support in purity. All this significantly improves the mood and stimulates immunity. However, so that the steam room can give human health as long as possible, it is necessary to take care of her protective system. The correct decoration of the walls within the specified room along with the use of the right facing system, will help to cope with this task.
In case for cladding inland walls Baths were elected lining or pungent, it is necessary to take into account that this building material has several varieties and not each of them will be able to fulfill this mission. Let's see what exactly the punishment is suitable for these purposes.
Choosing clap
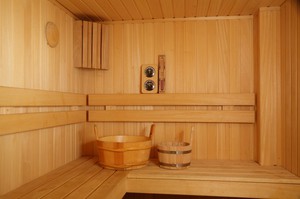
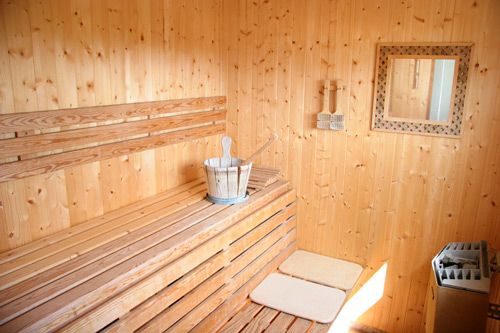
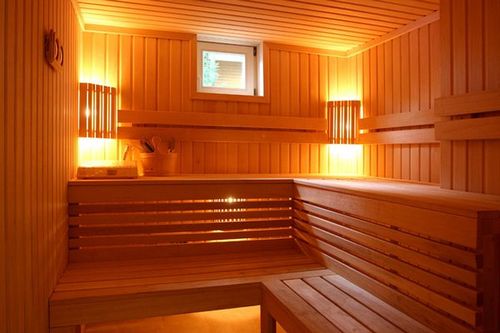
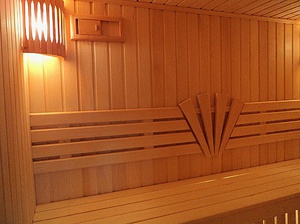
First of all, it should be noted that the most popular for the trim bath Walls is a chalet from such woods, like linden, aspen, cedar and pine .. Lipa in this list on the right occupies an honorable place of the leader, as not at all negative influence Couple and water. The photo shows the steam, the cover of which is made of lime lip.
The second place is given to Asin because it is capable of easily and efficiently replace the lip. It is important to pay attention to the fact that the correct drying can make a sufficiently solid material from this soft and pliable tree. Moreover, the punishment made from Osin is much cheaper than Lipova. However, such wood has one very unpleasant lack of her insidious habit of rot from the inside. Often this defect is detected only when the product is already unsuitable for further operation. This photo shows the steam room, the decoration of the walls of which was made by building materials from Osin.
As for the cedar lining, it is distinguished by excellent quality and has excellent properties: under the influence of high temperature, it highlights in resinous substances that fill the atmosphere with marvelous aromas. Such a steam room will have the effect of aromotherapy.
To the advantages of which a cedar chalevka boasts can be counted that it is weakly heated, and its mall does not go to the surface of the material, which significantly reduces the likelihood of getting a burn. If you decide to seize your bath with such a clap, then it should be noted that the price of this material is high enough. The steamer, covered from the inside cedar, is shown in the photo.
Pine shagevka is also able to allocate resinous evaporation into the atmosphere when it is under the action of high temperature. However, this type of building material is finished exclusively for the pre-bankers and premises that are meant for recreation. This is explained by the fact that the pine shageper is strongly heated, which means that skin burns can provoke. A sufficiently significant advantage of such wood is her low price. The steamer, the sheath of which was performed with a pine clap, is shown in the photo below.

A very important detail when choosing a lining, which a steam room will be turned into, is the absence of bitch on building materials. They heat up most, and it can spoil all the pleasure of staying in the steam room.
More detailed instructions On the selection of a bathing lining presented in the next video.
Montage with your own hands
Mount the lining in this case is better with the help of special accommodations - adhesive. The steam room is a room with a very humid microclimate, which will provoke corrosion of fasteners made of ordinary metal. This determines the fixing of the adhesive with the help of fasteners, for the manufacture of which was used galvanized metal.
You can, of course, use nails or self-tapping screws and for mounting the lining itself, if you are going to cover it with paint or dark varnish. Such manipulation will hide the cap of the specified products. But for the steam room, this method of processing the building materials will not suit, since the evaporation of these substances are toxic. The photo shows examples of rooms where you can use paint and varnish.
In most cases, this building material comes on sale without passing special processing. This means that before weching the walls of the bath with the clap, it will correctly be to prepare the product to the specified process. Such preparation includes the impregnation of building materials with anti-naval substances, as well as processing using emery paper.
The walls of the walls in the pair should be made only in the vertical direction. This is important because condensate will be formed on its surface and it is better that it is cut to the floor to the floor, and not delayed at the joints.
The plating of the bath from the inside with the clap also involves the installation of the hydrobrier and the reflector, which does not allow hot air to leave the room of the steam.
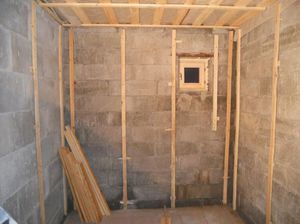
Often the steam room is built out of wooden BruschevHowever, you should not mount the lining right on the wall or the ceiling. Before we see the placement by this building material, it is necessary to install the crate. This condition is recommended to perform in order to extend the life of wood by creating an air layer between the building material and the plane on which it is stacked. In addition, the installation of the frame makes it possible to sew walls internal heat insulation. The result described above, manipulations are shown in the photo.
Installation instructions
The trim of the bath can be easily produced by their own hands. How to do it right, you will tell you the instruction below.
- First of all, it is necessary to prepare the walls and the building material for installation. At the same time, the framework is established, and the shagevka is amenable to special processing.
- When installing the frame, it is necessary to take into account the load, which will be subject to walls. If you are going to attach the shelves to them, then for the crate you have to use bars. If the specified part will not be present, then the framework can be built from the plates.
The racks (bars) of the crates are attached solely perpendicular to the direction in which the shagevka will be mounted. First, the first and last guides are installed, which must be aligned with a plumb. After that, intermediate rails are attached. At this stage, waterproofing is stacked.
- The next step is the installation of the insulation. It should be remembered that the size of the insulation slabs directly affects the distance between the frames of the frame. That is why the specified material is recommended to be purchased in advance to accurately calculate the location of the rail.
- Next, the fixation of vaporizolation is made. The main function is the protection of the insulation from wet air. Attached this material With the help of a special construction stapler.
- After all surfaces were prepared for work, you can start mounting. The chalet is attached to the walls, starting from the far corner of the room. The panels are inserted into kleimers, which, in turn, are screwed or nailed to the wall.
At the end of this process, the lining can be covered with paint or varnish, but these substances are prohibited in the steam room. In detail how to properly cross the battle by the bath, performing all the work with your own hands, is shown in the following video.
What materials are not used for building baths - bricks, foam concrete and gas-silicate blocks and much more. But only the tree can create that unique microclimate, which will be favorably reflected on the well-being of visitors to the pair. Yes, and for the gaze is much nicer, we are more familiar wooden panels. And even if the bath is built out of arbolit, stone or other similar material, nothing hurts with your own hands to sew the inner surfaces of the walls and ceilings with wooden clapboard.
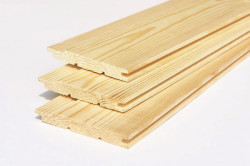
Lining as a product for the first time began to apply to cover walls of wagons. From here it happened its name. The difference from simple edged boards consisted in the presence of grooves along the long sides of the lining, due to which the maximum contact between adjacent panels was ensured. The walls were obtained without cracks and gaps, smooth and quite beautiful outwardly.
Together with technical progress, production stepped and production different species Lining. Today it is produced in several variants of the profiles themselves, which differ in size, quality, manufacturing material.
Note! You can find a plastic lining on sale, but such panels are suitable only to cover the pre-tribades and locker rooms in the bath. Plastic does not withstand high temperatures and is not suitable for steaming. Wood products in turn regulate the level of humidity, absorbing or evaporating water from its surfaces, and some wood varieties additionally highlight aromatic components, which are beneficial to respiratory system man.
Select the lining for the trim
Wood lining can be ordinary or euro. The first on its surface has a roughness and a pile, the second is perfectly smooth. On the back of the Eurovantia there is ventilation channels that prevent moisture accumulation (condensate) and remove stresses in the material. According to, the moisture content of wooden products is allowed within 12 ± 3%, however, the usual lining can be made of wood with humidity up to 25%, which can lead to deformation during the operation of the bath. Based on this, we will choose a suitable wooden eurvagon to cover the bath.
Marking and technical requirements
The lining is made of softwood and deciduous wood. Best options For steam room - aspen, linden, cedar, spruce, alder, oak, pine.
| Wood | Color | Properties | Photo |
|---|---|---|---|
| Aspen | White, acquires silver sings. Facely noticeable yellow annual rings. | Easy, well withstands high humidity and temperature. Over time, it hardens so much that it is difficult to score even a nail into the aspen panel. Does not secrete resin, not split. | |
| Linden | Bright, brown, less than reddish shades. There is a matte shine. | The fibers are homogeneous, the surface is very hot, in the steam room highlights healthy aromacomponents. When contacting lime wood in a humid environment, iron is oxidized and rust, dries appear. | |
| Linden Cedar Canadian or Siberian | Brown with a pink tint. | One of the most expensive and healthy wood breeds. It does not rot, well withstands mechanical loads, it does not crack. | |
| Beige, brown with red shades. Darkens with time. A pronounced pattern of annual rings and resin canals. | Good mechanical properties, viscosity, moderate warning. Does not cause difficulty processing. It secretes the resin when heated, therefore it does not bypass to cover those surfaces in the steam room, with which the tactile contact is possible. Not suitable for plating the ceiling steam room or a repeated protostka of the steam room is required, followed by the removal of the resin (the procedure is repeated until all resin comes from the wallpaper). For the bathhouse pine lining it is better to choose an extra class. |
The following table presents classes and their description. It is worthwing to know that wood with a lot of bitch heats up faster, can burn. Marking is the same for all types of wooden lining.
| Class or variety | Description |
|---|---|
| Extra | Without cracks, bitch and other defects. The surface is perfectly smooth, smooth. |
| A or 1. | Surface smooth or slightly rough. There are 1 healthy bitch for 1 mongo meter (bitch diameter not more than 1.5 cm). Mogue to be cracks: hair - no more than ½ panels, no longer-length less than 9.5 cm (the flow of cracks is sent to the end of the panel), which appeared When drying - the magnitude is not more than the width of the panel. There may be shocks and resin pockets for 2 pcs. per 1 mp |
| In or 2. | Many bitch, of which there can be no more than 2 pcs. per 1 mp Current cracks of up to 1 mm wide and up to 15-30 cm long, hair cracks are allowed along the entire length of the board. The presence of wormochin is allowed (3 pcs per 1 mp) and rot (no more than 1/10 part of the panel). Lining grade in suitable for staining. |
| C or 3. | Quality is low. Many different defects. Such lining is suitable for the upholstery of technical premises or draft. |
The norms of defects according to GOST are indicated in the table below.
It remains only to choose the lining profile, because Everyone has their own mounting nuances.
| Profile | Description | Scheme |
|---|---|---|
| Standard | It looks like a classic lining "in a quarter of the boards." It has a spike-groove compound, and the spike is shorter than the groove to prevent deformation. | |
| Castle or collective farmers | From the previous, it is distinguished by rounded edges and the presence of channels on the reverse side to prevent condensate accumulation. | |
| It is performed according to DIN 68126. Has an elongated spike. After mounting the lining the surface of the wall ribbed. | ||
| Soft Line or Soft Line is the symbiosis of the wagon of the euro and the calm. Soft rounded corners, elongated spike, relief texture wall after assembling panels. | ||
| It is used to finish external walls and premises. Stylized under a rounded log. There is a spike-groove compound, the front side is usually rounded, and the wrong is flat or with ventilation channels. |
Video - how to choose lining
Calculate the area of \u200b\u200bthe inside
For example, take a 3x3 meter bath with a 2.5 meter ceilings. The covering will be made on all walls and ceiling, do not take into account the floor in the calculations.
Suppose in the bath two rooms - a steam room 2x3 and an entrance hall 1x3 meters. Calculate the plating area of \u200b\u200bthe steam room.
- Ceiling area: 2x3 \u003d 6 m 2.
- Long wall area: 3x2,5 \u003d 7.5 m 2.
- Square short wall: 2x2,5 \u003d 5 m 2.
- The total area of \u200b\u200bthe room: 6 (ceiling) +7.5 (first long wall) +7.5 (second long wall) +5 (first short wall) +5 (second short wall) \u003d 31 m 2.
Calculate the area of \u200b\u200bthe entry of the hallway.
- Ceiling area: 1x3 \u003d 3 m 2.
- Area of \u200b\u200btwo long walls: 3x2.5 \u003d 7.5 m 2. 7.5x2 \u003d 15 m 2.
- The area of \u200b\u200btwo short walls: 1x2.5 \u003d 2.5 m 2. 2.5x2 \u003d 5 m 2.
- Total area: 3 + 15 + 5 \u003d 23 m 2.
The total area of \u200b\u200bthe casing will be 31 + 23 \u003d 54 square meters. From this number it is necessary to subtract the area of \u200b\u200bthe window and door openingsAfter which add a 15% material stock on trimming.
The price of the lining is indicated per square or rogue meters, less often cubic meters.
It is possible to calculate the difference in price, if you know how many layers of the lining will be required to cover the inner surface of the bath.
The most popular profile size is as follows:
- panel thickness 12.5 mm;
- panel width 96 mm;
- panel length from 2000 to 6000 mm.
The following tables will help to find out how many square meters of material in one cubic meter, calculate the number of packages (1 pack \u003d 10 of the wall panels) and determine the cost of the premises.
Tip! It is not necessary to acquire lining without packaging (shrink film) - this is the goods low qualitywhich will quickly lose its properties and the bath's trim will have to be fully or partially changed.
We choose the way of mounting the lining
The lining in the baths are attached vertically and horizontally. But the more rational option for the bath is horizontal.
Consider a number of advantages of this type of fastening:
When erecting and finishing a turnkey bath, builders are more commonly mounted the lining vertically, choosing suitable panel and installing them without trimming. With a vertical attachment, it is easier to make corners, work occupies a little less time. But time saving often "leaves sideways", because if from a random strike that dropped coal or high humidity will damage the vertical board, the entire wall will have to disassemble.
Installation of clapboard
Before the finish finish of the wall and the ceiling, the baths are insulated. It is best to use mineral (stone) cotton wool or other insulation, which, when heated, is not deformed and distort the vertical chemical evaporation into the air. Over the insulation is necessarily fixed by a layer of foil vaporizolation. Ruberoid and Pergamine are not used in the bath. The furnace and the ventilation system are mounted before mounting the lining.
Video - Wall insulation Bath
Video - Ventilation in steam room
Even if the overlap is made of wood, it is impossible to navigate to it with nails. Consider the step-by-step process of the ceiling.
Step 1. Assembling clamps on the ceiling
The suit will consist of a cross section from 2x5 cm to 5x5 cm. The rails must be sufficiently even and dry.
Reiki will be fixed on top of foil, under which there is already a lamp for insulation. The optimal distance between adjacent rails is from 40 to 60 cm.
Note! It is understood that the incomplete for the insulation was attached using the level and plumbers, and in the end it turned out the horizontal surface of the ceiling without distortion.
Rakes will be located perpendicular to the direction of layouts of the lining. The first rack is fucked at a distance of 10 cm from the wall using the yellow-walled stainless tapered screws on a tree 7-10 cm long. Screw the screws every half meters. It is recommended to drill the holes in the rails under the tapping screw in advance so that the tree does not crack.
Break is strictly parallel to the first rail at a distance of 45-60 cm. The ends of the rails must defend from the nearest walls by 10 cm. We continue to work until the last rake of the crates is installed. We constantly check the correctness of the deck attachment using the strained line / cord or laser level. If the deviation is revealed horizontally, small wooden wedges are laid between the foil and rail.
In some cases, when it is required to make a lower ceiling in the bath, metal suspensions are used to fasten the crates.
In this case, first on the ceiling with long screws (dowels with a diameter of 8 mm and a length of 80 mm are used only for ceilings from concrete and other dense materials) the suspensions are fixed, after which the lamp beams are attached horizontally (screws screws with large threads, length 3 , 5 cm). It is more convenient to carry out the work together for the assistant to hold the second end of the rail and followed the correct position of the crate.
Wooden crate is desirable to impregnate with an antiseptic to serve longer.
Note! You can first collect the ceiling and wall crate, after which go to the installation of the wall paneling or completely sew the ceiling, and then fix on the walls of the rails and wooden panels.
Step 2. Installation of cladding on the ceiling
Make through holes in the lining holes and you do not need to score in it. This is not only ugly, but will lead to corroding of hardware and the emergence of rusty spots on the ceiling.
To fix the lining, you can use either a set of crimemers with nails, or a bracket with a length of 38 or 40 mm. 25 mm long brackets are not applied.
Before fixing the first bar, you should cut off the spike. For this, the pencil is planning a flat line, we rebuff the board with an electropolitus along, we apply it to the place of the future location so that the panel will define for 1-2 cm.
On a note! If you are working alone, use backups under the panel. So it will be much easier to keep it.
The first panel of the wallboard is screwed by self-drawing to the crate. Withstand a step of 50-80 cm, screws apply only stainless. If you want to drown the heads of the screws in the thickness of the lining, screw for the screws for the holes, and then make the cencing of each of them (holes).
Consider the method of fastening by cleimers. Metal beammers are inserted into the head of the first board.
Each of them has three holes in which 2 nails coming in a set, or a bracket is shot. Kleimers are inserted in a step corresponding to the sequencing step so that the lining is attached to the raids, and not to the foil and insulation.
If instead of kleimers are used skoby, they shoot in the grooves of the boards of the lining at an angle.
When the first board is fixed, the next panel is inserted into its slide. To compact the connection, we take a wooden "chock", apply to the end of the panel and easily climb over the entire length.
There is another way to compact the connection. It will take a wedge, a clamp with a clip and a hammer. We fix the bracket on the lake of the crates, insert between the bracket and the end of the wedge lining, knock on the wide end of the wedge with a hammer.
We continue to wash the ceiling, if necessary, cutting holes for lamps, ceiling lattice ventilation, other decorative elements.
The last board of the lining may have to cut along. We measure the distance from the wall to the last inserted bar, we make markup, rebate the panel, part of the spike board insert into the groove.
To compact the connection, the bracket is useful. We insert it into the gap between the wall and the clapboard, we climb the image.
Note! Periodically, you need to check the parallelism of the chalkboard. It is convenient to use roulette for this. Insert the "tongue" of the roulette in the gap between the first panel and the wall, measure the distance to the end of the latter attached to the ceiling of the panel. We repeat the operation on the opposite side of the ceiling, the distance should be the same. That is, if on one side 5 panels nailed to the ceiling have a width of 60 cm, then from the opposite side should also be 60 cm.
The last board, as well as the first, is fixed by self-drawing.
Video - Installation of cladding on the ceiling
Mounting wallboard on the wall
Step 1. Installation of wall crates
First rake are screwed by self-tapping on the bottom of the wall, at a distance of 1-2 cm from the floor.
The following rails are nail in the corners of the room.
Also rails will be held near the windows and doors. To work faster (or in the absence of a screwdriver), you can navigate the rails of the nail (suitable for nails up to 65-160 mm long) or a bobbing pistol (the length of the slabs for a rack of 20 mm thick from 38 to 51 mm), but it is important to drive the nails and brackets Not perpendicular to the wall, but at an angle (from top to bottom) so that hardware tightly kept wood even with its thermal expansion.
After all vertical rails are installed, a doomle is nailed around the door and window openings, you can move to the installation of horizontal rails, the first of which is attached with an indent of 10 cm from the ceiling. The risk of foil breakthrough with sharp edges is minimal, so the champecker can already be done. We definitely check the correctness of the registers of the sets.
For convenience, the distance between the upper rail and the floor are divided into equal sections of 40-50 cm, the horizontal bars of the craters are fixed with the resulting step, using a screw of 90 or 100 mm (holes drill are drilled) or nails.
Note! The case described above is suitable for fastening the lining vertically. For horizontal location, the lanes of the clap will first be attached horizontal rails on the wall, and on top of them vertical.
It is worth noting that if the walls of the cutting wall are triggered, and there are no layers of insulation and foil (for example, in a pre-tribbon), then the crate is collected on aluminum suspensions. They are fixed to the log cabins by self-draws, after which the rails are fixed, leaving the gap of 5-10 cm for ventilation.
Step 2. Installation of lining on the walls
If a boards lining will be located vertically, then the first plank is secure from any of the corners of the room.
It is worth carefully measuring the length of the panels, because between the floor and wood, as well as between the already covered ceiling and wall wooden planks, it is necessary to leave 2 cm clearance.
To pretrately make an angle, cut off the spike board. We apply the cladding to the crate, check the verticality, screw the screws.
Insert the first panel to the first panel. Compact the connection of the Cyans. Next, we carry out fixation by cleimers or brackets (the installation method is identical on the walls and ceiling, the detailed instruction is described above).
If a the lining will be located horizontally, Installation is starting from the ceiling.
Drive the holes under the self-tapping screw, we apply the board to the crate (necessarily a groove down) at a distance of 2 cm from the floor, check the horizontality. Screw to the drilled holes of the screws. Between the ceiling and the first panel, leave a small gap, which closes the plinth. In the groove of the first panel insert the beammers or shoot the brackets.
Insert the second board inserted into the grooves overlap. We check their parallelism, after which we again carry out fixation by curvators or brackets.
Video - Celebration Parley
When all the walls are trimmed, it will only be to install the plinth (on the floor or additionally in the corners and under the ceiling), plaphones and sockets, make the shelves. On this plating the bath inside the clap is completed.
Video - steam finish
Files for download: DIN 68126 (Euro-making standard) and GOST 8242-88 (standard manufacturer of wooden clap, plinths, etc.).
What only materials are not used in the construction of baths - bricks, gas-silicate and foam concrete blocks etc. But to create a unique microclimate can only a tree that provides the most favorable impact on the visitors.
If the bath is built of stone, arbolit and other similar materials, then it is recommended to sow it from the inside only with wooden clapboard, which moves high temperature well and increased humidity. So how is the trim of the bath inside with your own hands? We will try to figure it out.
What lining is best suited for a bath?
For the plating a bathroom can use classic lininghaving a small size. It is best to fix it vertically, because thanks to the horizontal location of the ceiling, and without that low, visually sinks. In addition, due to horizontal fastening, water can not flip down and starts to accumulate in the connecting locks.
Much more interesting is the design of the room, if the inner cover is used by Eurowork. The qualitative characteristic of these wide and heavy panels is the same as the thin lining. On the back of the Eurovantia, there is a special propyl, thanks to which the tension is removed in the product and therefore the finish after a certain time is not cracking.
In terms of its composition, the lining happens:
- vinyl;
- wooden;
- plastic;
- metal.
Bath clapper with their own hands from the inside is usually carried out of wood, and all other types of lining are used to finish the facade.
Types of wood for the inner lining of the bath
 It is very important which tree was used for the manufacture of material. Usually the trim of the bath inside perform low thermal conductivity wood, such as:
- aspen;
- cedar;
- linden;
- abashi;
- alder.
Moreover, the cedar should be only the northern, as it contains little resin, and it will not start drip when the walls are heated. Larch species have a smaller wood density and such lining in the bath is very pleasant with tactile contact. Its cost is quite high, but such expenses are quite justified. Each viewed view can fit well for various rooms of the bath.
Aspen
Wood from this tree is characterized beautiful reddish tint and increased moisture resistance. When interacting with water, it not only does not destroy, but, on the contrary, it starts to fit. It is recommended to use it for finishing a washing department or a rest room. The only lack of wood from Osin is a high cost.
Linden
Lining from such wood is traditionally used for the inner covering of the bath. Lipa at high temperatures does not heat up, and its color is pleasant for the eyes. But there is such wood and a significant disadvantage - if it is not to handle protective compositions and antiseptics, then it rapidly darkens and rotates.
Cedar
The structure of such wood has a reduced density, so it is often used for the bath. Cedar is characterized by excellent antiseptic properties, and when heated, a pleasant aroma exudes. But for the steam room, such material is unsuitableBecause there is still a small number of resin in it.
Alder
Olhi wood has a pleasant velvety structure and pinkish shade. It is not afraid of moisture and keeps the temperature well. In the bath material is used in any part.
Preparatory work
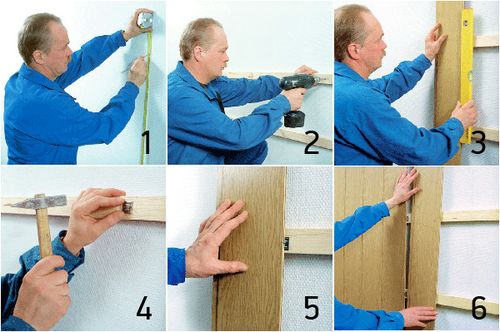
Before carrying out the bathing of the bath inside with their own hands, should be held preparatory work. First acquire required tools And materials:
As a rule, self-tapping screws can easily be corroded, so they are used for fastening wood only if the lining will be subsequently coated with paint or varnish. However, the material processed in this way cannot be used to cover the steam room, as toxic evaporations may occur. Therefore, instead of self-tapping screws for work in the pair galvanized metal skimmers. They are distinguished by high anti-corrosion properties.
Also completed all the work on laying communications, which will later be located under the clapboard. After purchasing the material, it must be left for several days in the bath in folded. Thanks to this, wood gets used to temperature and humidity indoors, which makes it possible to significantly increase its service life. It is also desirable to treat anti-naile compounds, which will prevent the appearance of posting and mold.
When all preparatory procedures are completed, proceed to the main stage - interior decoration Bath with lining with their own hands.
Conducting interior
Ban trim from the inside with their own hands provides for a certain sequence. Installation starts with the preparation of the frame. To do this, take a bar and collect it all over the perimeter of the room. Sew steam it is recommended only vertical. This is explained by a large number of condensate, which in the case of the horizontal location of the material begins to accumulate in its joints. It is for this purpose that the ram for the frame is attached in a horizontal position to the walls of the steam room.
First, the upper and lower guides near the floor and under the ceiling, using a screwdriver and self-tapping screws. In order for the timing to be accurately horizontally, use a plumb, and intermediate elements are assembled so that between them the same distance over the entire area of \u200b\u200bthe walls. Creating a frame, use a standard distance between the bars of 70 cm. If the insulation is used during the trim, the elements are placed, focusing on its size. For example, with a width of the mineral wool sheet in 80 cm, the distance between the bars should be exactly the same.
Ready carcass impregnate with antiseptic solution And leave to dry. After that, between the bars, the sheets of mineral wool are placed, which are attached to the walls with the help of a construction stapler. In places of contact, they must be placed on 10 cm, and the wool itself is covered with a waterproofing film attached by the stapler to the frame, and the joints are isolated by the assembly scotch.
As soon as the frame will be ready, the trim begins with the wallboard. First, the distance from the floor to the ceiling is measured, after which the prepared boards are cut by the desired size using an electrolovka. Embed from a long corner to work on finishing the indoor room, moving around the perimeter. The first element, fixed in the corner, should be located strictly vertically, which is evaluated using a level. The lining is attached to the bruster with a hammer and nails. If the work is carried out in the steam room, use galvanized klimers.
Treatment of lining made of wood after mounting with your own hands
 As already mentioned, before sowing a bath from the inside with a clapboard, the material should be treated with antiseptic solutions. But finished walls also need special processing. In the steam room and the washer, where it is wet and very hot, in no case can be used by varnish. In this case, a simulator or protective wax is used, thanks to which the wood is well protected from the impact of moisture, and also gives it a very attractive appearance.
The lining used for the premium of the pre-banker is covered with colorless varnish, which retains the natural color of wood. Experts advise sowing such a wood room from pine, because it allows you to significantly save on the construction of a bath. But the steam room is recommended to separate expensive and high-quality materials.
Thus, if you adhere to all the necessary recommendations, you can even make a bun from the inside with your own hands. The main thing is to choose required Material For work, as it greatly affects the performance characteristics of the room.