Operational characteristics, reliability of the construction depend on the competent arrangement of the roof. When building a roof, pricing nodes deserve special attention soft roof to mansard windows, chimney, walls, parapet. It is these sites that are considered a zone of increased risk in the arrangement of the roofs. In places of adjoining, snow accumulates, garbage, there are puddles of water, which increases the likelihood of leakage inside the building.
Varieties of soft roof
- Multilayer design, where a glass cholester is used as a base base, covered with a modified bitumen on both sides. The top layer of soft roof may be as follows:
- ☑ Tile bituminous Tiles or flexible tiles that are easily mounted, have low thermal conductivity, high sound insulation. The material is resistant to corrosion, sealed, easy to install, caring, produced in several colors.
- ☑ Rolled multi-layer roof consisting of roofing, parchment, rubberoid and roofing materialmounted by gluing using burners. The roof is resistant to frost, moisture, its installation is available at a price, it is carried out at any time of the year, even in winter. The lack of roof is the need for frequent repairs, because its durability is a maximum of 20 years.
- ☑ Membrane roofing coatings are flexible vapor-permeable PVC membrane sheets with durability, moisture resistance, frost.
Methods of arrangement of a soft roof adjustment
The choice of the method of installation of the adjoining depends on the surface with which the roofing material is joined. It can be wood, concrete, metal or flat slate, the main thing is that the base is solid. If the roof is flat, at first, using a bulk clay, make a "lowering", drawing up the rustling funnels along the way. The main carpet in the installation places of the drainfish funnel enhance fiberglass or burlap, impregnated with mastic and 2 layers of rubberoid.
Connection of a soft roof adjustment with rolled material - one of the most important moments. Works are carried out by a hot and cold way. In the first case docking the adjoining and rolled material It is carried out in the following ways:
- ☑ In the fork when the fasteners of the main panel and the closure of the adjoint is carried out using a wooden plank, after which the joint is protected by a metal apron.
- ☑ Vangest, at which the adjoining is carried out so that the end of the material is on the vertical plane, after which the roofing roll is additionally covered with a web. Then, with the help of dowels or nails, the canvas fasteners are carried out to a wooden plank of adjuncting for a soft roof, a metal apron is mounted.
In the cold method, the basis and rolls of the roofing material are coated with a solvent. After that, the laid rolls roll the clamping 100-kilogram roller. Works are carried out carefully, since high-quality rolling removes air bubbles under roofing material, ensures the strength of the seam.
Montage adjustment to the wall
- ☑ When adjusting the adjoining of a soft roof to the wall first, the surface is plastered, then the rails are mounted, the setting carpet on them.
- ☑ Then it is glued to the bitumen mastic, the end carpet is glued, fixing to the walls of the adjoining straps and dowels to the wall, sealing the upper ends of the adjuncing sealant. The carpet at the same time should enter the wall of the bill of minimum of 0.3 m, the skate to be at least 0.15 m.
- ☑ Installation of the roof adjustment with apron is carried out by outdoor debt. The planks are mounted directly to the coating, while the upper should be 0.3-0.4 m long pipe.
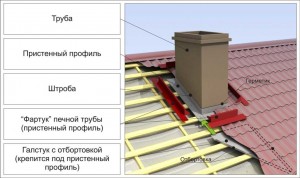
Arrangement of roof adjustment to pipe

- ☑ The device adjoining the soft roof to the pipe begins with the preparation of the surface on which the mastic is applied, laid geotextiles, on top - another layer of mastic.
- ☑ Installation of a soft roof adjustment to chimney has its own characteristics. Initially, at the top of the pipe, the crate is placed horizontally, after which the waterproofing is mounted, in one edge, driving it for the pipe, to others - under the roofing material.
- ☑ Places where waterproofing comes to the chimney are wicked by sealant, closed with a metal plate. At first, her dowels are attached to chimney, entering the bar, then poured with a sealant.
Installation of Parapete and Roof

- ☑ Installation of parapet and soft roof adjustment starts with waterproofing installation.
- ☑ first of the sand-cement mortar at an angle of 45o, the board between the parapet and the roof is equipped, after which heated bituminous mastic Ruberoid is fixed to the wall.
- ☑ After pouring the mastic glue the following layer of waterproofing, and the edge of the material is given to the groove brick masonry Or fasten with the use of dowels and metal strip.
- ☑ After fastening the bar, it is treated with a sealant, paint.
Work on the arrangement of the roof is better to entrust professional masters. Those who have never come across such work are unknown subtleties that provide maximum roof sealing.
As decorative element When decorating the connecting sites at the wall of the wall and the metal tile, the adjoining plane is used. They are also used during the installation of parapet, ventilation and chimneys.
Metal elements are selected in color metal tile. Often used with flexible types of roofing and professional flooring, including.
Varieties of planks adjoining
Used when mounting a plank adjoining for a roof from metal tile there are such species:
- Eaves. One bar in length reaches 2 meters and is available on the market building materials In any color variation. Basically, they are made of stainless steel.
- Facial. Planks for metal tile, which are attached to the wall. Also are made up to 2 meters long, but are wider than cornice. Most often created from stainless steel, but with a polymer coating.
- Adhesive. The dimensions are the same as in the cornisic or end, 2 meters in length. Material - stainless steel painted in different colors for greater compliance with roofing material.
Purpose
Plank adjoining for a roof of metal tile is a longitudinal fragment, which plays the concomitant role of the roof coating design. Its main task is to protect the frontal plates of the roof during precipitation. Thanks to him, the moisture does not fall inside the design and does not bear its destructive influence on the materials.
It is also a waterproofing suit for the leaping function, but it is designed to protect the tiles from excessive loads during strong winds.
The top plank of the adjoining allows you to maximize the seal between the sheets of metal tile and front elements. It is used to attach the roof to the ventilation pipe.
Increased percentage of leaks occurs at the border of the adjustment of the metal tile and chimney. Because this site should be defended the most reliable. In such a situation, the upper and lower layers of the adjoining are used.
Mounting work
The cornice bar is mounted from the end to any chalkboard, which is nailed with galvanized nails to the rafters. The mount occurs on the principle of chess order - a step from 30 to 35 cm. Each next element is nailed with the adhesive of 10 cm on the previous one. The ultimate plank must be cut in advance to the desired size.
Planck has standard dimensions - 10 × 6.9 × 200 cm.
Before carrying out installation, it is necessary to install hooks under the drainage, as they are attached to the same eaves board. During this process, the entry of the feet of hooks in the wood needs to be done deeper.
The installation of end elements begins only after the installation of the roof is completed.
Its standard dimensions - 13.5 × 14.5 - 200 cm.
During installation, the shap must be located below. Planck is attached by self-draws, both on top and side.
The inner apron is a place where the metal tile is adjacent to the pipes, it is created using the adjacent planks, as in the photo. With the help of the bottom plank there is marked on the pipe. According to this strip, the bulgarian hole is depth of at least 15 mm. Then it is carefully cleaned and washed from dust.
The installation is taken from the bottom up tightly on the surface of the pipe. Planks may have to be trimmed and secured with self-tapping screws. Fall from all sides should be at least 15 cm. The heat-resistant sealant is processed by the seams. Only in this case it turns out complete sealing.
Rain and snow are the most important enemies of any roof. Water flowing from the roof easily penetrates the coverage of the coating with chimney pipes and walls, having a negative impact on them. To prevent the roof destruction and premature failure of the roofing material, such a diverse element is used as the adjoining plank. What is the purpose of which species it happens and how mounted, we will be considered in this article.
Description
Plank adjoining is a corner with different sizes of the sides, made of galvanized steel sheet or residues of soft roofing material. It is installed to protect rafter system from moisture. This element is used on rectangular roof surfaces, such as ventilation mines or chimneys.
Depending on the installation method, the protective bar is two types:
- top;
- lower.
The top plank is placed in places of docking pipe and roof (from the side of the skate) on the roofing material. Most of the bar starts under the roof, so that flowing down the water does not fall into a wooden crate and insulating material. The other edge is attached to the pipe with the help of self-tapping screws.
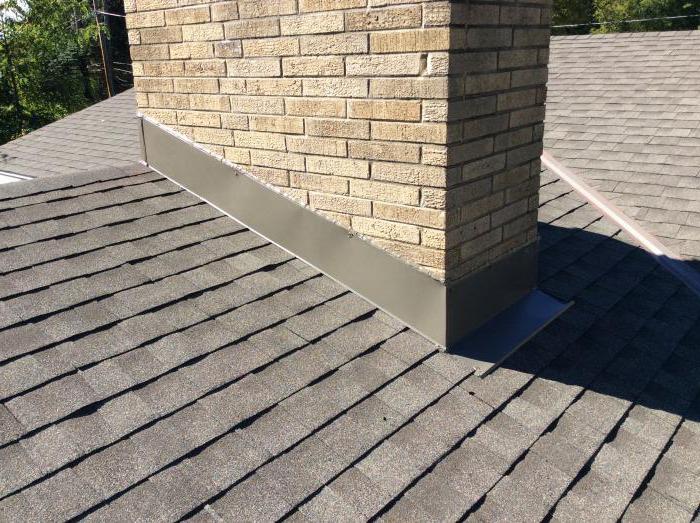
The second variant (lower apron) is installed at the bottom wall of the pipe (on the reverse oample of the roof) and stacked directly on the roofing coating. 
For flooring made of profiled sheet and metal tile, a steel coated with a protective polymer layer is used.
If either a roll coating acts as a roof, the junction can be drawn up both from the metal and from soft materials. In this case, the adjoining plank will have a form of a smooth strip. 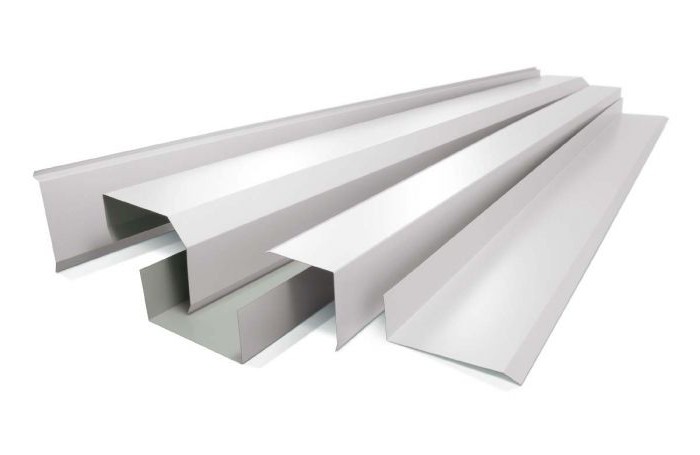
Now consider the installation process of all options.
What materials and tools will be needed for mounting the plank
Before starting work, it is necessary to take care that the following materials and tools are under hand:
- measuring instrument (roulette, line);
- a hammer;
- power tools (screwdriver, Bulgarian);
- pliers;
- roofing seal;
- self-tapping screws; nails;
- silicone sealant or bituminous mastic.
To begin with, we consider how the plane is installed in the case of using metal roofing material.
Top Plank Mounting Process
Plank adjoining (top) is installed as follows:
- In places of breakfast (where the roof will stick with the pipe) the lamp is installed with a very small step.
- The sheet that will cover the break, slightly push out so that it covers the place of the joint. As a connecting element, it is usually used between a roofing sheet and a connecting element lay a special seal (intended for installation of a good
- Promotion places to the wall are fixed by self-draws. The height of the vertical part of the plank should be at least 50 cm. All edges are waterproof by bitumen mastic or silicone sealant.
Installation of Lower Apron
Now consider how the inner apron is installed correctly (the latter bar is lower). 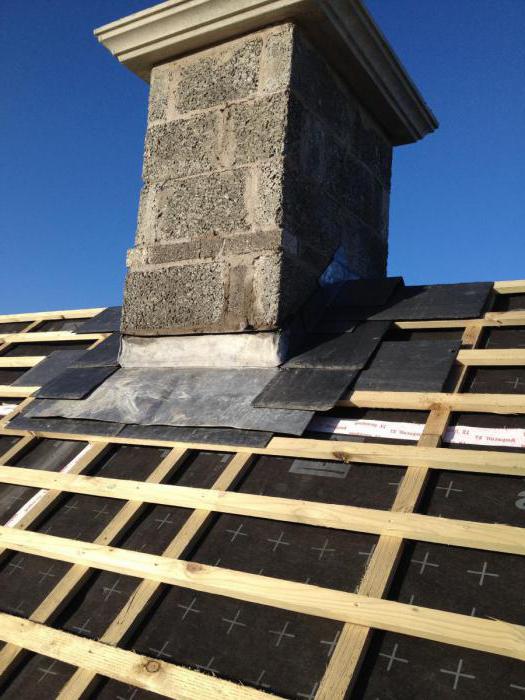 Installation technology implies the following work:
- On the walls of the pipe with the help of a marker, the height of the upper edge of the plank is placed.
- After the place of attachment of the plank will be determined in brick wall (With the help of a grinder) make a special stroke (at least 15 cm depth). It will place the edge bend, located at the end of the plank adjacent to the wall.
- Please note that it is strictly prohibited between bricks! This can lead to a violation of the integrity of the pipe.
- The resulting canal is cleaned of dust.
- The vertical edge of the plank is located at the pipe wall, the winding edge into the prepared hole. The installed element is fixed using multiple screws. From all sides, the pipe strip is set to the brass (15 cm) and are treated with a waterproofing composition.
- Under the bottom edge of the resulting design, a flat metal sheet is lined (in other words - tie), which is designed to remove water. He is sent to Undov or to the eaves.
- Next begin laying the main coating.
Device Plank adjoining on a soft roof
The soft roof itself is considered an excellent waterproofing material that does not require additional protection. TO soft coatings Believe:
- bitumen tile;
- rolled materials (Eroorberoid);
- polymer membranes;
- mastic materials.
Planck adjoining tiles and rolled coatings is shuting as follows:
- Works begin with a triangular rail mounting, which is needed in order to raise the edge of the coating. It can be made of a regular bar (with a cross section of 50x50), sawing it diagonally. The resulting contact will serve as an obstacle for moisture.
- A layer of bitumen mastic is applied to the plastered wall.
- Next is the material.
- In the angular joint of the roof coating and pipes (on top of the tiles), protective strips are installed. Usually for these purposes, good elements are used - endanders. The width of such a band is 50 cm.
- The inner side of the underson is labeled with a waterproofing composition - a bitumen primer or silicone sealant.
The width of the wall adjacent to the wall must be about 30 cm. In regions with a harsh climate (where a large amount of snow drops) this indicator can be increased.
- Before embarking on the arrangement of the adjoints, pay attention to the thickness of the material used as a strip. It can be equal to the thickness of the main roofing coating, however, it is preferable to use the elements are not thicker than 0.5 cm, since they are more flexible and better take the desired shape.
- The storms made in the brick wall must be thoroughly rinsed with water, since the dust remaining in them will prevent the good adhesion of silicone sealant and base.
- The waterproofing composition should be applied only on dry surfaces.
In this article, we looked at how the adjoining plane is installed correctly. Photo and installation instructions will help you perform these works on your own, which will avoid the cost of attracting qualified roofers.
We hope that we answered all your questions.
Planck adjoining
For decorative purposes in the design of connecting sites, where the roofing material and the wall of the building, ventilation or chimneysor Parapedes, it is possible to use layers of adjustment for metal tile. They are made of metal similar to its color scheme roofing. As a rule, their use is designed for the roof, where it is laid flexible tile, professional flooring or any other finishing material.
Views
Planks used when installing metal tiles, there are several types:
- Eaves. Their length is usually 2 meters, and sold in the most different colors, as a rule, which coincides with the color with roofing materials. Main material for farmery Plank. - stainless steel.
- Facial, or wired sheets for metal tile. They possess the same length of 2 meters, but they are produced wider, compared to the cornis. At the heart of this type of slats lies stainless steel on which the polymer coating is applied.
- Planck adjoining for metal tile. Its length is 2 meters, consist of stainless steel painted in colors similar to the design of metal tile.
Main functions
Planks of adjoining for metal tile - longitudinal elements in the corresponding roofing structures. Their main task is to provide frontal boards of eaves to protect against precipitation so that the water cannot penetrate inside. Their functions also include the waterproofing of the crate, however, its main function is to protect the tile in the event of a strong load from the wind. That is why, because of quite specific tasks, the end otherwise call the wind. The top plank of the adjoint makes it possible to seal the joints between the roofing elements and the fronton, as well as hermetically combined their and ventilation pipes.
The main problem of any roof is the high "protein" of the furnace adjustment, respectively, it is these sections that must be protected with greater thoroughness and reliability.
Installation
The cornisic bar is installed and mounted to the frontal board, nailed with galvanized nails to the rafters, from their ends. As a rule, it comes in sizes of 10 × 6.9 × 200 centimeters, and has a red-brown color tint. It is attached to the windshield, while the chess order is observed, and the step is 30-35 centimeters. After one barn plank, the overst of 100 millimeters fit another. To correctly finish the laying, the last plank is cut into the desired size.
Prior to the start of installation and installation of cornice slats, the creation of hooks under the drainage. The mounting of hooks is carried out directly to farmery boardAt the same time it will be necessary to make a deeper entry of their legs in the wood.
On a note: The metal tile is placed by sheets, while the beginning of work is best taken to take the left edge of the future roof.
Laying of subsequent sheets is made by waves for the last previous sheets.
Installation of end slats begins only after laying roofing material. It has dimensions of 13.5 × 14.5 × 200 centimeters. Installation face plank It is made so that the lamp is lower in the height of the component if you take a tile measurement unit, one wave. The mount is carried out using self-tapping screws, both from the top and side parts.
The manufacture of the so-called "apron" from the inside, so that the metal tile is tightly adjacent to the pipes, is done using layers of adjustment for metal tile as in the photo. The bottom is applied to the pipe, after which it marks the top level, which it reaches. The marked line is useful for pasting the hole with a minimum, a 15-millimeter depth, after which it should be cleaned and washed.
The inside of the "Apron" is set to bottom up, on the surface of the pipes. This requires cutting planks and their mount using self-tapping screws. Outlet when laying on all sides is approximately 15 centimeters to avoid the possibility of leakage. Also sealing planks using heat-resistant sealant. The external "apron" can be put in exactly also, but after after the metal tile or professional flooring is laid. Through the use of protective slats as finishing roofing elements, you can not only save the roof design in best view, but also make it more beautiful and aesthetically looking.
Video Pro Installation Planks Insuit


