Dreaming of creating your own cozy corner, you decided to buildlog cabins ... And taking a bar as a basis for a future summer cottage, you unwittingly ran into a problemmanufacture of window and doorways in wooden house... With your own handsit may seem impossible, but it is not. The main thing is to accurately understand the process and technological features of the task assigned to you.
General information on the formation of the opening.
Under construction.
The opening is made at the stage of building a log house
The hardest part of any business is getting started. Modern construction methods provide for markings for future doors and windows at the stage of building a building. That is, the opening is cut out initially, and at the end of the construction you have ready-made holes.
How it's done?
It is quite simple, having decided on the location and dimensions of the opening, and in the process of recruiting the crowns of the building, cut out the required size in the log with a periodicity of 3-4 crowns. This is done to prevent possible extrusion of the crowns, and after the end of the construction, these "crossbars" are cut out.
Tip: make the opening already 1/10 of the outgoing size, this will help with further alignment.
This technology is perfect for both simple and round logs. The profiled beam makes it even easier to form the opening and does not require a "crossbar".
After construction.
The opening is cut in the wall of the log house
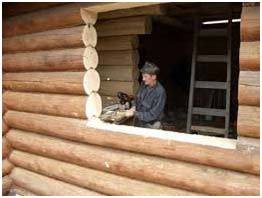
As an option for making window and doorways in a wooden house, cut out an opening in an already finished wall with your own hands. This is done using a conventional binzo / electric saw. The first and last log is cut by ½, later this will facilitate the mowing process. All irregularities are removed with a chisel and a planer.
Applicable to all types of logs. If the building is made of laminated veneer lumber, caution is required due to possible chipping and peeling of glued boards.
It is worth remembering that you need to cut the opening in the place where there are no) fastening the timber to each other.
Advice: for marking in the case of cutting, you need to use a laser level and plumb lines, otherwise the result may be unexpected.
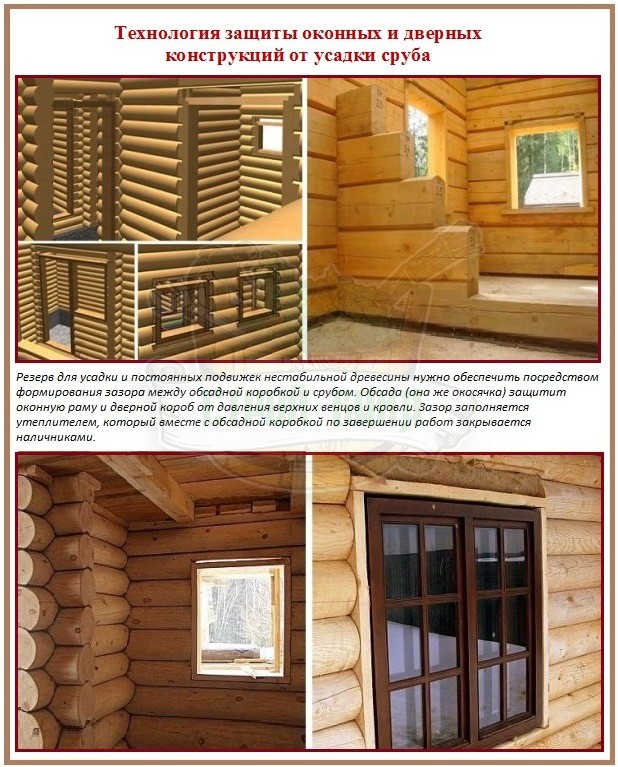
Formation of a jamb and a method of its manufacture.
When making window and door openings in a wooden house with your own hands, first of all, you need to casing the opening using one of the types of jigs.
Why is this needed?
Okosyachka or casing is needed to protect door and window openings from natural shrinkage and shrinkage of wooden logs during the operation of the building. It protects the integrity of doors and windows and prevents them from deformation. The upsetting is made in the form of a prefabricated frame made of sidewalls, a top and a sill board (threshold).
The process of making a jig is the same for all types of beams and is divided into the following stages:
- Cutting "grooves" or "thorns" in the end of the log.
- Manufacturing and fitting of parts of the casing (technology differs depending on the type of casing).
- Sequential collection of all parts of the casing.
- Installation of a window or door.
Casing options for window openings:
![]()
Monolithic connection
Basically, there are three types of okosyachki.
Consider the easiest one to perform.
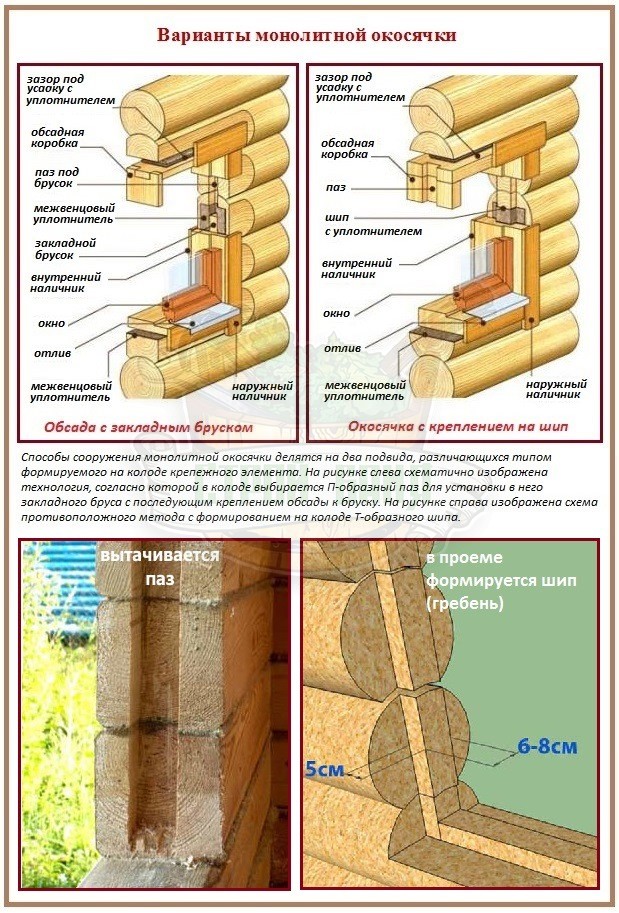
Monolithic connection... There are two subspecies.
In the first case, with the help of a chisel or a chainsaw (if it is possible), a cut ("groove") is made in the end of the timber up to 10 - 12 cm deep. Then, using the same tools, a corresponding spike is cut out in the board for casing (usually a board 5 cm thick and 15-20 cm wide is used).
All sides of the casing also have additional grooves at the end. The sidewalls have a T-shaped ledge measuring 5 cm, the upper and lower parts have a U-shaped depression. They serve to grip the box into a more stable structure.
After the spike should fit into the groove quite tightly (for this, you can also use liquid nails or polyurethane foam), but in no case "tightly" hammer it with self-tapping screws (you must not allow a hard landing). This is done so that during deformation and shrinkage of the timber, the casing can play a little in one direction or another without damaging the window or door.
This method is called T-shaped or otherwise in the deck.
The second option, U-shaped (or in a deck), is fundamentally no different, and the main difference is that the spike will be on the log, and the groove is made in the board.
The side parts of the window are mounted first, then they are wedged with a window sill, the top is installed last, also by the method of strutting the side parts.

Casing assembly and installation procedure for doorways.
Although the preparation and installation process is similar to the window casing, there are some differences.
Having selected the type of monolithic connection (P or T) and having cut the appropriate poses, first of all, you install the casing sides. Further, with the help of additional grooves, the strut of the lower part of the casing occurs. The top is mounted last. It is imperative to make a casing for the casing (you can choose any suitable material). The platband acts as an insulating component and will not allow drafts.
Note: there should be a space between the top and the building beam within 1/20 of the opening height of the window / door. This is the so-called slump gap. The gap itself is filled with a sealant and hidden under the casing.

Installation of the top
All connections are sealed and fixed with creepy nails (although in doorways, the threshold is sometimes rigidly mounted in bunches).
In no case should this be allowed in the process of making window and doorways in a wooden house with your own hands.
Firstly, you shouldn't rely on your diamond eye, a well-filled hand and an old daddy's level. Only accurate marking using modern devices will give the desired result!
Secondly, if you forget or do not consider it necessary (and why am I building a bathhouse, it will not allow you to land), you run the risk of being left, as they say, "No windows, no doors."
The third thing to remember is measure seven times, cut once. It is better to measure everything several times than then try to close up the cracks and get rid of the draft.

Strengthening the structure with liquid nails
Under no circumstances should the casing be placed on a "hard" grip with a bar, even if you just have a bathhouse. After heavy rains and a period of scorching sun, the timber can lead to the side and the casing will simply turn out.
You should not save on antiseptics and other woodworking materials, cases of rotting of timber in grooves and other contact points due to moisture penetration are not uncommon.
Do not try to use a metal hammer or a sledgehammer when strutting the sides of the window, upper and lower boards. This will deform the tree. There are special rubberized or wooden options.
Installation video
What you wanted to do but forgot or some useful tips.
- Glued profiled timber it is worth trimming with more "delicate" devices than a chainsaw, for example, with a grinder, in order to avoid structural damage.
- Before you start installationokosyachki, it is worth checking carefully again its connections with other parts (assemble it several times outside the opening, insert individual parts into the opening and check their adhesion)
- Oddly enough, but tow is the best suited for sealing cracks and at the same time quite elastic.
- One of the options for sealing between the top and the bar can be ordinary glass wool (it is worth filling it tightly into the gap and closing it with a casing), it perfectly retains heat and has excellent shock-absorbing capabilities.
- Try to keep yourself from large window openings and attics - this greatly affects the stability of the log house.
Finally.
Thanks to modern construction technologies you can choose any desired size of the window or door, and if you get an error in the miscalculations, or just something went wrong during the installation process, you can always order a door or window of a larger area. And in order not to tempt fate in the future and not try to master the manufacture of window and doorways in a wooden house with your own hands, it is better to invite the hands of a professional and a master of his craft.
08.05.2015 13:11
Wooden buildings of various types have been known to mankind for a very long time. Peasant huts and baths were built, churches, schools, public buildings were erected. To this day, wood has not lost its relevance as construction material... It is not only easy to handle and lends itself easily to the skillful hands of craftsmen, but also absolutely environmentally friendly, beautiful and aesthetic. Let's take a look at what we need swarms.
What is a swarm for and what is it

Unfortunately, when building houses and other objects from a bar or log, you can very often face a rather serious problem - deformation of window and door openings. With what it can be connected? There are several reasons for this:
- too damp wood that was used in construction;
- the wrong type of wood for this particular construction project;
- adverse weather conditions during the construction of the facility;
- violations of construction process technologies;
- very fast shrinkage of the building.

It is quite possible to minimize the curvature of the openings to a minimum. To do this, firstly, you need to use high-quality dried wood and, secondly, you need to install swarms in each opening. So what is it and why is it needed?
In principle, this is a regular block of wood, mainly of square cross-section, which is mounted in the end of the finished opening before the door or window structure is installed. If you do not install, for example, a swarm in windows, then during shrinkage, the opening can significantly change its dimensions and even lose its correct geometric configuration. Installation in doorways is also important and mandatory if, after a couple of months, you end up not wanting to see a skewed door. The opening made for a future window frame or door in a wall made of a bar or log is not supported by anything. That is why, when the building shrinks, its unwanted deformation occurs. The opening will definitely weaken over time, so the door frame or window frame can simply "hang" on the fasteners.

Manufacturing and installation: tricks and nuances
To make the "correct" swarm, you should remember and know some of the subtleties of the process. Please note that this product should be made of the highest quality dried timber. Wet wood is not suitable for swarm production. In terms of its thickness and width, the swarm should ideally match the size of the cut, into which it will be installed in the future. Its length should be about 5-8 cm shorter than the height of the finished opening. It is this difference that will provide a reliable stop and protect the opening from bending. Height clearance is only left at the top!
Care should be taken when installing rooks. Be sure to note: they must be placed exactly in the middle of the sawing at the end of the timber or log used for the construction of the building. Thanks to the swings, you can effectively solve the problem of subsidence of door and window openings.
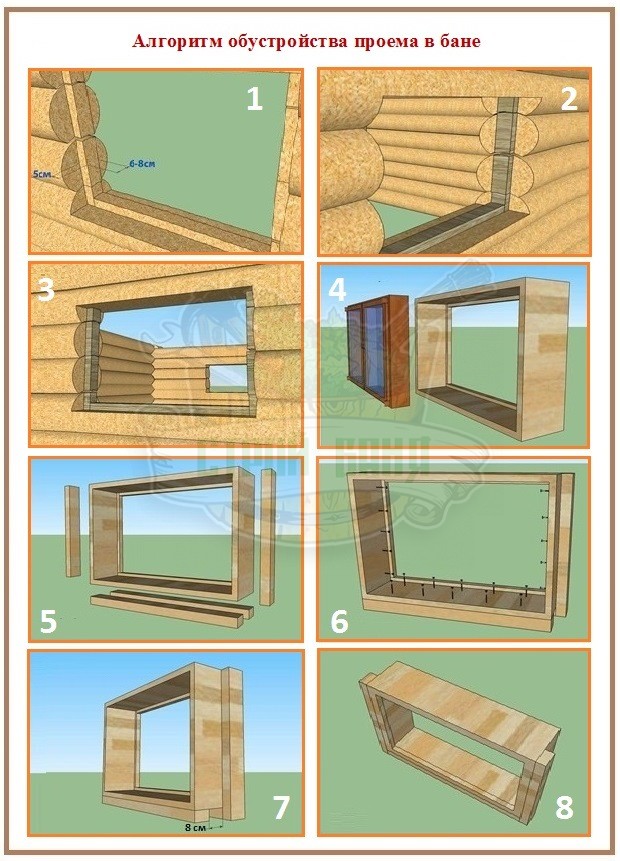
How to mount correctly
1. Cut a hole in the wall for a window or door, then process the opening.
2. In the inner part of the opening, a longitudinal cut is made in the form of a smooth, perfectly cleaned groove.
Important!
The cutting depth must match exactly the thickness of the swarm. The length of the cut should be 5-13 cm longer than the swarm size.
3. Further, all the swarms are placed in the places prepared for them, and only then doors or windows are installed in the openings.
It is worth noting that after installing the door or window frames, there is still a small gap between the swarm and top the opening, approximately 4-6 cm. Subsequently, it is filled with insulation, which also plays an important role and helps prevent the building from sinking.

Thus, you can easily get rid of unwanted cases of deformation and distortion of wood. They reduce defects associated with drying out and sagging of wooden buildings, so if you want to build a durable and cozy home, take care of their installation. At first glance, a swarm is a primitive piece of timber, but its functionality is very high. It will not allow the wooden structure to "sink" so much that the opening for the window or door is irreversibly bent, and it will take you a few minutes to install the swivel.
Having cut a longitudinal spike at the end in the openings for a door or window and inserted a bar-swarm there, you can not worry that any mechanical or other influences will affect the configuration or dimensions of the openings. No shrinkage will allow the built-in structures to loosen on fasteners, twist or lose their optimal functionality. The main thing is not to rush to the installation. door frame or window frame. Install a swarm and everything will be perfect with a wooden structure!
1. Openings are arranged both in stone, and in frame and chopped wooden walls, as well as - the side of the opening to about and in stone, plaster, wooden and other partitions
Openings are made wider than window sashes and door leaves by the thickness of the boxes. In addition, a gap must be left between the box and the structure of stone walls or partitions for subsequent sealing with thermal insulation or other material.
2. In frame buildings, the opening is formed by the appropriate installation of frame racks; in panel houses, the opening is left in the panels, while simultaneously with the manufacture of the panel, a box is installed and binders or doors are hung.
3. In stone walls and partitions, openings are left in the process of laying the walls. To fix the boxes, simultaneously with the masonry, antiseptic and tarnished dry wood corks, equal in size to brick, are laid in the side parts of the opening. Plugs are installed at a distance of no more than 1.5 m and at least two on each side of the opening.
4. The size of window openings in stone buildings with different floor heights and for different sizes of bindings are given in table. one.
5. Window openings in stone walls are made with quarters on the sides and in the upper part of the opening.
The size of the side quarters along the width of the opening e can be 65.75 and 100 mm, depending on the processing of the outer slope; the size of the upper quarter of the opening height is 75 mm (fig. 1)
Figure: 1. Scheme of the window opening
6. The opening for doors (Fig. 2) can be with quarters and without quarters. The size of the side quarters along the width of the opening is 75 mm. However, a quarter and 65 mm are allowed; the size of the upper quarter in the height of the opening is 75 mm.
The height of the doors can be 2,300 and 2,000 mm, therefore, for the opening height in fig. 2 shows two dimensions (the height of the opening is shown from the finished floor). 
In fact, the opening is made larger by a certain amount h, which depends on the floor structure and is usually 70-150 mm.
The width of the doorway a is taken: wider than the door leaf by 170 mm with a door leaf width of 1,790 and 1,290 mm and by 160 mm - with a door leaf width of 900, 850 and 750 mm.
Door leaves 650 mm wide are not used in stone walls. The width of the openings for balcony doors is the same as for windows of the corresponding size.
The top of the openings for the window and balcony door must be at the same level. The bottom of the opening for the balcony door is made 100 mm lower than the clean floor.
Figure: 2. Diagram of the doorway
Table 1. Dimensions of window openings
| Distance from the level of the finished floor to the bottom of the opening (d) | Distance from the top to the level of the finished floor of the above floor (d) | ||||||
| outer binding | floors | outer binding | |||||
SECTION 7. WINDOWS AND DOORS
Windows are designed for lighting, insolation and ventilation of premises. For normal lighting of living rooms, the area of \u200b\u200bthe windows is taken in the range of 1: 8 - 1: 5.5 floor area.
The shape and location of the windows depends on the architectural design of the building. In addition to the above, thermal, acoustic, and environmental requirements, as well as ease of use, are imposed on the windows.
The elements that fill the opening left in the wall, and sometimes in the roof, are called filling the light opening. It consists of a window frame, glazed window sashes, a window sill, an external weir and glazing (Figure 7.1). The set of elements for filling the light opening in assembled form is called a window block. The vertical side edges of the window opening are chamfered inward for better illumination.
Figure: 7.1. Window fill elements:
1 - window box; 2 - cover flap; 3 - transom; 4 - window board; 5 - impost; 6 - middle man; 7 - external weir; 8 - glass
Elements for filling a window opening can be made of various materials: wood, metal (from steel and aluminum profiles), wood-aluminum, plastic (with or without reinforcement, from various synthetic materials). Each material has its own peculiarities of application, has positive properties and disadvantages. For example: metal - strong, durable, easy to use, but heavy, require a lot of metal. Filling of openings made of synthetic materials have: light weight, non-rotting, beautiful appearance, but expensive, to ensure the required durability, their material must correspond to climatic conditions. Minimum warranty period for plastic windows according to GOST - 3 years. Wooden ones are light, beautiful, resistant to temperature extremes and exposure to direct sunlight, environmentally friendly, but do not provide a tight adjoining of the porches, require periodic painting to prevent decay, etc.
Wooden window blocks for civil buildings are produced in accordance with GOST, which provides two options for blocks: with separate outer and inner bindings (P series), and with paired bindings (C series), where both bindings are bolted together and are separated only to remove dust (Fig.). Paired binders are widely used in modern mass construction. * / 1 Windows with separate sashes are typical for buildings old building and for buildings built according to individual projects. */2
Plastic windows are mainly made with double sashes. In addition to the traditional opening, plastic windows have turn-and-turn sashes, controlled by one handle.
Figure: Double-glazed wooden sash with triple glazing.
a - vertical section; b - horizontal section along the impost.
______________
* / 1.Note: Modern windows with paired wooden frames and double glazing have a heat transfer resistance of 0.38 m 2o C / W, which is insufficient, since the required heat transfer resistance (according to SNIP II-3-79 and SP No. 232/13 ) should be about 0.60 m 2о С / W for the central part of Russia.
* / 2. For new construction and major repairs with the replacement of window blocks, window blocks must be used that provide the required resistance to heat transfer (0.60 m 2o C / W). Such a design is: double glazed sashes with triple glazing (Fig. 4). For heat engineering reasons, wood is preferable as the box material (metal and plastic conduct heat strongly and condensation can occur on them), but the use of technological, extrusion profiles is also allowed (plastics with a steel core or aluminum alloys). Stronger and more durable than PVC and aluminum profiles are polyurethane and polyolefin profiles.

Figure: Wooden window blocks with split and bindings
a - ordinary; b - overlaid;
1- glazing bead; 2- drip trough; 3- low tide; 4- surfacing;

Figure: Wooden window blocks with double sashes.
a - normal; b - wood-aluminum; 1 - window box; 2- glazing beads; 3- slot for condensate drainage; 4- insulating pad; 5- surfacing; 6 - inner binding; 7- outer binding; 8- clamping screw; 9- screws; 10 - aluminum cladding profiles.
Window sashes consist of openable, fixed or combined sashes. The number of leaves determines the type of window. According to the number of leaves, bindings are: single-leaf, two-, three-leaf. In some cases, the windows are combined with balcony door... Window frames consist of vertical elements - sashes and horizontal - transoms. The doors and transoms open inside the room; this creates the convenience and safety of their hinge, as well as changing and wiping glasses; open doors are not damaged by rain and wind; broken glass does not fall on the street. Sash opening in different directions is permissible only in one-story buildings.
In the absence of opening transoms for ventilating the premises in cold weather, vents are arranged in the sashes, at least one in each room. The vents with separate bindings represent an independent element and are hung directly on the window frame. (Fig.)
By the number of glasses, windows can be single, double and triple glazed. Triple glazing improves the thermal and sound insulation properties of windows (for example: they can be used in residential buildings overlooking a railway or a busy highway with an increased noise level, as well as to provide the required resistance to heat transfer).
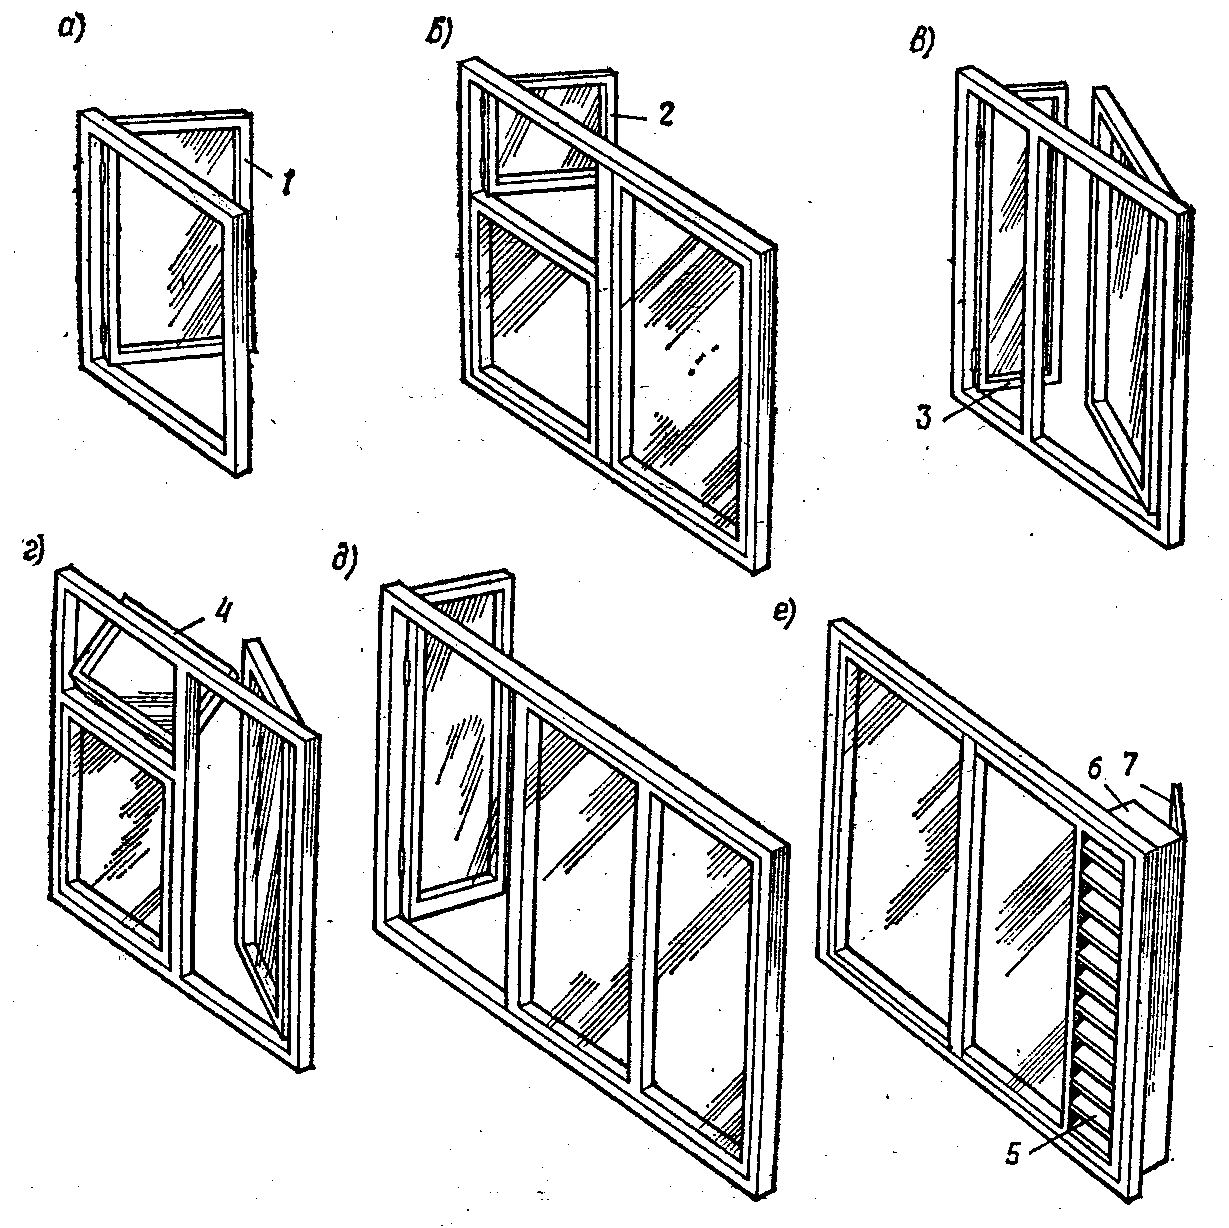
Figure: Window blocks for residential and public buildings.
a - single-leaf; b - bivalve (with a window); b - bivalve (with unequal valves); g - bivalve (with a transom); d - tricuspid; e - deaf with non-opening flaps and a ventilation valve; 1- sash; 2- window leaf; 3- narrow sash; 4- transom; 5- louvered grill; 6- box; 7- ventilation door.
For glazing windows, ordinary glass with a thickness of 2-6 mm is used. or glass with special properties, for example, patterned, tinted, transmissive ultraviolet rays, armored, etc., in accordance with the requirements of the premises in which they are installed.
* / Note: windows with twin sashes give more light, save 30% wood, 10% cheaper and 1.5 lighter in weight than split sash construction, but have more heat loss up to 25%.
Structures for filling window openings.
Wooden window frames installed in the window opening are nailed to antiseptic embedded parts in the window openings of the stone walls. The gap between the box and the masonry of the opening is carefully poured with tow soaked in a gypsum solution.
Plastic windows are attached to the opening, and the gap is sealed with construction foam. The design of transom sash consists, as a rule, of four contour bars, forming a strapping. The bars are connected in the corners with through spikes on glue and are attached with wooden dowels. Sometimes slabs are introduced into the structure - narrow intermediate blocks that reduce the size of individual glasses. From the side of the room, rounded bevels are attached to the straps and sills, and from the outside, quarters for inserting glasses (folds) are selected in them. The glasses are inserted onto the putty, and from above along the second layer of putty they are reinforced with wooden glazing beads (trapezoidal strips). In the lower bars of the outer sashes and transoms, there are ebb tides to drain rainwater flowing from the glass.
According to the shape of the cross-section of the straps, the bindings are overlapped (Fig.) And simple (Fig.). Surfacing is the protruding edge of the strapping that closes the gap between the binding and the box. In order to seal around the perimeter of the inner sash and transom, gaskets made of porous rubber or half-woolen cord are reinforced. The same gaskets should be used in the porches of internal bindings without overlapping. Overlaid bindings are more expensive than simple bindings, but have low airflow and are easier to operate (do not require putty for the winter).
In paired sashes (Fig.), The inner sashes are hung on the window frame, and the outer sashes are hung on the inner ones. The leaves are fastened with special screws.

Figure: ... Window blocks for residential (a) and public (b) buildings.
1- window box; 2- vertical impost; 3- horizontal impost; 4- bindings; 5- window; 6- slabs; 7 - transom.
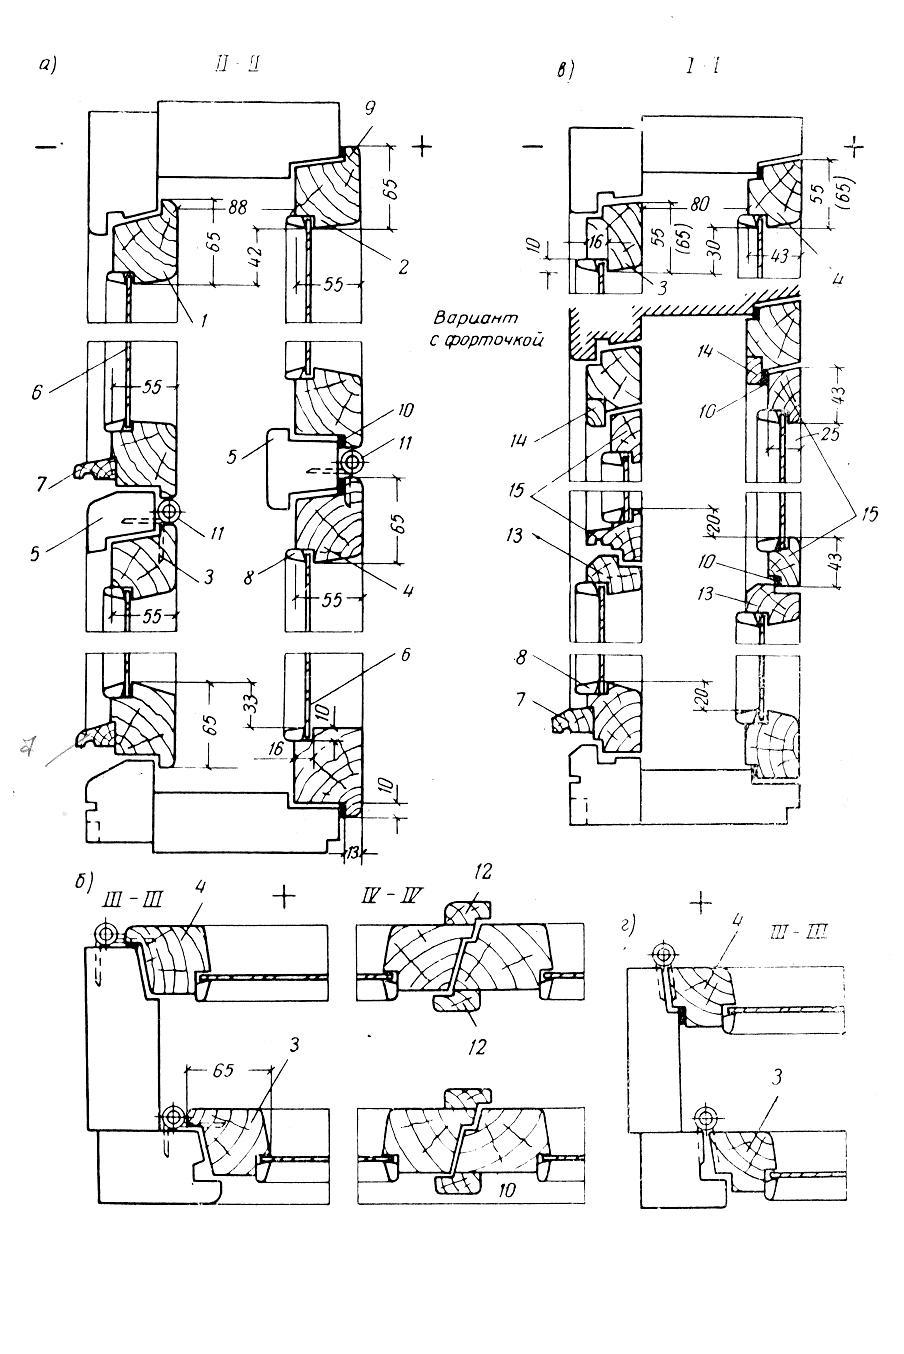
Figure: .Sections of separate bindings
a, b - overlaid; c, d - simple; 1- outer transom; 2- inner transom; 3- outer binding; 5- horizontal impost bars; 6- glass; 7- low tide; 8- glazing bead; 9- surfacing; 10- sealing gasket; 11- transom loop; 12- cover plate; 13- slabs; 14- bar; 15- piping of the window.

Figure: ... Sections of paired bindings.
a, b - vertical section; в - horizontal section; 1- inner binding; 2- outer binding; 3- slot for water drain; 4- sealing gasket; 5- loop; 6- window sill board.
Standard GOST window blocks for individual and brick buildings are not suitable for chopped walls. The design of the window frames should fasten the crowns of the log cabins at the openings. Such boxes are called wells, they are much more massive than GOST boxes. On the back sides of the side and bottom bars of the box, grooves are chosen, which are put on the ridges at the ends of the logs that form the side edges of the opening, and in the lower log of the opening. The window block must be greater than the thickness of the walls by the thickness of the inner and outer cladding (if such is foreseen, see der. Walls)
Bindings are supplied with window fittings. These include hinges (hinges), window latches (upper and lower), brackets (handles), window wraps, devices for opening and closing transoms, etc.
Sill boards in windows with wooden filling are made of wood or reinforced concrete with textured front surface. The overhang of the sill board from the bottom should have a groove-drip to drain condensation moisture from the walls. Sill boards are installed in the opening on a layer of gypsum mortar with a slight slope towards the room.
The structures of steel bindings are similar to those used in industrial buildings.
Instead of wooden ones, it is possible to use precast concrete window frames (Fig.), Which makes it possible to partially or completely abandon the installation of lintels and window sill boards. For attaching window frames to such boxes, embedded wooden plugs are provided in them.

Figure: Reinforced concrete window box.
Roof windows
To illuminate the attic rooms, windows located in the roof plane can be used. They provide 30-40% more light than dormers of the same size. An example of such a window is roof windowsdeveloped by VELUX (Fig).

Figure: .VELUX window in attic roof
The structure of the window unit consists of a window frame and a window frame made of high quality wood with painted aluminum outside cladding. The frame is a double-pane glass unit with the ability to rotate 180 ° when opening (Fig.). Installation of a window unit in mansard roof is shown in Fig.

Figure: .Opening of the window is possible 180 °.
* / Note: A double-glazed unit consists of two panes with a hermetically filled space between them with dry air.
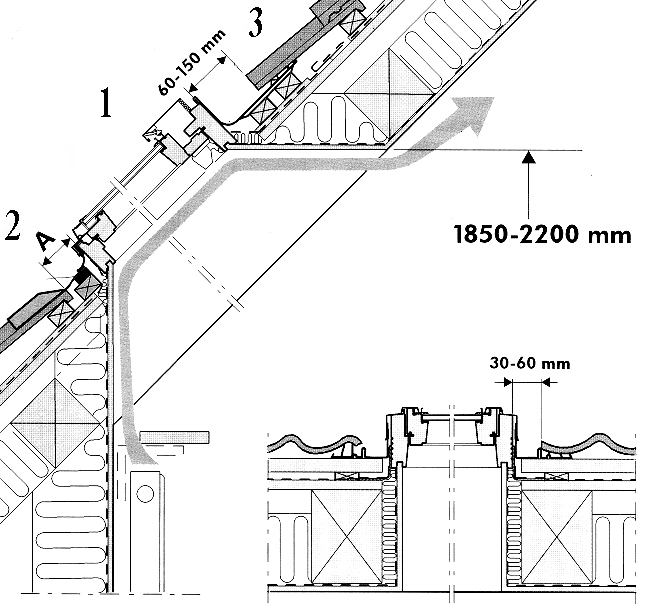
Figure: Installation diagram of a VELUX window in a mansard roof.
1-window block; 2, 3-apron waterproofing.
These windows are intended for use in roofs with a slope of 15 ° to 90 °. Fastening of the box windows to the supporting structures of the roof (rafters) is carried out using mounting angles with screws.
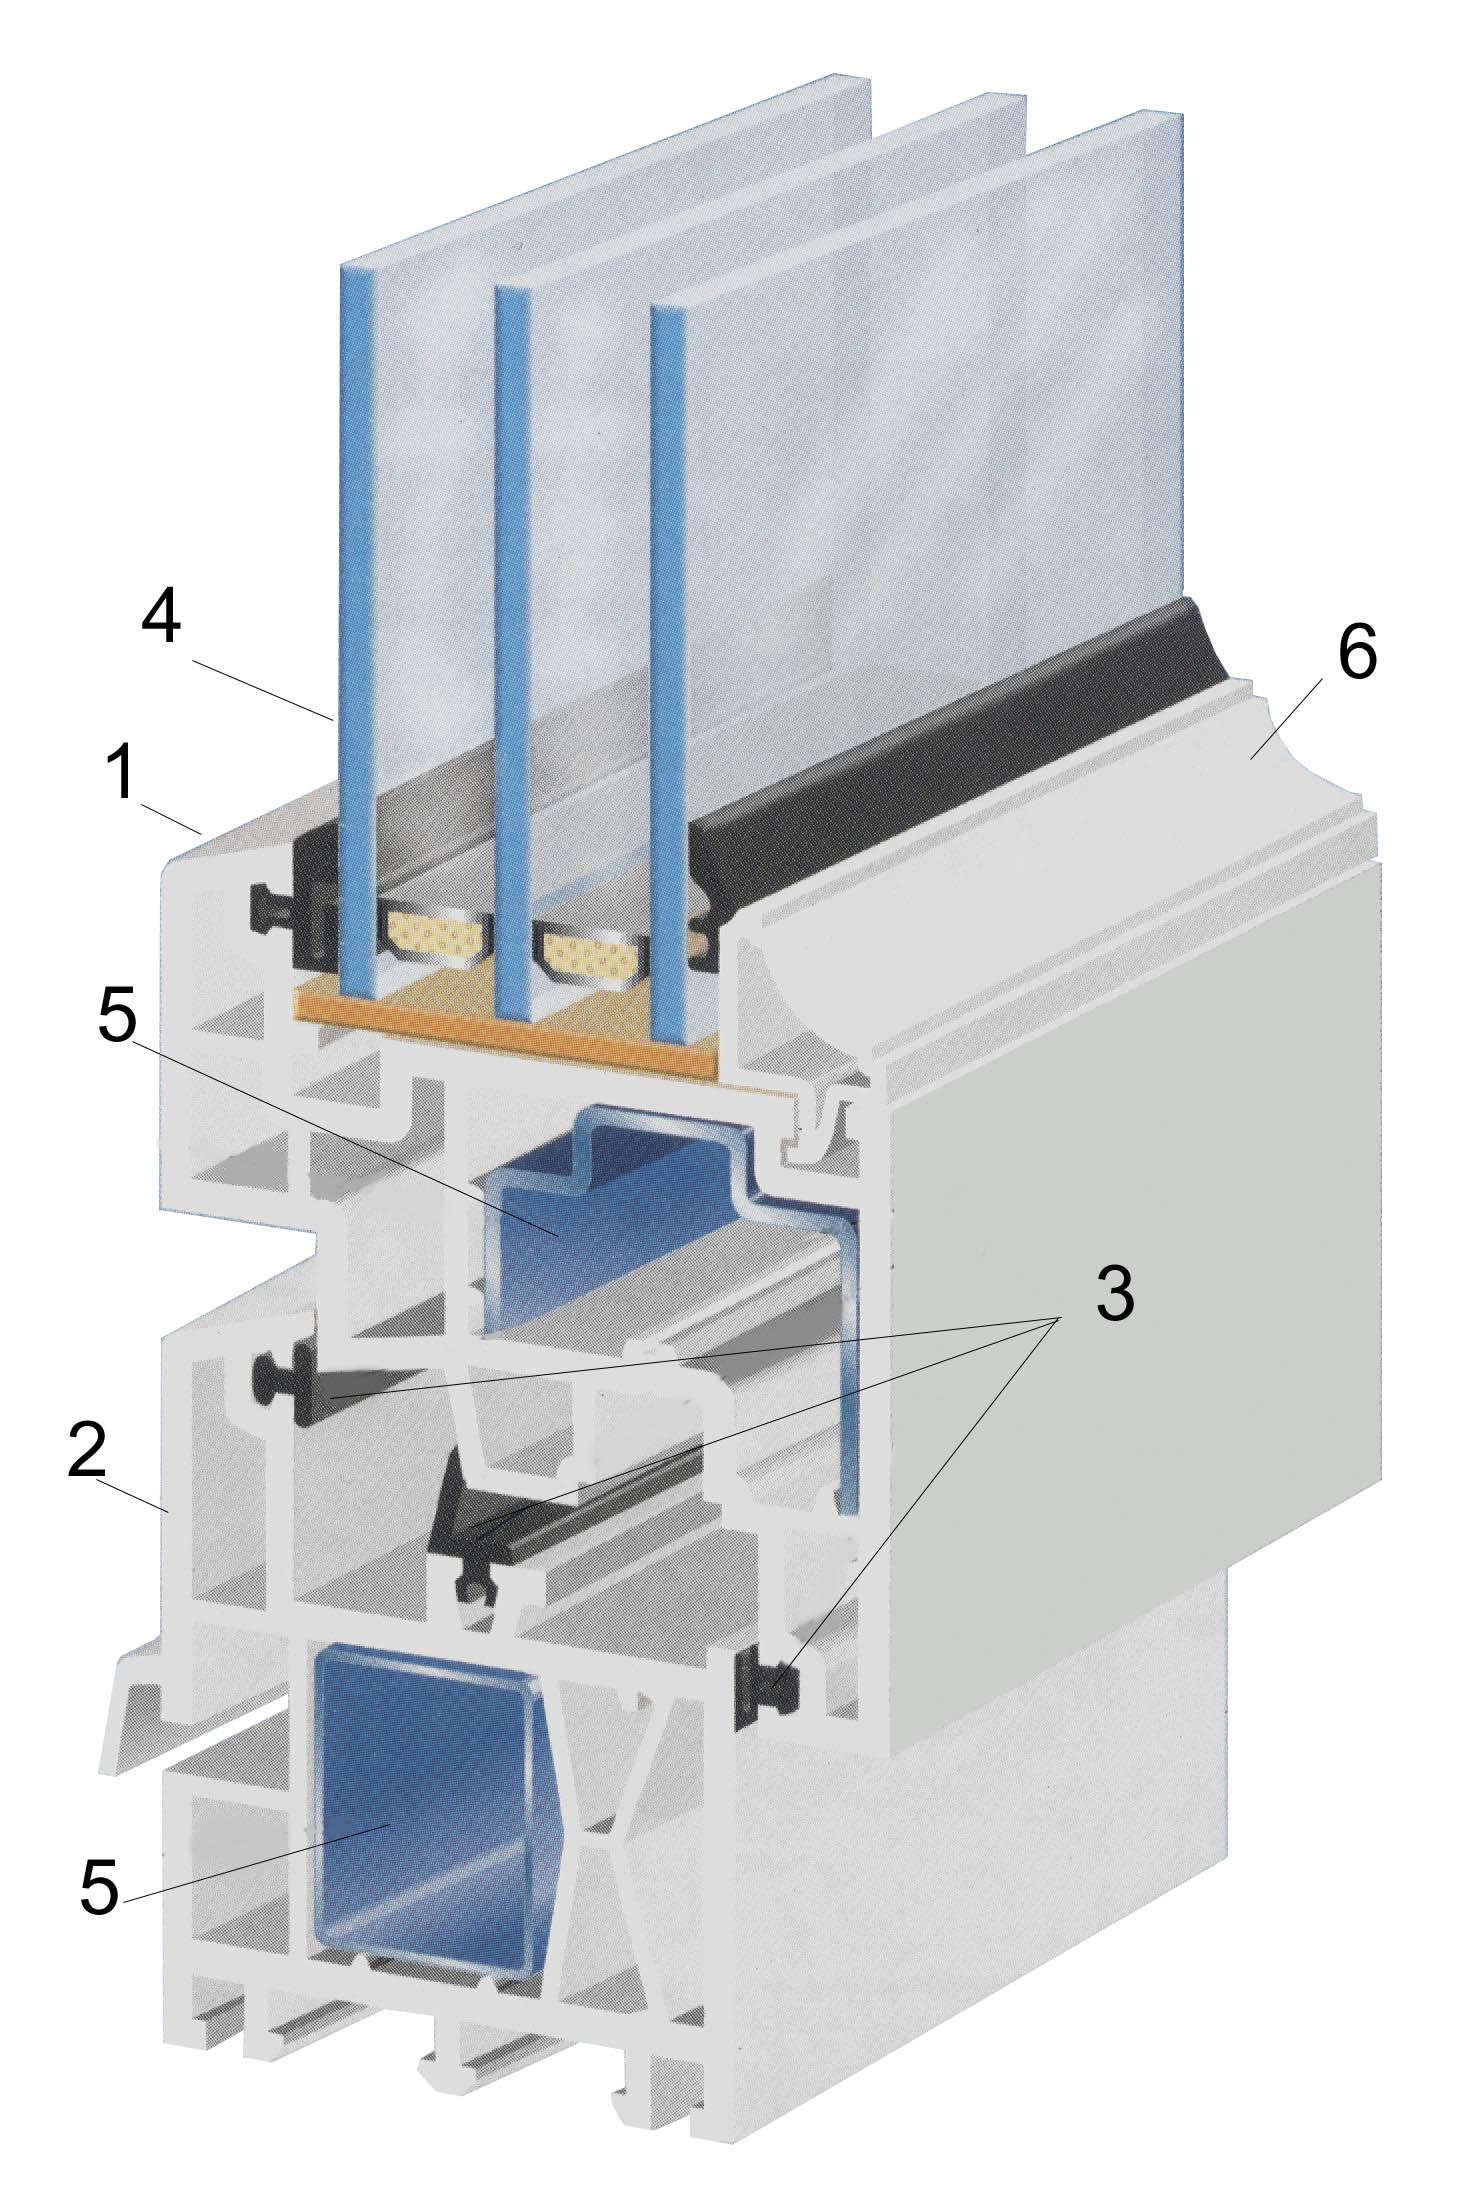
Figure: ... PVC windows
1- sash; 2- four-chamber frame; 3- seals; 4- multi-chamber glass unit without additional profile; 5- reinforcement with corrosion-resistant steel profiles; 6-piece glazing bead.
* / Note: A ratio of window area to floor area of \u200b\u200b1:10 is recommended to ensure sufficient illumination.
Glazing of large surfaces of public buildings (shops, sports facilities) is carried out using glass showcases. They can be the full height of the floor or form a strip glazing. (Fig.)
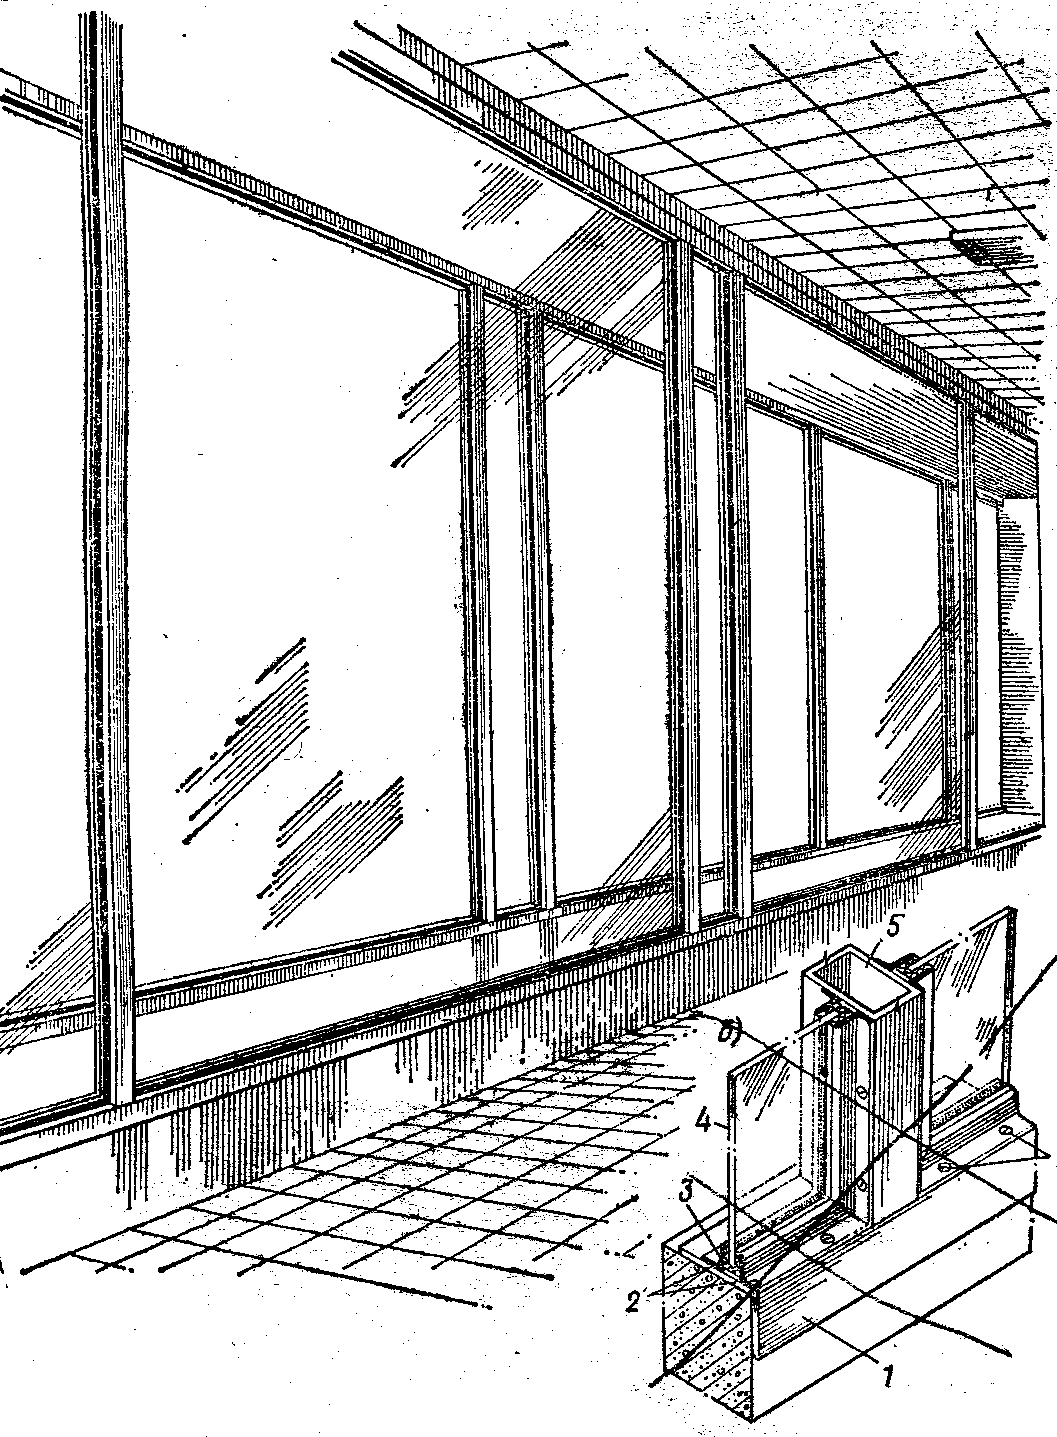
Figure: ... Showcase. General form.
For showcases, special showcase glasses are used. They are thicker than ordinary window frames (6-8m) and can have special properties, for example, they can be mirrored, bulletproof, etc. They are installed in wooden, metal and plastic frames. The most common metal bindings for display cases, as they are strong, durable, easy to use. The design of showcases should ensure winter time no condensation, fogging and freezing of glasses (Fig.).

Figure: ... Shop window.
a - vertical section; b- glass fastening details; 1,2- vertical
imposts; 3- mounting angles; 4- showcase glasses; 5- rubber gaskets; 6- welded rivets; 7- screws.
A special type of filling of window openings is masonry made of glass hollow blocks. These blocks have good light transmission, but are not transparent, as they have a corrugated surface. They are used in sports medical facilities and industrial construction. They are laid on a cement mortar and form a transparent filling of the window opening with a glass block thickness. (Fig.)

Figure: ... Filling windows with glass blocks.
By location in the building, external and internal are distinguished. External doors are divided into entrance and balcony doors. The doorway filling consists of a door frame and opening door leaves. Doors are single-sided, double-sided and one-and-a-half - with two canvases of unequal width. By material, door leaves are divided into wood, glass and metal. Wooden ones are divided into panel boards and paneled ones and can be deaf or glazed for illumination with a second light of auxiliary rooms; for the same purpose, they are sometimes made with a transom installed in a common door frame. Balcony doors are always glazed (Fig.).
Panel boards are solid or hollow panels with a thickness of 30-40 mm. with or without covers along the perimeter (Fig. a). Solid panels are glued from wooden strips or made from chipboards. Hollow panels usually have a frame-sheathing structure. Outside, door panels are veneered on all sides with veneer, plywood or hard fiber boards.
 a) d)
a) d)
 b) c)
b) c)
Figure: Door leaves.
a - general view of a single-floor panel door; b - also a double panel door; в - also a double panel door; g - also a paneled door.
Paneled door leaves (Fig. B) consist of a strapping, one or more mullions and panels, i.e. shields filling the frame formed by strapping and midships. Panels are glued from boards or plywood.
Doorways are filled with door blocks, consisting of a box with hung canvases equipped with devices. The dimensions of the doors are chosen taking into account the required throughput and dimensions of furniture and equipment. Internal door blocks are standard and manufactured in accordance with GOST (Fig.)

Figure: ... Installation of door blocks.
a - in the openings of stone walls; b- in the openings of partitions; 1-balcony slab; 2- door frame; 3- roofing strip; 4- antiseptic wooden insert; 5- partition; 6 - bar framing the opening; 7- platbands.
The door frame consists of a strapping with quarters for hanging the door leaf. If there is a transom, a horizontal impost is introduced into the box. In the boxes of interior doors, the lower strapping beam (threshold), as a rule, is absent. Frames of balcony doors, the canvases of which are made double for thermal engineering reasons, are made according to the type of window.
Installation of door frames in openings of stone walls with quarters (in the outer walls) and without quarters is shown in (Fig.). When installing the door frame into the partition, the width of its strapping is made equal to the thickness of the partition. The boxes are fastened with nails to vertical bars framing the opening or (with stone partitions) to wooden corks embedded in the masonry. For sound insulation, the seams between the box and the partition are caulked and covered with platbands (profiled boards).

Figure: ... Door frame elements.
a - sections of the bars and cuts of the door frame; b- detail of the box installation in the openings with quarters; c - the same in openings without quarters; 1- upper bar; 2- impost (with a transom); 3- lower bar (threshold); 4- board (in the absence of a threshold); 5- door frame; 6- wooden cork; 7- caulk.
* / Note: Standard sizes for interior door panels are set: 2000 and 2300 mm in height, 600, 700, 800, 900 and 1100 mm in width for single doors, and 1200, 1400 and 1800 mm for double doors.
Glass doors are used in public buildings (shops, cinemas). They are made of 10 ~ 15mm thick tempered glass. without strapping. Such doors are installed on metal thrust bearings, which, like door handles, are bolted to the glass. Metal doors are non-combustible and are made of 1 or 2 layers of sheet steel. The frames and trims of such doors are made of rolled profiles or tubular sections. Refractory ones include one, two, three-layer canvases with asbestos gaskets and cladding with roofing steel on all sides. The frames of such doors are also sheathed with roofing steel. Fireproof and non-combustible doors are installed in firewalls, from stairwells to the attic, and nowadays, metal entrance doors have become widespread.
Door devices are: hinges (hinges), mortise and overhead locks, latch locks that combine mortise locks and handles in one device, staples (handles) of various shapes and sizes, mortise latches for holding one half of a double door in a closed position, etc.


Regardless of the size of the sauna building and the aesthetic preferences of the future owners, the issue of arranging windows and doors requires a detailed analysis. To install these functional structures, openings are required, the location and dimensions of which should be thought out and calculated in advance. The design of window and door openings for cans from a bar or a log is carried out taking into account specific rules, depending on the operational characteristics of the hygienic structure.
Why is it better to design everything in advance?
A number of important functions are assigned to the windows and doors of a country bathhouse, by analogy with their other associates. They are "on state" supposed to let lovers of bathing pleasures, natural light and streams of fresh air. It is not supposed to contribute to the loss of the required temperature, the creation of drafts and the violation of the technical condition of the building.
Architectural prerequisites
Country baths are built for the reception of procedures adored by the people, attracting not only with standard hygienic action. The indisputable priority of bath ceremonies is reasonably considered the healing power and tonic effect. They are achieved through the influence of steam, heat or heat and a special atmosphere. Therefore, the main task of construction is to preserve a favorable regime, and not to architectural "perfection".
Although no one claims that these two concepts should enter into irreconcilable contradictions with each other. In the name of preserving the not at all cheap bath atmosphere, it is customary to make the openings as small as possible, which is why the bath houses sometimes look "deaf" and "half-blind". If you do not know how to correctly design doors and windows for a bath, the aesthetic component can be seriously affected.

Consideration of inevitable shrinkage
Steam and heat are far from the best allies of wood, which is very sensitive to unstable humidity and fluctuations in temperature. Natural organic matter either increases in volume or shrinks following the changes occurring around the bath walls. In addition, like all wooden buildings, the bathhouse will surely sink. In the first year, quite rapidly by 3-5 cm, depending on the quality of drying of the sawn timber and the type of wood. Then it is no longer so briskly by 1 cm or less. However, the movements inherent in wood will occur constantly, which must be taken into account when designing openings. Otherwise, the sagging crowns will simply squeeze out the window structures, and at the same time will warp the roof and jam the door.
Formation of openings in bath wallsmade of a bar or log is not at all an easy matter. To provide a reserve for the tireless movement of wood, it is necessary to leave gaps filled with insulation. Too large a gap will allow structures to move freely without breakage and damage, but it will become an undeniably attractive area for heat leaks. Insufficiently wide stock does not guarantee the safety of window frames and door frames, which again persistently suggests the need for preliminary design.
Ensuring the strength of the structure
Among the compelling reasons for planning in advance the installation sites of window and door structures is the need for a competent distribution of dowels or multifaceted wooden coke connectors. They are used to keep the crowns of a log house from lateral deformations and from displacement of long wooden elements relative to each other. In the wall between adjacent openings, fastening should be done by installing at least two connectors on the crown.
If the openings are formed directly during construction and the walls are made up of short stacks, it is impossible to forget about installing rallying pins or cokes. However, the carpentry masters, brought up on the experience of previous generations, strongly recommend initially erecting blank walls for uniform shrinkage of the entire log house. This method avoids sometimes perceptible differences in the height of individual components after shrinkage. True, the consumption of lumber increases, which does not bother those who want to build a beautiful solid bathhouse. According to the recommended scheme, all openings, except for the input brother, are cut out or cut out with an electric saw after a year of shrinkage of the log house, but an inexperienced builder may not lay the dowels in the required place.

In order to clearly identify the location of the openings and walls in the "blindly" laid log, the hole is left only in the crown on which the window sill board or the sill of the interior door frame will rest. Further, the logs or timber are laid according to the principle of blank walls, and the cutting formed in the crown tells the builders where to install the connecting pins.
Impact of casing option
Casing or casing, it is also a box, is an obligatory element of installation in a frame of a window or door structure. It simultaneously performs several important working functions:
- serves as the basis to which windows and doors are attached in the bath, because window frames and door frames are strictly forbidden to be fixed to unstable wooden walls;
- its vertical elements play the role of a kind of guides, along which there is a gradual movement of door and window structures in the process of shrinkage;
- strengthens the frame in the area of \u200b\u200bthe opening, providing a static position, in other words, holds the laid logs or timber in a given position.
In the arsenal of experienced carpenters, there are many options for the production of a jar, differing in the method of execution. All kinds decide in the end common tasks... Structurally, in any design, they are a wooden box, in fact, which is a buffer between the log house and what is mounted in the opening. Any cage is fastened into the opening according to the thorn-in-groove principle.
Please note that fixing the casing to the frame with self-tapping screws or nails is unacceptable. The tightness of the joining of the spikes and grooves is achieved by laying a heater. It is forbidden to use polyurethane foam along the lines of the junction and the log house.
Common methods of casing construction:
- Installation "in a deck". On the vertical ends of the opening, spikes are formed by sawing or careful cutting for the subsequent attachment of carriages or thick boards to them with a groove cut or cut along the central axis. If the independent designer prefers this method device, then he needs to take into account the thickness of the board or an equivalent size of the carriage. They will partially narrow the opening;
- Installation "on a foundation beam". In the vertical ends of the opening, a groove is selected to install the embedded beam. Because "Floating" bar is laid flush with the end plane of the opening, then the size of this hole will be affected only by the thickness of the casing nailed or bolted to the bar. But the window frame or will be attached to it. Hence, the size of the casing must be taken into account;
- Budget analogue of the previous version, consisting only in the installation of the embedded beam in the grooves selected at the ends of the frame. With this economical method, the frame is immediately attached to the movable rail on the mounting plates. Those. the stage of construction and fixation of the casing to the embedded bar is completely absent along with the material consumption.
The last budget method is not reliable. It can be used only for the installation of small in size and weight window frames. Canvases bath doors usually quite massive. They are made of wood, which becomes even heavier under the constant influence of moisture. The bar simply will not withstand a couple of spiritual slams, produced by the indignant bath attendants.

We found out that windows and doors to the bathhouse can be installed different waysby following one or all of the above methods. There are and are actively used numerous variations on the outlined theme of ossicles. Often, the openings are not selected during the construction of the crowns at full size. Bring them "to mind" before the immediate implementation of the finishing. However, it is recommended to form the entrance door frame during the construction of the log house with the reinforcement of the end of the logs with embedded bars. The top of the entrance opening is connected with a temporary jumper, which eliminates distortions.

In general, if you plan to build a bathhouse with your own hands, at least approximate projects of openings are necessary to mark the installation site of frames and attachment points with studs.
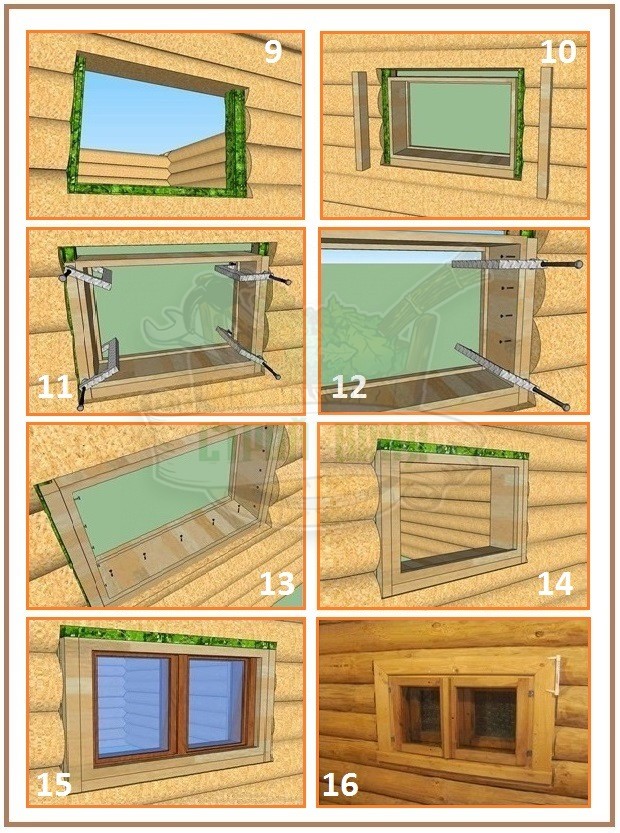
General rules for the construction of openings
The device of a window in any of the following ways is a prerequisite for the installation of windows and doors in wooden blockhouse... Even if it took several years to shrink. Equivalently required is the formation of gaps between the structure mounted in the opening and the end face of the assembled crowns directly.
Leave between the door or window structure to be installed and the window:
- on the side edges of the log house, 1.5 - 2 cm on the left and right;
- on top 6% of the height of the installed frame;
- bottom 0.5 cm for laying insulation for a window or birch bark as a natural waterproofing under the door frame.
Anyone who is going to show personal joinery and carpentry skills in self-made boxes and frames, easier. He only needs to accurately plot the distances in each of the openings being equipped. To do this, arm yourself with a dash - a compass-like carpenter's tool. The "Sword of Damocles" of specified dimensions does not hang over the head. A little more or a little less the opening will come out - not very important. The main thing is to reduce the excess equally. After all, the home craftsman has to make frames for the openings, and not vice versa.
With sawing openings for factory window and door structures, you will have to tinker carefully so that the hole in the log house clearly matches the size. To avoid the formation of gaps that are too large, impairing the insulating qualities and aesthetic aspects. It is better to first cut the opening according to the exact dimensions of the frame, and then cut the excess under the casing and mounting clearances along the contour. Please note that the use of polyurethane foam along the casing and window frame mating lines, as well as the casing and door frame, is allowed.


Choosing the right size
This is not to say that the recommended sizes are regarded as a technological dictate, but it is advisable to adhere to the advice given by the masters. After all, they rely on the rules that have been formed for centuries among folk craftsmen. At the forefront of the design of openings is thermal insulation, according to which:
- bath doors are built with a threshold from 10 cm to 30 cm in height. The porch will be a barrier from drafts. It should be arranged according to personal feelings of comfort and safety when stepping over. The presence of a threshold is mandatory in the entrance door frame;
- no door sill is required between the steam room and the washroom. On the contrary, a gap of 5 cm should be left for free circulation of warm air flow;
- the optimal door height is from 1.6 to 1.8 m. Too high doorway will become a zone of significant heat loss. Width for the same reason should not be carried away. The recommended size is 0.6 m, 0.8 m is possible. In extreme cases, for dense owners, a width of 1.0 m is allowed with minor deviations;
- the preferred configuration of windows is a rectangle, the long side of which is parallel to the floor plane. The priority is the small size of window frames with an aspect ratio of two to three or three to four. Minimum height 30 cm, maximum length 90 cm;
- windows in steam rooms are rarely installed, but those who wish can indulge in the presence of a small rectangular or square window with patterned glass. It is better to place it at the level of the upper upper bath shelf;
- the maximum glazing area in the steam room and washing room is 5% of the total floor surface area;
- there are discrepancies with the height of the bath windows. Who advises to deviate from the line of the door sill 60 or 70 cm, who recommends 90 cm, or choose the eye level as a guide.
Drawing instruction and video tutorial
And here is the video:
There is a council of architects on the rational and most aesthetic arrangement of openings in the bath - a single level for the upper elements of the casing for windows and doors. Subject to this rule, a building with small openings will look pretty decent. And the thermal insulation priorities will be preserved to the maximum. And terraces and verandas will help get rid of the "blindness" of buildings with small windows. Their vertical elements, which serve as supports for the roof or canopy, will imitate window openings.


