There is one element for a summer residence that cannot be replaced by anything else. A rectangular gazebo is a structure that is erected in a short period of time, but will serve for a long time. Food eaten outdoors is better absorbed and more use, and spending time with loved ones is priceless. In today's electronic world, many people forget about live communication. But it is precisely this that is the key to a strong relationship. Next, we will consider how a rectangular gazebo can be built with our own hands.
What size
In order to fully give a thoughtful answer, it is necessary to analyze a few simple points:
- Where will the building be located?
- What territory can be allocated for it?
- Will the gazebo function as a kitchen?
- How many people will be in the building at the same time?
- What kind of seats will be installed inside?
- Will the structure adjoin the house in the form of a canopy?
- Will the water rise high in heavy rainfall?
- Will communications be required?
There is no need to make the structure too large, since it will not be used to its full extent as often. Moreover, it will be additional waste during maintenance. At this stage, you need to think about whether all the walls of the gazebo will be open or several of them will need to be closed. The easiest way is to imagine a table in the middle surrounded by chairs. You can make a decision that is distinctive for some cultures - sun loungers.
We draw up a drawing

With the above questions in mind, it's time to transfer the plan to a piece of paper so that it becomes a little more real than our imagination. Here are some projects that will take up a little space, but will allow you to place all the necessary elements.
- 2.5 x 3.5 m. This solution is enough to place a dining table and chairs inside. Four people will feel quite comfortable.
- 3x4 m. In such a gazebo it will be possible to invite guests or gather a large family at a good table.
- 4 × 4 m. This option is with barbecue. A small area with dimensions of 1 × 1 m is being made without a covering, so that the smoke can freely rise and not linger under the roof.
- 5 × 5 m. In such a gazebo it will be possible to build sunbeds on which mattresses and pillows are placed. She will become really good place rest and pastime.
Dimensions are given as examples. They can be varied and adjusted to suit specific needs and land. Knowing the specific parameters, you can choose the type of foundation that will be used. There are several options that do not take much time to build, but will be a good support for the entire structure:
- columnar brick;
- columnar monolithic;
- pile;
- solid slab.
![]()
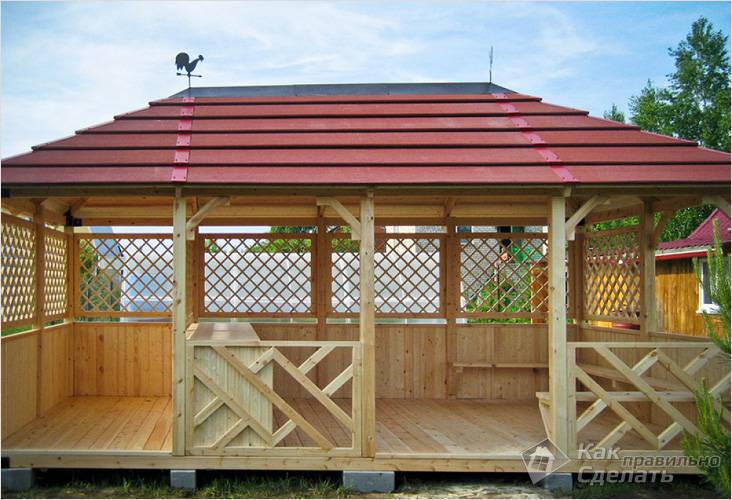
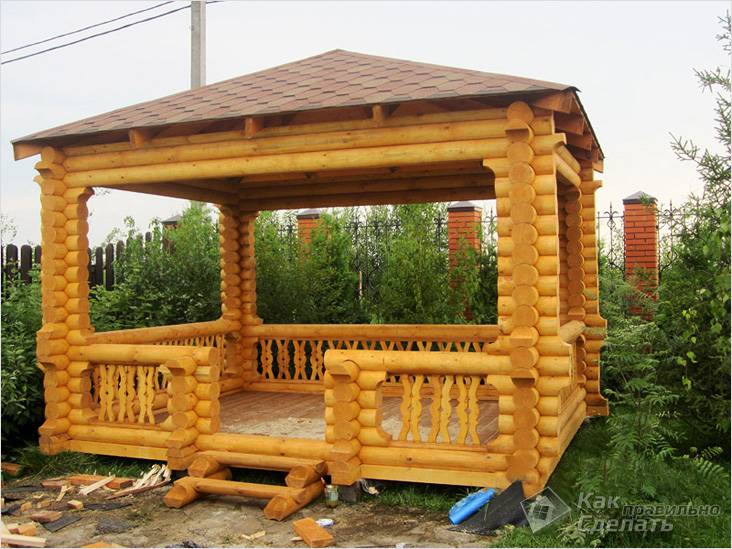
We will consider how each of them is made a little below. Also, the material to be used is applied to the plan. The gazebo can be closed from all sides with double-glazed windows. In this case, you can make a large number of casement or sliding windows. In such a structure it will be comfortable in any weather. The most common material used is wood. It is available, easy to handle, and no special tools are required to handle it. For the frame, profile metal can be easily used, but to work with it, you need to have the skills of a welder. One or several walls can be lined with facing bricks, which looks quite attractive and makes it possible to combine the design with the main building.
Foundation
It was said above what types of foundations can be used for buildings of this type. The simplest to erect will be a columnar brick. To implement it you will need:
- Dig holes to a depth of 30 cm. This is done every meter along the length of all walls. Sand filling is carried out with a layer of 20 cm. It is well rammed, then moistened with water so that the material undergoes shrinkage.
- For each element, you need 4 blocks. Their size should be 20 × 20 × 40 cm. These are standard dimensions for a cinder block or other similar building material.
- The first two are placed on the prepared pillow. They are leveled. It is most convenient to use a laser level with which a line is projected. She will be the reference point for all elements. A solution is applied between the stones to hold them together. They are equal in level.
- Thus, two elements are exposed in all corners.
- A fishing line is stretched between them, which will help to expose intermediate supports.
- From above, two more bricks are laid perpendicularly on the mortar.
The foundation can be considered ready. But it is important to remember that this option is suitable for those areas where the soil has sufficient density and does not get too wet in the rain. Otherwise, the gazebo may lose support and collapse.
The columnar monolithic foundation resembles the previous version, but has its own characteristics:
- The optimal step of the supports is selected for a specific structure. It can be in the range of 1-1.5 meters.
- First, holes are dug in the corners. Their depth should be below freezing of the soil, and their dimensions, for example, 40 × 40 cm.
- Further, with the chosen step, holes are dug along the future wall. If the width of the building is large, then in the middle it is also necessary to provide several supports for the central bar. If this is not done, then the floor will not be strong enough.
- At the bottom of each recess, sand is laid in the same layer as in the previous version.
- Formwork is made from edged boards, OSB sheets or plywood. It should be of such a height that the head is 20 cm above the surface. This will protect the main building material from getting wet during rains or other precipitation.
- The form is mounted and secured.
- The inner walls are covered with roofing material.
- Reinforcement rods are inserted into the middle. It will be more effective to make a crate: 4 main vertical elements should be 12 mm in diameter, the rest can be taken 8 mm. They are tied together with a knitting wire so that a parallelogram is obtained. The transverse segments are located in increments of 30-40 cm.
- The prepared concrete solution is poured. It must be well sealed. It is better to do this with an electric vibrator. If this is not possible, then as a last resort, you can use a piece of reinforcement.
- The upper ends of all elements are aligned in the same plane to facilitate further construction.
- At this stage, there is an advantage to make a blank for the grillage. To do this, you need a metal bar (strip sheet metal). Its width should be at least 5 cm. 2 pieces of 15–20 cm are made. They are immersed vertically into the fresh solution at the distance of the bar, which will then be applied.

It is possible to make permanent formwork for such a foundation. To do this, you need an asbestos pipe with a diameter of 250 mm. In the same way, holes are dug, bedding is done, but fine gravel is still laid on the sand with a layer of 15 cm and is well rammed. Pipes are inserted inside, they are leveled. On the sides, crushed stone is poured up to half and compacted. Several reinforcement rods are inserted inside and the solution is poured. In the same way, you can make blanks from metal plates for a bar.
Like the previous option, pile foundation will allow to withstand a structure of large mass. It will be possible to build brick walls... The easiest will be to work with screw elements.

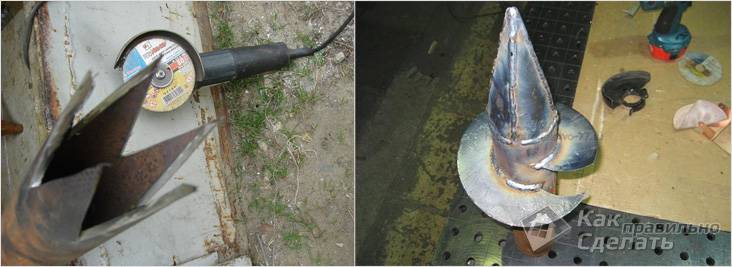
In order for the supports to serve as long as possible, they must be treated with an anti-corrosion agent and painted over. You can prevent the growth of weeds under the floor of the gazebo as follows: sheets of roofing material are laid over the entire area. The overlap is 10 cm. The top is filled with 5 cm of sand and is well rammed.
Base in the form monolithic slab will allow you to achieve two goals in one pass - to make the foundation and prepare the floor.
- The territory is marked.
- A pit is dug to a depth of 30-40 cm.
- The bottom is covered with a 15 cm layer of sand. It is well rammed.
- The next step fits metal lathing, which will give strength. Instead, you can use construction rubble - broken brick, leftovers concrete slabs or natural stone. It is laid in an even layer over the entire excavated area.
- Of metal pipes or wooden pegs beacons are made. They are leveled. In this case, you can make a slight slope to one side by 1–2 cm. This will make it possible for spilled liquid or rainwater that has fallen into the ground.
- The solution is poured and pulled together using a rule or a flat metal strip, for example, a piece of a drywall profile.
- If tile laying is not planned, then ironing can be done on top. For this, dry cement is applied to the still damp floor and rubbed. Subsequently, a flat surface with a slight gloss is obtained.
- The structure will reach full strength not earlier than in 27 days.

In the case when there is absolutely no desire to tinker with concrete and foundation, you can simply dig the racks into the ground by 50–70 cm, make a bed of rubble and sand and tamp everything well.
Basic construction
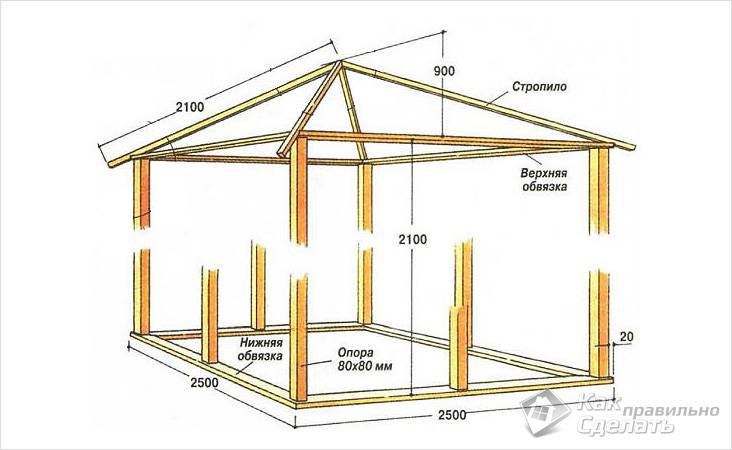
The principle of erecting a wooden and metal frame is in many ways similar. For the first option, you will need a 10 × 10 cm beam and a 10 × 5 cm edged board.In the second case, you will need an I-channel for the base, and a square one for the racks shaped tube size 6 × 6 cm or 8 × 4 cm. In this case, all work is carried out using a welding machine.
- If the first three options for the foundation were chosen, then it is necessary to make the lower strapping. To do this, the timber is cut to the length of each side, in the same way another element is made, which will be laid in the middle.
- They communicate with each other. For this, a cutout 5 cm deep and 10 cm wide is made in the corners. The grooves are joined together and fixed with self-tapping screws.
- The next step is to install the corner posts. For them, the same material is used as for the grillage. They are attached to the base with metal angle plates. To make the joint more reliable, it is necessary to cut the tenon and sink it into the corresponding groove.
- If the walls are more than 3 meters, then it is necessary to make additional vertical supports from the edged board. They can be installed after 1 m.
- From above, all elements are connected using two boards, which are nailed on the inside and outside. The corners are reinforced with metal strips.
- The next step is to lay the floor. It can be made from a sanded board that is nailed end-to-end. When finishing, it can be varnished and stained.
- If planned pitched roof, then the racks on one side must be made 20 higher – 30 cm. For a gable or four slope, they must be the same size. For the first option, it will be enough just after 40 cm to install the boards from one wall to another and fix them. For a gable, you will need to assemble several trusses, they can be arranged in increments of 60 – 100 cm. They represent an isosceles triangle. First of all, the two extreme ones are mounted. They are leveled horizontally and vertically. Three fishing lines are stretched between them, which will serve as a guide for the rest of the components. You can connect them together using a ridge beam or oblique jumpers. A crate is made for a specific flooring, and the area is covered.

For monolithic foundation corner posts must be sunk into the ground. This can be done at the stage of filling or after. In 4 corners, holes are dug to a depth of 50 cm. The columns are made according to the principle of the foundation ones, which were written above. They will support the racks. Further, the assembly is the same as in the previous versions, but it is no longer required to perform the lower strapping. In this case, you can go the other way. The main racks may not be wooden, but brick. To do this, columns are laid out in the corners, which are necessarily reinforced inside. On top of them fit wooden bar 10 × 10 cm. The elements are tied together as described for the grillage. This will be the Mauerlat, which will become the basis for the roof.
Some of the elements that can be located inside have already been discussed throughout the article. The space between the uprights can be open. Several sides can be closed with transparent polycarbonate. In another version, masonry is made up to the middle facing brick... The remaining opening remains as it is, or a wooden grill is mounted in it. Around the area, you can plant wild grapes or ivy. Over time, it will envelop the entire gazebo and get a green island.
If desired, the structure can be made with elements borrowed from the kolyba. For this, a hole is left in the middle of the roof, which will be used for the exit of smoke. In this case, you can make a fireplace right in the middle, which will allow you to enjoy the fire in any weather, sitting around it on comfortable chairs or sun loungers.
It must be remembered that wooden structures need constant maintenance. At least every 3 years it is necessary to remove the old coating and reapply the varnish or paint that is intended for outdoor use. In this case, it will be possible to avoid drying out and decay.

Video
An example of building a rectangular gazebo:
A photo
Many owners of summer cottages and private houses strive to create at least some kind of recreation area on their site and spend more time in the fresh air. First of all, attention is paid to the construction of a gazebo. Those who once abandoned this idea in favor of installing a collapsible tent for the summer season are also thinking about this and have already managed to make sure of the unreliability of its design. And rightly so. A capital gazebo erected to the conscience is not afraid of either hurricane winds or torrential rain.
Gazebo foundation
The construction of any wooden gazebo begins with the foundation. Given the relative lightness of the structure, it is enough to make posts of brick or concrete.
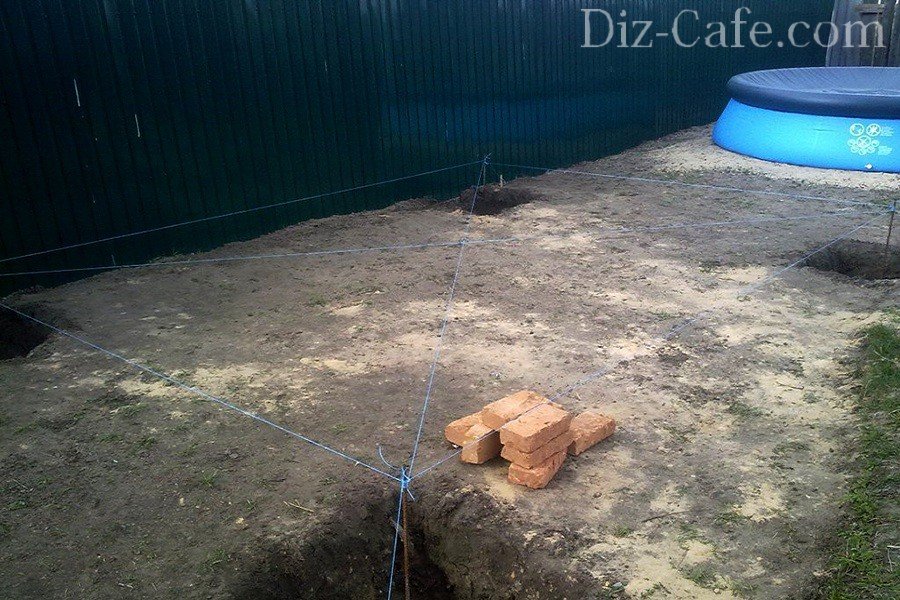
Pre-mark the area, pull the cords around the perimeter of the future gazebo. In the case of a square gazebo, measure the diagonals, thereby checking the perpendicularity of the cords to each other. Pulling two more cords diagonally, mark the intersection - the central base will be here.
The required depth of the pits for the foundation is determined by the type of soil. So, if we are dealing with non-porous soil, then it is not required to drill holes for pouring concrete pillars below the freezing depth. It will be enough to dig holes about 200-300 mm deep, and then fill them with a sand-gravel mixture to about half the depth, carefully tamping and leveling the backfill horizontally.

Coarse sand, crushed stone or gravel should be filled up to about half the depth of the dug holes
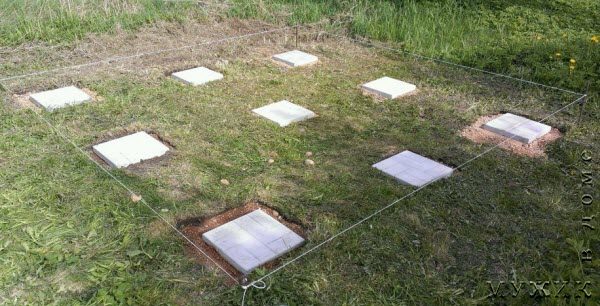
We lay concrete paving slabs at the base of each pillar.
The next step is to lay out the brick posts. Here you need to approach the issue of choosing a suitable brick with all responsibility, because not every type is suitable for the foundation. It is better to use either white silicate or fired red brick for these purposes. It should be noted that clay red brick is still preferable in terms of moisture and frost resistance, and in terms of its strength characteristics, the fired type of red brick is no worse than silicate pressed from sand.
Make sure that the masonry is strictly vertical. All posts should have been brought out in one horizontal plane. For these purposes, you can use the hydraulic level (transparent tube filled with water).

We lay out brick posts on the leveled areas
If it is planned to fix the lower strapping beam and racks to the concrete base (brick posts), then this can be done without the use of special fasteners, L-shaped bolts and other things, but with the help of ordinary reinforcement rods cemented into brick by about 20-30 cm. The bar should protrude about the same amount from above, as seen in the photo below.

The racks and the lower trim of the gazebo will be attached to the reinforcement
In general, the own weight of the gazebo is unlikely to allow it to tip over or slide off the poles even in strong winds, but just in case, at least some kind of fastening will not hurt. Of course, if you do not live in a seismically active area, where you simply cannot do without reliable fastening.
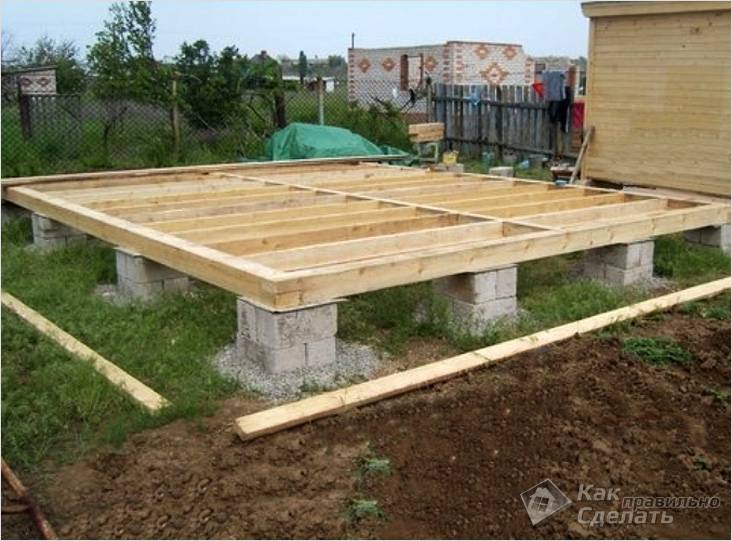
Bottom strapping
The next stage is the arrangement of the lower harness. For it, as a rule, a beam with a section of 100x100 mm is used. We connect the timber to each other "half-tree". All the grooves, which have to be done a lot during the construction of the gazebo, can be easily cut using a jigsaw with a long file or a reciprocating saw. Before laying the strapping, waterproofing should be placed on brick posts - ordinary roofing material. When fastening to the aforementioned reinforcing bars in the places of installation of future racks, we drill holes in the bar and thread them, as shown in the previous photo.
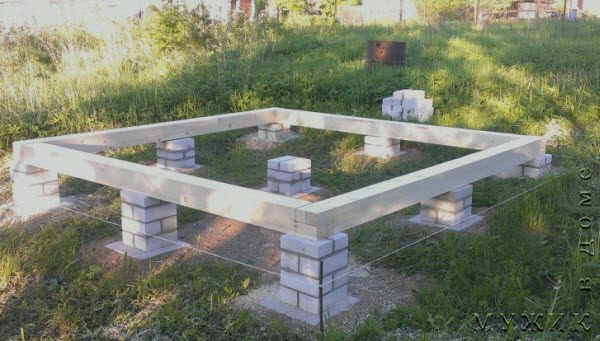
Pre-assemble the bottom harness, placing it on the base posts
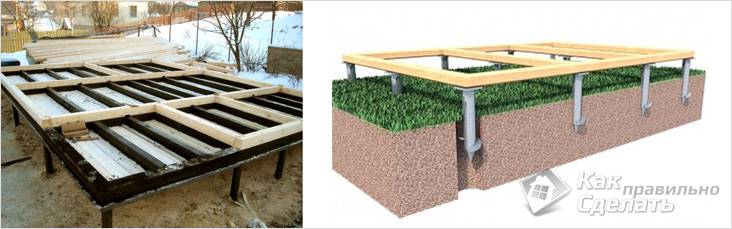
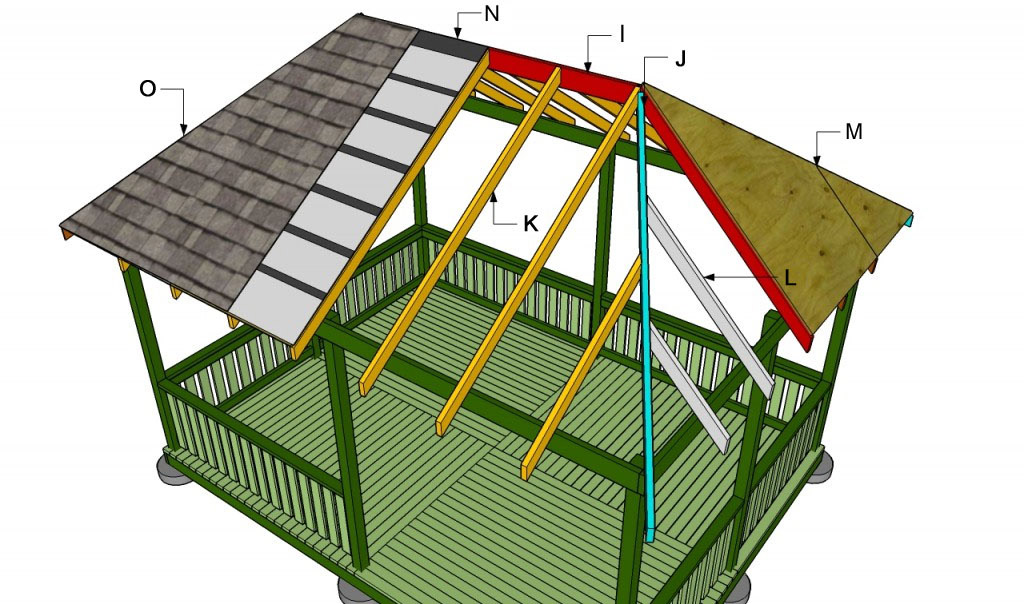
Rafter system
The roof rafter system with the upper harness, especially when working alone, is best assembled below, right on the floor harness of the future gazebo - it will be much more convenient to adjust the rafters and locks, and you will still have time to “jump” on the stairs at the final stage of assembly of the entire structure ...
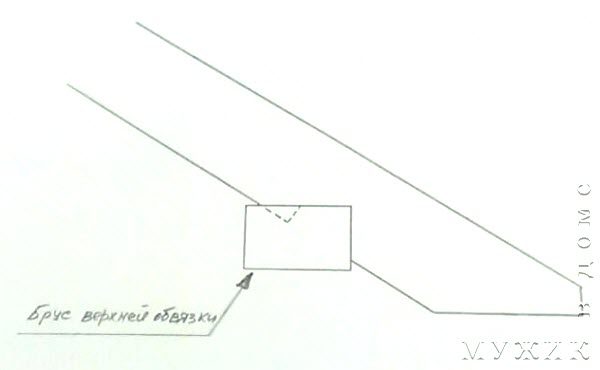
The upper strapping itself is made from a board of 50x100 mm, connecting the "half-wood" timber in the corners. To connect it with the pillars for a thorn-groove connection (as shown in the figure below), we gouge the corresponding grooves with a chisel.
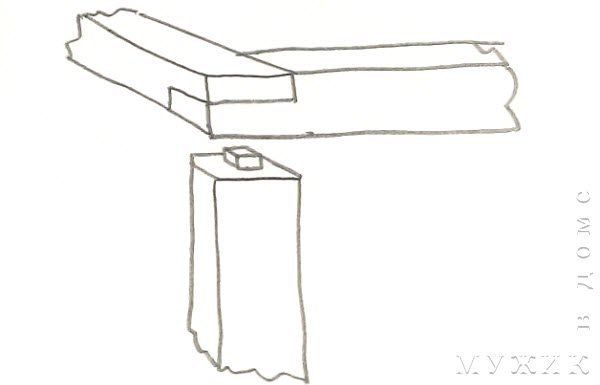
Thorn-groove connection
Painted top harness bars. The square grooves for fastening the studs to the studs are clearly visible
To prevent the roof from sliding down in the rafters, it is necessary to make the usual triangular samples or cut out a kind of thorn that enters the grooves of the upper harness selected by the chisel.

Finished rafters of the gazebo in the cut out "thorn"
 Armed with a screwdriver and long self-tapping screws, we collect the elements of the future roof.

Arbor rafter system assembled
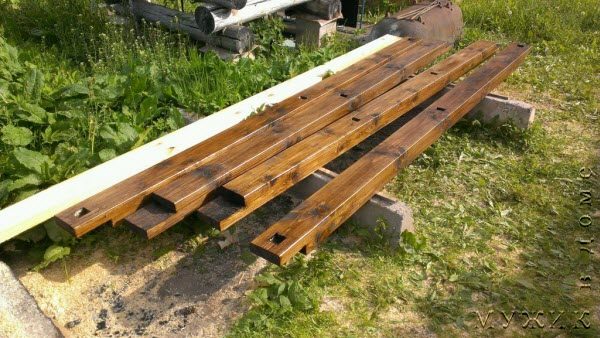
The finished roof frame can now be disassembled and each element can be painted with an antiseptic (for example, Pinotex wood impregnation or similar) that is resistant to atmospheric precipitation, sunlight and temperature extremes.
The final stage of the construction of the gazebo
Now that all the structural elements of the gazebo rafter system are completely ready, you can disassemble it, put the parts aside and start installing the racks.
Installation of vertical racks
For them we use the same timber as for the lower strapping - 100x100 mm.
For ease of installation, we saw off the ends of the timber strictly at right angles. On one side of the timber, we make a spike for installing the upper harness on it. For this purpose, it is better to use an electric jigsaw, which is simply irreplaceable when performing all the many cuts. On the other side of the beam, if the installation of the pillars of the gazebo is planned specifically for the reinforcement bars, we drill a hole to the required depth with a diameter equal to or slightly smaller than the diameter of the bar. For secure fastening, it is better to use grooved fittings.
We level the pillars strictly vertically, for reliability we fix them with temporary jibs. We attach each rack to the lower strapping with self-tapping screws using metal corners, as seen in the photo.
How to install the pillars of the gazebo alone
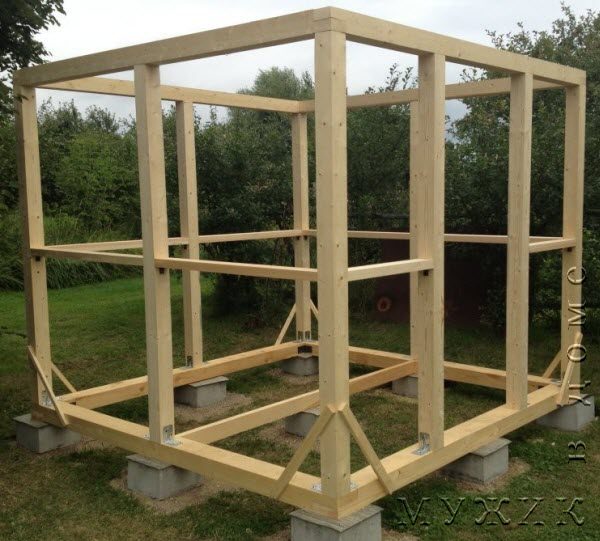
After installing all the pillars of the gazebo, we raise and fasten the upper harness to them ...
![]()
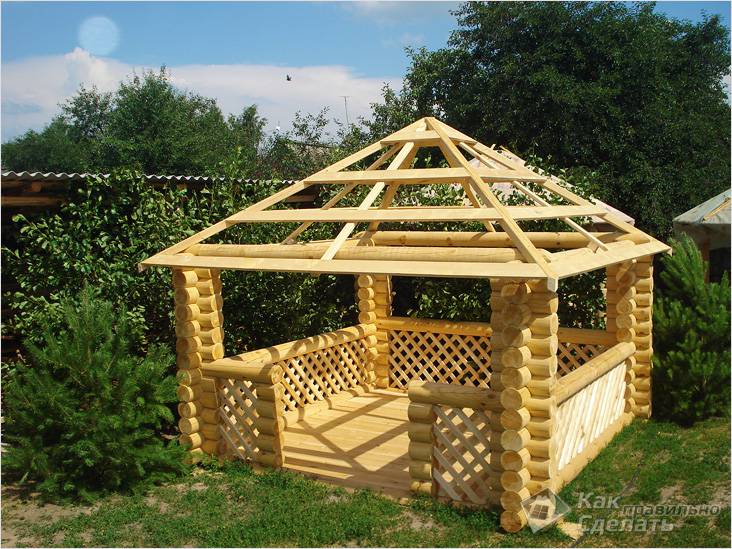
The frame of the gazebo is ready
... and then the rafters.
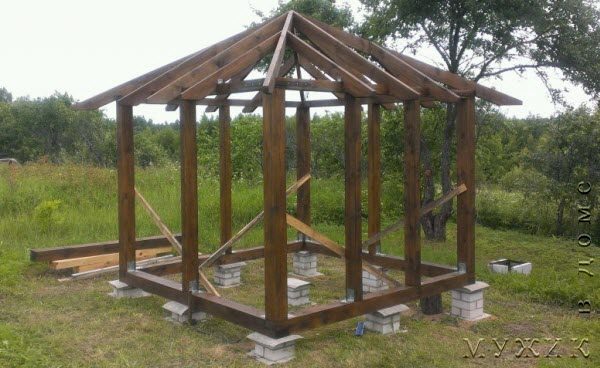
Install the rafters
The structure will immediately become rigid and stable and you can confidently proceed to the roof of the roof. We perform a continuous boardwalk from the bottom up, screwing the boards to the logs with self-tapping screws. It is convenient to use a template cut out of cardboard for marking the boards.

Pergola roof decking
OSB-3 slabs are also often used for roof decking - it all depends on preferences and the type of roof chosen.
For painting the floor and wooden furniture inside the gazebo, you can use a special terrace oil "Pinotex", which prevents the appearance of fungus and makes the wood water-repellent.
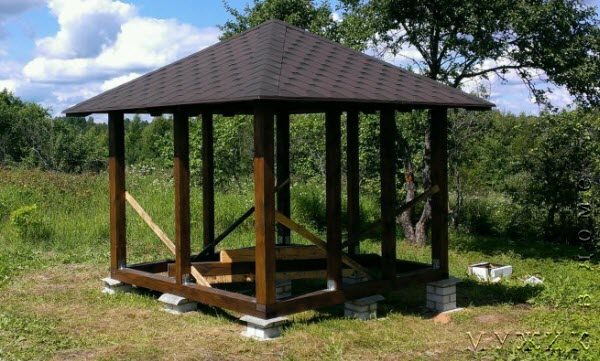
An excellent roof for the gazebo will be a soft bituminous shingles Shinglas (Shinglas). Don't forget the ridge and eaves planks!

We mount the curtain rod

We cover the roof of the gazebo with tiles
Install ridge strips
Floor covering, installation of stairs and rungs

We begin floor installation with the installation of the lag. We attach the logs to the lower strapping using U-shaped brackets.
Then we proceed to the flooring of pre-planed and painted floorboards.
We start laying the boards from one of the walls of the gazebo

Before painting, the floorboards are carefully processed with an electric plane and sanded with an electric sander
Between the supports, painted and dried handrail elements pre-fitted in size, planed with an electric planer are attached.
It is hard to imagine that such beauty can be performed alone. But the eyes, as they say, are afraid, and the hands ...

The railing of the gazebo, carefully planed with a plane, polished and painted, looks even very aesthetically pleasing

We mount the stairs.

We attach the porch of the gazebo from the outside to the bar of the lower strapping
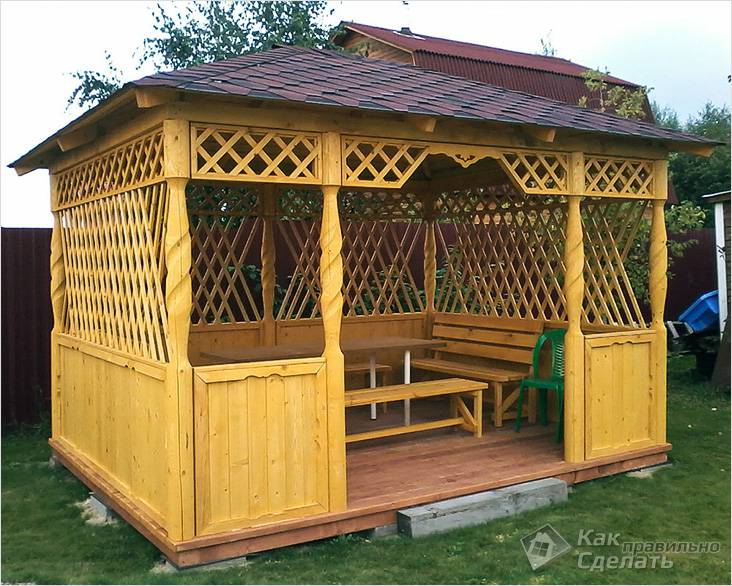
Here she is, our beauty!

Building a gazebo with your own hands in the country is not such a difficult task as it may seem at first!


The 3x3 gazebo only looks small outwardly, but 6 people can easily fit at this table. But you can make a bigger table if you wish! But only there will be almost no free space - there will be nowhere for guests to dance.
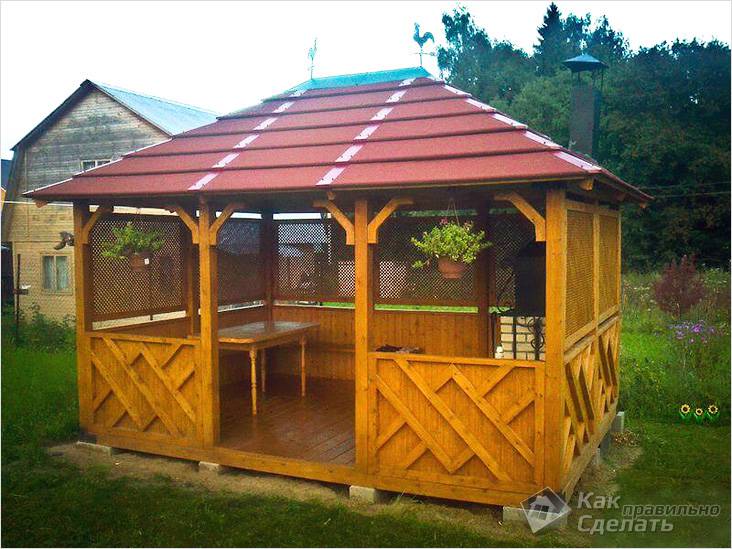
All that remains is to cover the outside of the gazebo with a darkening mesh like Tenax Jamaica ...

The mesh-covered gazebo looks pretty good in the sun.

The mesh not only saves mosquitoes in summer, but also protects the gazebo well from rain, and in winter - and snow
... thereby protecting yourself from mosquitoes and envious neighbors!
If you are planning to update your suburban area, but there are no opportunities for additional spending, you can try to build yourself a small structure for rest. The best option is a 3 by 4 gazebo for a small country house.
Before you get started, you need to create your own 3x4 gazebo project, which starts with a detailed drawing. That's right, the completed drawing will greatly facilitate all further construction work.
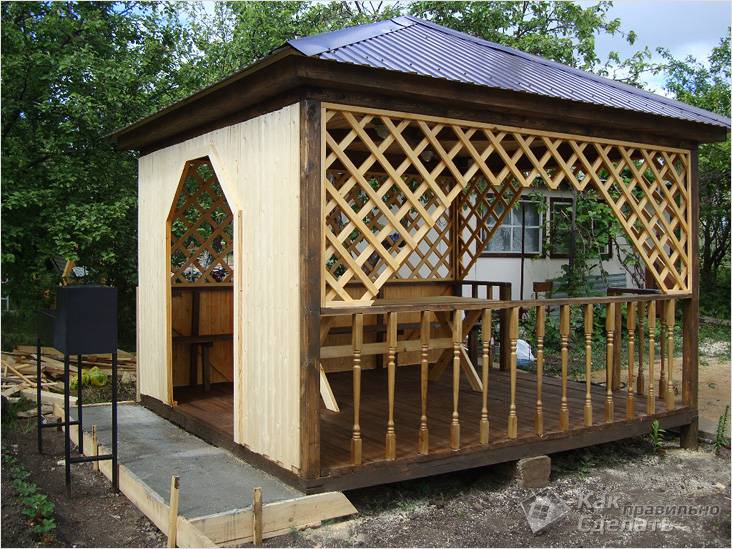
Some ready-made options for drawings can be viewed in the photo:
After we have decided on the choice of the model, we can proceed to the calculation of the material.
How to calculate the material
We will give an example of a wooden gazebo for a 3x4 summer cottage, but these are only preliminary approximate figures.
Note. The above calculations will help you control the approximate cost of the future structure.
First, let's take a look at a set of wooden beams:
- 3 pieces 10x10 (3 m).
- 3 pieces 10x10 (4 m).
- 4 pieces 10x10 (2.3 m).
- 5 pieces 10x10 (1 m).
- 8 pieces 5x10 (2 m).
- 7 pieces 5x10 (3 m).
- 2 pieces 5x10 (1 m).
- 2 pieces 5x10 (4.3 m).
Additional material
For work we also need additional materials:
- Bricks.
- Sack of cement M400.
- For the roof any material, you can shingles.
- 20 mm for 30 mm slats.
- 22 squares of lining.
- Roof boards.
- 12 squares of the board.
- Self-tapping screws.
Note. The range of material directly depends on the selected project and idea.
Tools for work
In order to fully complete all the work with our own hands, we need a certain tool:
Work stages
A gazebo 3 by 4 with your own hands begins with the arrangement of the foundation foundation (see). Next, we move on to the construction of the frame, roof and cladding.
Bearing base
The 3x4 gazebo provides for the construction of an economical columnar base.

Installation instructions:
- Initially, we make a marking for 12 piles with a step of 1 m.
- Next, we dig holes 0.5 m deep.
- We fill in gravel there 200 mm.
- Fill with a thin layer of concrete mixture.
- We make columns of bricks (2 by 2).
- All gaps are filled with a cement mixture.
Note. You can use used bricks for piles to save money. Those defects that will be on the surface can be hidden with putty.
Let's move on to the frame.
Create "walls"
Carrying out works:
- The construction of the frame begins with waterproofing the floor. We put a layer of roofing material on the pillars.
- We take the prepared material (beams 3 and 4 meters and connect them in a paw, forming a rectangle).
- A tree (2.3 m) will be needed as support pillars in the corners.
- A diagonal ligament is made from above along the perimeter.
- We make railings from beams (10 by 5).
Roof
Carrying out works:
- We need a beam (10 by 10) and install the cross brace ligaments in the middle.
- We connect the rafters to the main pillar.
We sheathe the structure

A ready-made gazebo with your own hands 3 by 4, in addition to the frame and roof, provides for sheathing:
- First comes the floor on which the board is laid (see).
- Then the tiles are laid.
- After, sheathing with clapboard or any material (at your discretion).
Last summer, I decided to do some landscaping country cottage area... He slightly reduced the allotments for garden beds, but allocated additional meters for a recreation area. The freed up space was enough for a small flower garden, a couple of bushes, an inflatable pool. But this was not enough for a good rest. We need a gazebo. I decided to build it during my vacation.
Initially, I planned to do something very simple, like a canopy on four posts. But then, after consulting with familiar builders, I realized that it is quite possible to build a more complex structure. Also on poles, but with walls and a full roof.
I had to sit down at the drawings, sketch the project. On paper, it turned out the following: wooden gazebo 3x4 m, on columnar foundation from gable roofcovered with slate. The project was approved by the family council, after which I rolled up my sleeves and got down to business. He performed all stages of the work alone, although, I must admit, in some moments the assistant would not interfere. Bring, serve, cut, hold ... It would be easier to work together. But, nevertheless, I did it myself.
I will try to describe the stages of construction in detail, since the little things in this matter turned out to be very important.
Stage 1. Construction of the foundation
According to the plan, the gazebo should be light in weight, built from boards and beams, so the most optimal foundation for it is columnar. With him I began my construction.
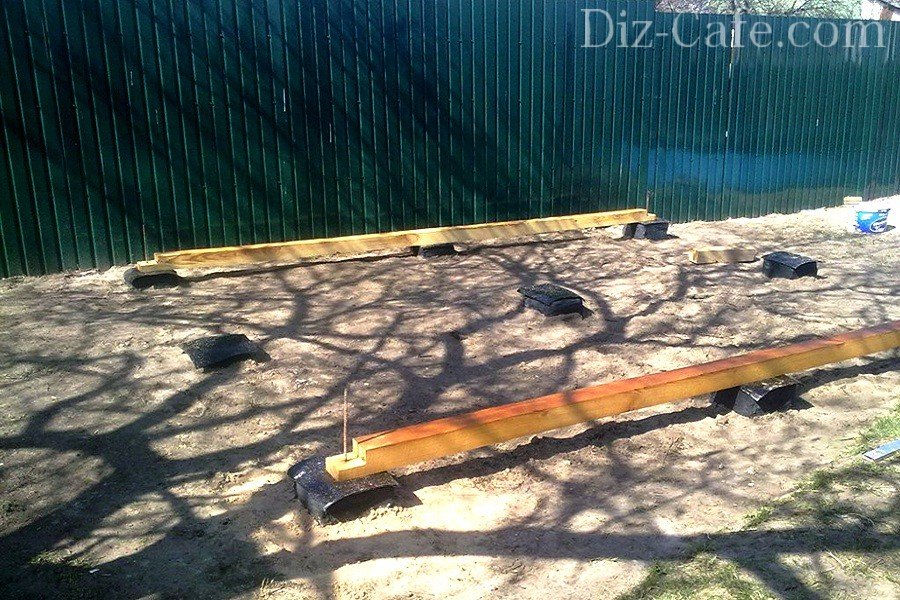
Allocated for this a suitable site near the fence for the size of the gazebo 3x4 m. In the corners I put pegs (4 pcs.) - there will be foundation posts.

I took a shovel and in a couple of hours dug 4 square holes 70 cm deep. The soil on my site is sandy, does not freeze too much, so this is quite enough.

In the center of each recess, I put a reinforcing rod, 12 mm in diameter, 1 m long. These will be the corners of the gazebo, so they need to be set clearly in level. I had to measure the diagonals, the length of the perimeter and the vertical of the reinforcement bars.
After dismantling old buildings on the site, I was left with a bunch of broken bricks. I poured it on the bottom of the recesses, and poured it over with liquid concrete. Happened concrete base under the posts.
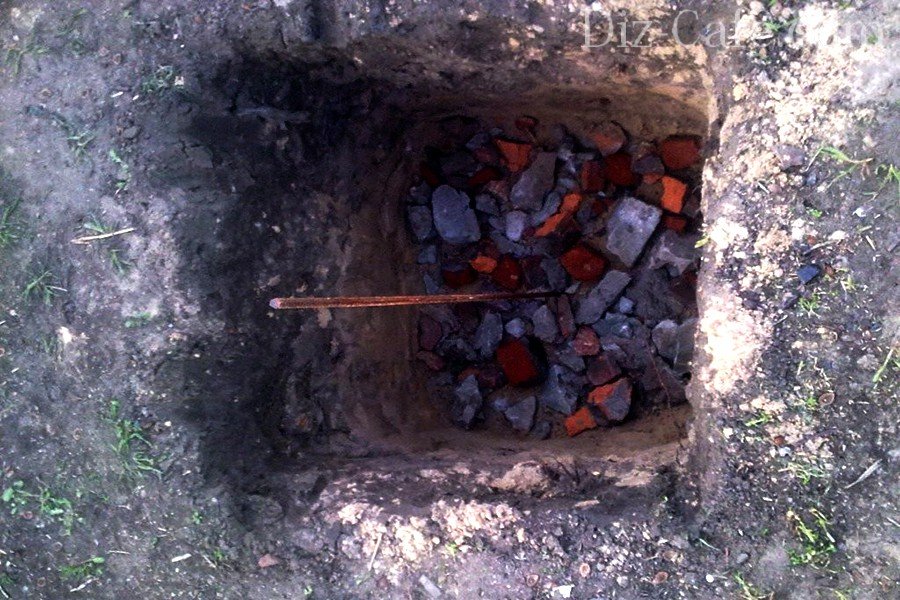
A cushion of broken bricks under a concrete base will help to evenly distribute pressure between the foundation and the ground

After two days, the concrete froze, on the foundations I built 4 brick posts by level.
4 columns are ready in the corners, but still the distance between them turned out to be too large - 3 m and 4 m.Therefore, between them I installed 5 more of the same columns, only without reinforcement in the center. In total, there were 9 supports for the gazebo.
I plastered each support with a solution, and then - I missed it with mastic. For waterproofing, on top of each column, I laid 2 layers of roofing material.

Brick support posts will serve as a reliable foundation for the base of the gazebo
Stage 2. We make the floor of the gazebo
I started with the bottom harness, on which, in fact, the entire frame will be held. I bought a beam of 100x100 mm, cut it to size. To make it possible to connect in half a tree, I made cuts at the ends of the beams with a saw and a chisel. After that, I assembled the lower harness, like a designer, stringing the bar onto the reinforcement in the corners. I pre-drilled the holes for the reinforcement with a drill (I used a wood drill with a diameter of 12 mm).
The bars were laid on the foundation posts - 4 pcs. around the perimeter of the gazebo and 1 pc. in the center, along the long side. At the end of the process, the tree was treated with fire protection.
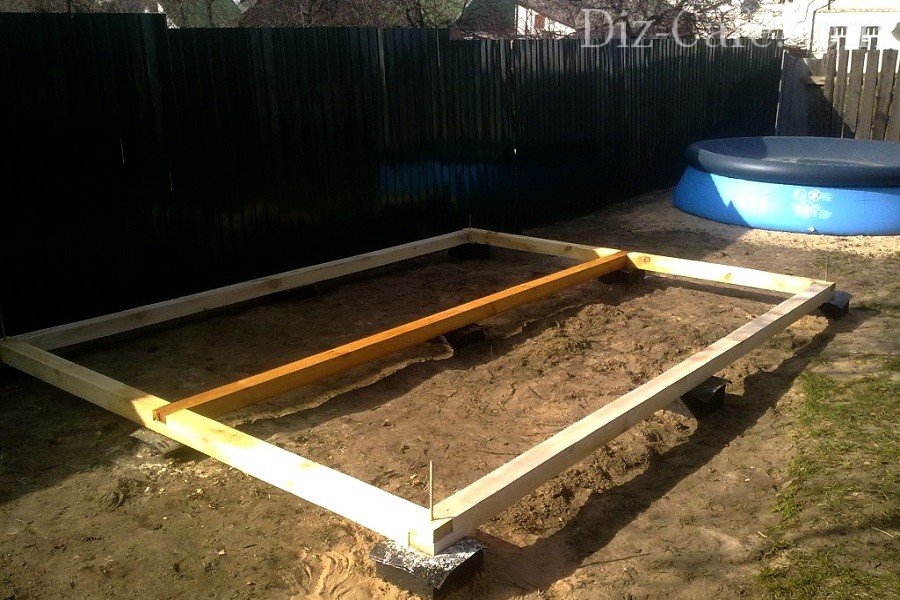
The lower harness, laid on the foundation posts, will serve as a crate for the plank floor
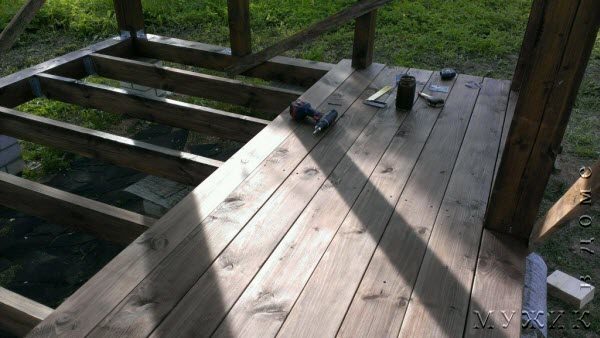
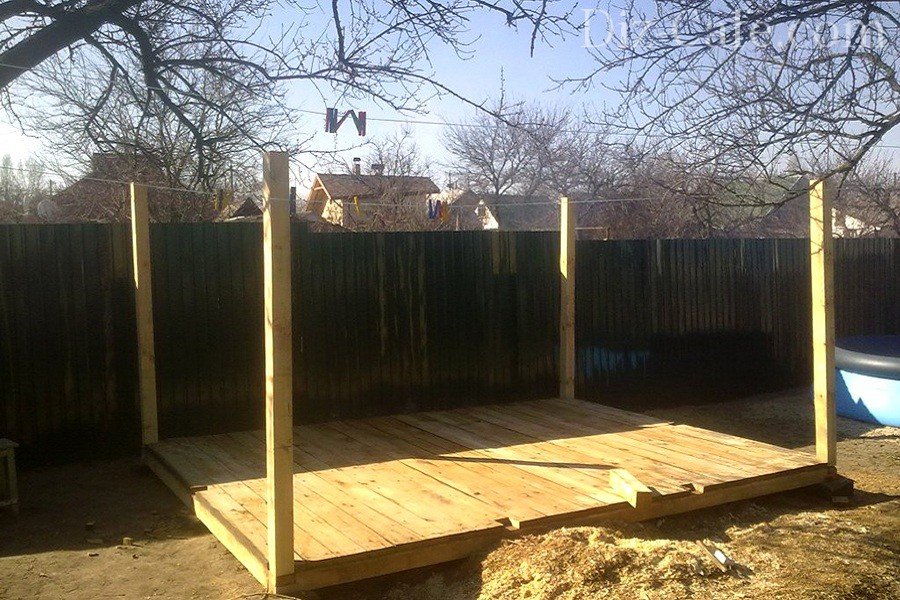
It's time to cover the floor. Since ancient times, oak boards of just the right size have been gathering dust on my farm - 150x40x3000 mm, and I decided to use them. Since they were not quite even and slightly crumpled, I had to drive them through the reimus. The tool turned out to be available from my neighbor, it was a sin not to use it. After the leveling process, the boards turned out to be quite decent. Although the chips formed as many as 5 bags!
I nailed the boards to the bars of the strapping with nails. The result is a smooth oak plank floor.

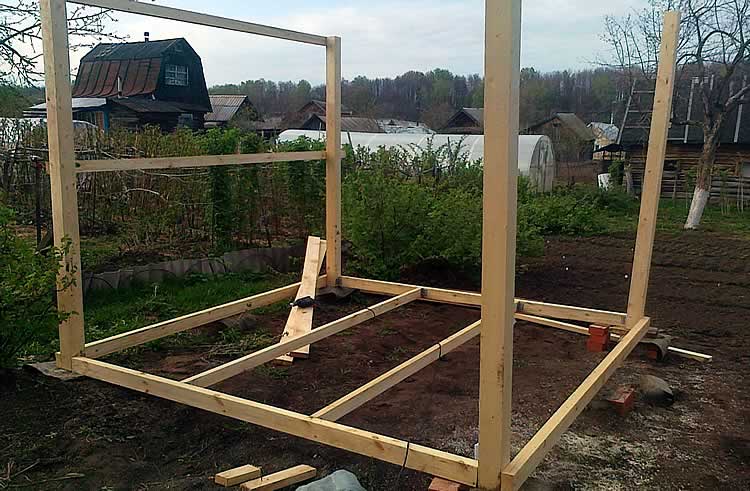
Stage 3. Arrangement of walls
From the existing 100x100 mm timber, I cut 4 racks of 2 m each. They will be installed in the corners of the gazebo. From the ends of the posts, I drilled holes and put them on the reinforcement bars. They did not particularly hold the vertical and strove to move at the most inopportune moment. Therefore, I fixed them with jibs specially cut for this case in a miter box. He nailed the jibs to the floorboards and racks. Only after that, the racks no longer lean to the side and swayed from the wind.
When the corner posts were installed, I secured 6 more intermediate posts. I also fixed them with jibs.
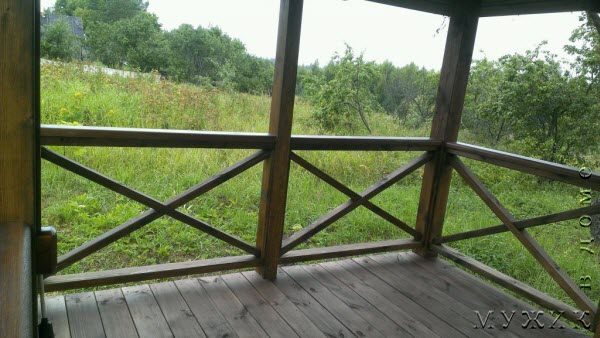
A series of horizontal railings came up. They will form the walls of the gazebo, without which the whole structure will look like an ordinary canopy. I cut the railing from a 100x100mm bar, and for the back wall I decided to save a little and took a 100x70 mm board. Exclusively for the crate, such a lightweight version will do.
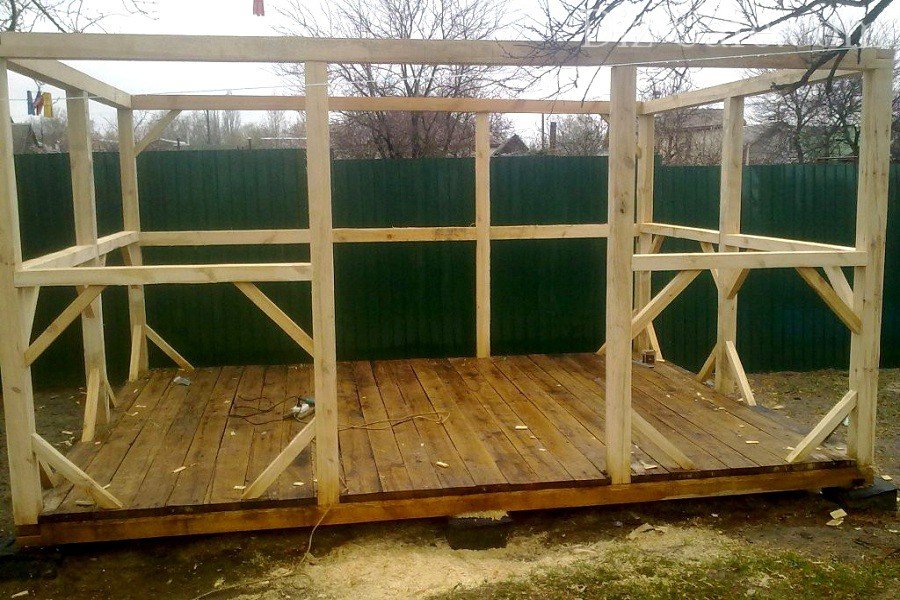
To install the railings, I cut in the racks, installed horizontal beams in them, and hammered in nails. Since it is assumed that they will lean on the railing, such a connection cannot be left. We need additional fastening parts for rigidity. In this capacity, I used additional jibs, which I knocked out from the bottom of the railing. I did not put the jibs on the back wall, there I decided to fasten the railing with the corners from below.
After all that was done, I took up appearance wooden elements of the gazebo. To begin with, I sanded the whole tree with a grinder. I didn't have any other tool. So I took the grinder, put the grinding wheel on it and got to work. While everything was cleaned up, a whole day passed. He worked in a respirator and glasses, because a lot of dust was generated. At first, she soared into the air, and then settled where she pleased. The entire structure was covered with it. I had to take a rag and a brush and clean all the dusty surfaces.
When no trace of dust remained, I varnished the wood in 2 layers. Used for this varnish-stain "Rolax", color "chestnut". The design shone and acquired a noble shade.

Stage 4. Roof truss structure
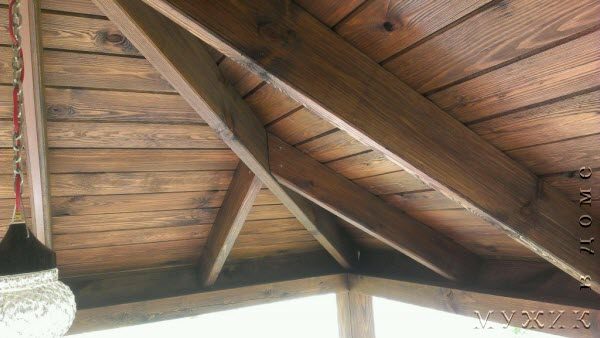
It's time to lay the foundation of the future roof, in other words - to exhibit rafter system... The roof is an ordinary gable, consisting of 4 triangular trusses. The height from the ridge to the harness is 1m. After calculations, it turned out that it is this height that looks proportionally on the gazebo.
For the rafters, boards of 100x50 mm were used. I made each truss from two rafters connected by a coupler. Above, on both sides, there are OSB linings nailed along the perimeter. According to the plan, the rafter legs rest on the upper harness, so I made cuts at their ends - the dimensions are suitable for the harness beam. I had to tinker a little with the sidebars, but nothing, I coped with this in 2 hours.

Roof trusses assembled from boards and fastened on top with OSB overlays
I installed trusses every meter. At first, he exhibited, maintaining verticals, then - fixed with screws. It turned out that it is not so easy to cope with the rafters yourself. Then I regretted that I did not take anyone as an assistant. After suffering for an hour, I nevertheless put them out, but I advise everyone who follows in my footsteps to ask someone to help at this stage. Otherwise, you can get skewed, then you will certainly have to redo everything, which obviously will not add enthusiasm to your work.
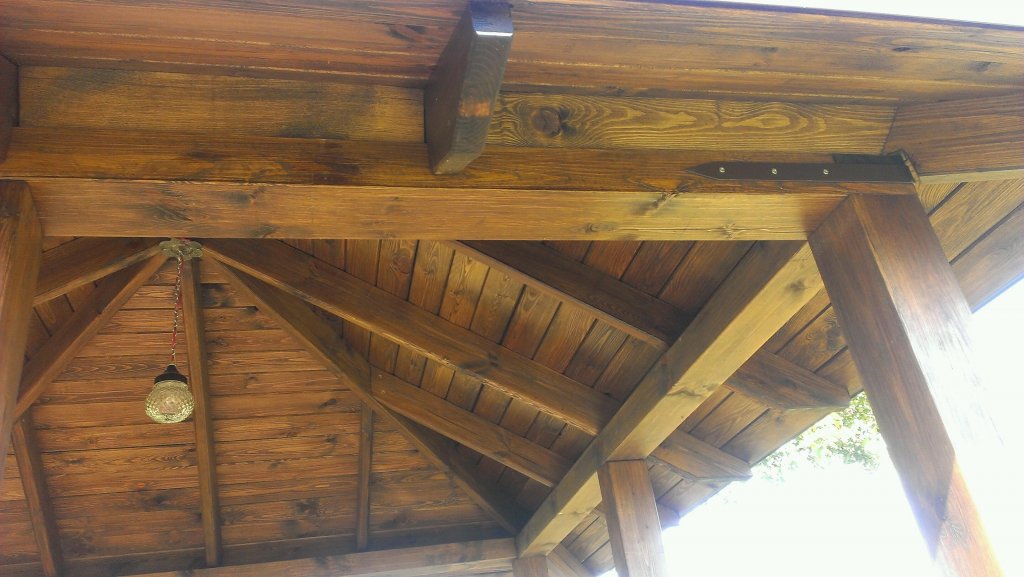
Since the roof of the gazebo will not be subjected to increased loads, I decided not to install the ridge beam, but to fasten the rafters together with a crate made of a 50x20 mm board. There were 5 boards for both slopes. Moreover, I filled 2 of them on both sides of the ridge at a distance of 2 cm from the tops of the rafter trusses. In total, the crate for each slope was made up of 2 outer boards (one "holds" the skate, the other forms the outrigger of the slope) and 3 intermediate boards. The design turned out to be quite strong, it will no longer be possible to loosen it.

The lathing connects the trusses and will serve as the basis for fastening the slate
In the next step, I opened the trusses and the floor with two coats of lacquer stain.
Stage 5. Sheathing of walls and roof
Next, I began to trim the sidewalls with pine clapboard. First, I filled 20x20 mm bars under the railing around the perimeter, and to them I nailed the lining with small nails. He covered the back wall completely, and the side and front walls - only from below, to the railing. At the end of the process, I painted the lining with varnish-stain.
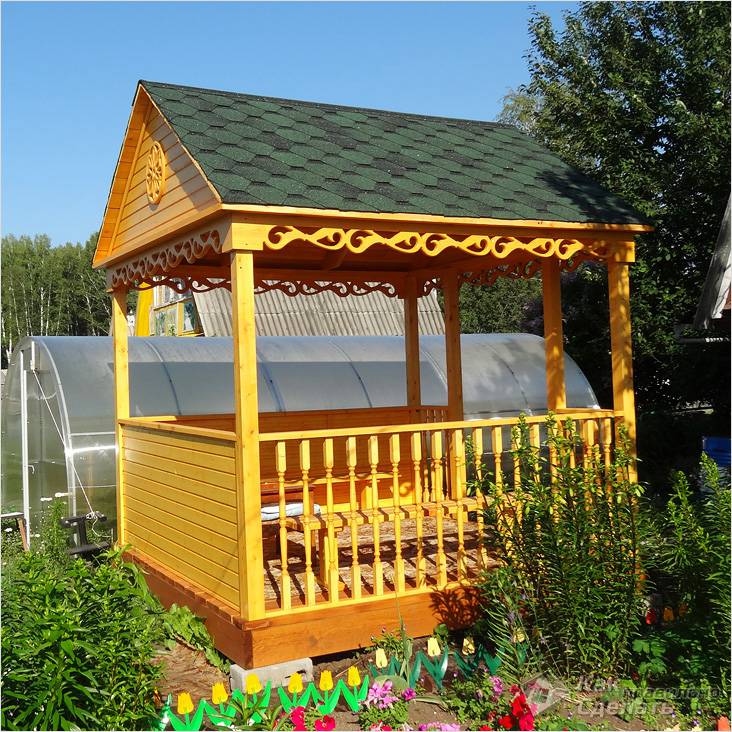
Only the roof remained unfinished. I covered it with dyed slate with 5 waves, color - "chocolate". The entire roof was covered with 9 sheets of slate, on top there was a ridge element also brown (4 m).

Pine clapboard wall cladding will protect inner space gazebos from the wind and sun
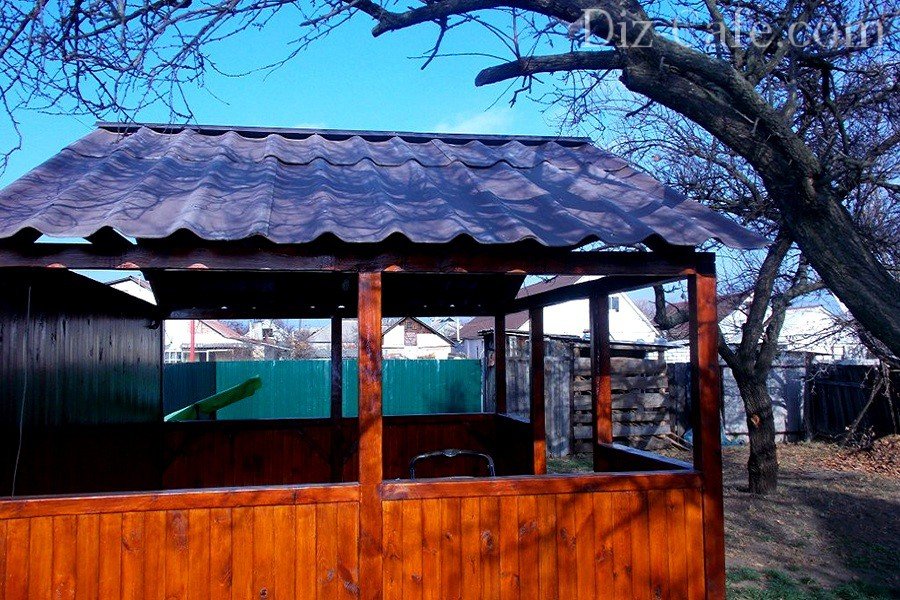
Colored slate looks no worse than modern ones roofing materials, and in terms of durability - much superior to them
A little later, I plan to make removable windows in the openings to protect the gazebo space in the winter. I will knock off the frames, insert some light material into them (polycarbonate or polyethylene - I have not decided yet), and then they will install them in the openings and remove them as needed. Perhaps I will do something similar with the doors.
In the meantime, perhaps that's all. I think that this option will appeal to those who want to build a gazebo quickly, simply and inexpensively.
Grigory S.


