Wooden floors for the bath were used for a long time. And today, despite the presence of a large number of new technologies, this option is considered to be optimal. We will look at several decisions of the arrangement of floors, we will tell about the technology of their construction, advantages and "problem" sides.
In this embodiment, the distance between the lags should be within 1.5 meters, the distance between the columns under each lag within 1.6 ÷ 1.8 meters. Multiple centimeters in one way or another way are not made, shift the columns with the specific size of the room.
The main thing - the columns across the area should be placed evenly.
Step 3. Prepare all materials. For columns there are several options: in the ground pour concrete or use concrete blocks. Above the Earth can be used red brick or blocks, between the concrete base and brick necessarily make waterproofing rubberoid. Better brick, its small size facilitates work on the output of columns to one level of the horizon. The blocks have to cut, it is long, the cut is irregular.
Column supporting brick - appearance
Step 4. Making columns. The sizes of columns are made under the brick, the standard length of bricks of 25 centimeters, take two bricks. This means that the side of the square of the column will be 25 centimeters.
Are there several concrete blocks in stock? Excellent, work will go faster and easier, lay the columns of them.
Concrete froze - you can put bricks. The thickness of the standard brick is only 6.5 centimeters, such dimensions will allow us to accurately set the surface of the columns to the necessary height due to changes in the thickness of the solution. You need to stretch new ropes, pull them on the tag height marks. Check the position of the bricks by the level, the columns should be located in a vertical position. With the help of cement-sandy solution, the surface of all columns on the thread is accurately poning.
Step 5. Lagges are stacked along the rubberoid, it is better to put two layers of waterproof.
The length of the lag must be 3 ÷ 4 centimeters shorter the length of the room, it is necessary to compensate for the expansion of the tree. Lags must be fixed to the walls with a moving way to exclude their overturning to the side, but allow a little to move in the longitudinal direction. It is better to do with the factory standard metal compounds, such are used during floating arrangement. rafter system. If there is no possibility to purchase such connections - not a problem, make them yourself. To do this, on one side of the metal corner of the opening, you need to be made oblong. This side will be fastened with self-drawing to lags, selflessness do not tighten with great effort, the lag should be able to slide. The second side of the metal corner is fixed to the wall of the bath.
Initially, you need to fix two opposite lags, pull the ropes between them and all the rest to put on it. If problems with the level - use different lining. The scatter at an altitude of up to two millimeters can be allowed, these irregularities are eliminated by finishing floor coating finishes.
Step 6. Floating boards. Check the quality of the boards, the materials with visible marriage signs are better not to use. If the boards as a result of the violation of the production technology have a curved side surface - you need to purchase ready-made or make independently special devices for their tightening.
To this end, ordinary metal brackets and wooden wedges can be used. Prepare several wedges at once with different angle of slope. Metal brackets are driven into lags, an unnecessary board is placed between them, and the wedges are driven between the germ and it. Driving force should ensure surface alignment. The boards are fixed to lags in such a clamping position, after being sublinking all the nails of the wedges are removed and a new floorboard is inserted.
Step 7. On the perimeter of the room, the plinth is ready to use the floor.
Fastening wooden plinths
There are two more nuances of the furniture of floors in the steam room. The technology of laying boards changes slightly taking into account how water will be merged. If the gravity is in the gap - boards do not attract tightly, leave the gap between them in several millimeters.
If water goes into a drainage system - you need to make a hole. The best way - Have an electric jig. Drill in the "starting" hole in a drill in the board, insert the jigsaw knife into it and carefully cut the hole of the desired size. No jigsaw - use the chisel and chisels. Works are slightly complicated, but it is not scary. Small irregularities made in this way holes will close with a decorative drain grid.
Lugi over concrete screed
A more complex and expensive option to arrange floors. Lags are put on a flat concrete screed, the floors can withstand significant loads.
Step 1. Make the laying of the floor laying, set the labels on the wall. It is necessary to note both the position of the lag and the position of each cement base layer.
Step 2. Align the surface of the soil, remove the upper fertile layer. It is necessary to pour out the base from sand or gravel, the base will be found in special vibration mechanism or manually.
Example of a sandy pillow
Step 3. Prepare concrete solution. During the manufacture of concrete, we recommend on one part of the cement to give two parts of the sand and three parts of the rubble. Such a recipe for concrete can be considered universal, it is suitable for the manufacture of most architectural structures of buildings using concrete.
Step 4. Make a filling of a concrete base. You need to pour under beacons.
For beacons you can use purchased metal or ordinary wooden rails. Reiki can not be pulled out of the solution, they do not affect the final operational characteristics. Level Check the plane of concrete. If there are significant deviations - make a screed from above cement-sandy solution. Make the screed for all the rules, do not allow irregularities and deviations horizontally.
Video - installation of beacons under the tie
Video - screed for beacons
Step 5. Between the concrete base and wooden lags to put waterproofing.
In cases of building a bath, this method of sexual coatings is infrequent. Such floors can only be done in the rest room, for a steam or shower method is not suitable. On the plywood, the floor of laminate or soft floor coatings are spilled. The thickness of plywood is determined by common loads, but in any case it should be more than one centimeter. Depending on the thickness of plywood, the step is regulated. Experienced builders We advise lags to mount them at a distance of no more than 50 centimeters.
Laying Plywood Lagas
Plywood must be moisture resistant, ordinary cheap varieties are unsuitable.
Important. During the markup of the placement of the lag, taking into account the size of plywood sheets.
And, moreover, it has good heat-shield characteristics, which allows not to use additional insulation for floors. Do not forget the joints of the sheets of technical traffic jams to glue the scotch. Otherwise, on time, they will shift, which complicates the laying of the laminate and makes the work more "nervous".
Methods of insulation floors for lags in the bath
It has high performance on many operational performance: perfectly holds heat, it is easy to work with it, the thermal insulation layer does not have slots. But there are wool and disadvantage - the material quickly absorbs moisture and gives it for a very long time. Long stay of wooden elements with direct contact with a wet wool significantly speeds up the appearance of rot and fungi. Wooden designs It is necessary to impregnate with antiseptics, use mechanical methods of steam and water protection. Such construction measures are quite expensive.
None of the manufacturers warns that this material for unknown reasons really like mice, they nibble with great pleasure and at high speed. Completely get rid of rodents on cottage plot No one else managed. We hope that this information will help you take the optimal solution during the selection of float insulation material.
How to insulate floors on lagas mineral wool
You can take both rolled and pressed material. The only remark - if you take a pressed mineral wool, then the size of the sheets should be taken into account during the location of the lag.
To the side planes of the lag, we live thin rails or bars, they will lie with a draft floor. For its manufacture, you can take unedged boards, segments of lumber, plywood remnants or OSP sheets. Mineral Wat must be reliably protected from the penetration of moisture from the bottom, the land under the bath will always have increased humidity rates.
For steam protection, you can take any of the existing materials, they all have excellent performance.
Win mineral wool on the draft floor carefully, do not leave slots and skips. Mineral wool thickness can not be greater than the height of the lag.
Laying mineral wool on the floor
The upper surface of the insulation must be covered with waterproof and only after that begin to engage in finishing sex.
One of the floor insulation options. The film is fastened with brackets over basalt minvati
If you can replace mineral wool with glass, immediately use such a chance. Glasswater is much cheaper than the "branded" material, and in its physical and operational properties it is not inferior to her.
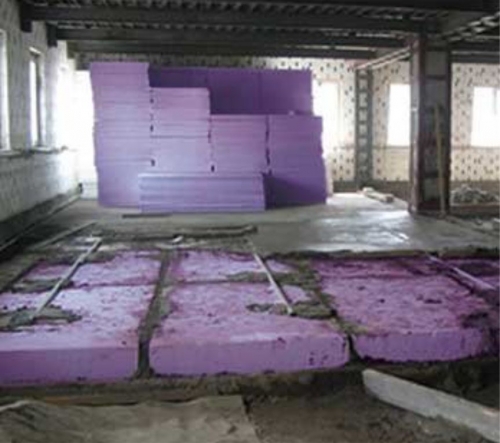
Polyfoam perfectly cuts into a special carpentry knife. During circumcision, make sheets a few millimeters more. The sheet will easily be squeezed, due to this, the density of fitting to lags will increase significantly. With the right plot number of unproductive waste, the material is reduced, the work is performed faster and better.
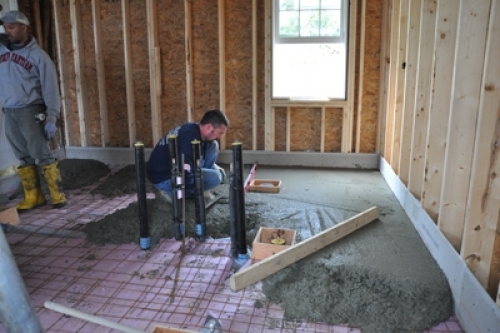
Laying engineering communications under the gender by lags
Schemes engineering networks You must have even before the start of the construction of floors, they need to be taken into account during the markup of the location of the Lag and laying insulation. We give several practical advice on the installation of engineering communications.
Communication under floor
During the installation of sewer pipelines, it is better to make a stock of throughput, reinforce from clogging. The path of the pipe will be a larger diameter, let their total length increase somewhat. The main thing is to have confidence in the long and reliable work of the entire system.
Video - Installation of rough floors
Video - Floors on the soil. How to make it right
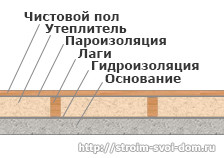
For the concept of "draft floor" are hidden not just badly processed boards, but the most real "pie" from different materialswhich together form a solid base for the first floor. By the way, the draft floor does not have to be wooden, it can be a concrete screed on the soil. The draft floor arrangement includes a set of activities that provide hydro, heat and noise insulation of the base. In this article, we consider how you can make a durable and reliable draft floor to which any piston coating can be seized.
How to make a wooden black floor in the soil
IN country house Floor arrangement is the task of responsible and time-consuming. Wooden floor on the soil can be performed without restrictions. Even with a temporary stay in the house when heating does not work, the wooden floor serves a long time unchanged, since the underground is well ventilated through produced in the foundation.
For the wooden elements of the floor design, it is necessary to choose quality leaked wood, no more than 12% humidity. This is important, since the wet tree can "lead" during operation. For roughing floor, coniferous woods are chosen in the house - spruce, pine, fir, larch. Wood-saturated wood resins are less susceptible to rotting and developing mold.
Also, wood for lag and rough floor should be treated with antiseptic and antipiren.
The underground of the wooden floor on the lags should be well ventilated. To do this, the foundation is performed by products that are closed with a cell with a cell no more than 8 mm so that the mice do not penetrate inside.
Foundation for wood floor
The design of the wooden floor in the soil assumes that the floorboards will fit on the lags - longitudinal beams. Depending on the features of the house, the lags can be laid on the support beams, a mortgage crown or on the support columns.
If the room is large enough, fasten the logs only by the ends on the beams will not be enough, the design will be fragile. Therefore, in the intervals between the walls, the support columns are installed to which lags will be laid. The step between the columns depends on the cross section of the lag. For example, if the ram 150x150 mm will be used as a lag, then the distance between the support columns is no more than 80 cm.
How to make pillars under lags:
- First we make a markup where the lags will be located. We make a note on the support beams or the foundation of the house. Then stretch the cords through all underground. Across future lags stretch the cords at a distance of 80 cm or any, the other that is equal to the step between the columns. In places intersection of cords or ropes, the support pillars will be located.

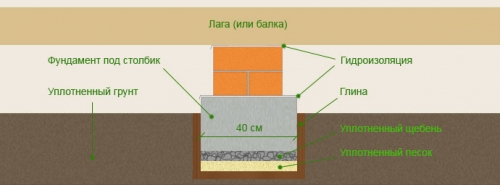
- In places where we will make reference pillars, dig a hole with a depth of 40 - 60 cm, with 40 cm sides.
- At the bottom of the pit, the soil is tamped, pour 10 cm layer of sand, and then 10 cm rubble. Alternately, each layer is thoroughly tamped. It will be our recession under the foundation of the column.
- Install in the pit wooden formwork To fill the foundation under the column from concrete. If the support columns are made of bricks, the foundation height should be such that it is tied up by 5 - 10 cm above the ground level. If the entire reference column is to cast out of the concrete, the height of the formwork should be such that lags laid on the column were horizontally.
- Inside the formworks insert the reinforcing frame, bound from steel rods 6 - 8 mm cross section.
- Pour concrete.
Important! If the entire batch is poured from concrete, then it is necessary to control the surface of the column to be smoothly horizontal and that all columns are at the same level.
- After a complete drying of the concrete, we drag the surface of the column with rubberoid or glassware in 2-3 layers. Necessarily without a sprinkle. We wash the surface and joint mastic.
If you want to make support columns from brick, then the masonry must be fastened with cement mortar. For a tag less than 25 cm, the laying must be 1.5 bricks, for a higher column, 2 brickwork will be required.
After drying the concrete, you can remove the formwork. For greater reliability, fertile soil from the underground is better to remove. It must be removed on a depth of 20 cm. Instead of the soil, it is desirable to pour 10 cm gravel and 10 cm of sand and thoroughly tumped by vibrating.

Before starting the establishment of the foundation, it is necessary to process beams, lags and blackboard boards by antiseptic. Lags can be laid at once on the mortgage crown or the foundation and on the support columns, and you can first install the support beams on the posts, and on top across the lags. Any option is correct. Only laying Lag across the beam provides a more stable and durable structure in the event that there is a very small distance between the lags, 40-60 cm.
The Lag section must be selected based on the thickness of the heat-insulating material that will be laid between them. For example, if the thickness of the insulation is 150 mm, then it is necessary to take a ram with a height of 180 mm. You must always leave a 30 mm ventilation gap.
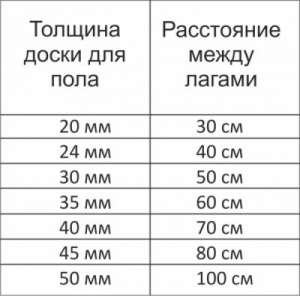
The step between lags is selected with the thickness of the future floor boards. More accurate instructions can be viewed in the table below.
Table 1. Step Lag.
Consider laying the lag on the support columns:
- We put lags on the mortgage crown (reference beams, foundation) and support columns. Control their smooth location, horizontal. On the surface of the support columns under lags, you can put the material-noise reducer. But this is not necessary, since the runneroid or other waterproofing material, which is covered with the surface of the pillar, springs well and reproduces sounds.
- If still somewhere noted the sagging of the lag, on the support posts for lags it is necessary to put wooden lumps and firmly fix them. If somewhere the beam is repeated, then it can be cut off with a plane.
Important! The maximum allowable deviation in the evenness of the location of the lag is 1 mm per 1 m.

- Fix the lags to the supporting columns using mounting corners. From the side of the wood, we fix the self-pressing of 50 mm long, and from the side of the concrete column - we twist an anchor.
- The first are placed by the so-called "lighthouse lags", which are located at a distance of 2 m from each other. Next, we will focus on them.
- By analogy, we also put all the lags and check their smooth location.
After all lags are fixed, it is possible to start the arrangement of heat and waterproofing.
Heat insulation and waterproofing of wooden floor
Waterproofing materials and thermal insulation are laid between lags. To secure them, it is necessary to equip the base. You can do this in several ways.
Method 1. From the bottom of the lag you can kill the sheets of moisture-resistant plywood. This design will get the most reliable as possible. For this you will have to work by the underground, which is not always possible.

Method 2. In the lower part of the lag, you can navigate the cranial bars with a thickness of 20 mm, from top to perform the rolls from the board. This work is more paintaking, as you have to cut a lot of boards with a cross section of 15 mm and a length of equal to the step between lags.
You can choose the way you like more. The main thing is that it turned out quite a solid foundation.
- Fill the layer of waterproofing with an adhesive 15 - 20 cm, we sink the joints with a construction scotch.
Important! Be sure to use a superdiffusion vapor-permeable membrane. It is necessary for us that the waterproofing material produces moisture from the room, but not allowed inside from the side of the underground. Therefore, it is impossible to use a conventional polyethylene film.

- On top of the film between lags, we are placing the thermal insulation material. Cut rolled material The width equal to the step between lags plus 1 - 2 cm so that the material is in the gap between the vagas of the Mospus.
Important! As a heater for the wooden floor, mineral wool can be used in rolls, plates, basalt cotton wool, you can poison EcoWhat, sawdust. It is impossible to use foam and extruded polystyrene foam. These materials are fully playproof, the wooden floor simply will not be able to breathe.
On top of the insulation, it is necessary to leave the ventilation gap 2 - 3 cm.
Laying of rough floors
Now you can put the draft floor in the house. There are several variants of the arrangement of draft flooring. Can be used as a material hand board Thickness 15 - 25 mm with minimal processing. You can also use the floorboard for the floor if finance is allowed. On rough floors, the price depends on the cost of the materials used. If you use fat massive board, It makes no sense to fit the draft floor from the floor board. And you can wish the sheets of plywood, and on top to perform laying of a pure floor covering.
Black floorboard floorboard:
- We start laying from the wall. Sut the spike and apply the board to the wall, leaving the gap of 2 cm.
Important! The retreat from the walls is obligatory, as the tree is plastic material, gaining moisture, expands, and sweating, swears. The gap will ensure the unobstructed opportunity to expand and make the wood.
- Fix the board to lags. From the walls of the wall, screw the screws directly into the board, then this place will hide the plinth.
- From the side of the spike, we screw the screws in the spike at an angle of 45 degrees.
- The next board is moved close to the first. We insert into the groove of the first board.
- In the groove of the second board, screw the screws, fixing it to the lag.
- All subsequent boards are stacked by analogy.
Important! If the boards are the same length as the room, then you can lay exactly parallel to each other. If the boards are shorter than the room, then they must be laid with the displacement - the rotary.
The last board is fixed so that you can hide the hats of self-tapping screws under the plinth. On this draft floor is ready. The main thing is to customize the boards to each other. From above, you can lower the floor covering.
How to make a wooden black floor on a concrete base
In apartments with concrete floors you can also make a wooden floor. Lags are placed on concrete baseBut for this it should be smooth. The difference of heights of several centimeters is unacceptable. Therefore, the option is when the wooden bars are put up for brewing lags, it does not fit. Over time, the lining sneezes and deform, from which they can easily fly out and the floor will begin to creak.
Preparation of the foundation: hydro and noise insulation
Before laying the lag on the concrete floor, it is necessary to align the base. To do this, fill the cement-sand tie. Further work can be continued only after complete drying of concrete, i.e. a month later.
On the surface concrete screed Fill the waterproofing film with the adoption of 15 - 20 cm, the joints are sinking with scotch.
For lags put noise insulating lining. To do this, you can use cork materials or foamed polyethylene 1 - 4 mm thick. Lugged under lags is needed in order to pay off shock noise.
Laying Lag on concrete
It is advisable to use a bar length equal to the length of the room. If it is impossible, you can take a bar in short and connect to the end. The locations of the compounds should be aroused.
- We put lags on the prepared grounds.
- Check the horizontal location of the lag.
- Fix the lags to the floor with the help of the corners. Do not forget that the corners themselves are attached to concrete floor Anchors.
- After laying and fixing all the lags, we put the insulation between the lags as well as in the case of the floor on the soil.
Do not forget to leave 2 - 3 cm ventilation gap.
Installation of rough floors

From above, lag filament the draft floor. As already written above, it can be plywood, and maybe a floorboard.
Consider an option to arrange a draft floor from plywood:
- We take a sheet of moisture resistant plywood with a thickness of 22 mm.
- We put the sheet of plywood on the lags and fix it with self-draws in 15 cm increments.
- We have plywood sheets in a chess order. To do this, part of them will have to cut.
- It is impossible that the places of the joints of the plywood sheets were on the same line.
We do not forget that there should be a 0 to 3 - 3 cm0 cm between the wall and the draft floor. Top of plywood base can be flattened by such floor coverings: laminate, linoleum, ceramic tiles, vinyl tile, parquet, parquet board, massive board.
Device of rough floors made of concrete on the ground
You can not always fill the concrete floor in a private house on the soil. There are certain limitations. First, the groundwater on the plot should be low enough - at the level of 4 - 5 m. Secondly, the soil must be stable, not movable, otherwise the concrete floor can collapse. Thirdly, people must constantly live in the house or even would be more correct to say, he should be heated in the cold period of the year. If all the conditions are observed, you can safely pour the concrete slab on the soil.
Earthworks and the preparation of the foundation
First of all, it is necessary to outline the "zero" mark - the level of the future floor. It is necessary to focus on the bottom of the doorway. All the walls need to apply a mark so that in the future it is seen to how long it is to pour concrete.
- Paul in the soil - a multi-layer structure with a thickness of 30 - 35 cm. To equip it, remove the top layer of the soil until the height from the zero mark to the bottom of the pit is equal to 30 - 35 cm.
Important! If the soil level is below 30 - 35 cm from the floor level, then it is necessary to align the surface of the soil, the ravage of it, shove the sand to the required level and also thoroughly tamper.
- We are tamped by the base of the pit.
- We embarrass 10 cm layer of rubble and carefully tamper. If the thickness of the backfill is difficult to control, then you score a few pegs in the ground with the desired mark. After moving and tamping, pegs can be removed.
- I fill 10 layer of sand, water water and also trambam.
- From above, we emballon a small layer of rubble fraction 40 - 50 mm.
- We sprinkle sand, forming a thin layer, thoroughly tamper.
Important! If suddenly the sharp edges of the rubble fractions are observed on the surface of the base, it is necessary to deploy pebbles and put so that there is no sharp corners so that nowhere else.
At all stages of completion of the adhesion, it is necessary to monitor horizontality.
Waterproofing, heat insulation, reinforcement

- Fill on the base surface waterproofing material - polyethylene film with a density of 200 microns, rubberoid or glasses. The main thing is that the material is not damaged about the edge of the rubble.
- Waterproofing material We bring onto the wall to a 2x mark above the floor level. Fill with the adoption of 10 - 15 cm and sample scotch.
- At this stage, it is possible to lay a solid heat insulating material. For example, an extruded polystyrene foam or basalt wool in the plates, perlite or clay is suitable. You can also place the heat insulating layer above, on top of a concrete base.

- Concrete floor must be reinforced. To do this, use a metal grid with 10 cm cells.
- We establish a reinforcing mesh on the stand 2 - 3 cm height so that the grid is completely inside the concrete.
Installing formwork and guides

To comply with the horizontal level of the floor, it is necessary to put the so-called "lighthouses" or guides. For these purposes, you can use round and square steel tubes, wooden bars. We have them in increasing no more than 1 m. I fix them with a thick cement mortar. Also, their height can be monitored, begging under the guides more than the solution.
Between the guides, we establish a formwork for the fill of the floor. This is not necessarily, but significantly facilitates the task of filling a concrete floor manually.
We process guides and formwork with oil or throughout, so that after the fill it can be easily removed.
Chernovaya Floor Screed - Concrete Pouring
Pull the concrete floor in the house is needed in one or two right. If you do big breaks, the base will be fragile.
- We start pouring a concrete from an angle opposite to the front door.
- We pour several cards at once, then recall the shovel.
- We are tamped by concrete using a deep vibrator.
- Align the surface using the rule. We set the rule to the guides and pull it to yourself. Excessive solutions are distributed over the cards in which the solution lacks.
- We take out the cards and fill the emptiness concrete.
- When the entire floor is pouring concrete on this technology, it is necessary to cover it with a plastic film and give drying for a month.
For better drying of concrete black floor, its surface must be wrapped with water.
After complete drying of the concrete, you can perform a finite tie of the floor and flatten the flooring.
The execution of the draft floor with their own hands is a very responsible task, because the solid foundation is much more important than the final coating. For example, it is not necessary in the old house to lay a new floor covering from above the old draft floor, if its overhaul has been carried out.
Wooden floor in an apartment or private house one of the most accessible and eco-friendly flooring. Has good heat and sound insulation, so widespread in country construction. The tree has always created comfort and comfort for any person.
The most good wood for floors is a nut, a red tree or oak. But they are very expensive and cheaper to buy imitation of these breeds.
Plaques made of conifers, such as pine, spruce, fir, larch received the greatest distribution. They are practically not inferior in quality with their expensive brethren and have an affordable cost.
For wood floor device The boards are used that should be sucked in special chambers, to prevent the sinking process and deformed. If you have the opportunity to check the moisture of wooden boards, it should be no more than 12%. In order for the wooden floors to be like a monolithic canvas, they are tongued. On the one hand, they make a deepening, and with another protrusion, the same form as a deepening, thanks to which the boards are tightly connected.
After buying a material, it should lie about 3 days in the place where it will be not. This process is necessary for the wood to type that humidity and temperature, as indoors and less twisted and wounded.
When buying, pay attention to the appearance. The board of the highest grade does not have bitch on the surface, and for the first grade, healthy ingrown bits are allowed. It is convenient to buy about 30% of the first grade board, the rest of the highest, because the wooden floor under furniture or in remote corners of the room are minor. If only part of the board is needed, the first grade is excellent for this suitable, because You can cut a piece of small length. It is also necessary to take into account that always material must be taken with a stock of about 15%.
Laying the wooden floor, it is almost the final stage when the interior device. By this time, windows, doors must be installed, the ceiling is placed and the walls are rejected and the base is prepared.
Wooden floor on concrete base
When the device is directly on the plate deposit, it is necessary to prepare the base. For this, the surface must be smooth. If this is not the case, then make an additional leveling layer using a screed. Next, purified from garbage and dust, ground. After which they make waterproofing and laid slab material, such as plywood, OSB, chipboard.
The laying should be made in a checker with a 0.5 cm gap. On such a surface, you can arrange a wooden floor with a thickness of 25 mm.
For the wooden floor device on the lags, the thickness of the board should be at least 40 mm, otherwise it can be fed and the floor will turn out wave-like.
The wooden floor on the lags is not sensitive to the irregularities of the base. Lags can be placed directly on the concrete base, and it is possible to align large irregularities with a height of the lag.
You can make additional insulation using mineral wool or other similar materials. This is especially true when the wooden floor is on the ground. Many communications, wires can be easily mounted directly under the flooring, which is very convenient, especially for country houses, where the number of different wires and pipes is huge.
If you decide put the wooden floor with your own handsThe first thing it is necessary to check the quality of the base. If it is a monolithic base or concrete overlap, then check in principle and nothing. The only thing that can be done is a cement screed, but you can do without it. If the screed is already present, then it is necessary to examine it with the help of a climbing and visual inspection. It should not be cracks. If they are, then you need to clean this section from the screed and pour a new one.
The next stage is the laying of waterproofing. To do this, a conventional polyethylene flask of 20 cm is placed on a purified surface, which is fastening with a tape or can be purchased polyethylene equal size of the room.
Lags are wooden bars. They must be sucked and covered with special compositions that prevent the process of rotting. They should not be bark. If the border is present on the bar, it must be deleted, and this place must be cleaned and processed by an antiseptic.
After that, lags with a size of 50x100 mm in size 50-60 cm, aligned in terms of the level and are attached to the base. Now there are regulated lags that are very conveniently installed, but they are more expensive. Additionally, the space between the bars can be filled with any thermal insulation material, which is topped with vapor insulation.
Next, you can proceed directly to the wooden floor device. It is raised perpendicular to lagas, usually in the direction of light falling from the window. The first row should be separated from the wall for 1 cm. This gap is necessary so that the tree can be freely expanding to the sides to the side when changing the temperature and humidity in the room.
After that, with the help of self-tapping screws, floorboards are attached to lags. For a more aesthetic type, the self-tapping screws are screwed into the end of the board at an angle of 45 0. Next, the next board is fastened and the whole process is repeated. Laying occurs in a checker order.
The next step is grinding. If the difference between the floorboards of the flooring is large, these places are aligned with the electrolake. Then they take a grinding machine, which is cheaper to rent, and bring the surface to perfect, with the help of a decrease in the grit of the grinding ribbon from large to small. When grinding indoors, a lot of fine wood dust is formed, so it is necessary to curtain the doorways and wear a special protective respirator.
Often after the grinding stage, you can detect small chips, slots, recesses on the surface. They must be treated with the help of a putty on a tree, give to dry and get a small emery paper again.
The final stage will be wet cleaning of the entire premises, vapor or painting of the wooden floor and installation of plinths.
The base for the wooden floor on the soil
Often it is necessary to tempt the wooden floor right on the ground. This situation is typical for basement rooms of country houses. The main thing here is to isolate it from moisture, which is inevitably present in the soil, otherwise the floors will be cold and quickly rotate.
There are two most common options for the preparation of the foundation:
The first is the fill of the concrete slab, and the second is a flooring device on brick or concrete pillars. The fill of the concrete slab is considered the best option.
Why?
Watch the video at the end of the article where you will find the answer to this question.
Concrete monolithic plates for wood floor
To do this, remove all the vegetable ground, if it is, and fall asleep with a layer of sand about 20 cm, which you need to raise well. On top of this layer, 10 cm of rubble are floated, are also compacted and poured with liquid cement mortar, which is aligned using a level and rule.
 The next layer will be waterproofing. Now a huge selection of such materials, but if you want to save, you can put a conventional polyethylene film in 2 layers. Then goes a layer of insulation, which can be made of granulated slag, claying or more modern extruded polystyrene foam. If clay or slag is chosen as a heater, it must be aligned using a cement solution.
After that, one more layer of plastic film, which is poured concrete monolithic plate. The stove thickness should be at least 5 cm. It is advisable to rein it with the help of a reinforcing grid.
At this stage of the preparation of the base ends and you can proceed directly to the wooden floor device as it was written above.
By the way, on our site there is another article, where the device of a warmed monolithic base for the floor is described in more detail for the ground (link).
Wooden floors on the ground on brick bedside tables
It must be said that such a design is applied for a long time. First make the base in the form of bedside tables. As a material, a red burned brick is used, which is not afraid of moisture. The distance between the neighboring beds should not exceed 2 m. After that, the remaining area is covered between the supports of polyethylene and fall asleep with a clay or slag.
 Next, two layers of rubberoid or other waterproofing are put on the reference pillars, which are installed wooden beams cross section 150x50. The next stage of preparation, the base is the so-called stitch, in order to hold the insulation between lags. Then the steam insulation on which the insulation will be lying. The whole design is covered by another layer of vapor barrier.
If you are placing the parquet board, you will have to make flooring from a wooden draft floor. If not, you can immediately arrange a finishing wooden floor.
Wooden floors are very popular in low-rise construction: they are equipped in residential rooms, and in the technical premises (sheds, summer cuisines, verandas, etc.). Note that wooden floors have not the best characteristics and life, but they are beneficial from the filling economy, environmental friendliness, simplicity of laying and low load on the base.
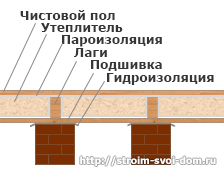
The classic wooden floor consists of several key items:
- base;
- supporting columns;
- lags for the floor;
- fresh flooring.
General diagram of the wooden floor device on the soil
Lagi
The base for the wooden flooring is lagows - thick beams stacked on the columns. Most often they are made of wood, but there are also plastic lags, and reinforced concrete. At the same time, it is wood that are considered the most practical, because they are inexpensive, comfortable in the installation, and with proper processing can serve as decades.
To main advantages wooden Lag.oV can be attributed:
- Environmental purity of material.
- Good level of heat and noise insulation.
- Fully simple installation of wooden flooring.
- Uniform load distribution.
- The possibility of arrangement of the ventilated underground.
- Excellent performance properties.
- Availability and simplicity of repair.
As a rule, lags are made from inexpensive wood distributed in the region. For example, lags from pine and birch, spruce and larchs have proven well established. Can be used as lags can be a second-round and third-stranded wood, the humidity of which is less than 20 percent.
Note:lags should be the right form (smooth face). With elevated loads, the height of the bar must be about two times higher than its thickness.

Lags laid on blocks and waterproofing
What board to use for the floor?
It is necessary to select the width and height of the lag, depending on the design of your sex and you have covered. The wooden floor device on the lags provides for the following standards: For boards with a thickness of 20 mm, the distance between the edges of the lag should not be more than 30 cm, for 30 mm board - 50 cm, for a 40 mm - 70 cm, 50 mm - 100 cm. If Make spars more, the board will fake, which will cause discomfort when using. The distance between the supports to which lags are based, is usually 100-150 cm.
Material for flooring is usually inexpensive wood. Often used all the same pine and fir coated with special substances that prevent rotting. But it should be borne in mind that this wood is considered soft and easy to damage heavy furniture and even heels.
If the room is planned high permeability, then instead of pine, it is necessary to use larch or oak. The price of these materials is more expensive, but for durability has to pay. An excellent option for a bedroom and children can be alder or aspen - this wood has a beneficial effect on health.
Think in advance how you will decorate the floor. No need to buy a tree of the first grade if you will paint it with enamels. The first grade is usually covered with transparent varnishes that do not spoil the texture and appearance of the tree. For sheds and utility rooms, the third grade of wood is quite suitable.
Note:for flooring, it is necessary to use a board with humidity no more than 12 percent. If the board is wet, then it will bloom or appear slots on the joints.

The boards are more convenient to lay together, pressing them to each other.
Laying and processing
Before buying, be sure to measure the size of the room and compare them with the maximum possible length of the lag and boards. Ideally, when materials are stacked whole, without compounds. If you still have to split them, then do it with the displacement (the connection must be made alternately on the left - to the right in each row). Be sure to lay the seam on the column. Buy materials with a reserve at least 15 percent.
Before laying, trees the lags with special chemicals, which will protect it from mold, pests and fungus. It is allowed to process lag old machine oil - it is perfectly absorbed into the tree and protects the material from rotting. Also, at mandatory, the bottom layer of boards is processed by various antiseptics. All carriers are recommended to soak at least twice, waiting for the complete drying of the previous layer. Additionally, all wooden surfaces can be treated with antipirens that protect the material from open fire.
Types of wood floor
Wood flooring on lags can be carried out by two main options:
- Wooden floor in the soil.
- Wooden floor on the existing base.
Paul on the ground most often stacked in private single-storey houses - This is the most economical option from all existing. Flood floors can fit in apartments, offices and industrial premises - they are equipped over reinforced concrete plates or concrete surface.
Note:if you fail to choose lags on the required thickness, you can use boards stitched with each other. Flooring Floor in this case is placed on the edge of the bonded boards.

Floor alignment can be carried out by electronics
Installation of floors
The floor on the ground is best equipped in a new house when the box is built and the roof is made (the precipitation will not interfere with you). The final finish is usually carried out at the very end, when the final wall thickness has already been defined and dirty paint-plaster works are made. Installation of wood floor on lagacprooms in such a sequence:
- Preparation of the foundation. To do this, the upper fertile layer of soil is removed, the earth is well tightened and falling asleep with a 5-7 cm thick rubble.
- Creating platforms under support. You must calculate the number of columns for lags, place them and pour on the site of the alleged columns the foundation (40 per 40 cm).
- Building columns. Usually they are laid out of red bricks, as silicate can crumble from moisture. Under the column and it is placed on it a layer of waterproofing (a resin and several layers of rubberoid are usually used).
- Installing lagows. It falls on the surface of the columns, if necessary, its height can be corrected by laying solid material. The tree is attached to the columns with special corners or metal strips.
- Final coating by boards. The boards are tightly pressed to each other and nails are nailed (in the lag should be no less than the length of the nail). Cress the boards can be either using a partner or a special strut.
Note: Such floors can additionally be insulated with polystyrene foam. But between it and the board, it is necessary to leave a gap of 2-4 centimeters for free air movement.
After all the boards are laid, an existing drops and surplus are shy if necessary. A gap of 15-18 mm should remain between the boards and the wall throughout the perimeter for additional ventilation and temperature expansion. Subsequently, this seam will be closed by plinths.

Floor installation
In some cases, it is necessary to lay the lag for the floor on the already existing base (concrete surface). If the surface is perfectly smooth, then the lags can be placed by ribs right on it. If she has obvious differences, it is recommended not to do lining, but to pour the base sand-cement tie, Aligning the floor. The fact is that lining over time can jump out from under lags, as a result of which the floor will begin to see the floor in this place. Stacking is recommended as follows:
- Creating a waterproofing layer. As waterproofing, you can use the most conventional polyethylene film.
- Laying lag. Try to use one-piece stripes if you need to split them, then make joints from different sides.
- Creating a heat insulating and sound insulation layer. Absolutely any material: Minvata, polystyrene foam, foam and even clamitis can be performed as a heater.
- Laying boards. Fix them with nails or screws, tightly configuring each other.
Sometimes it is not a concrete slab as a base, but wooden logs or beams. Even in this case, the board is recommended for lags, as in other versions. They will be easily screwed to the existing base from the side with strong self-draws (with a diameter of at least 6 mm). So that your bars do not split off, capture the holes in the hole in them in 4 mm.
Note:try to alternate annual rings on the boards. Place them so that in one row they walked in one direction, in the second - to another. So the boards will independently prevent the deformation.
This is all the information that you can come in handy when the floor is lagged. In principle, there is nothing complicated in this - one person will quite cope with this work in the presence of minimum set Tools. The main thing is to calculate everything correctly. To do this, we recommend that you draw a room on the right scale, and calculate the desired number of lags, boards and columns in a visual form.
For the facility wooden floors, whose finished flooring is watered on the lags, there is a mass of technological variations. The choice of the optimal scheme depends on climatic and geological conditions, from the financial capabilities of the owners. On the method of the floor of the floor with lags affects the type of base, operational specificity of the structure or separate room. However, according to the principle, the wooden floor was not performed on lags, the construction of the construction is based on classical techniques and options about which will be discussed.
Main types of floors with lags
Lags - a rather capacious concept that includes not only known to all wooden bar. With a rectangular cross section. The technical definition of lags is applied to:
- plates created from logs with a cross section in the finest part of at least 160 mm;
- died from two sides of the logs with dimensions in a slice of at least 150 mm;
- twisted two, installed on the edge board, with a width of 100 mm and over with a thickness of 25 mm and more;
- directly rectangular bar, whose size determines the upcoming load. The dimensional minimum is considered 100 × 150mm with a step of installation of lags 60 cm;
- reiki used for dry alignment and insulation;
- the 2-way metal chaserler used is extremely rare in the case of facilities for reinforced concrete beams;
- plastic long products included in the package of factory systems for forming a dry screed.

Regardless of the material from which the lags are made, the function of them is one: they serve as the basis for the future of the bedding floor and the final coating. Can be relying on the mortgage crown, on the support poles, on the wooden beams, concrete plates or for pre-tamped, prepared soil.
Need or not need an underground?
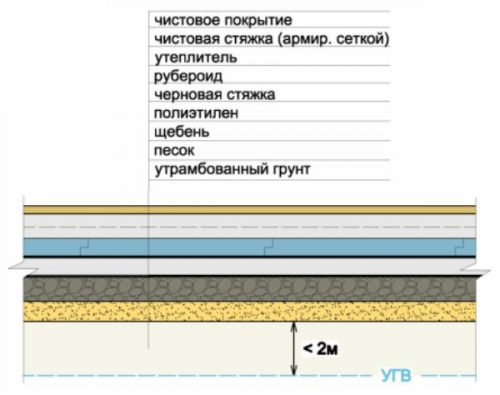
Depending on the geological characteristics of the site chosen for the construction, it is determined whether the space between the soil and the lag system or it can be refused to reduce costs and labor costs.
The dictator of the mandatory presence or permission for the absence of underground is the indications of the seasonal level of groundwater:
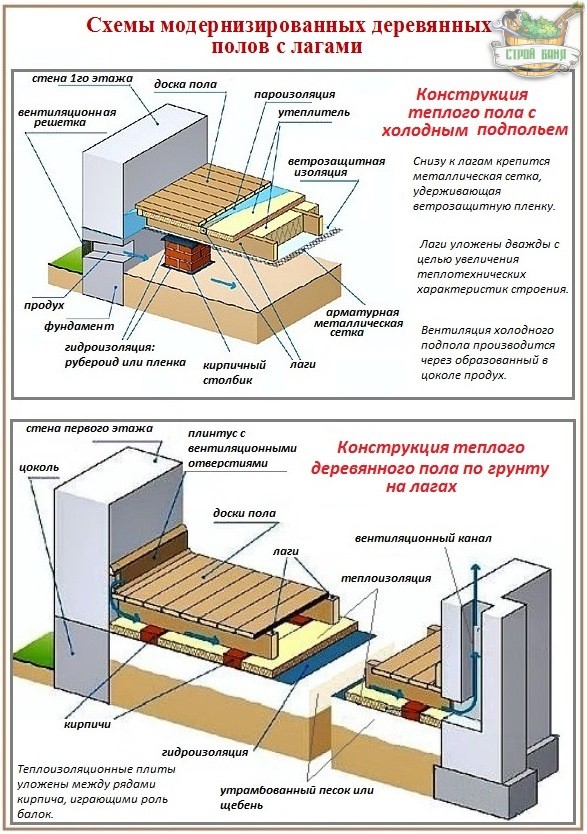
- with low running, the GW arrange simple, extremely cheap, but cold floors without sample. Lags are based in such an embodiment on the primer base. This type is ideal for country constructionFor the construction of a seasonal bath. In the middle lane and southern regions, it can be used if the structure of constant use has a high basement;
- with a high occurrence of GW, which is a serious threat to wood, the system of lags must be raised above the ground surface. Under the installation of the frame system of the lag, it will be necessary to build supports of brick columns, monolithic concrete or foam concrete blocks.
The values \u200b\u200bof the GV level should be found in the local weather service before the design of the bath.
Classic floors with lags
The presence of underground space shares all existing schemes into two classes: floors with underground and without it. Constructions without sample are considered cold, but there are methods for their insulation. The floors with the trim are significantly more varieties. They can be cold and thermally insulated. In insulated floors, the heat insulation layer may be located between the lags or between the supports.
The easiest cold floor
This design is drunk on dry ground. In order to arrange it:
- fully removed the soil-vegetable layer;
- after removing all the "consequences" of growing organics, natural soil must be carefully tumped;
- the area liberated from herbal residues fall asleep with sifted sand, replaced which will be able to crushed stone or construction trash with sandy aggregate;
- the pillow again tram. The homemade tool for sealing the soil and backfills can be built of a peculiar decking deck, navigating the transverse shelter to its upper plane as a handle;
- then there is a new layer of frosting from the crystal sand, slag or dense clay. This layer will become the medium and the basis for installing a frame of wooden lags, which means the conditions for rotting wood, it should not be created. Failure power must be two or three times higher than the thickness of the timber selected for the arrangement or made of half the plate logs;
Note. If it is planned to use a slag to create a pillow to buy and bring it to the site it is necessary a year before the start of work. Slag need to be "crippled".
- in the last layer of frustration "plunge" lags, the upper line of which should be flush with the plane of the construction base. Timber before immersion in the ground is necessarily processed by an antiseptic agent.
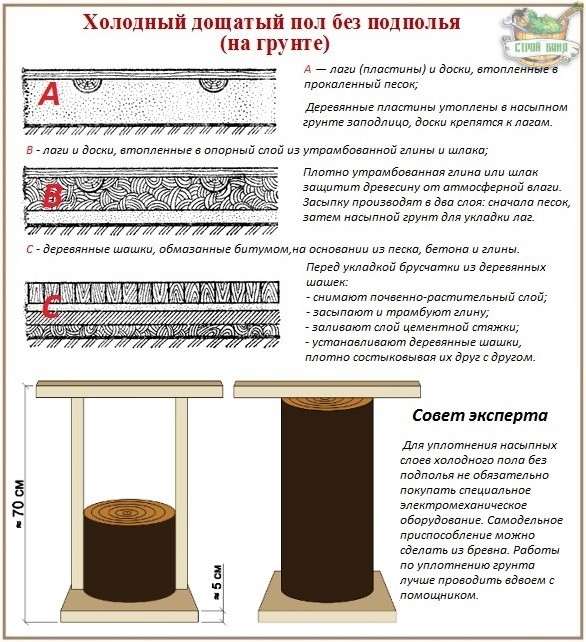
Laying the lag is made in a step depending on the width of the flooring. Since the wooden flooring device in the baths are mainly completed by a 37 mm bracket flooring, the optimal distance between the lags will be 60 cm. Too wide boards are undesirable to arrange a bath, because wood in a wet environment will be deformed, and wide boards will make warning especially noticeable and uncomfortable For movement.
Important. Annual rings of neighboring flooring should be sent to different directions, so that adjacent elements will spontaneously obstruct the deformation.
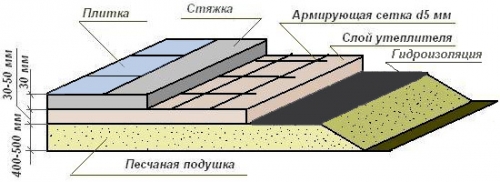
Insulated floor option for soil
- The bottom of the peculiar pit for the subsequent backfill of the multi-layer pillow is trambed and covered with insulation, which is suitable for bags from under the lime or cement mixture, which are used in two rows.
- Then they fall asleep with a layer of 8 cm. It also needs to be tamped and pour lime milk.
- Next rubberoid fill.
- Then the fiberboard is thick 3 cm.
- The ceramzite layer of the shallow or average fraction is about 8 cm.
The multilayer insulation base for the floor at the end is poured with skinny concrete, which prevails sand. After the solution grabs the area of \u200b\u200bthe constructed floor fall asleep with sand and further act according to the scheme described above.
Cold floor type with insulated underground

Initially, standard basis preparation is carried out. The difference is that on the prepared surface do not produce frighting of the crystal sand, and the reference pillars are built full-time brick or foam concrete blocks. Each support column is a separate structure with its foundation, for the fill of which you need to pre-mark.
Please note: the boards of the first flooring are mounted "in the cross" lags.
The optimal option for laying board maps is:
- parallel direction of light flow in the rest room;
- parallel direction of the long wall in the washing department and in the steam room;
- perpendicular to the movement in the pre-tribbon.
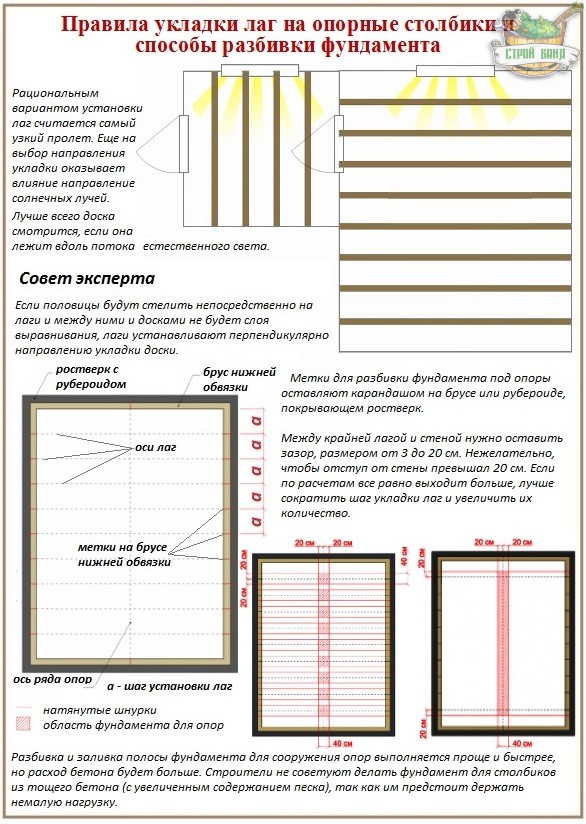
If the lags will not arrange an additional crate, lags need to lay across the direction of the board. All distances must be measured, plan and count, focusing on the central axes of columns and lag. Marks need to be left on the element of the design to which the ends of the lag are to be preserved: on the rubberoid covering the woodlock, on the bar of the lower strapping.
The first lag from the wall should be positioned so that a 3-20 cm gap remains between its side surface and the wall and exactly from the opposite side. That is, an independent builder has the opportunity to slightly move the scheduled rows of columns when breaking. The foundation for support can be pouring entirely under the whole range or for each of the columns separately. It should be noted that the foundation for the column should act at least 1 cm, it is desirable for 5 cm throughout the perimeter for the contour of the support. It means that the formwork for the fill of the strip for a row of supports should be constructed so that the base of the foundation is wider and a long row to 2-10 cm. The foundation for a separate support should be so wider and longer.
Council. According to the axis noted on the strapping, it is necessary to postpone half the width of the future foundation in both directions and score a peg-designed peg in the dot. It is necessary to pull the cord between the carriages and repeat the same actions in the perpendicular direction. For the fill of the foundation, the band is enough to break only the corners of the future local base.
![]()
The sequence of action on the fill of the concrete basis is extremely simple:
- tamping soil;
- the formwork device with the height of the side of 10 cm;
- laying on the reinforcement grid;
- concrete pouring itself, waiting for pouring for 3 days;
- then the foundation is covered with polyethylene or rubberoid for waterproofing and build supports.
Note. The upper plane of the supports must be located at one level. The alignment of the row is made by applying a cement solution. If the alignment takes a layer more than 5 cm, the reinforcement grid is "combined" in cement.
On top of the aligned support, a waterproof layer should go on top, which needs to be impregnated with an antiseptic Wooden gasket with a thickness of 3 cm. Here it will be laid on it, and by the way, also treated with an antiseptic, and on top of a boardwalk.

The underground space of cold floors fall asleep with clay or slag, leaving 5 cm of emptiness from above. For the ventilation of the underground around the perimeter, the technological gap leaves. In plinths necessarily equip holes for the ventilation of the underground. According to the construction standards, 15 m² of the area should be two ventilation holes formed in the plinth of opposite walls. Overall area of \u200b\u200bholes 20-30 cm². They are closed from a thin metal mice from non-ferrous metal.

Warm floor facilities with cold
It is fundamentally this technology of wood flooring devices differs from the previous scheme only the fact that the insulation is not in the subfield, but in the frame built from the lags.
- To lay the insulation to the lower edge of the bar from both sides nourish the rail, which will support the crank floor.
- The cranial flooring is overlapped with polyethylene, mineral wool is placed on it or grind clamzit.
- Between the insulation and the upper line of lags leave ventilation gap.
- Overlap with vapor insulation material.
- Fill the boarded floor.
Another difference is a way to organize ventilation warm floors With a laptile trim. For ventilation, in this case, the holes are made in the basement, every 5 m. In the frost period, the outstands are closed.

The described types of structures are a kind of foundation for developing their own wooden floor project. All other types are upgraded variations on the theme of basic classics. Depending on the upcoming load and climatic features Just change or components are added.


