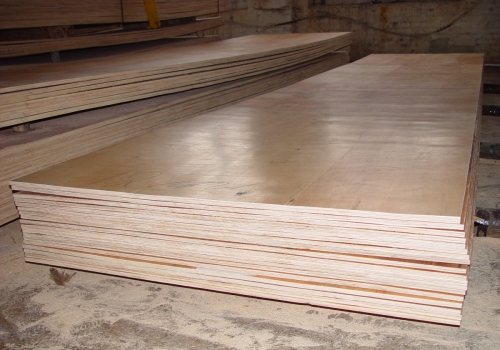
The use of plywood for floor repair is perhaps the most economical, simple and affordable way. The material is inexpensive and its installation does not require significant physical effort, therefore, alignment can be completed in a fairly short time. But there are still nuances that home craftsmen should know about.
Why plywood?
Plywood is one of the most popular and convenient materials that can be used in renovation work. Let's highlight the main advantages of plywood sheets:
- easy to handle and install;
- high-quality grinding of the material;
- there is no unpleasant smell;
- solid surface;
- lightness of the material;
- high strength;
- moisture resistance and water resistance.
It is worth noting and specifications material.
| Plywood type | Description |
|---|---|
| Plywood FC | moisture resistant appearance, urea resin is used for gluing veneer sheets. This plywood is intended for indoor use. |
| Plywood FKM | has increased water resistance, is made on the basis of melamine resins. This type of plywood is unique as it uses environmentally friendly melamine resins. Due to its environmental characteristics, plywood is used in furniture production and for interior decoration. |
| Plywood FSF | veneer sheets are glued together using phenolic resin. This type of plywood is also highly water resistant. It is not recommended for interior decoration premises, so phenolic resins are harmful to health. Typically used for outdoor decoration |
| Laminated plywood | contains basically FSF plywood, which is covered on both sides with a special film. Film faced plywood is used for the manufacture of formwork. This type can be used many times. |
| Bakelized plywood | bakelite resin is used for gluing veneer sheets. This type of plywood is used in aggressive climates, sea water, aggressive environments, sometimes for performing monolithic works |
| Marine plywood | analogue of bakelized, but less durable. Made from foreign wood species |
| Plywood Flexible | foreign version. A distinctive feature is the ability to bend well in the transverse and longitudinal directions |
During work, plywood can be bent, while the material will not crack, and it will not break. The durability of plywood allows you not to worry that the floor will not withstand the loads. In addition, conventional plywood sheets have a large surface area, which means you can cover the desired surface faster. And, finally, the material is quite unpretentious, and in view of this and its low weight it is convenient to carry it, lift it to the upper floors.
The use of plywood sheets also allows you to achieve high quality and reliability of the new floor. As a result, instead of the old coating, you get a flat and durable surface. In this case, the floor height will rise by only a few centimeters, which will be almost imperceptible. At the same time, plywood flooring provides a rich space for the implementation of various design solutions.
When buying material, pay attention to the grade. Plywood comes in four varieties:
- first grade - the best quality, no external defects;
- the second grade - plywood with wood inserts, sometimes with dents or scratches;
- third grade - material with devil's holes or fallen out knots;
- the fourth grade - the worst in quality, many defects.
IMPORTANT: when buying low grade plywood, you can be sure that the material is perfect for rough work - this will help keep high-quality plywood intact and at the same time not make mistakes in calculations.
Tools for work
To properly level the floor, you will need tools such as:
- roulette;
- level, preferably 2 m;
- self-tapping screws;
- jigsaw;
- screwdriver.
Technology selection
To choose a certain leveling method, you need to assess the condition of the floor and find out how much the relief deviates from the desired norm. If the height differences are about 2 mm, while the area does not exceed 1 sq. meter, you do not need to level the floor. It is enough to use acrylic sealant on the surface or apply the putty method. In the latter case, the mixture can be made independently by mixing moistened sawdust and PVA.
With the correct laying of the floorboards, where the differences are even up to 5 mm, it is possible to fix the plywood directly to the floor. When the drops reach from 8 cm, you need to make point or tape supports. What are boards / thick plywood used for?
IMPORTANT: for a board whose width is from 10 to 20 cm, a thickness of 10 mm is sufficient. When the width is over 20 cm, use thicker plywood sheets.
When the differences are too large, the structure will have to be disassembled and redone by purchasing new materials. In addition, such a deformation usually hides some serious reasons that need to be clarified.
IMPORTANT: plywood is used for leveling only if the technical parameters of the shelf meet the standards.
Table. Characteristics of plywood and plywood boards made from birch veneer sheets
| Indicator | Plain plywood | Bakelized plywood | Plywood boards |
|---|---|---|---|
| Thickness, mm | 4 | 16 | 20 |
| Density, kg / m3 | 696 | 1190 | 749 |
| Water absorption in 24 hours,% | 24-32 | 0,92 | - |
| Tensile strength (MPa) when tensile along the fibers of the outer layers | 101,1 | 113,4 | 104,0 |
| Tensile strength (MPa) when tensile across the fibers of the outer layers | 65,9 | 120,0 | 94,4 |
| Ultimate strength (MPa) at static bending across the fibers of the outer layers | - | 112,0 | 85,7 |
Determination of drops
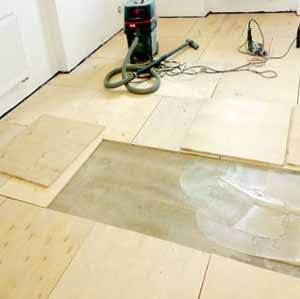
To measure floor differences, you need a 2 meter level gauge. In the corners of the room, mark the places where the walls and the floor meet, as well as a point in the center of the room. After "breaking" the room, each site needs a researcher separately. Write down the results - it will be easier to estimate the volumes work ahead... It would be nice to repair the base of the floor before that - check the floorboards, logs, eliminate the creak, and update the fasteners. Replace damaged parts of the floor, otherwise leveling will be useless.
IMPORTANT: the plywood sheets start from the center. For fastening, it is necessary to leave a distance of at least 2 cm. However, if another coating is laid on top of the plywood, then there is no need to worry about the location of the sheets - you can start from the far corner and gradually move deeper into the room.
The first way
The simplest and most common method is the alignment method, which does not set lags. Before proceeding with it, leave the material for two days in the room in which you are going to work. Leave the plywood sheets on the "edge" - so they "get used" to the new environment. If the room does not have regular heating, the plywood is moistened with warm water and left for at least one day.
IMPORTANT: floors made of veneer or fibers must be treated with an antiseptic. The same applies to the materials used for dry screed.
It is not necessary to install the support bar, because the curved floorboards take over its functions. In addition to plywood, you can use DSP boards.
When laying plywood, leave a gap of 2 cm between the sheets and the wall. This is necessary so that deformation does not occur in the event of expansion of the material due to temperature changes - the sheets can "run over" each other. A gap is also left between the plywood sheets themselves.
IMPORTANT: if the floor sinks in "waves", it is stupid to level it with fibreboards. The material will shrink just like the floor.
For floorboards no thicker than 20 cm, plywood with a thickness of 8-10 mm is required. For floorboards with a width exceeding 20 cm, plywood boards with a thickness of 18 to 20 mm will be needed.
- Place the bosses around the perimeter of the floor surface, 2 cm away from the wall.
- Lay the plywood with a 3 to 8 mm gap between the sheets. If you need to lay in several rows, follow the method brickwork - the slab of the next row is shifted to the previous row. Make sure that the sheets do not intersect crosswise at four joints - the permissible error is from a quarter to a half of the sheet.
- Attach the sheet to the previously installed floor ridges. Distribute the attachment points evenly.
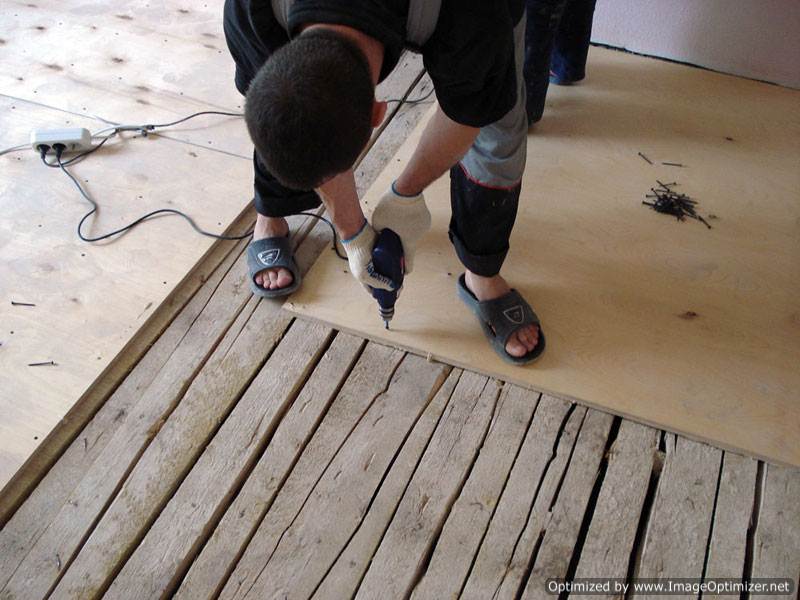
IMPORTANT: in order not to spoil the plywood during fastening, drill holes - first along the diameter of the screw barrel, and then for the head (not through). Do not nail the plywood to the floor; the material will split.
Lay the sheets on which the final copy will be laid with the unpolished side facing up. On the contrary, it is possible if the screw heads are hidden under the sealant, and the plywood is opened with varnish.
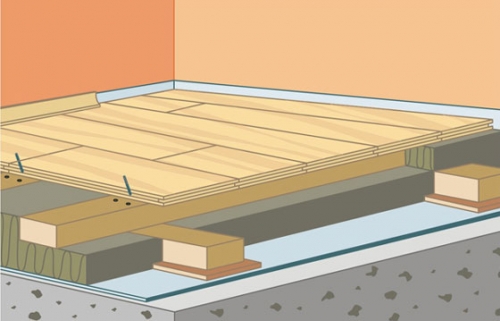
Second way
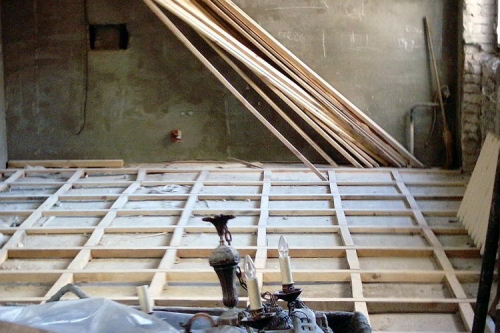
A strip support is pre-installed, which represents longitudinal logs and horizontal cross-members. The distance for the lag is 3 cm from the wall. Laying is carried out depending on the size of the plywood sheets, most often from 40 to 50 cm.
Plywood flooring on logs
Between the lags, the empty space can be filled with insulation or made a screed - mix PVA and wet sawdust. Apply the resulting mixture in two to three layers to the free space and wait until it hardens. This is usually two days.
Mini lags are great for correcting a very curved floor (drops of a few centimeters can already be considered as such). You can install mini-lags along or in front of the boards, there is no difference. But the dimensions for each element must be calculated individually.
Do not try to use the method of fitting the plywood to the floor relief - this will require special tools and complex engineering calculations.
Fourth way
Instead of a lag, you can install supports, they are also called cobs. They are cut from any available material - plywood, OSB, boards. The thickness of the shell is calculated from the new surface and the old floor. The result is a system that is a cell. Square sizes: 30 cm for plywood not thicker than 14 mm and 45 cm for thick plywood boards.
IMPORTANT: put the scabbards, making a small step, because this system is less reliable than the tape crate.
To set two layers of alignment material, do not arrange the top sheets in the same order as the bottom sheets. Try to offset the butt joints by at least 20 cm. This problem can be solved and easier if you start laying the second layer from the opposite corner. Glue the plywood layers with any wood glue for greater strength.
To ensure ventilation, drill at the points marked in advance and then cover them with a ventilation grill.
As you can see, all methods of leveling the floor with plywood are quite simple with the proper skill and dexterity. Plywood is a comfortable and lightweight material that can be handled by one person. Plywood can be laid both over uneven floors and on logs. Each method is good and convenient in its own way, but it is chosen based on the height of the irregularities on the old floor. One of the main advantages of using plywood is its low cost and the least expenditure of physical strength, although you will have to be extremely careful with the calculations.
Video - Method of leveling floors with plywood on logs
In this article, we will look at how to level an old floor with plywood for a laminate, as an example, let's take two basic bases: wood and concrete.
The use of plywood as a leveling layer under the final floor covering is considered to be rightfully economical and proven method.
The technology of arranging a dry screed using plywood does not require significant labor costs and large monetary investments.
Since the floor can be leveled in a short period of time, and you do not have to wait for the screed to ripen, as a result, the repair floor surface carried out without delay.
Aligning a wooden base can be done in two ways: along the crate and without it. It's up to you which technology is best for you.
Leveling a wooden floor with plywood along the logs under the laminate provides for the dismantling of the old coating, including floors and boards lying on the logs.
After the boards are removed, it is necessary to inspect the log, perhaps some of them will have to be replaced with your own hands or simply strengthened with anchor bolts.
If you need to raise the floor height in the house to a certain level, then you can completely get rid of worn-out logs and install new ones, having determined in advance the required step size.
It is best to use coniferous wood beams for mounting lags. First of all, strapping is made around the perimeter of the room, leaving a temperature gap of 50-100 mm at the walls.
Then the working area is equipped with longitudinal beams with a distance of no more than 60 cm. The correct horizontal position of the log is controlled using a building level.
The plywood is fixed on the beams so that the butt joint of the sheets lies on the support.
The seams of the leveling layer must not be suspended in the air. If the lathing beams were laid with a large step, then it is necessary to supplement the support base with transverse beams.
At the same time, the smaller the cell of the supporting floor, the better it will be possible to level the base under the laminate with your own hands.
First, an insulating layer is laid, as it can be used polystyrene foam plates or mineral wool. On top of it, a vapor barrier is equipped with an overlap on the walls.
Installation of plywood sheets on beams:
- Taking into account the unevenness of the walls, they control the corners and adjust the extreme sheets of plywood to the desired parameters;
- Installation of plywood is carried out in a run so as to avoid the formation of a cruciform seam of four sheets. In this case, a temperature gap of about 2 mm should remain between the products;
- The distance of the plywood covering from the wall must be at least 20 mm. The free space will subsequently be masked by a plinth;
- Plywood is fixed to the beams using self-tapping screws. The length of the fastener rods is calculated by multiplying the sheet width by 3;
- The holes for the self-tapping screws are pre-countersinked, which will allow them to completely sink their caps in the plane of the plywood;
- Plywood is laid on the crate in strips. The sheets are fastened with a step between fasteners of 20 cm;
- If necessary, the extreme elements of the floor are cut with an electric jigsaw for laying communications, or adjusted in accordance with the protruding parts of the wall;
- After the installation of plywood on the crate is completed, the irregularities are putty.
In addition to the above material, we suggest watching a video on how to level a wooden floor with plywood.
Leveling a wooden base under a laminate without logs
It is quite possible to level the wooden floor surface without the use of logs. This technology can be considered, of all existing, the most in a simple way leveling the floor under the laminate.
In this case, you do not need to spend time dismantling the old surface and mounting the lag.
In addition to plywood, wood floors can be leveled using cement bonded particleboards or gypsum fiber floorboards.
It will sag under the weight and deform over time.
To level the plank floor, it is necessary to select the correct thickness of plywood.
If the floorboards are about 20 cm wide, then the thickness of the product may be 10 mm; if the width of the floorboards is more than 20 cm - the thickness of the plywood should be about 20 mm.
Installation of plywood sheets without logs:
- It is necessary to retreat 20 mm from the wall in order to correctly form an indent, it is necessary to expose the mounting bosses around the perimeter of the floor;
- When installing sheets between them, it is necessary to leave a temperature gap of 3-8 mm, with the help of which depreciation of the rolling stock will be achieved when the humidity indicator changes;
- In the process of installing plywood under the laminate, it is recommended to imitate brickwork. That is, each sheet should be stacked with an offset relative to the sheets of the previous row. The minimum offset is ¼ of a plywood sheet, the maximum parameter is half the width of the product. Cross-shaped joints of the seams of four products should be avoided;
- Fixing the sheets to the boarding with your own hands, you need to correctly distribute the attachment points. In this case, it is necessary to focus on the step between the elevation differences identified during the preliminary measurements. More details in the video below;
- Holes for fasteners are made in advance in several stages. First, the hole is drilled with a drill, the diameter of which corresponds to the size of the screw. Then the finished hole is countersunk so that the head of the fastener, after screwing in, is at the level of the plane of the plywood sheet.
All holes that should be located around the perimeter of the sheet are made by hand with an indent from the edge of at least 20 mm.
Leveling the concrete screed with plywood
It is possible to level the concrete flooring under the laminate using different leveling technologies, but the technique using plywood is the simplest and cleanest. Indeed, in other cases, concrete work is indispensable.
Depending on the evenness concrete base, choose the option of the final leveling of the surface with plywood under the laminate.
The technology can provide for a lag method or leveling the floor without using a lag structure.
Leveling a concrete base without a lag is the best option for a relatively even screed, its horizontal difference can be no more than 1-1.5 cm.
Plywood sheets are glued to the concrete floor with a special adhesive, and then additionally fastened with dowel-nails.
By the same principle, do it yourself using chipboard plates.
The main thing is that the base on which the leveling layer will be mounted is strong and even.
Alignment of the screed along the lathing is required if it is necessary to raise the concrete floor or when the height difference of the horizontal surface exceeds 1.5 cm.
Alignment concrete screed by means of bars, provides for the following series of actions:
- First of all, it is necessary to prepare the base, as a result of which the screed must become completely dry and clean;
- Along the perimeter of the room, using the building level, the boundaries of the future flooring are determined;
- The beams are adjusted to the required dimensions; coniferous wood products are used as the future support structure. Lags can be purchased at a hardware store, but, as a rule, they are not always well dried. For the construction of a rough base, completely dried wood is suitable, otherwise the structure may twist. Suitable material parameters are 40x100 mm;
- For the working process, wooden spacers of the following sizes are also prepared: width - 100-150 mm; length - 200 mm; thickness - 250 mm;
- The installation of the beams should be carried out transversely to the door opening, in increments of 40-50 cm. The distance from the wall should be 20-30 mm, it is done in order to exclude deformation of the floor due to temperature fluctuations;
- Controlling the evenness of the mounted structure and its compliance with the intended height of the future floor, wooden wedges are placed in uneven places;
- Moreover, between each element (wooden wedges, gaskets, logs) it is necessary to lay a soft sound-insulating layer, a piece of linoleum or foamed polyethylene;
- Lags are mounted around the perimeter of the room, then transverse beams are attached to them. The voids of the finished lathing are filled with a heat-insulating layer, which is used as mineral wool or basalt. As a result, the floors will not only be insulated, but also noiseless;
- Then they proceed to laying plywood sheets, they must be well dried, and for ease of installation they are dismantled into squares of 75x75 cm. The products are mounted on bars with self-tapping screws with a temperature gap of 2-3 mm.
A thematic video plot will complete and supplement the above information with details.
Everyone who has started a renovation wants to see his apartment after its completion as in the picture. This is unthinkable without a beautiful floor, and laminate, parquet and other hard floors require a level base underneath. This can be achieved different ways, but the simplest is to level the floor with plywood sheets.
Why is the method good? The most important benefits are as follows:
- no need to wait for the screed to dry;
- relatively inexpensive;
- simple;
- during work, you can take long breaks;
- when leveling with plywood, there is no such dirt as when pouring a cement-sand screed;
- lightweight construction;
- environmental Safety;
- long service life;
- this way both wooden and concrete floors can be leveled.
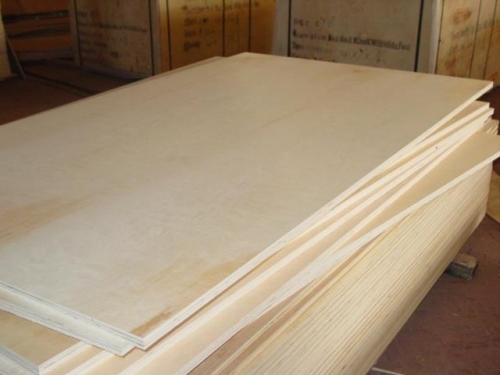
Before starting work, you need to stock up on plywood. It is divided into different classes depending on the purpose, moisture resistance and quality, which is determined by the number of knots, cracks and other defects per unit area. Allocate 5 degrees. Plywood of “E” quality has no imperfections, therefore it is very expensive. The next grade I has small knots and the last grade IV has the lowest quality.
In this case, you can save on quality by choosing degrees II or III. After all, this is a rough coating that will not be visible. When buying a material, it is better to pay attention to how suitable it is for use in residential premises. To do this, you will have to ask the seller for a hygiene certificate. It is desirable that the plywood is moisture resistant. Before starting the repair, it will need to be additionally treated with an antiseptic.
All plywood sheets come in the same standardized sizes:
- 1525 x 1525 mm;
- 1220 x 2440 mm;
- 1500 x 3000 mm;
- 1525 x 3050 mm.
It is very comfortable. Knowing the perimeter of the room, you can pre-outline the layout of the sheets and choose those from which the least waste will remain. After buying plywood, you need to bring it to the room where the repair will take place, and give it a couple of days to get used to the temperature and humidity. The further fate of plywood will depend on the quality of the base, whose irregularities it has to hide.
There are three leveling methods: glue-free, adjustable plywood and log floor.
Whichever of them the floor is leveled, the final step will be to check for slope and horizontality, and then sanding with a special machine or emery.
Leveling without support
This option is used when the height differences are small, 5-10 mm. To align them, sheets 10-12 mm thick are suitable.
It should be fairly flat and dry. It is easy to check the degree of humidity - you need to take a piece of 1x1 m film and attach it to the surface, pressing the edges. If no condensation has formed on it within three days, then the concrete is dry. Another option is to place a glass jar upside down on the base and also check for perspiration inside.
Cut the plywood that has settled in the heat into pieces according to a pre-planned scheme. It is not laid in large sheets, since the tree is capable of expanding under the influence of temperature and humidity, and in small pieces this expansion will not be so obvious.
The size is calculated so that as little waste as possible remains from the existing sheet. By the way, for the sawn fragments, you need to check the ends for delamination. If they are, then the plywood is of poor quality and you need to demand a return in the store.
Place the cut pieces on the floor as they will be attached. Cut arches for pipes, doorways, engineering communications. When laying the sheets, leave a gap of about a centimeter between them. This is the so-called damper seam. Plywood is susceptible to thermal deformation and the gap will help compensate for possible expansion and avoid squeaking.
For the same reason, as well as for ventilation, a gap is needed between the walls and the future coating. It can be made 2 cm in size, and a damper tape can be glued to the wall to prevent the squeak from contacting the coating with it.
It is necessary to place the sheets relative to each other so that four seams do not converge at one point.
When the experimental layout is complete, the pieces of plywood must be numbered and removed.
Foundation preparation
In this case, the floor is flat and you just need to sweep or vacuum it so that the dust does not prevent the plywood from sticking to the floor. Wet cleaning is not allowed in this case.
Then you need to coat the joints of the slabs with waterproofing mastic, all the cracks and joints of the floor and walls.
When done with cleaning and waterproofing, apply a primer to the surface. In fact, this is the same composition as plywood will be glued, only with an increased amount of solvent, so that the mixture penetrates deeper into the base. Often acts as a primer bituminous masticdiluted with gasoline.
Apply the primer to the floor with a roller or brush. Such an operation will bind the remaining dust particles, give strength to the cement coating and improve the adhesion of adhesive materials.
Glue is applied to the floor in an even layer 2 mm thick. Numbered sheets of plywood are laid in accordance with the diagram and are additionally fastened with self-tapping screws with a pitch of about 15-20 cm. The length of the screws should be at least three times the thickness of the plywood. To prevent the hats from protruding above the surface, the plywood is drilled together with the screed to the required depth with a drill for the diameter of the dowels. The resulting hole is additionally countersunk with a larger diameter drill. This will allow the cap to sink into the recess.
Foundation preparation
First you need to assess the quality of the floor. If the floorboards creak, warp and even move away, then they need to be fixed or completely replaced, because one of the requirements for wooden base - strength.
All floor elements and screeds made from organic materials, in particular wood, need to be treated with an antiseptic to prevent mold.
As with a concrete floor, the plywood must be cut beforehand and laid out on the floor. By the way, for a wooden floor, plywood can be taken thicker, up to 2 cm, especially if at the base there are "humped" floorboards more than 20 cm wide.
One of the features of the wooden floor on the ground floor of a private house is that there is a subfloor underneath that needs ventilation. To do this, in the corners of the room, a pair of small holes, up to 2 cm in diameter, are drilled, which must be closed with gratings with a fine mesh. They will prevent various underground animals from entering the house. The joints between the walls and the floor must be closed with a polystyrene seam.
The method is also suitable for wooden and concrete floors and allows you to hide both small and significant differences in height.
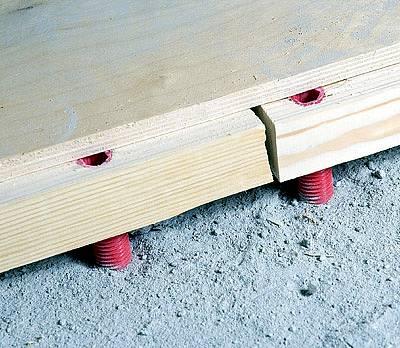
This system offers a pattern according to which the plywood sheets must be drilled first. Then they are laid out on the floor in the right order, and according to the finished markings, holes are drilled already in the base.
Anchors with nuts and washers are installed in them. The nuts act as a stopper and are leveled, hence the name of the system - adjustable. After that, it remains only to apply the finished plywood sheets and secure them from above with the second nuts and washer. The rest of the rods are cut off, a second layer of plywood is laid on top of the first one, so that the joints overlap.
This option allows even the most hopeless floors to be quickly restored to perfect condition. It is more time consuming than the previous ones, but it has a number of significant advantages, in particular, it allows you to place various engineering communications under the floor, and insulation can be placed in the cells between the logs.
Leveling the concrete floor. Foundation preparation
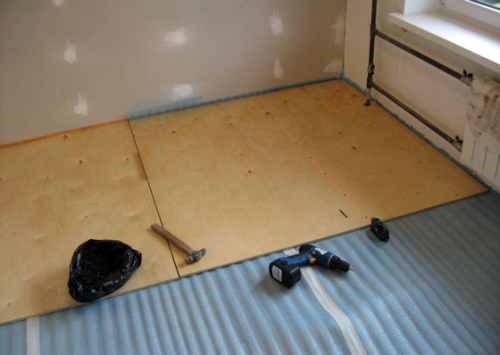
As usual, it all starts with preparing the foundation. It should be dry and clean, treated with a primer, and all gaps covered with waterproofing. With the help of a level on the walls, it is necessary to mark the border of the future floor, and lay a waterproofing film on the floor and, if desired, a layer of soundproofing material.
In the case of attaching plywood to logs, it is also required to measure the room in advance, determine the position of the log and the place where the covering will be laid, then saw large sheets and spread the blanks on the floor. In this case, it is necessary that the pieces of plywood are accurately attached to the logs, so all calculations must be correct.
You can buy a ready-made system, but it's cheaper to do everything yourself. For homemade logs, beams made of well-dried wood with a section of 40x100 are required. This is the most common option, but others are possible.
They are placed in the room perpendicular to the direction of the incident sunlight, since the tree is prone to thermal deformation. In this case, each bar will be in an equally heated zone, without falling into the temperature gradient. If the floor is leveled in the hallway or in a room where there is little or no sun at all, then the logs are located perpendicular to the direction of movement so that the floor is more durable.
The distance between the joists is determined by the thickness of the plywood. The larger it is, the less often you can set lags. Usually it is within 40-50 cm. Lags should not be close to the walls, you need to leave 2-3 cm of free space.
After distributing the lags around the room, you need to raise them to the level marked on the walls, placing pieces of plywood, linoleum, roofing material. In places of support, there must be a soft gasket made of linoleum or foamed polyethylene, which will act as a shock absorber and waterproofer.
When the logs are laid and verified, transverse bars are attached to them on metal corners and self-tapping screws, and the result is a rigid structure. It is fixed to the floor with anchors, and heat-insulating material is placed in its cells. If it is in the form of slabs, then the dimensions of the slab should be slightly smaller than the cell so that the insulation lies tight enough, but does not create pressure on the beams. Then the crate is covered with an additional layer of vapor barrier.
On top of the finished log system, plywood is fixed on the brickwork principle, sometimes in two layers, to increase strength. As in the case of fastening without a lag, the heads of the screws must be drowned.
Leveling the wood floor
It is done in a similar way. The repaired floor is primed, covered with waterproofing, logs are laid on it, fixed, filled with insulation and covered with plywood sheets. The only difference is the need for underground ventilation in the basement floors. For it, you need to drill small holes in the corners of the room and close them with a ventilation grill.
As it follows from the described, plywood leveling can bring any floor to the ideal - both relatively even and far from perfect. It is also very important that such work is quite within the power of anyone who has a desire to make repairs on their own. Leveling with plywood does not present any particular difficulties, but the result of the work will be an even and warm floor, on which you can put any, even the most capricious, coating.
The construction boom of the last two decades has given birth to such previously unseen technologies that it is quite possible to abandon central heating by installing three-chamber ventilated plastic windows... You can even create the layout of the entire apartment yourself anew by applying metallic profile... But something still remains from the "old", good construction days, this is leveling the floor with plywood without logs.
Plywood for leveling the floor serves not only its intended purpose, but also allows you to give the room a neater look, it is the basis for further interior improvements
Fast, comfortable and perfectly straight. A large number of offers on the market of plywood of various sizes and thicknesses contributes to a quick decision and the choice of just such a leveling method.
But this breadth of choice has its own difficulty - you need to skillfully choose and understand the characteristics of plywood.
Plywood characteristics
- NSh - unpolished;
- Ш1 - ground on one side;
- Ш2 - sanded on both sides.
Main characteristic
Well, and the main characteristic that immediately catches the eye when choosing is its quality, determined by the number of knots per square of the outer layer.
There are 5 degrees:
- E - the so-called elite quality, when there are no knots at all. Plywood of “E” quality is expensive, at the same time leveling the floor is not the kind of operation that requires such plywood, unless of course you intend to make the floor gilded;
- I - maximum length knots and warpage does not exceed 20 mm;
- II - there are cracks, but not more than 200 mm, wood inserts are permissible, glue seepage is permissible on an area of \u200b\u200bno more than 2% of the area of \u200b\u200bthe entire sheet;
- III - there cannot be more than 10 knots with a diameter of up to 6 mm per square. There is also a limit on the total number of flaws - no more than 9;
- IV - the quality is the worst, possibly with knotted knots and edge defects under 5 mm. Such plywood is clearly not even for leveling.
Helpful advice! When choosing plywood, it is advised to choose a quality indicator from I to III. And then the economy should come into play - choose the most suitable size and the cheapest sheet. There are many offers on the market, and the price for the same quality is very different.
First, research all the proposals and choose the cheapest - let's not forget, after all, the alignment is of an auxiliary nature, then putty, varnish, painting and the finishing, front, floor covering will go.
Dimensions
For alignment purposes, one cannot do without careful selection of plywood sheets by size.
All sizes are strictly standardized, there are four of them:
- 1525x1525 mm;
- 1220 x 2440 mm;
- 1500 x 3000 mm;
- 1525 x 3050 mm.
Helpful advice! The choice of the cheapest plywood and the largest size, as they say, with the minimum unit cost per square decimeter is not always reasonable. The catch is that the size of the plywood must match the size of the room as closely as possible to reduce waste.
Therefore, it is reasonable to first simulate the placement of all sheets of different sizes in the room before purchasing. The option that gives the minimum waste will be yours.
Process progress
There are two ways to level the floor with plywood:
- more time consuming, using the lower massive crossbeams, called lags, plywood will be attached to them;
- and less time consuming, almost instantaneous, directly to the existing subfloor, without the construction of any additional structures.
But the tools in both cases will be the same.
Tools
There are two basic requirements for the set of tools used in construction - reliability and convenience.
When working with plywood you will need:
- Punch, or
- Screwdriver, or
- Hammer - it all depends on what you are better at and on what basis the plywood is fastened, if the lags, then the hammer will also work, if the base is concrete, then, most likely, a more serious tool is a screwdriver;
- Level - any type, you cannot do without this tool, it is important to choose a level of great length, ideally - overlapping a sheet of plywood;
- Jigsaw - you can't do without cutting plywood, choose any tool that you skillfully own to make an accurate cut along the entire length;
- Long tape measure - measurements will have to be performed constantly and the tape should always be at hand.
Leveling without lags
A very quick way of leveling, but this speed also hides some haste, which can miss the following nuances:
- Whatever the base may be, it should not have pronounced humps, even alignment will not help here;
- The base must be thoroughly dried;
- You, of course, use waterproofing, but it will not save you from the floor constantly fed by moisture. This situation is typical for basements, basements or first floors, directly below which the basement is located;
- The plywood thickness must be at least 10 mm. The market can offer you 4, 6, and 8, but this will not work when leveling without lags;
- It is very useful to cover the plywood sheets with an antiseptic before installation, which will help to avoid the appearance of mold and mildew in the future.
Using lags
There is one more indisputable advantage in the use of lags - in the free space between them, since it is given, and almost “free”, you can place a heater, which is the “unkillable card” of this laying technology.
The nuances of styling suggest:
- You, of course, did not philosophize slyly, as they say, reinvent the wheel, and purchased the logs already on sale, coordinating them along the length of the working room. The most optimal are logs with a cross-sectional size of 40 by 100 mm;
- Be sure to check the degree of dryness of the purchased tree, it must be guaranteed high;
- Do not forget to install wooden spacers on top of the waterproofing under the logs. Recommended dimensions of spacers (width x length x thickness, mm): 150 x 200 x 25;
- A distance of 40-50 cm is usually made between the lags, but this distance must be coordinated with the dimensions of the insulation boards, if they are used. The distance between the lags should be slightly less than the size of the slabs so that they enter the tightness, but do not create excessive pressure on the structure of the lags;
- In no case do not install the logs close to the walls at the end - leave a gap of 4-5 mm;
- Moreover, do not allow plywood to come into contact with the wall surface - the gap must be at least 15 mm;
- SNiP 3.04.01-87 Clause 4.11 requires the obligatory priming of the base to be performed beforehand. A primer is a lightweight primer with an increased amount of solvent. Such a primer provides a very high-quality preparation of the base, this is important, both when using lags and without them;
- In order to prevent the dowels from protruding over the plywood, the following procedure is proposed:
- a hole is drilled through the plywood to the screed, with a dowel diameter (usually 6 mm);
- the hole is countersunk with a drill of a larger diameter so that the screw head goes completely into the hole;
- a plastic dowel is inserted into the hole and a self-tapping screw is screwed in.
How to level the floor in the apartment yourself and save money ”href \u003d” http://shkolapola.ru/ustroystvo/vyravnivanije/449-kak-vyrovnyat-pol-v-kvartire ”\u003e find out here how to level the floor in the apartment yourself and save money
We sincerely hope that the work we have done will bring you practical benefits.
Good luck in the repair!
Over time, a wooden floor in any room inevitably begins to sag, crack and lose its original appearance. The main defects of wood flooring include loose boards, irregularities and creaking caused by wear and tear of the boards. Homeowners use different floor coverings to hide these defects. But before laying any floor covering, it is recommended to align the rough base without fail. Today you will learn how to level a wooden floor with plywood.
The need to level the floor
Modern floor coverings are for the most part demanding on the underlying base of the floor, therefore the procedure for leveling a wooden floor is considered an integral part of repair work. Parquet and laminate are very sensitive to unevenness of the subfloor, which is explained by the presence of a lock connection. If the base does not meet the requirements for the installation of these coatings, then the lock will quickly lose strength, and a crack will form in this place, where moisture and dirt will enter, provoking further destruction of the floor covering.
If the subfloor is slightly uneven (with a difference in height levels of about 2 millimeters per square meter), then you can fix this easily with a minimum of materials and tools. It is enough to treat the surface with acrylic sealant or cover it with a homemade putty made of PVA glue and moistened sawdust. In addition, you can surface treatment of already aged boards by removing the boards, peeling them off and re-laying them. Loose floor boards can be secured with screws or nails.
But if the floor covering has significant damage and large irregularities, it is recommended to lay sheet material on the wooden floor, which allows you to level and strengthen the base. For this purpose, you can use gypsum fiber board, chipboard and plywood. The most popular is the latter material.
The use of plywood is considered to be a simple and quick way to level the floor in wooden buildings. Plywood is indispensable for leveling a wooden floor, as it has such key characteristics as a relatively low weight, sufficient material hardness, great flexibility of plywood, high-quality sanding, resistance to stress, resistance to water, no unpleasant odor.
Plywood sheets, due to the perpendicular arrangement of adjacent layers, have high strength in all directions. For accelerated installation of a wooden plywood floor over large areas, you can pick up large sheets of plywood. In addition, a dry screed using sheet material does not require large financial investments.
Do-it-yourself plywood leveling of the wooden floor
1. Choosing plywood
The choice of plywood to level your wood floor will depend on the type of flooring you will be installing. For soft coating - linoleum or carpet, thin sheets can be used, but in this case you will not achieve complete leveling of the floor. For laminate or parquet, you need to buy plywood thicker than 10 millimeters. Remember that the thickness of the plywood underneath parquet board and the laminate should be no less than the floor covering.
It is customary to determine the grade of plywood in accordance with the moisture resistance of the material. For industrial construction, plywood of the FB and FOF brands is used. For individual works plywood FC and FSF are intended. Consider in more detail the grades of material that are intended for individual construction.
In the manufacture of FC plywood, an adhesive composition is used without the use of phenols, therefore this material is completely harmless and can be placed in a bedroom or children's room. Such plywood is resistant to mechanical stress and has an average water resistance.
FSF plywood is characterized by increased wear resistance, water resistance and mechanical strength. The material does not change these properties even with changes in relative humidity and temperature. This is achieved through the use of phenol-formaldehyde adhesive resins. However, they are quite toxic and it is best not to use such plywood in residential areas.
In accordance with GOST, four grades of this material are on sale:
- First grade. Such plywood is the best in quality, since there are almost no visible external defects on it, however, veneer warping or cracks of no more than 20 centimeters are allowed.
- Second grade. Plywood of this grade may have a slight seepage of glue on its surface (no more than 2% of the material area) and wood inserts. In addition, the sheets may have dents and scratches that reach up to 5% of the total surface.
- Third grade. Such material may contain fallen out and accrete knots, as well as traces of wormholes.
- The fourth grade. This grade is recognized as the lowest quality, since there are many defects on the plywood that were formed at the production stage. And although the disadvantages of this material are significant, the quality of veneer gluing is quite high.
Of course, when buying plywood for leveling a wooden floor, you need to focus on your own capabilities. However, the following should be taken into account. The first option is ideal for leveling the floor, but in terms of price-performance ratio, the most appropriate decision is to buy second-grade plywood. The fourth grade is not recommended for leveling a wooden floor with plywood.
Plywood is sold both in polished and unpolished form. Designation "Ш1" indicates that it is sanded on one side, "Ш2" - that it is sanded on both sides, "NSh" - unpolished plywood.
It is imperative that sanded plywood be marked with the emission class of free formaldehyde. The “E1” marking means that the presence of formaldehyde per 100 grams of dry plywood mass will be less than 10 milligrams. The designation "E2" indicates the presence of 10 to 30 milligrams of formaldehyde per 100 grams of dry weight.
From the foregoing, it follows that the best option for leveling a wooden floor is plywood sheets of the second grade with markings FC, Ш1, Е1 and 10-12 millimeters thick, which allows you to make the floor perfectly flat.
2. Choosing a floor leveling technique
The choice of technology for leveling a wooden floor with plywood should be carried out, having previously determined the condition of the floor and evaluating the degree of deviation of the "relief" of the floor covering from the norm. It is customary to use a two-meter level gauge as a measuring tool for studying the floor surface. Mark points in the corners of the room, find and mark the centers of the mating lines of the walls and floor, as well as the center of the room.
After dividing the space into peculiar segments, examine each area. With a uniform deformation of the floorboards with a difference of 5 millimeters in height levels, you can level the floor with plywood by attaching the sheets to the wooden floor... With height differences of more than 1 centimeter, but not higher than 8 centimeters, it is recommended to create point or tape supports. The whole procedure, in essence, consists in arranging a batten from a bar or thick plywood.
3. Preparing the surface
To lay plywood on a wooden floor, you will need: jigsaw, screwdriver, tape measure, level and screws with dowels. Before leveling the wooden floor, check the condition of pipes and other communications that run under the floor, as this space will not be freely accessible after all work is completed. Inspect the subfloor for usability, repair squeaks and replace old rotten boards.
Leave the plywood sheets for several days in the room in which you will perform the work. This will allow you to achieve the same humidity in the room and the material used, which will avoid the process of deformation of the plywood sheets after installation. If the room is regularly heated, then you need to put the plywood sheets on the edge, as shown in the photo of leveling the wooden floor with plywood, and hold it for at least two days. When working in a room that is periodically heated, the sides of the material should be slightly moistened with water at room temperature.
4. Trying on plywood
The first step is to "cut" the plywood, according to the size of the room. As part of this process, consider the size of the damper joints: one centimeter at the walls and 3-4 millimeters between the workpieces. Otherwise, changes in moisture and temperature will provoke "swelling" of the base. After finishing cutting, check the ends of the blanks for defects and delamination. It is better not to use damaged plywood sheets and replace them.
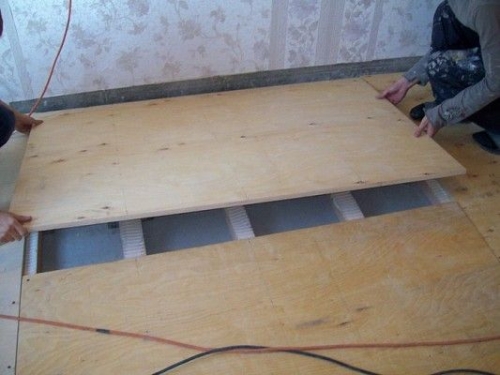
After that, you need to lay the plywood on the base in the order in which you will attach them. It is not recommended to make a joint of four corners. Lay the plywood sheets with an offset, as shown in the video on leveling a wooden floor with plywood. Then number all the sheets. Focusing on the joints between the plywood sheets, mark the locations of the logs, and you can remove the blanks. The joints of the sheets should fall in the middle of the lag.
5. Install lags
Lags for leveling a wooden floor are made of plywood, which is 3-4 centimeters wide. They must be laid according to the marks made. The logs are attached to the floor using self-tapping screws or special glue designed for wooden products. During the laying process, gaps between the joists and the floor may appear; it is necessary to lay pieces of plywood of suitable thickness in them. Before laying them, grease both sides with glue.
You need to do the same if the base has differences in height.
The horizontal placement of the lag is determined using the level. The evenness of the future flooring depends on the thoroughness of this process. After laying the lag, make a crate, its size should correspond to the size of the plywood. The space between the joists must be filled with a sealant.
6. Fasten the plywood to the floor
After the logs are installed, you can start leveling the wooden floor with plywood with your own hands. Attach plywood to wooden floor according to the diagram. The workpieces must be treated with an antiseptic before this. Fastening is carried out using self-tapping screws with plastic dowels. To prevent the plywood from being damaged by hammer blows, drill a hole in the places where the screw is screwed in, which is equal to the diameter of the dowel. And then bite out the larger diameter hole. The screw cap will hide in it.

The final finish of the plywood will depend on the chosen flooring. The surface under the carpet is covered with several layers of varnish. For a laminated floor, the plywood base is sanded and then coated with protective varnishes. A special sound-absorbing underlay should be laid on the base under parquet or laminate.
Thus, using this technology for leveling the floor and plywood decking, you can level almost any base. With careful work, you will end up with a solid and level surface. A coating laid on such a base can last for more than one year. In addition, the plywood layer will act as additional thermal insulation.


