Handicrafts perfectly develop fine motor skills of hands and creative imagination... Paper is an environmentally friendly material, it is practical, affordable and very popular with children. In this article, we will look at paper crafts for children. preschool age.
You will need: colored paper, felt-tip pens, glue, a simple pencil.
Master Class
- Take a square of colored paper.
- Fold the corners down to form the ears.
- Shape the chin by bending the center corner in the opposite direction. The puppy's head is ready.
- Take a square of colored paper for the torso.
- Connect opposite corners by folding the square in half.
- Expand the triangle so that it becomes rectangular.
- Fold the corner to form a ponytail.
- Cut out the eyes, nose and tongue from colored paper and glue the puppy's face.
- Draw the puppy's paws.
- Glue the head to the torso.
Binoculars

You will need: yellow cellophane, 2 sleeves, scissors, scotch tape, black paint, paintbrush, green and black paper, glue, rubber band, wine cork, string or elastic band.
Master Class

The binoculars are ready!

You will need: colored paper, pencil, scissors, glue, felt-tip pens.
Master Class
- Take a sheet of colored paper.
- Circle the palm with a simple pencil.
- Cut it out.
- Cut off the middle finger.
- Bend your thumb and little toe to form the paws.
- Glue the legs together.
- Draw the face and ears with felt-tip pens.
The paper bunny is ready!
In the same way, using your palm, you can make an octopus and a fish. See this video for more details!
Paper sisters

You will need: paper of two colors, 2 wooden sticks, buttons for eyes, elastic bands or strings for hands, pencil, glue.
Master Class

The paper girls are ready!

You will need: colored paper, scissors, glue, felt-tip pens.
Master Class

Paper fish are ready!
You can make an interesting crocodile out of paper with your own hands. Watch a detailed master class in this video!
Together with the child, choose exactly the craft that he liked the most. Then your child will approach the process of making crafts with joy and a sense of responsibility, because it is at this age of the child that I feel almost adults.
Fast navigation through the article
Making paper crafts with your own hands is a simple, inexpensive and very interesting activity for both children and parents. All you need is paper, scissors, glue and some cool ideas. In this material you will find 7 step-by-step master classes on needlework from different types of paper and 50 photo ideas for your inspiration.
Idea 1. Volumetric crafts
We offer the smallest needlewomen to make a simple volumetric paper craft in the form of such a cat.

Materials:
- A4 sheet of paper;
- Scissors;
- Glue.
Instructions:
- Download and print the template (see the cat template below) on white or colored paper;
- Cut out the template with scissors, and then make 4 cuts in it along the outlined solid lines;
- Bend your neck along the markings with an accordion and twist the tail;
- Bend the dotted fold lines on the legs and glue them to the cardboard.
For older children, there is a more difficult task, namely a master class on making a volumetric paper craft in the form of a bird.

Instructions:
Step 1. Download and print the layout diagram (see below). Note that the file contains a colorless template so you can print it on colored paper.
Step 2. Cut all the details exactly along the solid lines using a breadboard knife.
Step 3. Fold all the fold lines according to the principle: bold dotted line \u003d fold inward, thin dotted line \u003d fold outward.
Step 4. Glue the parts together by glueing their corners (with the inscription Glue). Stick to the following order:
- First glue the beak to one side of the bird, then to the other.

- Glue the back of the bird starting from the beak, as shown in the photo.

- Glue the wings.

- Now take the part, which is the poultry breast, and at one end, fold and glue the triangle as shown in the photo.


- Assemble the legs, make sure the knees are at a 90 degree angle, then glue the legs to them.

- Well, that's all, it remains only to glue the legs to the body and your volumetric paper craft is ready. If you wish, you can make a whole flock of such birds in different colors with your own hands.


Idea 2. Wall panels, paintings and applications
It is known that you can draw not only with paints on paper, but also ... with paper on paper. Such classes are no less exciting and useful for the development of hand-eye coordination, fine motor skills, perseverance, the ability to plan their work, to combine colors, shapes and materials.
The following selection of photos presents ideas for paintings, panels and paper applications for children of different difficulty levels.


By the way, the applique can be made of parts of the same shape, but different sizes and colors. These can be circles or hearts. The next slider shows examples of such paper crafts and schemes for their manufacture.


And here are some more examples of interesting paper crafts of different types.

Now we offer you to get acquainted with a master class on making an original, but very light paper craft. We have no doubt that such cute figures will help instill an interest in reading books in your child.


Materials:
- 1 sheet of colored A4 paper;
- 1 sheet of A4 white paper;
- Scissors;
- Glue stick;
- Markers, pencils and paints.
Instructions:
Step 1. Bend one half of a white A4 sheet in half and let the child draw on it the cover of his favorite book on his own, also signing the title and author's name.
Step 2. Cut three long strips from a colored sheet about 2.5 cm wide. You will have 4 details: 2 stripes for the legs, 1 stripe for two arms and one rectangle for the body of the figure.

Step 3. Take two strips (for the legs), fold them like an accordion, and then glue them to the body-rectangle.
Step 4. Divide the remaining long strip into two equal parts, draw fingers at the ends and glue to the body.
Step 5. Bend upper part figurines on the front side and make her bangs using scissors as shown in the photo.

Step 6. From the remaining half of the white sheet, cut out circles and glue on the figure as if it were glasses.
Step 7. Draw the details: eyes, mouth, nose and temples with black marker.
Step 8. Now glue the book to the hands of the figurine and finally place it on the table or hang it on the wall, for example, near a bookshelf.

Idea 3. Hats
All children love transformation games and for this they use everything that comes to hand. To provide your child with props, you can make fancy hats with him. By the way, such colored paper crafts can be made for one or several children for a performance, masquerade, thematic Day birthday or any fancy-dress party. In the next selection of photos, you can see examples of a wide variety of paper "hats" - from pirate cocked hats to wigs.


Today we offer you and your baby to make a hat in the shape of a dinosaur head. This master class is so simple that a child from the age of 3 will need very little help from you.

Materials:
- 3 sheets of colored paper;
- Glue stick or PVA;
- Scotch;
- Scissors.
Instructions:
Step 1. Cut 4 strips about 3 cm wide along the long side of the sheet of paper. Two of these strips will turn into a headband, and the other two - into the “cap” crossbars, on which the dinosaur spikes will stick.

Step 2. Take two other sheets of paper and cut them into strips about 5 cm wide along the short side of the paper. You can measure and cut strips by eye, but in the end you should get 5 strips from each sheet. We need these blanks to make thorns.

Step 3. Fold each blank for thorns in half and, stepping back about 1.5 cm from the fold, draw a marking in the form of a triangle up to the very edge (see photo). Next, just cut out the future spikes.

Step 4. Glue the two strips, and then glue the spikes on them in a row as shown in the photo below.

Step 5. While the glue is drying, adjust the two pieces of the headband to fit the circumference of the child's head, then tape them together in a circle.
Step 6. Now back to the spikes. Turn the crossbar over so that the spikes are on the table and bend each of them well (see photo). Form the first spike: cover one side with glue and connect it to the other. Use paper clips to secure the spike until the glue dries. Repeat these steps for the rest of the pins.

Step 7. After the glue is dry, remove the staples from the cleats and simply glue the crossbar to the headband at the front and back.

Idea 4. Toy figurines from a toilet paper roll
Toilet paper rolls are great kid's craft blanks that only need a little embellishment. For example, you can make such wonderful toys from them.


One of the most common materials for children's creativity is paper... Paper crafts for children is one of the entertaining activities for both children and parents. Co-creation unites and develops creativity.
Paper handling:
- develops fine motor skills in children;
- promotes concentration of attention;
- develops imagination;
- forms artistic taste;
- develops an eye;
- stimulates the development of memory;
- activates thought processes;
- develops patience;
- contributes to the creation of game situations.
There are all kinds of paper handling techniques:
- Application. It can be cut or cut, flat or voluminous, made of paper or napkins.
- Quilling is one of the types of application. A drawing is applied to a thick paper base. The image is filled with elements from narrow strips of paper curled in a special way.
- Mosaic (from French: folded from pieces) - an applique made from geometric shapes.
- Paper and plastic - art modeling from paper.
You will find even more articles with instructions on how to create all kinds of DIY crafts on the website - myhobby.guru
Crafts from paper for preschool children
From the early age children like to do light dIY crafts especially paper.
Butterflies
Butterfly 1

To cope with such a craft and two year old child... Of course, you cannot do without your help. Fold a sheet of white paper in half and draw a half of a butterfly. You can choose any shape and size of the wings. It is advisable to make the butterfly big.
Then the butterfly needs cut and unfold... Give your child some finger paints and have them paint one side of the butterfly. While the paint is still wet, fold the butterfly so that the unpainted part rests on the painted one. Press and unfold the butterfly, let it dry.
This paper masterpiece can decorate your baby's room.
Butterfly 2
 You can make a butterfly out of prints of children's pens... Such a craft can be done with a child of 3-6 years old. This will require the following materials:
- sheets of colored paper;
- a sheet of white cardboard;
- scissors;
- glue;
- marker, felt-tip pens, sequins, stickers and other elements for decorating a butterfly.
On a colored sheet of paper, with a simple pencil, outline the outlines of the baby's right and then left palm. Cut out the resulting patterns twice. There will be four wings- palms of different colors.
Stick on white list cardboard cut out wings. On colored paper, draw an oval for the body of the butterfly. Have the child carefully cut it out with scissors and glue it to the junction of the wings. Butterfly eyes can be done in different ways: Draw with a felt-tip pen or glue two small white circles, in the center of which put dots with a marker. You can also glue on finished eyes. Draw the antennae and mouth.
Invite your child to decorate with butterfly wings. Let the baby show imagination. For decoration, you can use sequins, stickers, or just paint with markers.
Mom will definitely keep this paper butterfly with the palms of her beloved child.
Butterfly 3
To make this beautiful, paper, airy butterfly with your own hands, the following materials are needed:
- paper (thin or napkins, plain colored or for origami, you can use sheets from a glossy magazine);
- wire or thread;
- scissors;
- glitters or other decoration materials.
 Draw two squares 10x10 cm and 8x8 cm on paper. In the future, you can make any size of the squares. To make the butterfly look beautiful, make the square for the upper wings 2–3 cm larger than the square for lower wings.
Invite your child to cut out these squares.
You fold one square diagonally with an "accordion", and with the second, let the child do it. You can choose any width of the folds, the narrower the folds, the more magnificent the butterfly will turn out.
Press the resulting blanks of the wings with ears to each other and fasten by tying them thread or wire.
The abdomen, head, and antennae can be made from paper, wire, or beads. Using scissors, you can round the wings. The resulting butterfly is an elegant craft that can decorate a baby's room. It will look even more impressive if you decorate it with sequins or other decorative materials. The craft is suitable for any competition in kindergarten.
Mosaic applique
 This type of crafts will be interesting for children of any age, although a three-year-old child will cope with this work. To create a mosaic applique, you need the following materials:
- rectangular sheet of white cardboard;
- colored paper;
- scissors;
- simple pencil;
On a white sheet of cardboard, draw with a simple pencil the outlines of a fish, mushroom, sun or other simple object that would have enough space inside for gluing mosaic elements.
From colored paper, cut strips about 2 cm wide. Then, from these strips, invite your child to cut out small squares, triangles or other geometric shapes. With the resulting mosaic elements, let the child glue inner space drawn figure. At the same time, you need to glue the elements of the paper mosaic close to each other. This craft can become an original gift mom or grandmother.
Volumetric applique ladybug
 A child of 4-5 years old can make such a craft. The main thing is to correctly tell the baby the sequence of actions. It is even better if, together with him, you do this craft, showing how to perform each action correctly.
First, prepare circle templates with diameters of 10 cm, 5 cm and 1 cm, colored paper, a white sheet of cardboard and glue.
Let the child use the template to draw two large circles on a red sheet. On a black sheet of paper, circle one large circle, one smaller and 6 small circles.
With your own hands, using scissors, let him cut out all the circles drawn.
Now in the middle of the white cardboard will stick a large black circle - the body. The circle, which is smaller, must be glued so that it goes a little over the big one. This will be the head.
Now let him decorate the wings with black small circles, gluing them with glue.
Having learned how to make such a craft, a child can diversify his work by seating a ladybug on a leaf or flower.
Paper crafts for primary school children
Nosed bookmarks

This craft is very easy. A preschooler can cope with it, but it will be especially pleasant for a first grader to make such a bookmark for his first textbooks.
This will require the following materials:
- colored cardboard;
- scissors;
- ruler;
- chenille (fluffy) wire;
- glue;
- eyes.
Cut a 6x12 cm rectangle from a sheet of colored cardboard.
Step back one and a half centimeters from the sides and draw two parallel segments 8 cm long. Make a cut with scissors along the marked lines.
The middle stripe will serve as the nose. At the bottom on it, draw a rounding with a simple pencil and cut out with scissors.
Now glue the eyes (if there are no ready ones, you can draw them).
Punch one or two holes at the top of the head with a hole punch. Pass a chenille wire through them and shape it into horns or tendrils.
Having shown imagination, the child with his own hands will be able to make bookmarks of different shapes and sizes, as well as decorate them at his own discretion. The main thing should remain unchanged - this is a long nose at the bookmark.

Younger schoolchildren are especially delighted with volumetric paper toys. It is not difficult to make them. You need to print templates, cut and glue them. Children like it very much. And then they are happy to play with toys that they made with their own hands.
Here are some papercraft-style schemes for your favorite cartoons.
Papercraft style diagrams


Paper crafts for middle school children

For children of secondary school age, it will be interesting to make a puppet toy with their own hands. To make one toy you will need:
- roll of toilet paper;
- rope or twine;
- two plastic bottle caps;
- awl;
- scissors;
- glue;
- stick (control bar);
- acrylic paint;
- fishing line.
To make this craft you need:
- To paint the lids and toilet roll with orange paint.
- For the arms and legs, make four holes with an awl on the sides of the roll.
- In the center of each cap, make a hole with an awl.
Cut off two small strings of equal length. Tie a knot at the end of each. From the inside of the roll, thread the free ends of the ropes into the hand hole and tie knots at the ends. The handles are ready.
Make the legs in the same way. Only the strings need to be cut off to a length and the ends are threaded into the hole of the covers, fixing them with a knot.
On a piece of paper you need to draw the head and tail of the fox. If you don't know how to draw, you can use a template, paint them with paints and cut them out. After that, glue them to the roll-body.
Now it remains to tie it to the legs and head (roll) along the fishing line and fix them on the control bar.
Origami lotus
 Children can give this simple and original hand-made craft to their mother or grandmother. You can simply make it both at home and at school.
To make a lotus, you will need green, white, and yellow origami paper. Scissors and strong thread or wire.
Cut 5 rectangles 7.5x15 cm green and 10 of the same rectangles white, and 3 rectangles 4x10 cm yellow.
Let's figure out how to assemble a lotus flower step by step - this wonderful paper craft.
Fold the long side of the green rectangle in half. Unfold the paper and fold the triangles towards the center on one side and the other.
Bend both long sides to the center alternately.
Make 5 green blanks like this.
Now fold the white rectangle in half along the long side. Flip it up and fold the triangles as you did in the green rectangle.
Bend the long sides towards the center, then bend them in half. You should get a boat.
Repeat all actions with the remaining white leaves.
Fold the yellow rectangle in half lengthways and again across.
Use scissors to cut into narrow strips, but not completely, so that you get a fringe. These will be stamens. There will be three such blanks.
The video shows step by step how these fakes are made.
Now you can collect the flower. Fold the green blank in half and alternately put two white blanks on it. We attach a yellow stamen on top. Repeat these steps two more times. As a result, you will receive three sets, each of which consists of a green one, two white blanks and stamens.
Assemble the remaining two sets according to the same scheme, but without the stamens. Now collect the blanks. First take a set with stamens, then without yellow stamens, again with stamens. Lay the resulting sets on top of each other, alternating sets with and without stamens. First take the set with yellow stamens. Tie all these blanks in the middle with threads or wire. Now bend the blanks to the sides.
Start collecting the flower from the stamens. In those petals where there are stamens, bend them so that the "tails" are looking up. Now lift up and spread the white petals through one. This makes the first row of petals. Assemble the second row. Lift the remaining petals up through one. The third row is similar to the first and second.
Lift up the last row of petals, and finally, spread the green leaves. Your original lotus is ready.
In modern schools and preschool institutions pay great attention to working with paper. Both toddlers and schoolchildren love to create original paper crafts. Working with her, the child develops his imagination, learns to think creatively, and also develops fine motor skills of fingers.
Simple volumetric boxes for gifts or volumetric figures can be made by hand by drawing a diagram on a piece of paper. Many crafts are almost impossible to fold without schemes. Thanks to templates, you can create complex volumetric fakes from colored paper or cardboard. Beautiful knick-knacks, furniture models and much more - within the power of any lover of creativity.

To do this, you need to find on the Internet, for example, on the Country of Masters website, any template you like. Animals, birds, toys - everything can be created using ready-made templates and diagrams.
Each template is accompanied by instructions on which you will need to collect the craft. The template must be downloaded, printed on a printer, cut out along the contour of the figure. Each figure on the template will have dashed lines along which to fold the model. Glue the finished model with glue.
Easy paper crafts for babies
Children have shown an interest in paper since childhood. To instill a love of creativity, parents should enthrall their child by creating a variety of paper crafts. You can make a beautiful bright hand-made bird that the child can play with or use for bedroom decor.
Simple cardboard bird:
- Cut out the shape of a bird according to the template, draw a beak, feathers, a tail.
- Fold an accordion out of a square sheet of colored paper.
- Make a hole and fix the wings in it.

If you cut out a few birds, you can make a Chinese feng shui breeze. By hanging the birds on a wooden stick, you can steal the entrance to the nursery with such a craft.
All cutting work must be carried out by adults or under their close supervision!
After working with the paper, the child should put the entire tool in the box. This is how neatness is developed.
Stylish crafts from cardboard and paper: volumetric paintings
The simplest paper crafts is considered to be an application, it is often studied in primary school... A beautiful three-dimensional picture of bright flowers will be an original gift from a child to a mother or grandmother. Flowers can be made from white toilet paper or tissues.
If you take toilet paper for crafts, it is better to use an expensive white paper with perforation, which can then be slightly painted over.
Working with napkins is very simple, but you need to be careful not to accidentally tear it. Therefore, you should be especially careful when creating such crafts.

Progress:
- Fold the napkin in four, fasten with a stapler in the middle. Cut a circle out of a napkin
- Lift each layer of the napkin in turn, forming a lush flower.
- Cut 6-7 leaves from green paper according to the template.
- Cut a basket out of brown paper, stick it on a thick red sheet of cardboard. Place flowers and leaves in the basket.
The basket can be made from corrugated paper any color, but it is advisable to stick it in a couple of layers. Instead of paper, you can use baking foil or chocolate.
Interesting paper crafts: weaving
There are a lot of ways to weave paper crafts, it is very interesting and original way creating crafts.
The simplest thing is to braid strips of paper in a checkerboard pattern, creating an object. More difficult way - this is weaving from paper rolled into tubes.
Depending on which paper you choose, your craft will have special properties.

There are several options:
- Newspaper;
- Glossy magazine;
- Cash register tape;
- Plain paper.
Note that it is easier to work with paper that is durable - the craft will accordingly come out more durable. An original drawing will be released from glossy magazines.
Do not weave different types of paper together. Thick paper may not intertwine with thin paper, and sometimes it can tear it.
Finished products can be decorated with ribbons, beads, quilling flowers, whatever your imagination is capable of.
How to make a craft out of paper: preparing paper tubes
Weaving from paper tubes is a very interesting creativity. You can make tubes from the sheets of the magazine - the material is quite dense and bright pictures will become an original drawing on the basket.
For manufacturing you will need:
- Paper;
- Scissors;
- Pencil;
- Ruler;
- Glue;
- Knitting needles.

First, we will prepare the tubes. We simply wind tapes with a width of 90 mm of any length on a knitting needle. We glue the edge, take out the knitting needle, leaving a couple of centimeters inside the tube, glue the second edge.
It is desirable to wind tightly, the accuracy of the product depends on it. Do not be distracted by extraneous matters, so the progress of work is lost.
By gradually pulling out the knitting needle and building up the paper on it, you can lengthen your tube to the desired size. To weave a basket, the length of the tube should be such that it is convenient for you to bend it.
Beautiful basket: paper crafts step by step
So, we made the blanks, in addition to this, you will need a piece of durable cardboard, scissors and glue. The bottom of the future basket needs to be cut out of cardboard. To do this, cut out two cardboard circles according to any template.
Now you can start weaving the basket:
- On the first cardboard circle, glue paper tubes around the circumference. We glue the second circle on the tubes.
- Lift the tubes up and fasten them with an elastic band.
- Glue the end of one tube to the base, then grab the standing tube from the outside, lead it inside and grasp the second tube from the inside.
- We alternate "outside-inside" until the tube ends.
- To lengthen the tube, insert a new vine at the end of the previous one.
- In order for the basket to have a certain shape, it is better to insert a bottle or jar inside when weaving.
- We weave all the rows to the required height.
- If there is a piece of vine left, do not cut it, it is better to fix it inside the already finished basket. To be sure, you can glue it to one of the tubes.
- The frame tubes can be glued to the sides of the basket.
- We paint the finished product with acrylic paint, wait for it to dry completely and paint over again.
42.jpg)
The decorative basket is ready, you can put a small artificial flower or adapt for hairpins and rubber bands.
Simple paper crafts: an angel on a Christmas tree
On New Year so want to decorate the house with beautiful decor. The easiest way is to make beautiful paper crafts yourself with a little effort. Even a child of 4-5 years old can make an angel's craft under the supervision of parents.
How to make a Christmas angel step by step:
- Cut two 10x10 cm squares out of colored paper. Fold them like an accordion.
- Make a fold on the accordions, stepping back 3 cm from the end. Bend one accordion to the right, the second to the left.
- Glue the folded fold to the bottom of the fan.
- To make the head, you need to cut 4-5 strips of paper as wide as the edge of the fan. We wind the strips on top of each other, forming a tight circle. Fix the head size with glue.
- Direct the remaining piece of paper down.
- Glue the halves together. The angel is ready.
17.jpg)
If you want to decorate a Christmas tree with an angel, you can tie a serpentine to a halo and hang the craft on a branch.
You can also plant it on top of a tree. To keep it in place, just attach the craft to the branch with a regular clothespin.
Crafts from white paper: voluminous snowflake
Volumetric snowflakes look impressive, besides, they can decorate an apartment before the holiday and decorate a Christmas tree. To create such a craft, you will need paper, scissors, glue.
How to make a voluminous snowflake step by step:
- Cut 6 squares from sheets of paper.
- Fold the square in half to make a triangle. Make cuts from the bottom fold towards the top corner. The cuts should not meet, a small gap should be left between them. Thus, make 3 triangular cuts.
- Expand the sheet and put it in front of you in the form of a diamond.
- Fold the first inner row of strips together, fix with glue.
- Turn the craft over, repeat step 4 with the following strips.
- Turn over and fasten all remaining strips.
- In a similar way, make 6 pieces of a snowflake.
- Fasten together in 3 parts with a stapler.
- Glue the two ready-made halves together.
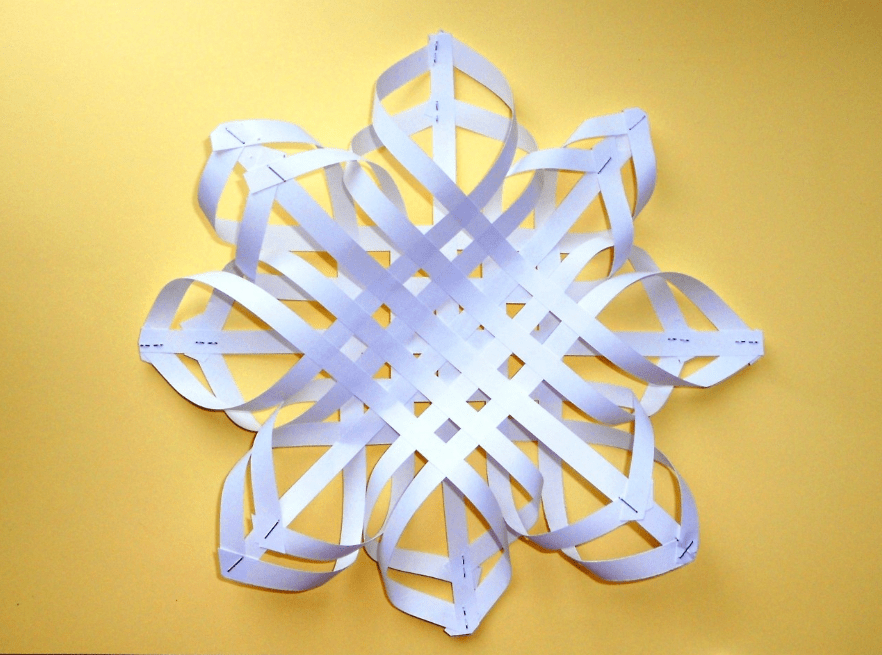
When working, it is better to use glue with a brush or glue stick.
If you place a loop-ribbon in the center when gluing, the finished craft can be hung anywhere.
White and colored paper is suitable for work. A paper snowflake will look very unusual, where one side is colored and the other is white.
The simplest children's paper crafts without scissors
Easy and beautiful craft for kids - "Universe through the eyes of a child." The figure can depict a month, stars and other celestial bodies. This craft can be done without cutting.
To work, you need very few materials - glue, confetti (or small pieces of torn paper) and a dark blue sheet of cardboard.
How to do:
- Collect confetti from firecrackers or cut a bunch of small circles out of multi-colored paper with a hole punch.
- Take a stencil and apply a drawing on a sheet - a crescent moon, stars and planets.
- Paint over the drawn figures with PVA and until it dries, sprinkle with ready-made confetti.
The finished picture can be decorated with a shiny frame, for it you need to finely chop the New Year's rain and stick it along the contour of the picture in the same way.
7.jpg)
Work with such a craft can be carried out even with preschool children - in kindergartens or early development circles.
This method can also be used to decorate appliques. By decorating, for example, a Christmas tree cut out of a green leaf, you can make a beautiful New Year's craft.
Fun Paper Crafts for Kids: Movable Toys
Such toys are very interesting for children. You pull the thread, and the arms and legs of the animal or doll move. In fact, making such a figurine is pretty easy.
An entertaining puppet toy can also be made of plywood, but since cardboard is more malleable to manufacture, let's analyze this option better.
For work, you need cardboard, a couple of buttons, thin wire, scissors, strong thread and bars.

How to make a puppet dog:
- We draw moving parts (paws and tail) on cardboard separately and cut out.
- Subsequently, at these points we make fastenings with the help of wire or studs-bards. Buttons can be used as a stopper.
- Glue the body and head with tape or glue to a bamboo stick.
- We insert into the pre-made holes in the paws along the mount and align with the body. We tie the legs together with a thread or elastic band. To do this, we make two additional holes in each foot so that they are closest to each other, and the thread is not visible from the front side.
- We attach the tail in the same way and connect it to the hind leg.
- After we tie another long thread to the one between the legs, it will set in motion all the moving limbs.
- The final stage is painting, at your discretion.
Having completed a cat, a fox, a hare using a similar technology, you can arrange a puppet theater for kids. A play based on a favorite fairy tale with the participation of animals will appeal to every child.
Crafts from paper without glue: the simplest origami for kids
The origami technique is quite complicated, but you really want to make your child an interesting volumetric toy with your own hands.
This chicken is one of the most interesting and relatively simple crafts. The sheet of paper should be square.
Tip: If you walk around while tearing off to avoid severely torn edges, bend the sheet in both directions.

You can use scissors or a ruler with a sharp clerical knife to cut.
Origami chick step by step:
- Fold the square sheet diagonally. We unfold, fold in half.
- Having expanded, bend the left and right corners of the square inward, aligning them in the middle of the square. It turned out to be a pentagon.
- Bend the top of the cone in the middle. Then we bend the same cone in the opposite direction, so that a small angle protrudes beyond the border of the sheet - the future beak.
- We combine the left and right sides of the entire craft, put it so that the beak is on the left.
- Bend the upper right corner into the middle of the product.
- The lower right corner, it consists of two sheets, we bend them outward of the product. We do this by combining the lower sides, while drawing out a small corner beyond the extreme left border - these are chicken legs.
- We turn out a small corner-tail.
- Lower the beak down a little. Can be painted over with regular red pencil for more realism. Draw the eyes.
You can surprise a child with such a craft, intrigue him. By arousing interest in the toy, you can attract the kid to help create such an origami next time.
Master class: DIY paper crafts (video)
In fact, you can make so many crafts from paper and cardboard that you can't even list - animals, birds, cars, dolls. They can be voluminous or plain, colored or white. The richer your imagination, the more interesting the craft turns out.


