- How to cover flat or scope roof Alone?
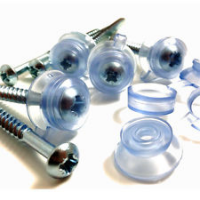
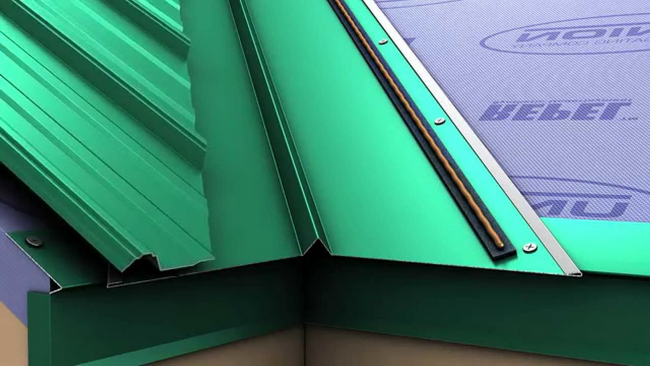
- Seals and self-tapping sheets for profiled sheets
Many beginner masters want to overlap the roof of the roof with their own hands, but not everyone knows how to do it right.
IN lately Proflists are used in construction quite often. Professional flooring is a hard material and has good aesthetic properties. This material can be covered with the roof of a private house on cottage plot or industrial warehouse. The roof may have a different shape. The material is enough just to mount - even a master without experience will be able to figure out how to block the roof of the roof of your own hands. The company is steel sheets with waves.
The main difference of the proflift from other materials is a molded profile that has several species. The wall of the professional flooring can be characterized by a small height of the profile and a sheet thickness of the metal. It can be used in places that are not exposed to strong loads.

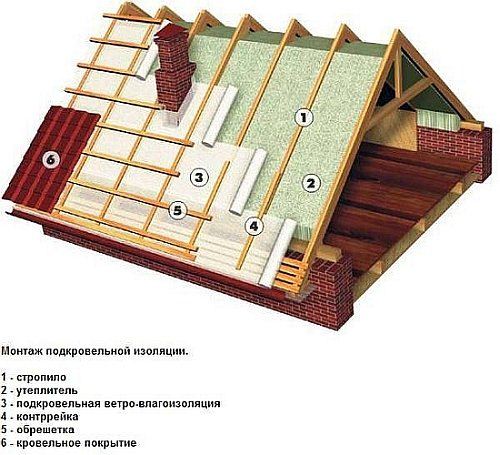
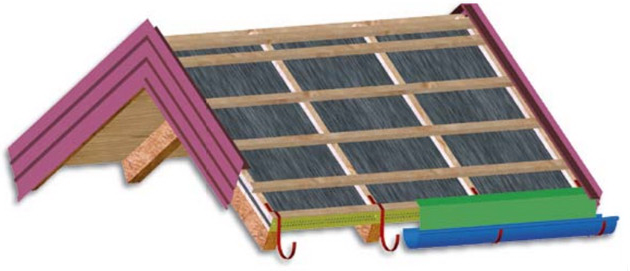
The diagram of the roof device from the corrugated floor.
Another kind of professional leaf is roofing. It is durable, profile height - from 20 mm. Additional strength to the material is attached to the ribs; It can be used to cover the hangars, fences and canopies.
Another kind of professional flooring is carrier. This material has high strength and rigidity. It is performed from a large metal thickness, has a profile height from 45 mm and more.
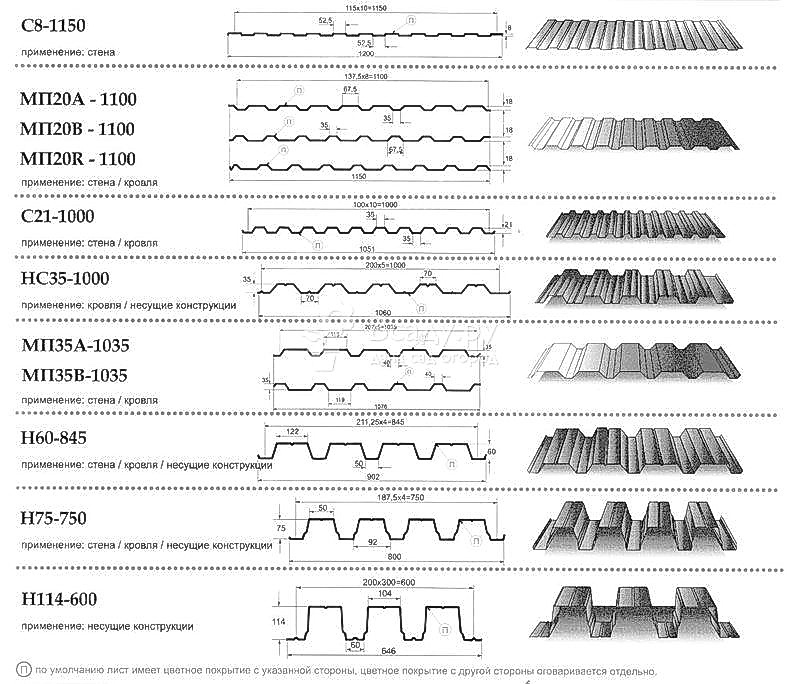
To properly cover the roof of the straw, you will need to decide on the type of material. For the roof, the brands N and CH are suitable, the profile height must be more than 35 m.
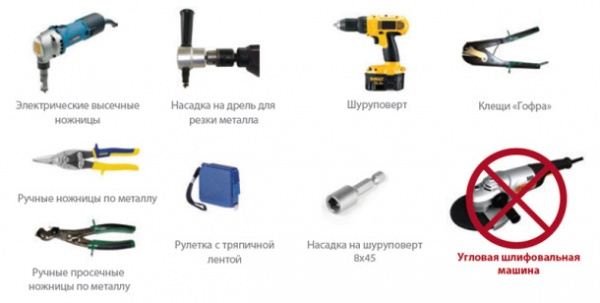
Tools that need to overlap the roof of a professional flooring:
- scissors for metal;
- nozzle on a drill for cutting metal;
- screwdriver;
- special ticks;
- roulette;
- nozzle for a screwdriver 8x45 mm.
Nuances that need to be considered
Fasten the proflists is easy, however, there are some features that should be considered. These include the delivery of the material and the rise of it to the roof of the house - all actions need to be done carefully so as not to damage the professional flooring.
It is worth remembering about the safety: when any actions are performed with the metal, you will need to wear protective clothing, movement in soft shoes is allowed on the roof.
First you need to determine the laying method. Next, it is necessary to make flooring from the boards under the Rake Endovy and consolidate end rails.
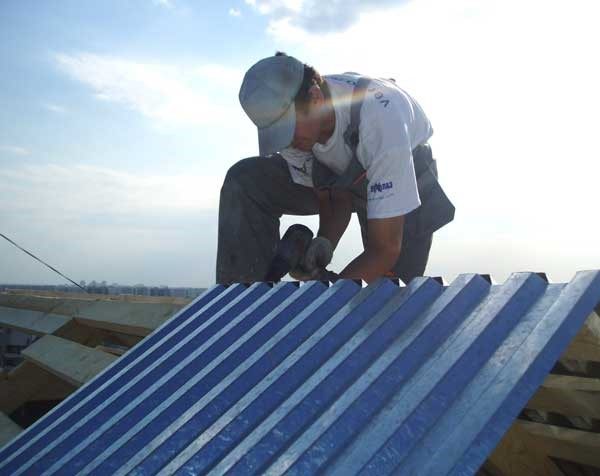
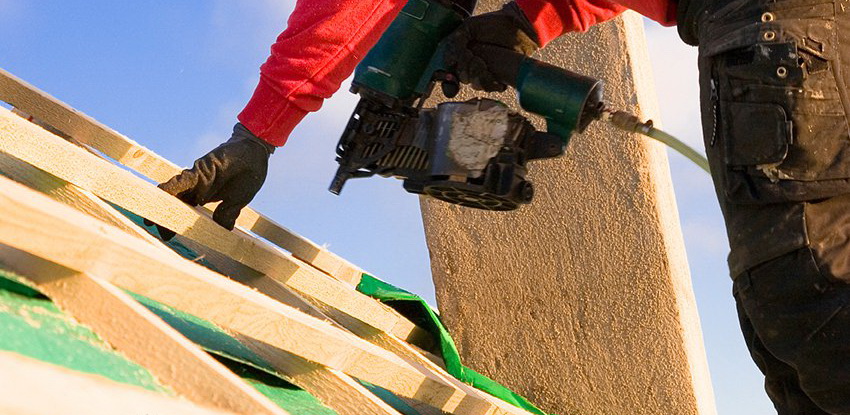
Installation of the roof should be started with the styling of the railway rails. After that, from the end part, you can start fixing profiled sheets. If the professional flooring is installed on the Walm roof, then you need to start with the central part of the hip. To fix for each sheet, approximately 7-8 self-tapping screws will leave. Some joints are desirable to be treated with rivets from metal.
Back to the category
How to fix professional flooring near Enda, skate and tubes?
The technology of installation of the professionalists involves the design of metal sheets near the endands, tubes and the ridge of the roof. It can be done on your own:
- First, the device is carried out with a small length. To do this, cut the sheet at the bottom of the suspension into several identical parts. The first thing is mounted by the bottom sheet, after which - the bottom rack. At the end, a roof sheet is installed.
- Next, the end rail is mounted. The length of such a plank is 2 m, the nest must be from 5 to 100 mm. Installation should be started on the side of the sink towards the roofing side. Near the skate of the excess will be needed to cut, the entire end rail should cover at least one wave of the sheet. Next, the rail is fixed to facial bar. Element settings - 1 m.
- The next step is set sking Planck. In this case, you can use special smooth parts for skates. Under the professional clothes, qualified masters advise to lay sealing elements with small corrugations. Another option is to use elements that repeat the roof profile. Fall must be more than 100 mm. From the side of the rail sheet is fixed using self-tapping screws. The installation step of the fastening elements is a maximum of 400 mm. All clamps must be under the trim. To protect you should use the ski seal. In the case of lateral adjustment, it will take a longitudinal sealing element. This item can not be installed on steep slots.
- Next, the installation of passing parts or output tubes is performed. All tubes consist of two parts. At this stage it is recommended to provide for the installation of a snow-resistant. The diameter of the tubes should be about 10 cm. Ventilation tubes must be insulated.
Back to the category
How to perform the roof overlapping on the roof?
It is possible to equip the roof at any time of the year. This requires an ordinary plumbing tool. The material canvases can be easily cut and bend under the necessary size and shape, while the waste will almost not be.
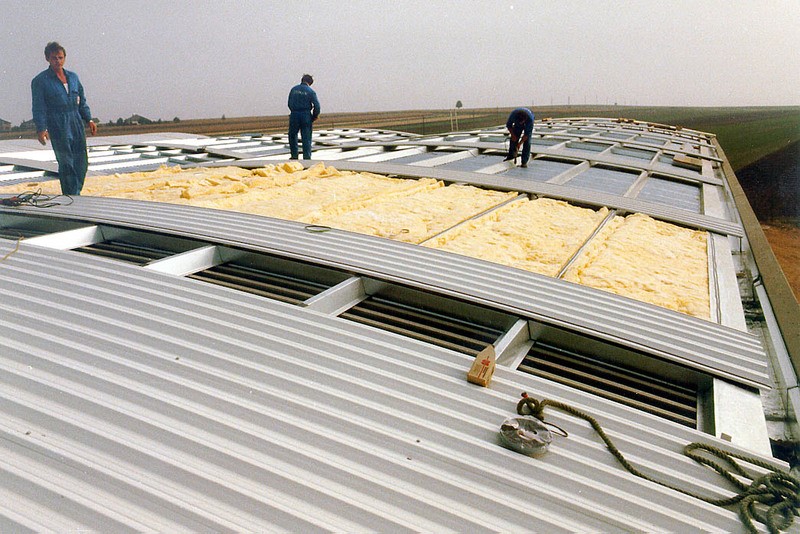
Before covering the roof, you will need to arrange reliable waterproofing. The design of the rafter should be installed a special membrane. When the insulated roof is installed on the waterproofing material, the layer of insulation is laid, then a layer of vaporizolation. In the case of a cold roof, a ventilated space should be provided.
The more the bias of the roof and the height of the profile, the bigger there can be a step. After the installation of the crate, it will be possible to start the roof overlapping. It is important to take into account the following nuances:
- The laying of the professional flooring is performed from the bottom-up from the end part of the roof.
- To install with smooth rows, the installation must be made parallel to the sink of the roof.
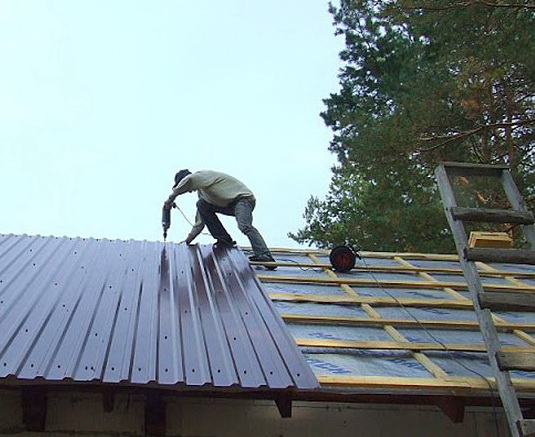
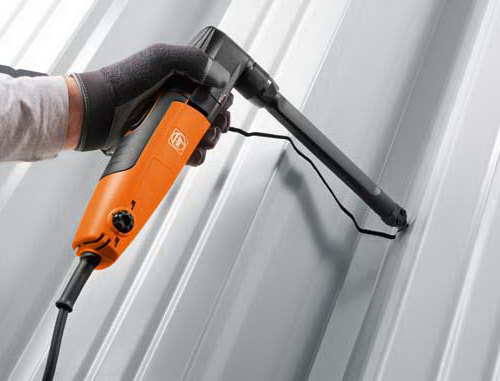
- The profiled sheet is attached to the crate with special screws for the roof, which are supplied with a polymer washer for sealing.
How to cover the roof with your own handwritten
If your home requires a roof that has an attractive and exquisite view at a relatively low cost, a roof of a professional flooring is a cold-rolled galvanized steel sheet with color polymer materials coated - this is what you need.
Advantages of profiled steel sheet:
- excellent performance: resistance to atmospheric factors, solar radiation, mechanical strength, corrosion resistance,
- low specific gravity (from 5.5 to 9.5 kg / m 2), so low load on rafal systems and crate,
- the roofing material can be chosen by texture and color under the design of the building,
- relatively low price With high aesthetic qualities.
What professional flooring is suitable for the roof
![]()
Any of the brands of the professional flooring (universal, carrier or wall) is suitable for the roof, but for laying a thin wall material it will take almost a solid doom. For a regular crate in 65-100 cm increments, it is preferable to use a more durable and hard professional. Materials are most often used with indicators:
- mark H or NS (carrier and universal),
- the thickness of the proflist is from 0.5 to 0.7 mm (durable and easy at the same time),
- the height of the corrugation is 20-75 mm (it provides the possibility of elastic deformation of the roof),
- the presence of a capillary drainage groove,
- color coating suitable for an existing or projected exterior of the house.
The price of professional flooring depends on several indicators of the material.
What you need to cover the roof of your own handwritten
![]()
Simple single-table or duct roof of the country house, summer cuisine Or the garage independently cover will not be much difficulty with one or two helpers and some skills of working with a screwdriver and an electrolovka. The broken rope roof of the house with an attic will also be under power for independent work. Will help it.
If the roof frame is a more complex configuration, you should invite experienced specialists to overlap the roof of the professional flooring. The price of the work will depend on the complexity of the roof and the area of \u200b\u200bthe skate.
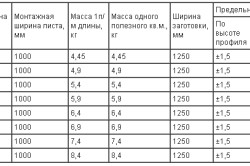
How much material will you need?
Calculate the amount of material for single or duscal roof, Knowing the size of the skates, will not work. If the length of the skate is 12 m or less, you need a skate width to divide on the width of the material, the resulting number of sheets to increase by 15%.
For more complex roofs, it is possible to calculate professional flooring on the roof online by special programs. Programs allow not only to determine the amount of material as accurately as possible, but also calculate the roof slope, the size of the adolescence will determine best option Location and fastening of the proflist.
Tools and fasteners for work
For work, measuring and cutting tools, fasteners are required:
Features of styling the roof from the proflist
Perform work is best in total, it will work much faster. Two people can also cope, but alone working with long sheets of professional flooring is very difficult.
- Minimum roofing angle of 10 o. At a smaller value of the corner of the skate, water can fall under the material.
- The standard length of the professional leaf is 12 m. If the length of the skate is less or more, the sheets will have to trim.
- To protect professional flooring from corrosion, waterproofing and vapor insulation on the crate should be made.
Installation of crates for clothe
An important stage in the installation of the roof of the corrugated is the organization of hydro and vaporizolation to protect the metal from corrosion when water vapor enters.
Do it in two ways:
- setting vaporizoation to rafters under the crate and waterproofing (rubberoid) over the crate under the brastic;
- organization of the ventilated roof, creating a ventilated space between the waterproofing layer and the roofing material. For this, the false rafters from bars are installed along the rafter feet, they make a crate on them, it turns out a puff pie: rafters, waterproofing, false rafters, a doomlette, professionalist.
Important! All elements of the crates must be impregnated from all sides by antiseptic composition for wood. This will prolong the service life of the roof.
The shells of the crates are laid in increments of 0.5-1.0 m attaching them with nails or screws to the rafters. The thicker and durable professional flooring is used, the greater the distance between the shell boards. So, for example, for the brand proflist CH35, the shape of the crate 0.5-0.6 m, for CH44 - 0.65-0.75 m. The distance is no longer any distance between the boards.
Having made the crate, you need to check the diagonals of the skate and align the skate along vertical, horizontals, diagonals. This will greatly facilitate work on laying a professional flooring to the crate.
Order laying professional flooring with their own hands
- The proflists laid down, from the bottom up, starting on the slope from the end of the building, left to right or right to left - it all depends on which side of the sheet the manufacturer made a capillary groove. When laying material, the groove should be closed by the wave of the next sheet.
- The size of the allen proflists horizontally and vertically depends on the value of the roofing corner. With small magnitudes of the angle of inclination, the sheets are placed with the allen in two waves vertically, at high values \u200b\u200b- in one or in the half-wave.
- Fasting horizontally skate at least 10 cm. The first row is placed with the departure of 30-50 cm above the sve (depends on the design of the drain system). The junctions between the professional sheets are sealed with a special tape. The sheet of the second row is placed with the displacement of the end of half the width.
How to raise sheets on the roof
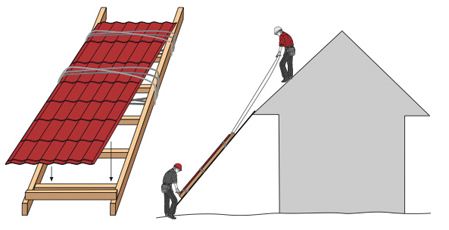
If 2 or more man, Raise sheets just. They are placed on a frame of 5-6 bars with packs of 5-10 pieces and in oblique boards attached to the crate, tighten the rope to the top.
On the crate for the sheets do not roll, nourish one or two bar below and put the packs of coverage sheets. So it is much more convenient to work than to serve one by one, although this method is also used.
How to fix the roof career
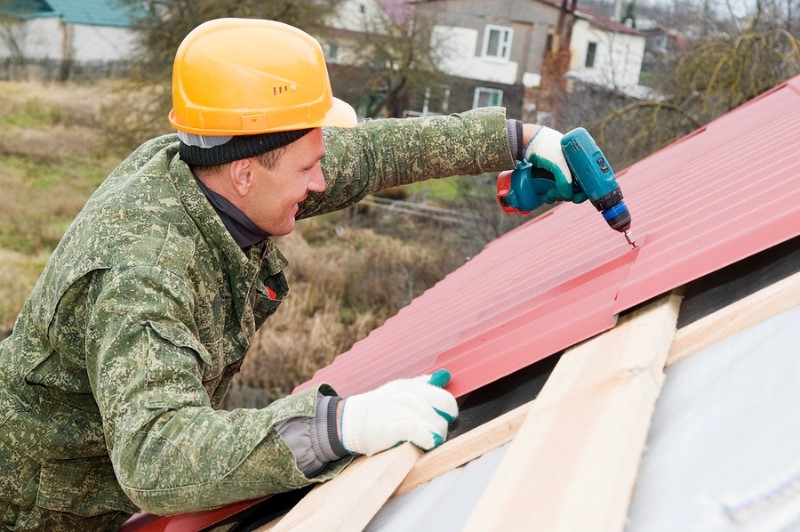
Sheets are attached to the crate of self-drawing with washers and sealing gaskets. The number of their no more than 6-10 pieces per 1 sq.m. Flooring. On the skate, screws are screwed into the lower, and on the skate - to the top waves of the sheet.
If the material is thin, screws simply screw the screwdriver, they easily pass through, without damaging the coating. On the thick steel sheets in the places of fastening them to the crate, it is advisable to make pre-marking and drill to drill holes under the screws.
Important! It is necessary to accurately align and correctly install the very first sheet, the quality of all work will depend on it.
The first sheet is first fixed in the middle by one screw and thoroughly align the sinks from the cornice and the position vertically the crates. After that, it is fixed by the second screw.
The material is fixed to the upper and lower sheets of crates, screwing up the screws into every wave deflection, to the central boards - through the deflection.
The second round of the row is put with the displacement of sheets to the right or left half the width. Cut the professional sheet electronics, with a metal or an electric bolt with a metal saw. Do it on Earth.
Attention! Cut the professional owl of the Bulgarian is impossible. This will destroy the polymer coating. For cutting, apply scissors for metal, and cut the cuts.
Horizontal joints are also sealed with ribbon. Self-tapping screws are screwed into every deepening wave. The rubber sealing washer should perform 1-2 mm around the perimeter of the screw head, it indicates that it does not shift and not tightened weakly.
Installing a skate on a professional flooring
Sking challenges to the roof of the corrugated floor release
- simple in the form of a leaf bent at the corner with a width of shelves up to 30 cm,
- with a semicircular edge,
- with a P-shaped edge and shelves of the same sizes.
To install a horse on a roof from a corrugated floor, the last row of sheets should be aligned in the upper part over the end and put in one horizontal plane. Installation of installation Next:
- to the edge of the last row of sheets laid the ribbon or the strip of the skate seal,
- parallel to the axis of the skate pinches the bars,
- to the bars of self-draws in the upper corrugation after 20-30 cm screw the elements of the skate, starting from the side, which is most often blowing,
- ends of the semicircular skate are closed with special plugs,
- The p-shaped horse is attached to the bar, which is specifically installed on it on the rod of the roof.
The roof of the professional flooring will delight you with its beauty and cause a sense of pride with excellent work performed by their own hands. Money saved on this can be spent on the manufacture of the original flora, which will decorate the house.
Work with the professional flooring is convenient and simple. The thing is that it has a small weight, and the size of the sheet allows you to cover immediately a large roof area. In addition, the material is soft, the fastening is simple, so you can take on the equipment of the roof alone. No need to be afraid. Two main rules that will help in work:
- follow step by step guide;
- to avoid possible errors, We will tell you in detail in the article.
Working with a professional flooring is relevant today, search engines sites will be full of thousands of new requests like "Crow the roof of a straightened."
Selection of material
Approaching the choice roofing materialInitially, all possible options. There are many of them on russian marketAnd the benefits of everyone should be known to the one who approached the question of the roof coating is close. This issue is important:
- material cost;
- its quality and durability;
- appearance.
Deciding to use precisely professional flooring, remember that the material must necessarily be roofing, that is, to have a groove for rapid sediment. Brand also has a value.
- C - wall;
- H - roofing;
- CH - universal.
Professional flooring - universal material, use it everywhere. In connection with the growth of popularity and the number of sales, manufacturers produce new products of bright colors and interesting design. The advantages of using it as roofing material are obvious:
- ease;
- the presence of corrosion protection;
- affordable price;
- ease of installation;
- ensuring the roof waterproofing.
A roof covered with a professional flooring can give to leak only in the presence of serious mechanical damage, for example, as a result of the fall of the heavy branch of the tree. In general, the durability of the coating is one of the most favorite qualities.
The sheet of professional flooring consists of several layers providing its protection:
- zinc coating;
- anti-corrosion layer;
- soil coating;
- polymer coating.
On top also apply a protective film, which is removed after installation. Overview of various brands of professional flooring that can be used for the roof is shown in the video.
Self installation
Detailed description self-laying Professional flooring on the roof will help any newcomer to cope with the task. For standard duplex roofing houses of 10 for 10 meters, two people will cope with a task in two days. This will save money and gives certain experiences, which is useful subsequently.
When transporting, loading and unloading work, be careful. If the sheet is damaged, it will be necessary to replace it, which entails additional costs. Correct bend it is impossible. When lifting a professional flooring on the roof uses lags. You need to lift one sheet.
You can walk on label sheets with sheets, but it is necessary to do it carefully: to come only to places, under which there is a doom in shoes with a soft sole.
Preparatory process
For those who only started the root raising process, the short video is below for familiarization. We will start with the fact that it will take a crate for attachment. Pre-create thermal insulation and cover the roof with waterproofing material.
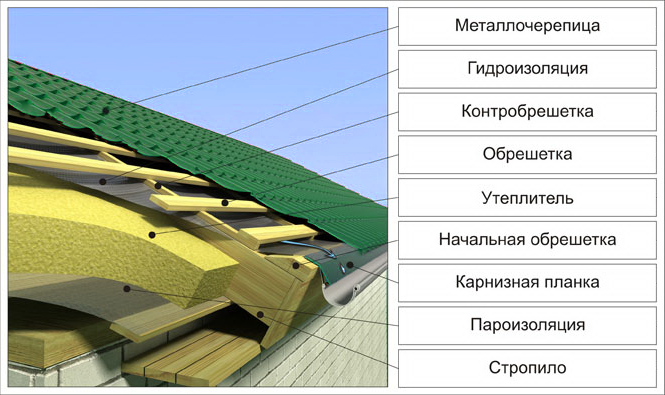
The work is made in this way:
- the vapor insulation material is laid under the rafter;
- for strong frosts In the region, the insulation is laid;
- the waterproofing material is placed on the rafter;
- install the counterclaim and the crate.
All this is called " roofing pie" To the first board of the crate on the edge of the roof, it will be necessary to secure the cornice bar for which water will be drained.
Doomnet and counterclaim - mandatory elements. Before laying out them, you need to process with a special solution against wood rotting. The presence of insulation materials will further reduce heat loss through the roof.
Necessary materials
You need to prepare tools and materials in advance so that you are not distracted by trifles. So, make a list:
- sheets of professional flooring (it is best to use sheets with a long-line roofing skate, as stated on the first introductory video);
- lags (serve to lift roofing material on the roof);
- roofing screws for fastening;
- portable screwdriver;
- gloves.
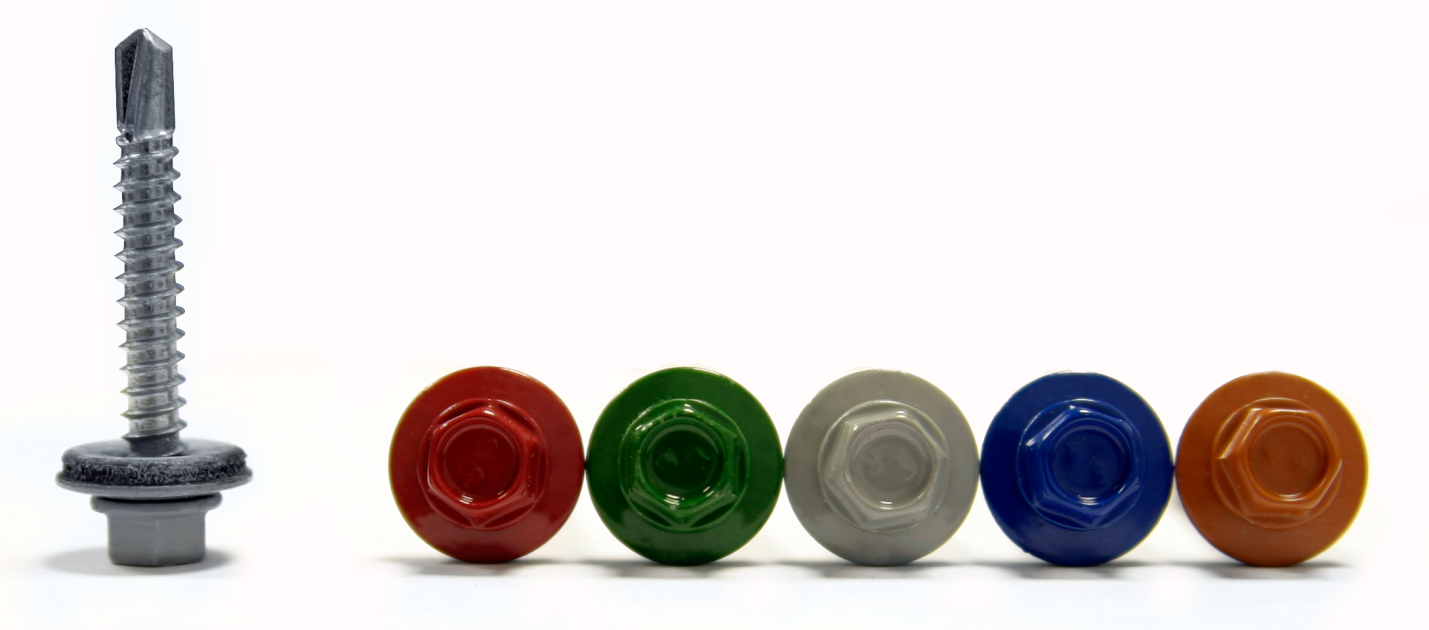
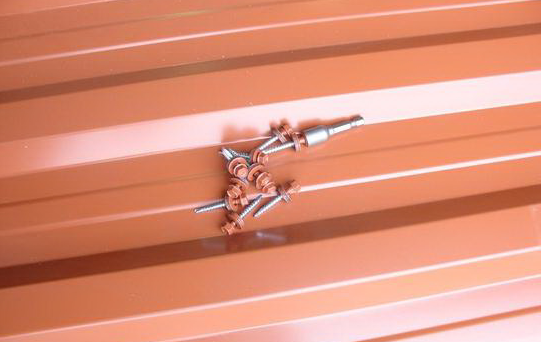
Profile sheets are calculated and cutting off on Earth. Back to top are delivered for fasteners. Separate places handle anti-corrosion primer. As for the screws, it is better to use special, since they are equipped with a rubber seal that does not allow moisture to flow under it. Also, the convenience of using them is that it is not necessary to drill a hole in advance, and the caps are painted in different colors in the color of the professional flooring. The flow rate of the sizes of 4.8 * 28 mm is 6-7 pieces per 1 m 2 of the material.
Tip! Use a screwdriver with a battery, it is not heavy and does not require further pull extension cord.
Safety regulations
It is important and compliance with the rules of security, because work at an altitude is conjugate with a number of difficulties and dangers. Store the following rules:
- it is forbidden to cover the roof of a professional flooring in windy weather;
- be sure to use tight gloves to avoid cutting with material;
- for lifting and shutter, an appropriate staircase is used, fixed in two places;
- work without insurance on the roof is prohibited;
- if it started rain, all work is stopped until the roof is completely drying;
- when moving along the fixed sheets, the leg is put in the groove;
- after work, remove all the garbage and tools.
If you follow this list of rules, you can avoid injuries that, unfortunately, are often found when working newbies.
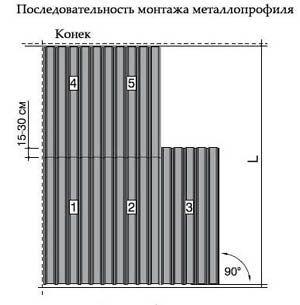
Features of laying professional flooring
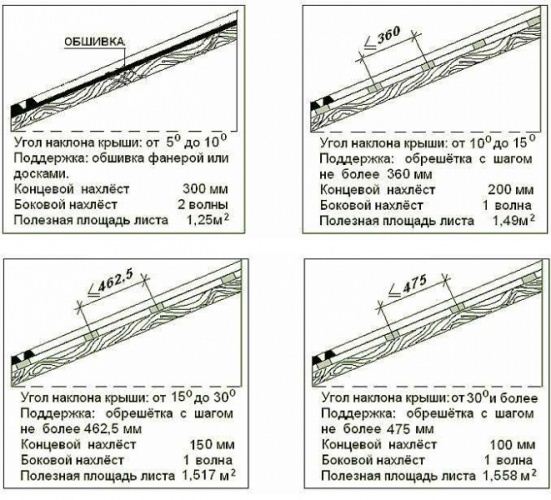
Mounting work starts with the installation of a cornice plank. Very often forget about it. When installing the corrugated floor, the angle of inclination of the roof is taken into account. If he does not reach 15 degrees, the professional flooring has twisted 20 centimeters. The angle of up to 30 degrees allows you to cover the brass at 15 centimeters, and for angle above 30 degrees can be reduced to 10 centimeters. Keep in mind that the minimum overlay size can be considered the size of a single wave, which is convenient in operation.
You can start work both on the right and left. For holm roofs begin work from the middle of the hip.
Work process
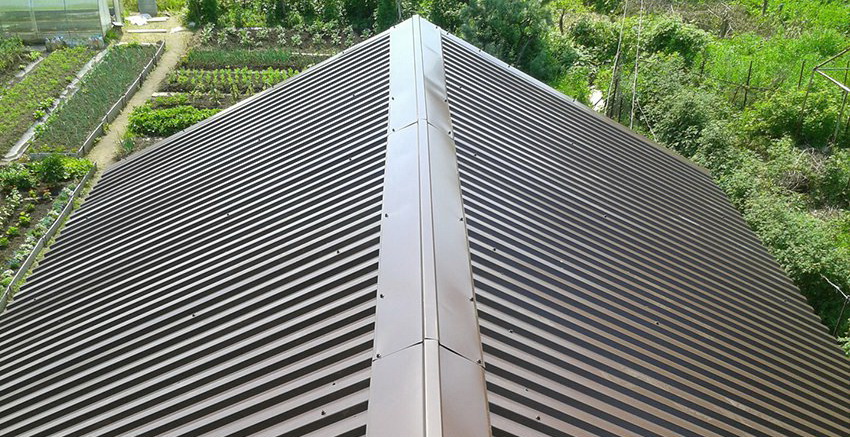
Gently raise sheets on the roof, lay them and align. The video of the roofing work is shown in the video "Cruem Roof in the Garden".
The fastening of the professional flooring with the crate should be carried out in the groove, and not at the top of the wave, it is then that fasteners will be reliable. Bottom go up to the skate. In this place of the roof you need to use a halter of a large length. As a rule, it is 80 millimeters.
If the skate length is very big, and the roof is not so far, you will have to work with a smaller professional flooring. At the same time, it stacked from bottom to top. This prevents moisture from entering it.
End strips and elements of the skate are mounted upon completion of all works. Previously in the area of \u200b\u200bthe skate leave a small gap, which is needed for ventilation. Despite the fact that there are a lot of photos and videos on the Internet with details of working with a professional flooring, newcomers often allow mistakes when installing.
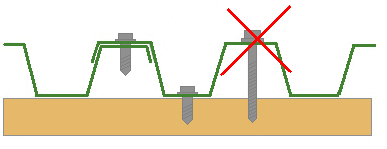
The most common mistakes
Part of the errors are presented in the video below, they concern the sequence of installation of the joints of the corrugated floor.
In addition, it often makes errors when working with a professional flooring in the field of endands, skate and pipes. Newbies cut out and bent metal special forms, although it is not necessary. Manufacturers specially produce false elements from this material To facilitate the task.

No need to invent something, it's easier to buy a ready-made element from the corrugated floor and consolidate it on the roof that will be reliable. Otherwise, there is a risk of leakage and rust formation over time. Mounts are required to be carried out. To the attention of those whose roof is equipped with chimney pipes: the smoke is installed in addition to the pipe (you can pick up a color).
Roofing work with a profile is simple, it is quite possible to do it yourself. The most important thing is to follow the instructions and comply with the security technique. Then your roof will be one of the most beautiful!
Recently, there has been a tendency to replace traditional roofing coatings, such as slate, on Ondulin, professional flooring or metal tile. To block the roof of the old house - in itself the cost event and the desire of customers somehow reduce the estimated cost is quite understandable. Often the hired brigades of the roofers insist on the complete replacement of the roof with disassembly and crates, and rafters. And it entails the increase in the estimated cost of repair work. But there is experience in replacing roofing on the roof without replacing these elements. In fact, the way out of the combined position. An example of how you can overlap the roof of the old house with minimal losses told in this small article.
Professional owl on top of the rubberoid - problems
Remove or not runneroid, before - the question that everyone decides for himself. But if you take into account the experience of using such technology, it is better to familiarize yourself in advance, with which the owner of the house after repair can be faced:
- Ruberoid is not able to skip moisture. Because of this, under the sheets of overlapping over time, an excess of moisture will accumulate, which can adversely affect the metallic material;
- In summer, under the sunny rays, the metal is heated to high temperatures. From the heat, bituminous impregnation begins to melt with the selection harmful substances. Not only is the volatile compounds are harmful to human health, the smell itself from the molten bitumen creates a sense of discomfort. In addition, the molten bitumen source of increased fire hazard;
- Cutting spots of bitumen on the surface of the professional leaf make all the roofs of untidy and ugly.
Video: Replacing the roof of the house without dismantling old
Advantages of professional flooring
The popularity of this material to cover the roof of the old house is quite explained. It has a number of benefits, such as:
- Complete waterproof;
- Does not fade in the sun;
- Practical in operation - it is easy to clean against pollution;
- Resistant to mechanical effects of atmospheric precipitation in the form of a hail;
- Has low weight;
- Relatively inexpensive;
- Simplicity in montage;
- It is used not only to cover the roof of the old house, but also for the fencing of the land and wall cladding.
Professional official is divided into three categories:
- Carrier.
- Wall.
- Nonsense - wall.
Each type has its own characteristics (both by weight and hardness) and its destination - for the walls or to overlap the roof of the old house:
For small areas, where it is necessary to overlap the roof of the old house, it is quite suitable for a wall professional flooring. In the case of large areas or with a rare inches, only roofing is used - with a profile height from 20 mm (the same approach and to the islande roofs on the roof, since they have to experience large wind loads).
Replace the old coating at home, consider the example of such a material as slate.
Preparatory activities
The first thing you need to do before blocking the roof of the old house, it ... Learn the weather forecast for the coming days. It will be completely deplorable if the old coating was removed and long and long rain began. Therefore, it is necessary to exclude rainfall in the residential premises through the roof.
Important! Even if the Hydrometeorological Center promises dry weather, it will not be superfluous to have a roll of plastic film to cover the roof in case of rain.
The main material for dismantling the roof covered with a wavy slate:
- nails;
- pair of wooden bars;
- long ropes;
- a pair of hooks (they can be made of slate nails);
- for the descent of sheets from the roof to prepare two long guides of the bar (they will also climb up the top and new material).
Dismantling
Before covering the roof of the old house, a straightener is disassembled by the old slate roofing. The disassembly process begins with a skate down. It is used for pulling out slate nails. Save sheets from cracks when dismantling will help wooden bar, placed under the novelter.
Each sheet is descended by rope with iron hooks along wooden guide bars.
Important! Schifer's sheets are just a rope contradicts safety technician.
If the working hands are not enough to overlap the roof of the old house, it makes no sense to strive to dismantle the roof in one day. The coating replacement is allowed by the phased method. First one skate - after that you can start repairing another skate.
Since it is necessary to overlap the roof of the old house, the parallelism of the rafter with the crate - if the plane is not necessary, it will have to be dismantled, leaving only the system of the rafter.
Video: Clear the roof of the old house without replacing the root.
Repair of the rafter system
Of course, to speed up the process and cover the roof of the old house by the professional floor, the crate can be left. But for construction standards there are significant differences in the requirements for deviations from the slate plane and professional flooring.
The first thing is checked the condition of the rafting bars along the edges of the roof. After that, we build a plane as a whole.
This can be done on a lacing, stretched out of four points, on the same depth into the sling of screws. The cord is stretched and diagonally, from the angle in the angle, and along the rafted.
If the plane of overlapping the old house is broken, it needs to be restored. To do this, the rafter is equalized to the edged board, linked to the bolt connections to the bolt.
Video. Overlapping the slate roof of the old house by professional flooring.
Waterproofing
The waterproofing device on the roof of the old house of the professional flooring consists in laying the waterproofing film over the rafter. It is beginning to cover the peaks - from the lower tier gradually climbing the skate. Film must lie freely without prior tension. Fastening is easiest to produce a construction stapler.
Simultaneously with laying layer of waterproofing begins the installation of the crate. This ensures access to measures on the roofing device.
Okeekhet
The new cuttlet, to overlap the roof of the old house by a professional flooring, begins with fastening of the support bar (50x40mm) or one-piece blank or cutting a length of 1 - 1.5 m with fastening along the entire length of the rafted.
The transverse elements on the roof of the old house can be made of 25x150 mm cutting board. Mounting direction - from the eaves and ends with a skate, following the following condition - the first and last board is attached to the very edge of the rafter. The remaining bands go in a step of 450 mm.
Important! The fastening step is selected from the type of professional flooring applied.
Works end with a wind board device.
We put a professional list
The final stage is the installation of a professional flooring. It is desirable that the sheets be the size of an equal length of the skate - the distance from the skate to the edge of the rafted, with a reserve of 5-8 cm.
With sheets in the production process do not forget about accuracy in circulation. Each sheet is carefully removed from the pack and on the wooden guide served on the roof of the old house.
Important! A neat handling of a profile will help protect the surface from scratches and dents.
Proper installation of sheets depends on how carefully will be held preparatory activities. Responsible moment - reconciliation and installation of the first sheet of overlapping the roof of the old house. It is he who will ask the direction of laying the remaining elements of the roof of the old house.
For this purpose, it is necessary to fasten the limiters on the roof of the old house to the extreme rafters - small rails of 20 - 35 cm long. They must be installed in the same plane with the entire system of rafters. In these rails at a distance of 5 - 7 cm from the cornice, screws are twisted in such a way that the hat performs over the wave of the corrugation.
This is necessary so that a metal string is stretched between self-drawing. The installation of the first row for such a guideline will be much simplified and will not give the material to go away.
The attachment of each sheet of professional flooring to cover the old house is made using special screws - self-tapping screws from the calculation of 7 - 9 pcs / m².
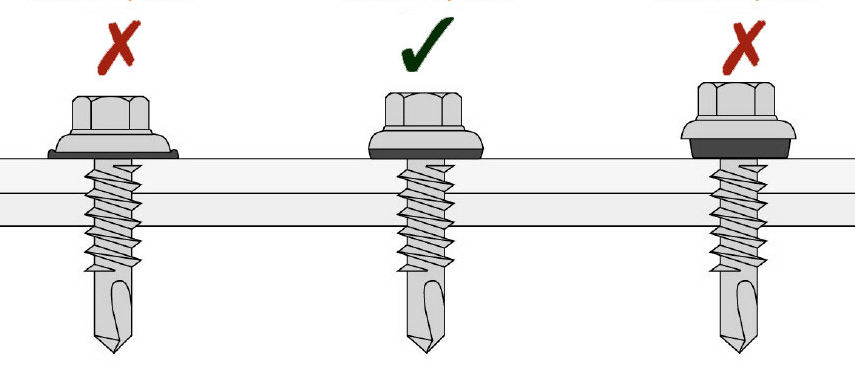
Important! Tightening torque of self-sustaining must be adjusted in such a way that the press does not deform the iron roof of the old house.
Wind corners and rustle can be better installed immediately after installing the top row of sheets. So, less risk scratch or make a dent. Cracker is fastened with long screws - self-pressing with pressshabiba.
Video. Overlap the roof of the old house.
Metallic profiled sheet is quite popular both among professional builders and architects and among individual developers. The professional flooring, obtained from thin-sheet steel by the method of cold rolled, has a high bearing capacity and easily withstands even very large wind and snow loads. For proper montage, the roof overlapping a corporate corporation strafficer is very reliable - such a roof will last 20-25 years without any operating costs.
An important advantage of the professional flooring is the possibility of making sheets of long length. With the length of the roof of the roof to 12 m, the roof overlapping the roof can be made in one row without transverse joints. And any additional junction increases the likelihood of a roofing tightness.
Due to the low weight, the roof roof is often used when replacing the old roofing coatings, since it is increased to strengthen the existing slinge system Under the professional sheet will not have. Among other things, thanks to modern colored decorative coatings, the metal profiled sheet looks very attractive.
The small weight of the professional leaf allows you to overlap the roof of the roof with your own hands without attracting builders. In addition, information on how to properly cover the roof of a professional owner, and the process itself does not require many years of experience, special education and skills.
Below we will focus on the main features of the installation of this roofing material, with which you need to get acquainted before the roof of the roof of the professional flooring.
What professional owner to choose for roofing?
Before you focus on how to block the roof of the roof, we will shortly focus on the policy of choosing a profiled sheet for a roof. Today, it is widespread as a wall brand's wall-based brand, intended for the manufacture of sandwich panels, facing facades of buildings and construction of various fences and a special professional in for the installation of roofing coatings.
Many are interested, whether it is possible to cover the roof of the brand with the brand with, which is at times cheaper by the carrier of the professionalist. This question, in general, can be answered positively. However, the height of the trapezoid or the profile wave should be at least 20 mm. For steep roofs of small buildings, you can even use C10 professional flooring, but under it you need to perform a solid crate.
However, the use of wall professional flooring, albeit economically, but not reliable enough. Because you are interested in exactly how to cover the roof with a straightener, and not the ability to save on reliability and quality of the roof, I strongly recommend using a roofing profiled sheet. Especially if the building is built in a region with plenty of precipitation and high snow cover.
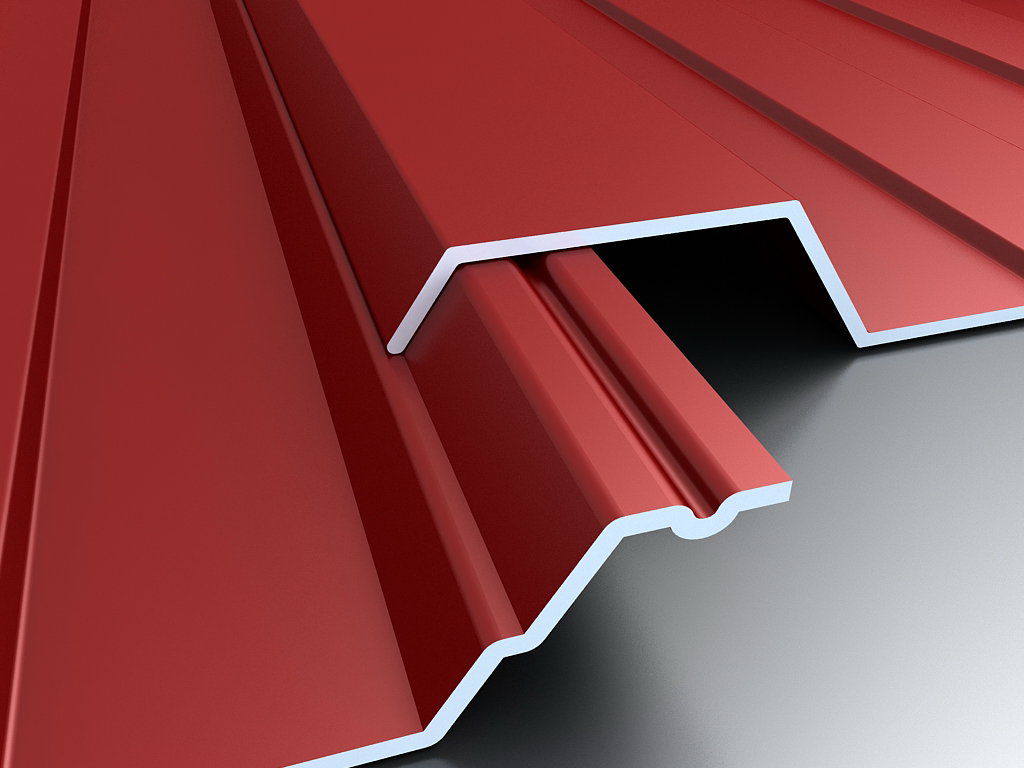
It differs from the wall by the fact that the width of the profile shelves is greater than the width of its crest. This facilitates the approach of water and snow from roofing. In addition, roofing professional flooring often have additional ribs and capillary groove along the edge of the sheet.
These features of the design increase the longitudinal rigidity of the profile and contribute to the moisture dismissed between the roofing sheets.
By choosing a profiled sheet, you can start covering the roof of the corrugation.
How to start the roof of the roof of a professional flooring?
To prevent accidental damage to the material, transportation and lifting of professional flooring on the roof must be performed with maximum precautions. After all, in case of deformation, the initial geometry is almost impossible to return the profiled sheet. In addition, even the most minor damage to the protective coating can lead to premature corrosion of corrosive and reduce the service life of the roofing coating.
If you have acquired a professional in advance, you can remember that you can keep it in the factory packaging. At the same time, it should be horizontally on lining, no less than 100 mm high. If it is supposed to keep a professional flooring for more than a month, wooden rails are stacked between individual sheets.
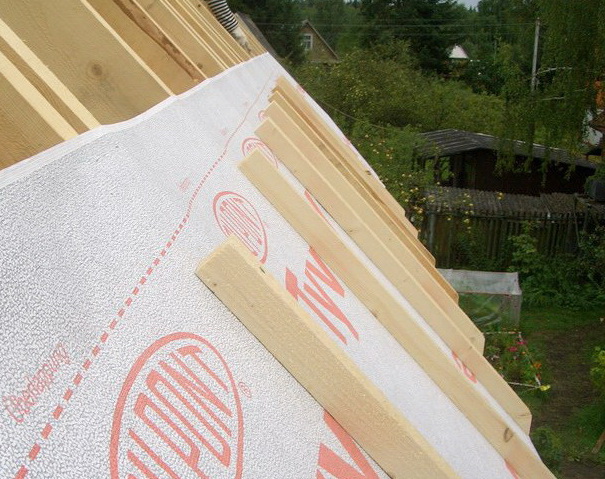
Before covering the roof of a straightener, with the help of bars, the counter tests need to perform ventilation gaps under the surface of the roofing coating. It is correct that the ventilation prevents the condensate accumulation on the inner surface of the roofing coating. The size of the ventilation gap must be 40-50 mm. To protect the undercase space from droplets of condensate, the waterproofing membrane is stacked on the rafter, on top of which a counterclaim is mounted.
The roof prepared for covering the professional flooring: a doom is made, the frontal and farmery plank
Strictly performing installation technology, two or three people can cover the roof with their own hands without special skills.
We start mounting from installing a device for lifting a professional flooring on the roof. From the ground on the roof professionalist raise wooden lagum, and only one sheet at a time.
The order of further work with the profile largely depends on the angle of inclination of the roof. Although, in the theory, the profiled sheet can be used even for roofs with slopes of 2-3 °, it is better that the roof slope exceeds 10-12 °. In this case, Crow the roof of a professional flooring with the allen in just one wave. If the installation of the proflift on the roof scap is performed in several rows, the nestling between the rows should be from 100 to 200 mm, depending on the angle of inclination of the roof.
Fit the sheets of the sheets before the roof overlapping
Before overlapping the roof of the house by professional flooring, you need to adjust the coverage sheets. To cut the sheets of professional flooring, the electronics on metal, which neatly, smoothly, without jar and extra effort, allow you to make the desired cut. However, since we cut the roof of the roof of our own hands, therefore, there is no specialized tool, you can use the electrolybiz, and hand-hacksaw with small teeth. To prevent the edge corrosion, the edges of the slices need to be treated with anti-corrosion mastic.
For cutting, professional flooring is strictly forbidden to use high-speed power tools with abrasive circles. Red abrasive particles can seriously damage the polymer protective covering Profiled sheet.
How to cover the roof of the professional flooring - cutting a profiled sheet
In order to overlap the roof of a professional flooring with your own hands, you also need to follow several simple rules that will avoid injuries when performing work:
- it is necessary to work in a soft shoe that does not damage the polymer coating and, at the same time, it will not slide along its surface;
- it is not recommended to work in windy weather due to the high sailness of sheets of professional flooring;
- it is also impossible to work in the rain, because the wet surface of the professional leaf is very slippery and to stay on it even with a small slope of the roof is very difficult;
- you can not raise several sheets at the same time, because when one of them is slipping, you can get a serious injury.
After laying and fitting the proflist, they start fastening it. To how it is properly and securely fasten the professional flooring, you need to pay special attention.
How to cover the roof of a professional flooring?
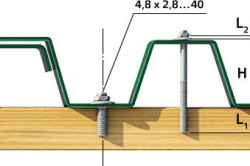
Mounting profiled sheet with nails can not be fixed, because under the action of wind loads, such fasteners will gradually relax. Subsequently, this will lead to deformation of the professional leaf and disruption of the roof tightness. Therefore, before the roof of the roof is a straightener, you need to purchase special roofing screws.
Roofing screws are usually a hexagon head with press. The tip in the form of a boraine makes it possible to fasten the professional flooring with roofing screws not only to wooden, but also to metal crate, without pre-drill holes.
The hex head allows you to firmly and reliably press the professionalist to the crate with the help of a screwdriver or an electric drift with an adjustable rotational speed. Special importance are sealing gaskets of roofing screws manufactured from special neoprene rubber.
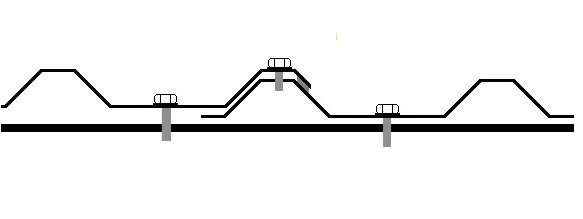
In order to close the professional flooring tightly to the crate, the mount is performed through the bottom wave of the profile. But it is this way that all water from the rain and melting of snow flows from the roofing coating. Therefore, when we cut the roof by a straightened, it is very important to ensure the tightness of the assemblies of the professional sheet. Neoprene rubber of the protective gasket is self-incanted when tightening the roofing self-drawing, completely excluding the possibility of penetrating moisture under the roof. Through the top wave, the self-tapping screws screw only when installing the skate.
Horizontally professional flooring to the crate is fixed through one wave. Vertical Self-tapping screws are installed through one piece of crate in a checker order. On the front-line squeezing, the mount is performed for each shell board. On the cornese swelling, the self-tapping screw screws into each wave of the profile.
In each wave, the professional flooring is also fastened in the places of the allen between the neighboring rows of coverage. Sheets of coating in places of longitudinal adhesive are recommended to be additionally copped with special rivets.
When screwing the screws or drilling in roofing holes, a small metal chips is formed. Before the final tightening of the screws, it must be removed to avoid damage to the polymer protective coating. In addition, this chips can interfere with the dense fit of neoprene gasket.
Before overlapping the roof of the roof, it is necessary, just in case, to purchase a spray paint can. It is better to immediately cut the protective coating in places of minor damage than in a few years to repair the roof repair.
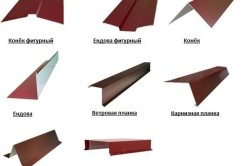
Installing challenges
Any roof, in addition to laying the material itself, provides for the installation of special challenges. And if the need for a skate is known to everyone, the importance of the remaining elements is no longer so obvious. These include various straps of adjoins, endands, as well as details of the frontal and cornice soles. All these elements have not only decorative purposes. They protect the edges of the roofing coating from the proflist from the waterproof and undermine the strong streams of the wind.
If you are interested in how to cover the roof of a professional flooring, then the installation of challenges is one of the most important stages. Especially with the fact that many of them need to be installed before laying the main coating.
The most complex in the execution of the end of the roof of the roof from the professional flooring. So called the butt shake of the roof forming internal corner. This is a practically mandatory element of any complex attic roof. Since it is precisely in this place that water flows from both rods, it is very important to ensure the tightness of the roof in the Endaist area.
Before ling mansard roof Profile, place the locations of the endands and install the bottom planks of the funds. The crate under the bottom bar of the endand is solid. Only after checking the reliability of the installation of these elements, the installation of the roofing coating is performed.
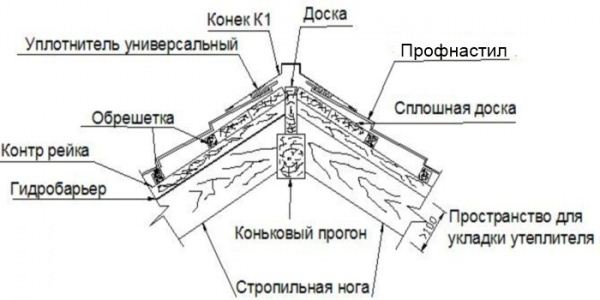
It is very important to know how to overlap the roof by a straw in the area of \u200b\u200bthe skate. It is on the top junction of the rod of the roofing the air from the ventilation gaps. Therefore, at the top of the roof between roofing Skates left a gap, which is covered with skate elements.
Start the mounting of the skate from the side, which is opposite to the prevailing direction of the wind for the locality. Elements of the skate are mounted with an adhesive in 100-150 mm roofing screws through the top wave or a trapezium of professional flooring.