The installation of roofing professional flooring allows with its own hands with minimal financial costs and in fairly short time to get a roof that will not only be acceptable to look, but will ensure effective precipitation protection. The relatively small mass, the mechanical strength and corrosion stability of the professional sheets make them quite universal.

So it remains only to carefully examine the technology and apply it in practice with sufficient skill. In this article I will reveal the main aspects roofing work Using this material, starting from how the neckenet is done under the professional flooring and ending with the technology of mounting a metal profiled sheet.
What do we need to work?
Materials

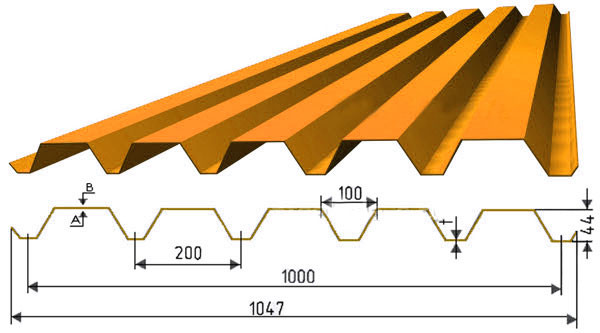
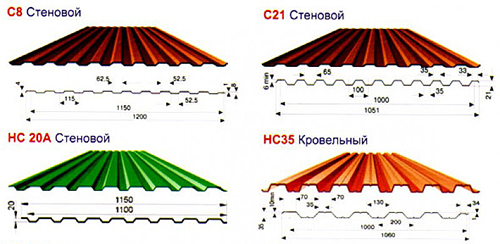
Naturally, the first question that needs to be given attention is the selection of the roofing material itself. For the roof device, a variety of brands of the proflist are suitable, ranging from C8 - C21 and ending with C44 or H60.
Naturally, for structures small house It is better to take a lightweight material with a thickness of 0.5 - 0.7 mm with a relatively small corrugation height, while for industrial facilities it is desirable to use the most massive of the available models.
In addition to the professionalist, we will need:
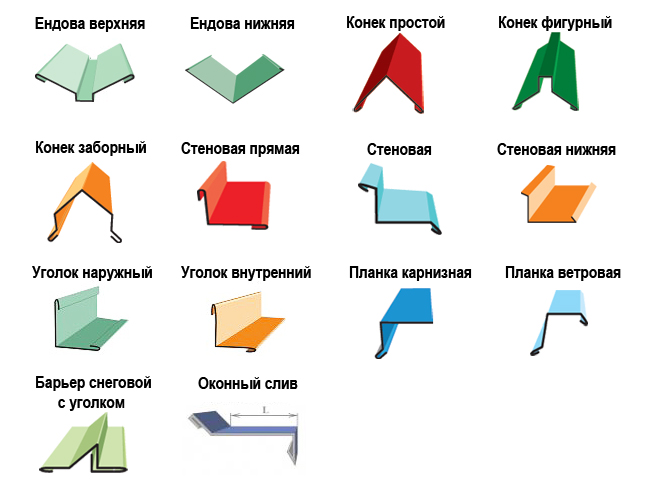
- dobly elements made of profiled metal -, skates, angular, end and cornice strips, lining for adjustment to walls, etc.;
- wooden bars and boards with a cross section from 30x100 mm for a rarefied crate;
- plywood or oriented chipboard with a thickness of 15 mm - for a solid crate;
- waterproofing membrane;
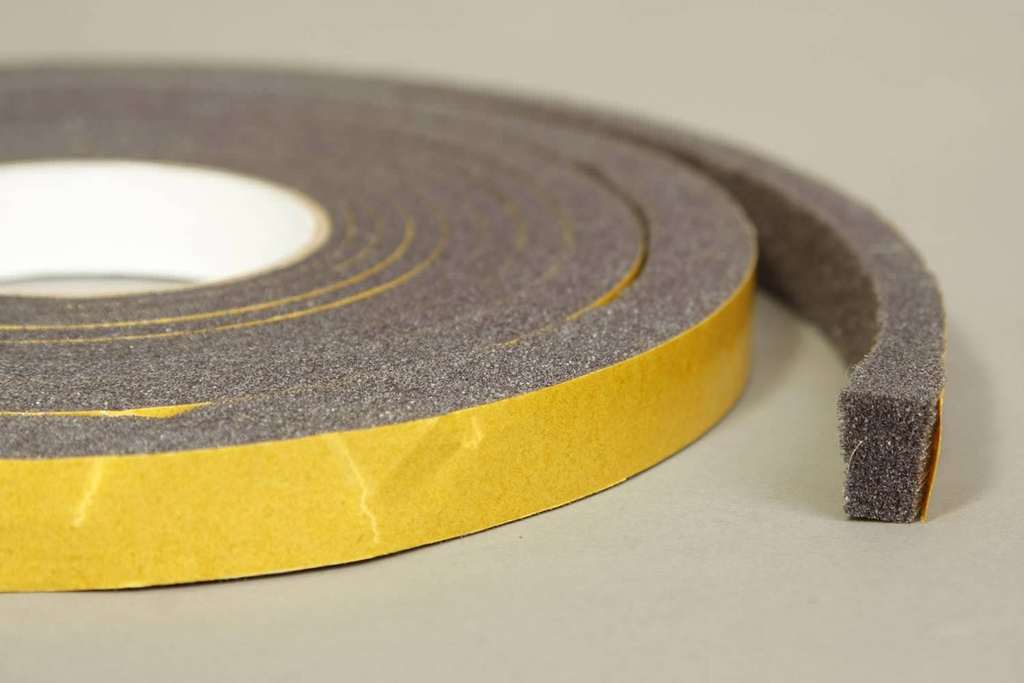
- sealing tape (and universal, and special, with protrusions for professional flooring);
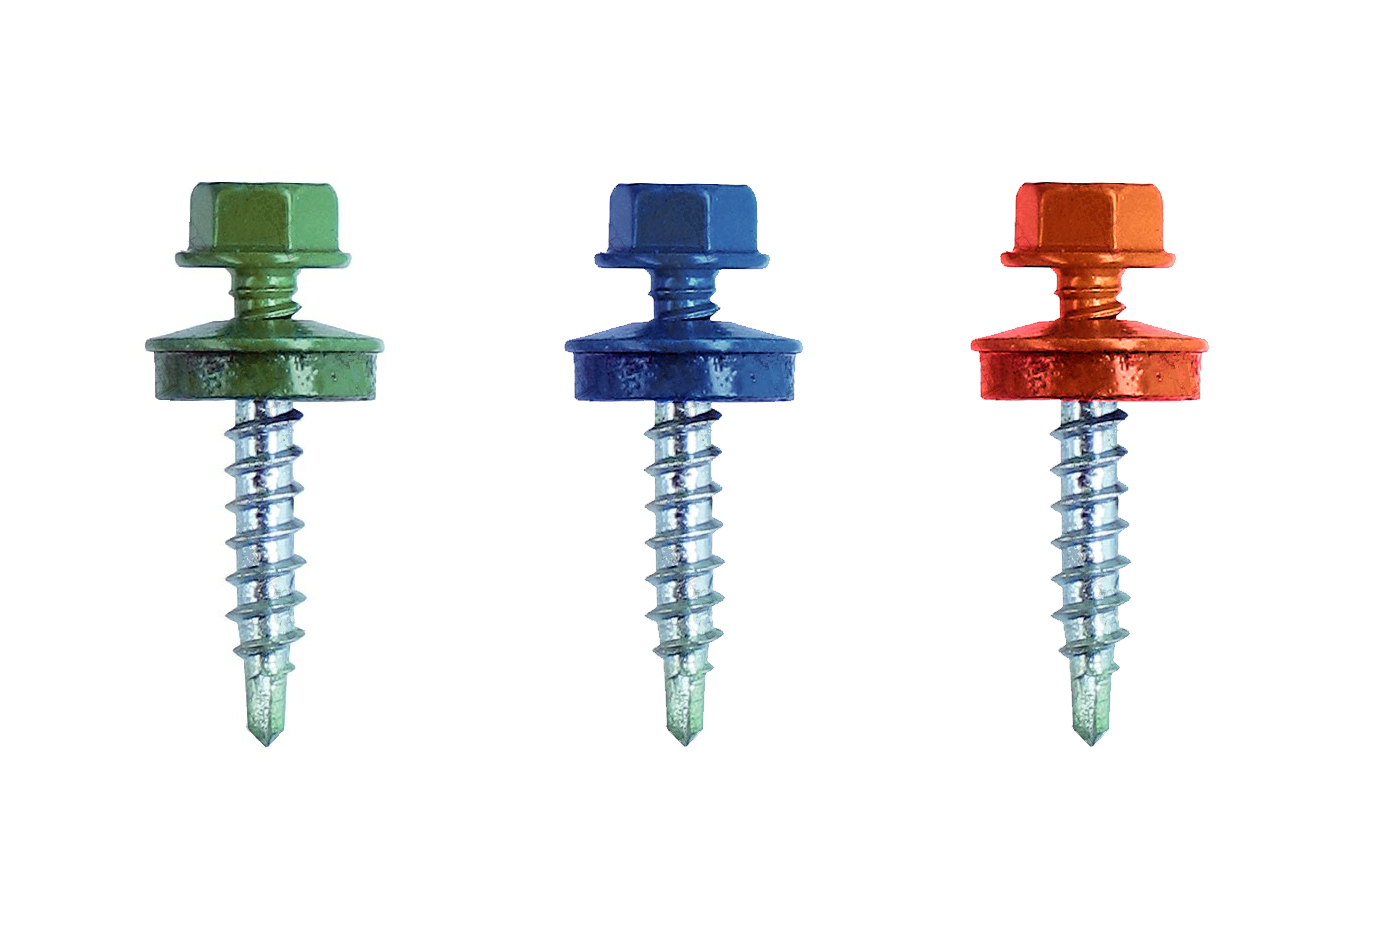
- self-tapping screws;
- special self-tapping screws.
In addition, it should be borne in mind that professional flooring is characterized by high thermal conductivity. Consequently, when using this material for the roofing device, its insulation will be extremely desirable.
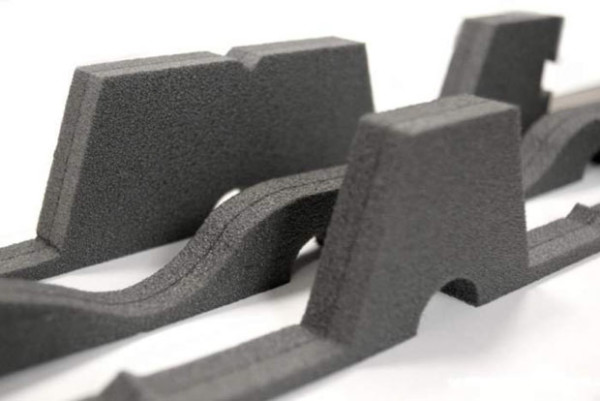
As a heat insulator, I prefer to take special roofing panels based on mineral fiber - let them stand quite expensive, but it is perfectly preserved thermal energy indoors.

Instruments
Self installation metal roof It assumes the use of a specially selected set of tools.
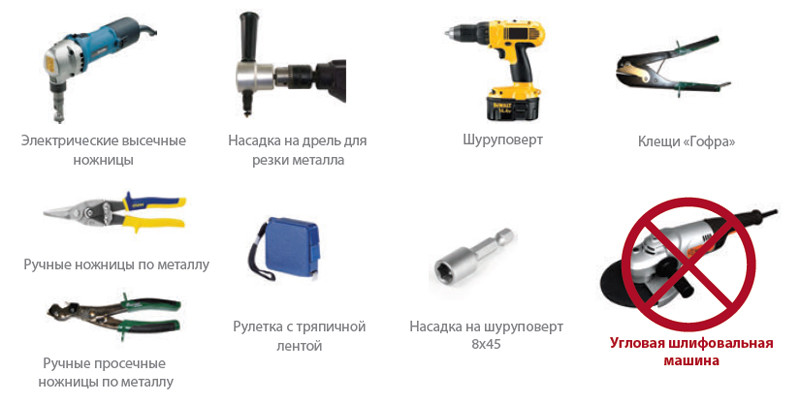
My toolkit includes:
![]()
- electric carving scissors;
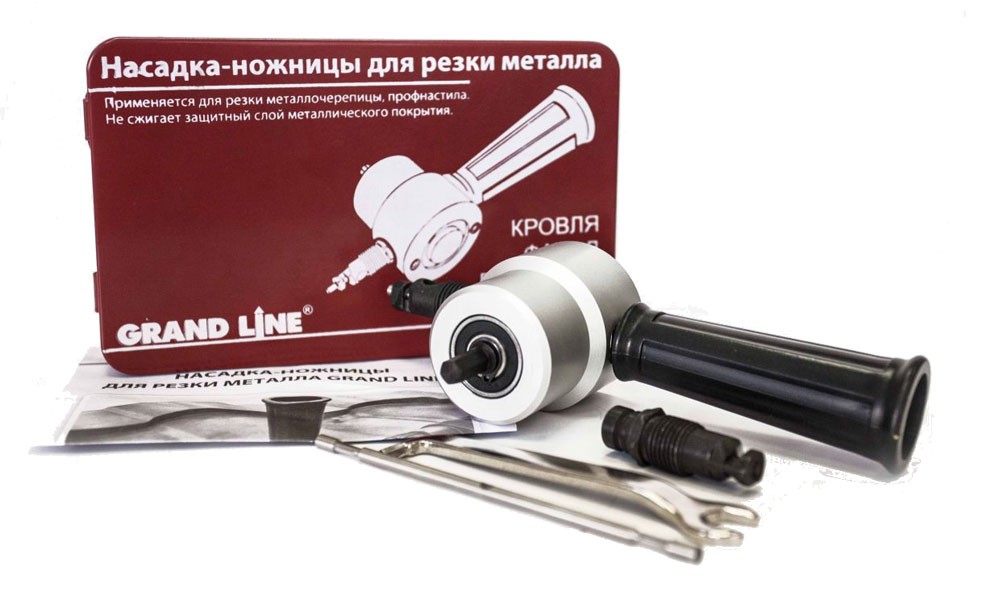
- nozzle on the drill for cutting metal;
- manual scissors for metal for accurate trimming and formation of small recesses;
Keep in mind that it is impossible to cut the profiled metal sheet with a grinder - when the disc is rotated, the metal is strongly heated, which leads to destruction protective coating And with outdoor, and from the inside of the professionalist. As a result, in contact with the atmospheric moisture in the sections where the trimming was conducted, corrosion develops.
- wood saw for work with the details of the crate;
- construction stapler;
- knife for cutting hydro and heat-insulating material;
- screwdriver with a nozzle under the hat of the "professional flooring" self-building;
- set of measuring instruments - long level, roulette, plumb;
- hand tools - a few hammers, passatia, chisels, etc.
I also remind you that when roofing works it is advisable to protect yourself, using insurance for movements on the roof.
The tool is best to wear a special belt in pockets - so the likelihood that he will fall and will be unreasonable (or provokes injury to the right person) will be minimal.
Foundation of the roof
A few words about heat and waterproofing
As I noted above, despite the whole range of objective advantages, there are professional flooring and disadvantages - in particular, the heat and sound insulation characteristics of it is purely symbolic.
That is why when the roof device, from the profiled metal sheet, it is additionally insulated:
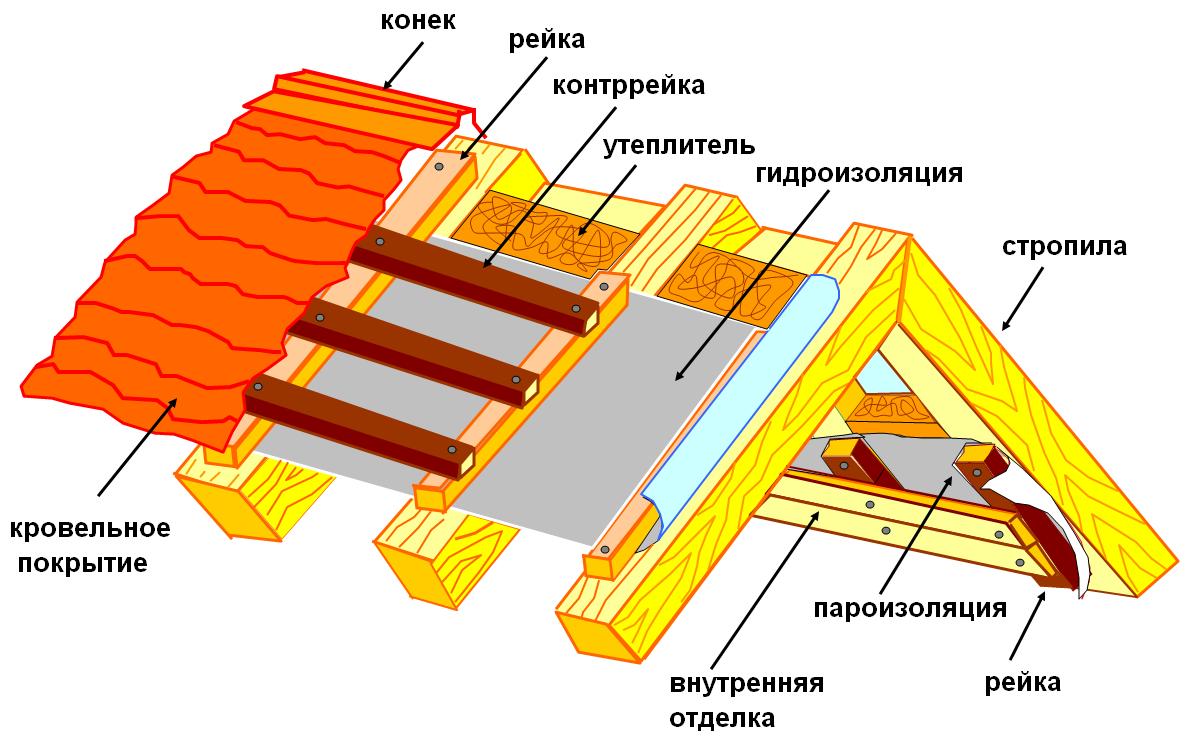
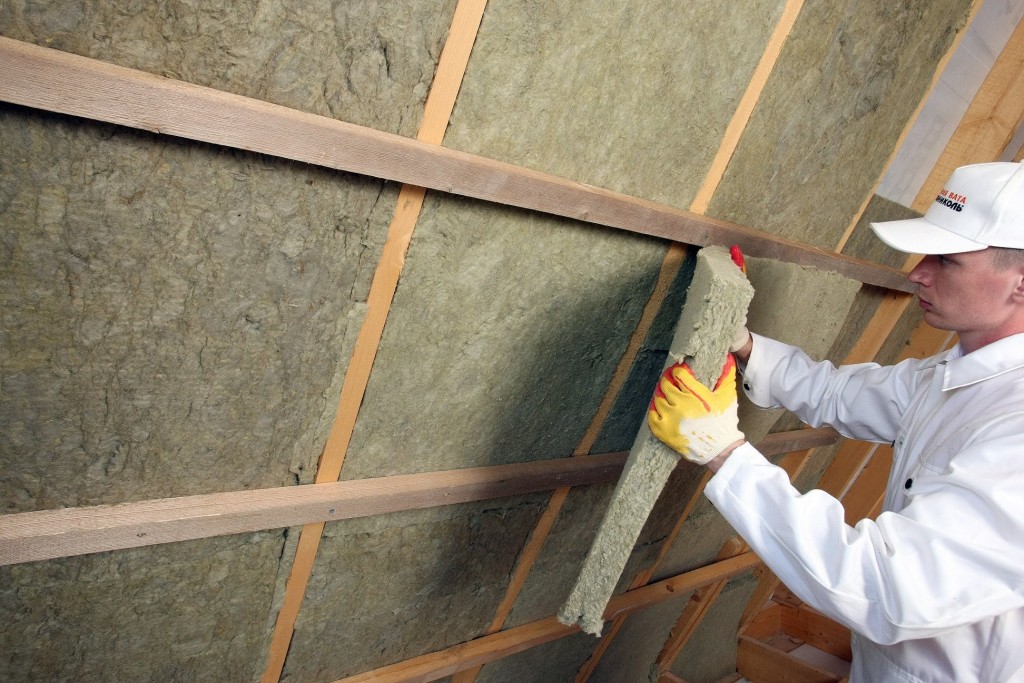
- In the interval between the rafters from the inside, the panels of the heat-insulating material are minvati or analogue. The power of thermal insulation is determined by the design heat engineering indicators, but under the corrugated floor it is worth putting at least 75 mm.
- From the inside of the Ministry of Service hides with a vapor insulating membrane and fixed with transverse bars - a counterclaim. These bars not only fix the insulation in the space between the rafters, but also provide ventilation gap.
- The suspension of the undergraduate room is mounted on the counterclaim: it can be made of lining, plywood, osp, moisture-resistant drywall, etc.

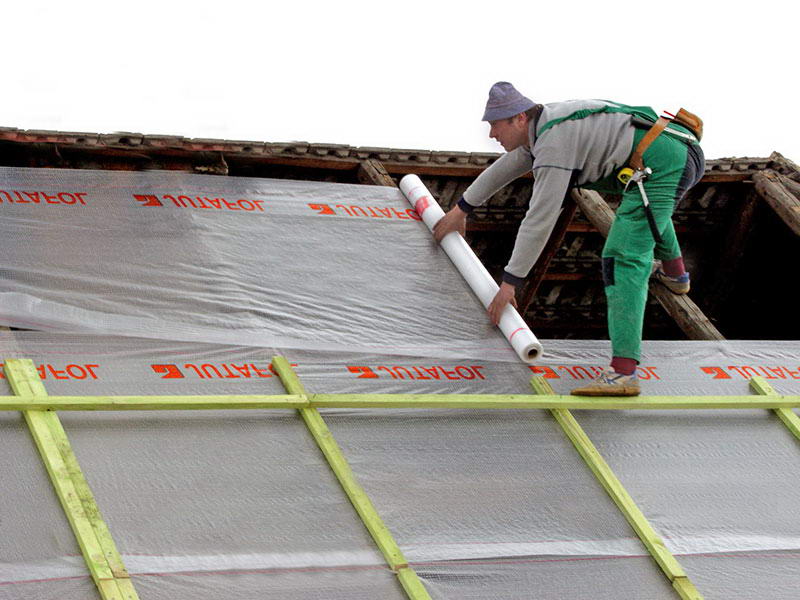
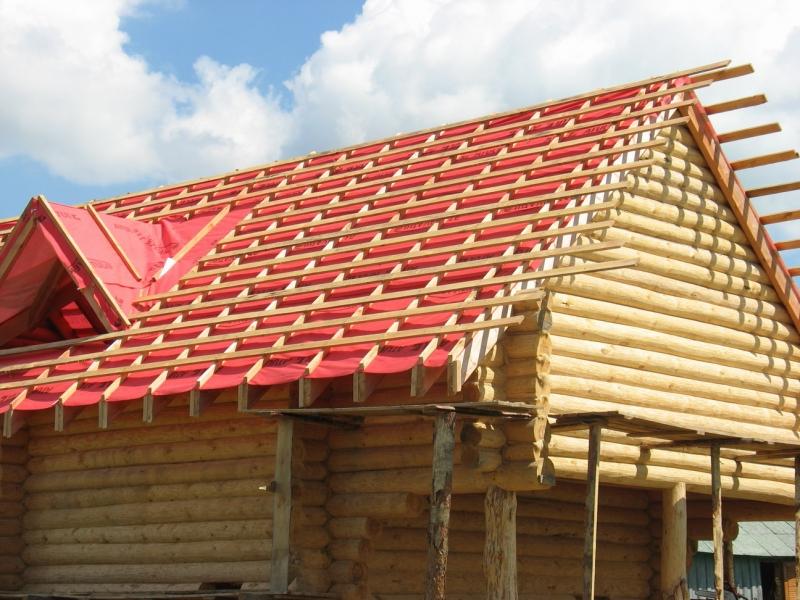
- From the outdoor side, the waterproof membrane is placed on the rafter (extremely preferably - vapor-permeable). The membrane roll horizontally, moving from the skate to the eaves, with a mandatory adhesive. With the bias of the roof from 30 degrees and more minimal overlap is 100-150 mm, with a bias from 12 to 30 degrees - 250 mm. The fixation of the membrane is performed using steel galvanized brackets or special nails with wide hats.
For a more reliable connection, I squeeze the joints of the waterproofing cloth with a sticky ribbon, which prevents water flowing.
Calculation of the basic parameters of the base
Following important element Roofs - doom. The carrying ability of the profiled sheet (especially high-profile models) is quite high, but still the accurate calculation of the crates under the professional flooring is very important.
The type of base and the pitch of the carrier elements determines the coating rigidity, and with the improper selection of the structure there is a risk that the roof will "play", flexing under wind load and its own weight. As a result, the tightness will be disturbed primarily at the points of attachment - and from here not far to leaks.
Choose the optimal step of the crate under the corrugated floor is best on the table below:
In the overwhelming majority of cases, the lamp is made from the 30x100 mm boards or 50x50 mm bars. When installing a solid base, a moisture-resistant plywood with a thickness of 15 mm or a material with a similar bearing capacity is used.
Based on the received data on the chase of the professional flooring, we carry out calculations: so, if we need to separate the roofs of the roof with dimensions of 3 x 5 m with a pitch with a step of 500 mm, then we will need a minimum of 7 five-meter bars of the desired cross section.
In addition, you should not forget about the removal of the roof (the horizontal protrusion of the roof is beyond the limits of the front) and the skeleton is a vertical ledge beyond the wall. So the final figure will be somewhat more.
It is necessary to find out, lumber which length is available, and there are already calculations for them. It is one thing, if you can order six-meter bars, and completely different if only three-meter panels are available, and their will will have to be allowed to be allowed.
The supply of material for the crate must be at least 15 - 20%. This will allow us to not worry when trimming and fitting parts in size.
Installation of crates
The process of preparing for the installation of the crates is quite simple:
- To work, choose the material described in the previous section. Most often used boards and bars from pine, spruce, larch (in some regions this wood is the most affordable price), beech, etc.
- Before buying, be sure to check the quality of the material. It is desirable to build a tree crate with a moisture content of no more than 18 - 20%. Also unacceptable large cracks, damage to the vertices, rot, through the swirls, etc.
It is not necessary to overpay and buy a fugged board / timber: the quality of the surface during the installation of the roasting plays a minor role. But on the geometry it is worth paying attention - the smaller items will be, the less we will have to mess around, aligning them when installing on the roof.
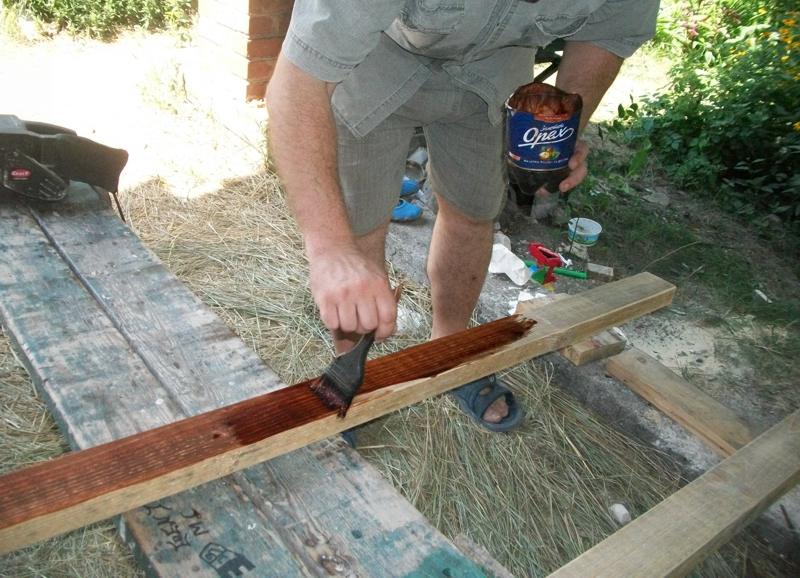
- All wooden parts are processed by an unbecable antiseptic. In antobacterial processing, it is not worth saving: 90% of all cases of repairing the roof, with which I had to face, were caused by the failure of the crates as a result of rotting wood.
The design of the crate is quite simple:
- On the ends of the rafter, we feed the rafting supports - bars with a cross section of 50x50 mm. They not only pressed the waterproofing material, but also form a roof air clearance.
- Under the rafter supports you can lay a special metal design - Dropper. It is laid under waterproofing material and serves to lead condensate. The dropper is attached directly to the rafters.
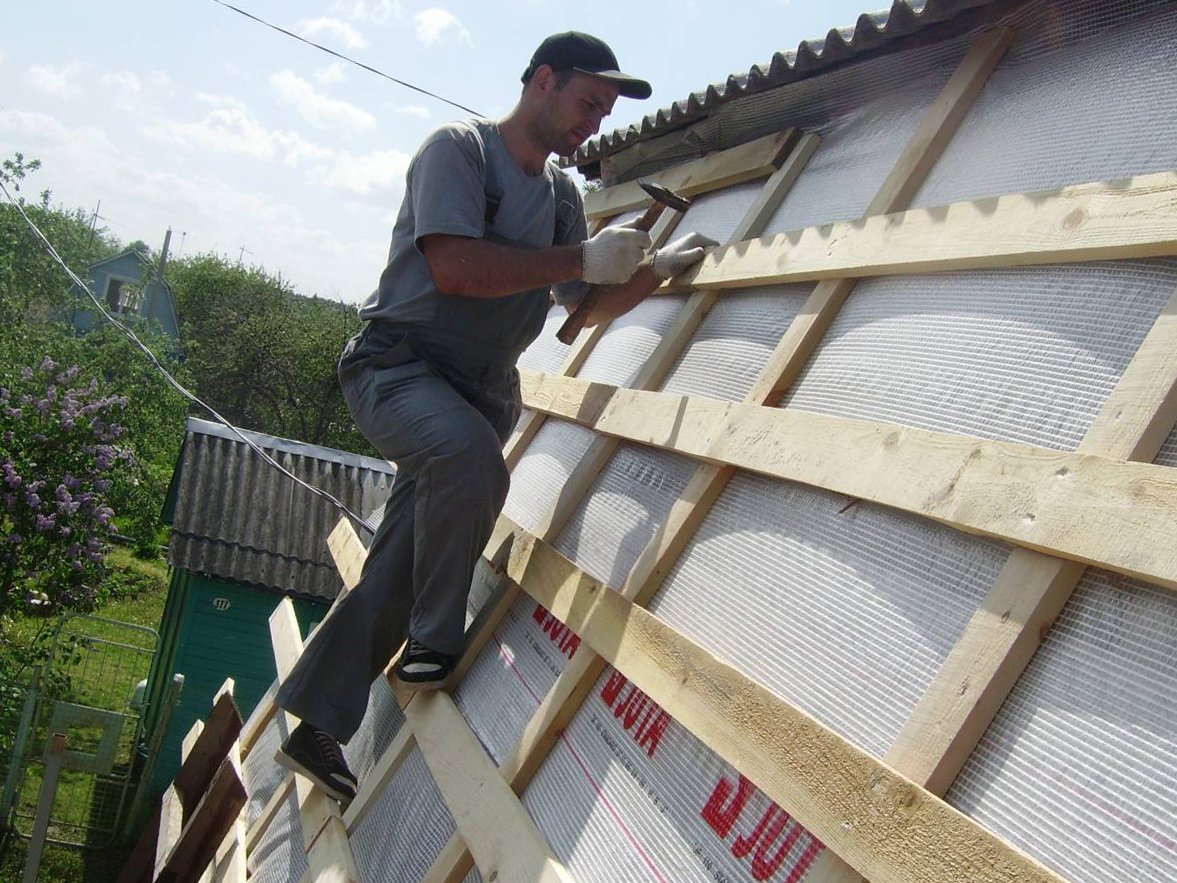
- The elements of the crates are attached to the rafters perpendicular to the installation using nails or self-tapping screws. Bar is fired by one element in the center, the board is two: from above and below. This approach allows you to compensate for the load, and the board fixed at two points will not go "propeller".
- Docking parts are made only on the rafyl. At the same time, the end of each timber is nailed by a separate nail, after which the elements are "binding" by the bracket.
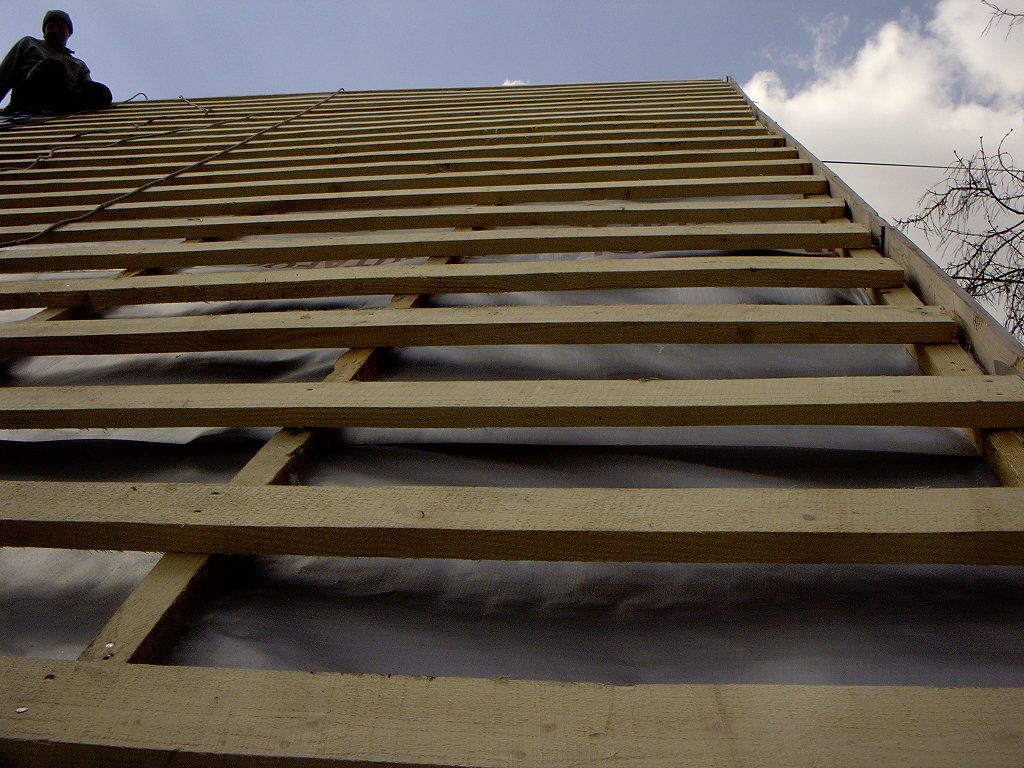
- When installing the base for the roof control the geometry of all parts: it is desirable that the boards lay perfectly exactly, with a deviation from the horizontal not more than 1-2 mm on 1m. To control it is convenient to use a strained cord.
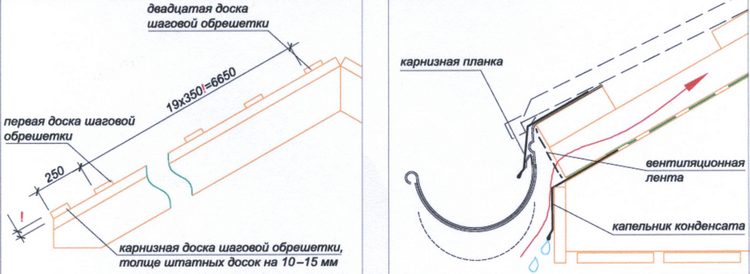
- At the bottom of the skate, along the eaves, we install the baseboard - it needs to be thicker than the main parts. This board will be used as a basis for farmery plank.
- The cornisic bar can be attached with the hooks for the drain.
- In the endowes, we set the lower fundamentals, fixing them on the crate.
Roofing
Rules of installation of the professional sheet
Instructions for fastening profiled metal sheets on the crate from the board, plywood or timber is given below. It is advisable to follow these recommendations as accurate as possible, since it depends on how the roof is obtained.
The main factor determining the sequence of our actions will be the size of the material. The manufacturing technology of professional flooring allows you to make parts whose width is equal to the width of the roof, so that the sheets do not have to go.
If we work with professional sheets standard sizeThe installation should be carried out by this algorithm:
- Stacking sheets start from the bottom of the roofing slope. As a rule, the lower left corner is selected, because so we get the opportunity to optimally overlap the capillary grooves of the neighboring sheets.
- The roofing sheet is laid on the crate taking into account the frontal protrusion and the cornese swell, align and fix one screws.
In this place, it is desirable to install a sealing tape that will block the space under the corrugations of the proflist. The same tape can be attached and in places of adjoining to vertical surfaces, along the funds, etc.
- Then we are placed two or three sheets horizontally, each of which is also fixed by one self-tapping screw - exclusively they do not fall. When laying sheets, we definitely make the backstage of the extreme left wave on the extreme right wave of the already installed detail.
![]()
- Then finally align all the details and proceed to their fixation. For mounting, we use screws with a brown, hexagon head and neoprene gaskets. When tightening the fastener, the gasket is occurring, due to which it is ensured by tightness at the place of metal perforation.
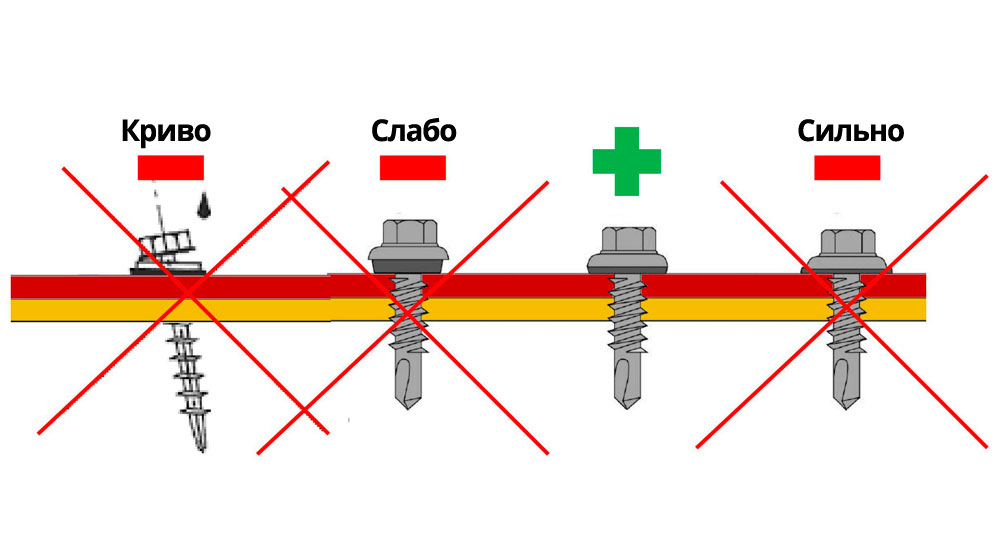
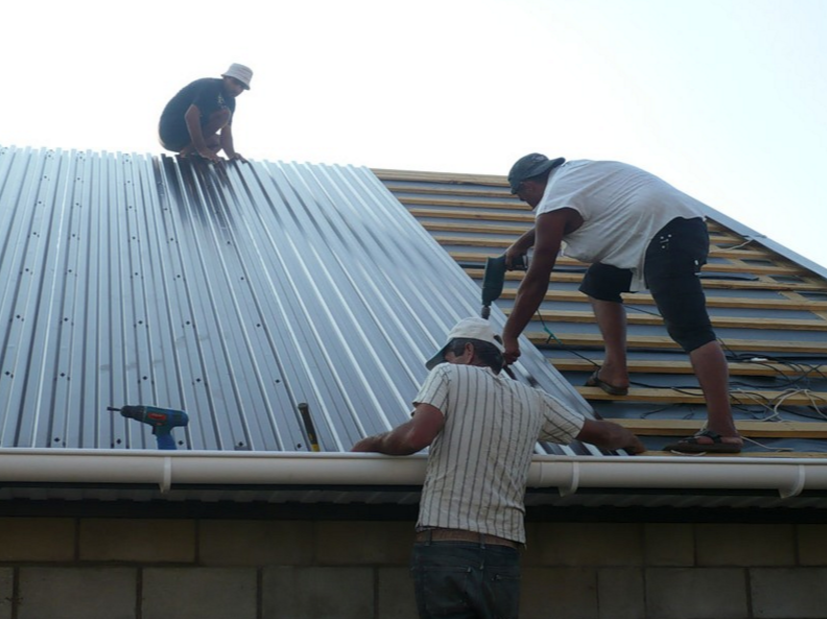
- Self-tapping screws into the lower part of each second wave, along the same sheet fasteners are fastened in a checker order (4 - 12 pcs. On m2). It is extremely important to control the power of tightening: the hat should tightly press the elastic washer to the metal, but not to get it.
When working with sheets with a thickness of more than 0.5 mm, I prefer to perform fastenings on the preliminary drilling (it is enough to "pass" the metal and slightly globally in the tree). At the same time, the drill diameter I choose a little more diameter of the self-pressing: the tightness of this does not suffer, but with a temperature expansion of the roof at the point of fixation there is significantly less voltage.
Fastening Scheme Fastener Plank
- Along the front, we establish an end bar, which should cover one wave of a sheet located with the edge. Planck is attached and to the board at the end of the crate, and to the professional floor.
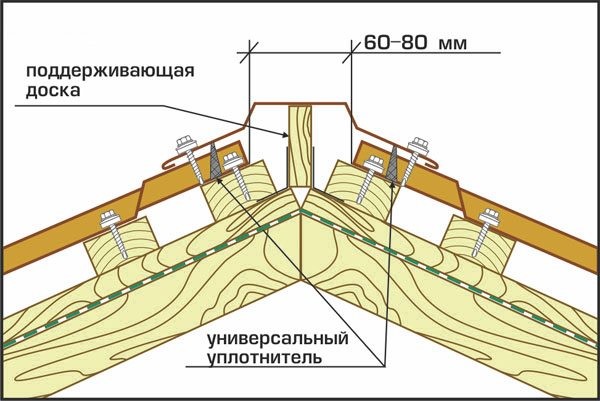
- From above, we set the horse, which is reported to enter both skates. Concrete with a board installed on the edge and fix the screws. To minimize heat loss along the skate, we lay the universal seal.
- In the joints of the plane, we put the upper endands.
- All the joints of the professional sheet with vertical surfaces cover the adjoining plates. At the point of contact, the bar and the proflist lay the lane of the sealing material. Fasten the strap to professional flooring is best long with a long self-tapping screw - it pulls out to the root and hard fixes the entire design.
Conclusion
Knowing what the rules are mounted under a straightener and how the roofing material is attached to the base, you can independently cover the roof of almost any shape and square. Of course, it is better to start with simple objects, especially since at first you will help you video in this article, as well as those tips that you can get by asking the question in the comments.
Updated:
2016-08-26
The roof from the corrugated hand is the affordable and quite budget decision during the construction and repair of a private house. The low price and excellent characteristics of the coating strength make it the most popular roofing option in any climatic zones of the country.
With the existing assortment of brands of the proflist, choose the types of profile for the roof seems to be a very difficult task. And in the photo in the catalogs do it definitely not worth it. In fact, everything is simple: the characteristics of the strength, the wave height and the metal sheet profile determines its suitability for certain operating conditions. The brand of professional flooring is important.
- mark is suitable for the construction of fences and other protective structures and is used when erecting a light roof;
- the NA brand is used for any roofing work, used for walls of buildings;
- mark H has an additional edge of the rigidity on the wave and is suitable for the roof on the capital roofs.
Such characteristics as the height of the wave also have important. All types of professional flooring have several modifications with various magnitudes of this indicator. For the construction of the roof, it is preferable to use professional flooring for a roof with a wave height of at least 2 cm.
Before work, the amount of materials is calculated and the estimate is drawn up, the calculation of the roof and the estimate of all elements of the roof from the corrugated. The price per leaf may differ, therefore it is worth consulted with specialists, measure the tilt, take into account the value of the material and your financial capabilities. Make the calculation of the material if two- or single roofingMore easily: to measure the length and width of the skate, taking into account the bias of the roof from the professional flooring, add to these standards the desired sizes of the eaves and take into account the nesting of sheets during installation (10-15 cm). On trimming, processing, all possible inaccuracies need to additionally add 5% of the total area of \u200b\u200bthe future roof. The result obtained should be divided into a sheet area of \u200b\u200bthe selected brand of professional flooring. This number is the number of sheets of material. If it happened fractional, then it is necessary to round in the biggest.
Boards for the crate should be calculated based on the height of the wave, the characteristics of the thickness of the metal and the linker of the roof: the less these quantities, the less should be the shap step. The maximum permissible step is 1 m. When calculating the holmic or multi-track roofs, it is better to resort to the services of a specialist. Estimation for materials should include the number of challenges of the roof of the roof of the corrugated, and the fastening screws.
For work, the following tools and materials will be required:
- insulating materials. Make vapor insulation for the roof of the corrugated floor must be necessary;
- proflist;
- self-tapping screws and nails;
- boards for the crate;
- electronics or disk saw for metal cutting;
- screwdriver and hammer.
The main stages of installation and knots of the roof of the corrugated floor
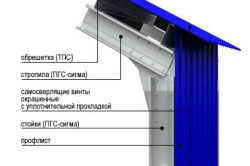
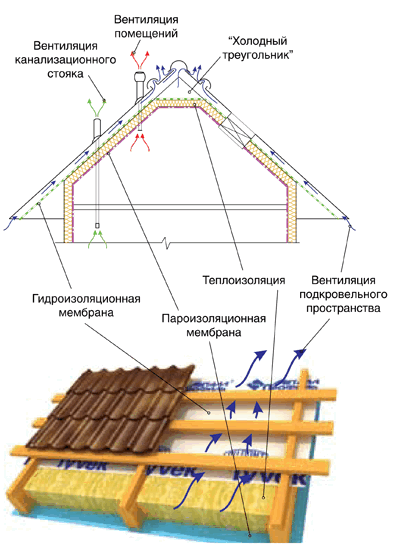
 It is quite possible to master the roofing technology of the roof. But the estimate on the roof from the professional flooring is better to compose together with a good specialist. Previously examine the bottom of the roof from the professional flooring. The roofing technology consists of several stages, on each of which certain works are performed. The roofing device from the corrugated floor is called "Construction Pie". It all starts with the installation along the cornice of the plank and laying on top of it vapor insulation, which is designed to prevent the formation of condensate on the crate and the thermal insulation of the roof. For vaporizolation, special films are used, which are rolled along the rafters, fixing so that the material resulted a little. After that, they feed the boards of the crate and laid the insulation. The next layer must be a waterproofing film again. Only after that you can move to the installation of the roof from the professional flooring:
- On simple roof rods, you need to install the ending boards. They are nailed perpendicular to the plane of the skate on each of its edge from the roof ends. Top part The boards should be located with such a calculation so that part of the wind corner overlap the brass the edge adjacent to the end of the proflist. Node diagram in fig. 1. Visually shows how elements are located.
- Laying sheets can be made from any side of the skate. It is recommended to start on the right, as this is due to the execution of the adolescence: at the beginning of work on the left side, the sheets will have to raise and apply the next 1-2 waves of the previous one. It is inconvenient, although under certain conditions it is quite acceptable. At the beginning of work on the right side, the next sheet is simply placed on top of the already laid. On the hollow roof, laying sheets should be started from her center.
- Installation of the roof from the professional flooring should be produced on special self-tapping screws with a sealing gasket, screwing them into a chute between the ridges according to the scheme: in the cornice and skate in each second chute, in a checkerboard in a step of 50 cm on the sheet area, as well as in every gutter on the spot The interface of sheets 1 and 2 rows in the height of the row, if the length of the sheet is not sufficient to cover the slope entirely. (Fig. 2.)
- Fastening the skate must begin by the opposite of the prevailing wind. Konk and other good elements for roofing from a professional flooring with an overlap at 15-20 cm. Fastening them to the professional foot and crate should be produced by skate screws with a gasket. Screw the screws into the shelves of the skate in 20 - 30 cm increments (Fig. 3.). A sealer must be installed between the shelves of the skate and a strawlist to prevent the roof and moisture into the undercase.
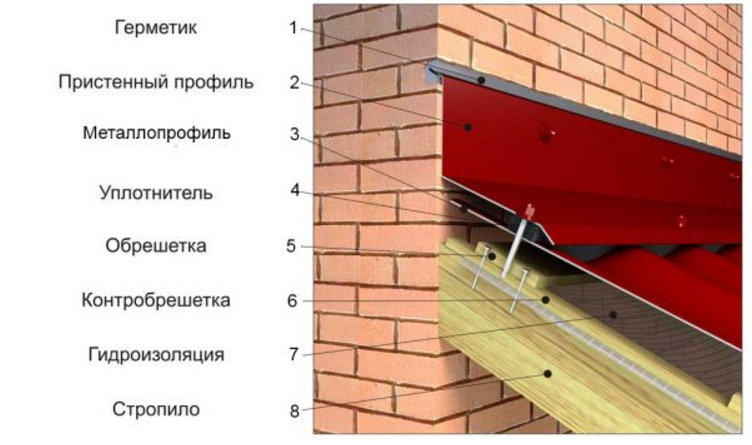
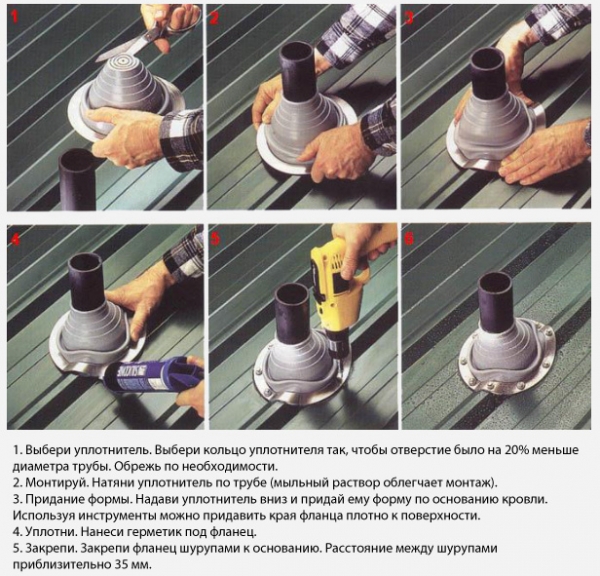
The installation of such good elements as the plane of the adjoining is performed in the places of the roof adjoining to the wall, the yield of the chimney, etc.
The bar must be installed on top of the fully mounted profilters close to the wall, laying between it and the roof of the ski seal. Fasten with self-drawers in a step of 20 - 30 cm to the wall and roof. Place the fastener on top and bottom is best in a checker order. The place where the plane is connected to the wall, loss in a sealant.
The cost of services of specialists often stops homeowners. For such cost, it is not bad to supplement the interior or purchase better material. The cost significantly affects the characteristics of building materials.
The roofing device from the corrugated hand is a time-consuming, but performing the task. Of course, during the work, some unaccounted details may be found out and the initial estimate may be exceeded, but the cost of the work will still be significantly lower than if you use the services of professionals. And the quality and final cost will depend on the thoroughness of the execution of each stage of work. Knowing exactly how to make every knot design, you can safely save. But if the only source of knowledge of the installation nuances is the usual instruction, we advise you to connect to the work of the wizard or fully entrust the process of specialists.
The roofing device includes not only the installation of the main elements, but also expands the roof coating finish by fair elementswhich give the roof a more aesthetic appearance and ensure its protection against negative external influences.
Snowmaders not necessarily mount around the perimeter of the roof, It is possible to install them only in those places where the likelihood of snow is highest. This will save material.
Mounting Snow Customer - Part 1
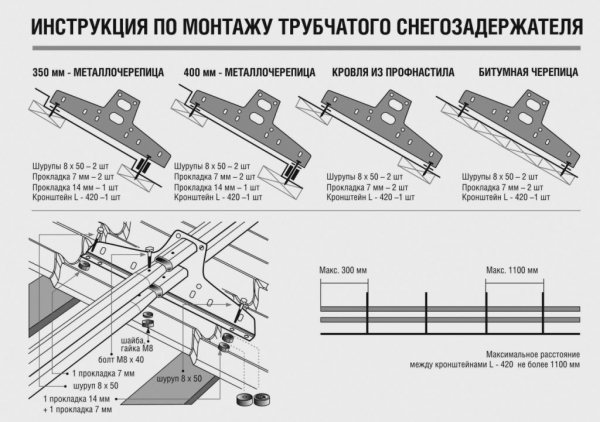
Snowplow mounting - part 2
Single Roof Dropper
The drip not only allows you to drain condensate and rainwater, but also protects inside roofing cake From penetration of ice growths in winter.
The dropper is covered with a polymer layer, so the change in its size by cutting the product with a grinder undesirable - it can damage the structure.
The product is attached to the upper corners of the rafting boardsSince it should be under the crate and other elements of roofing pie. The mount is carried out with nails or screws.
NOTE!
It is not worth confused by a cornice bar and a drip - these are different products. The cornice bar is installed on the frontal board of the crate and allows the rain moisture to drain into the drain. The drip is under the crate and drainage and performs the function of removing condensate.
Device of drip
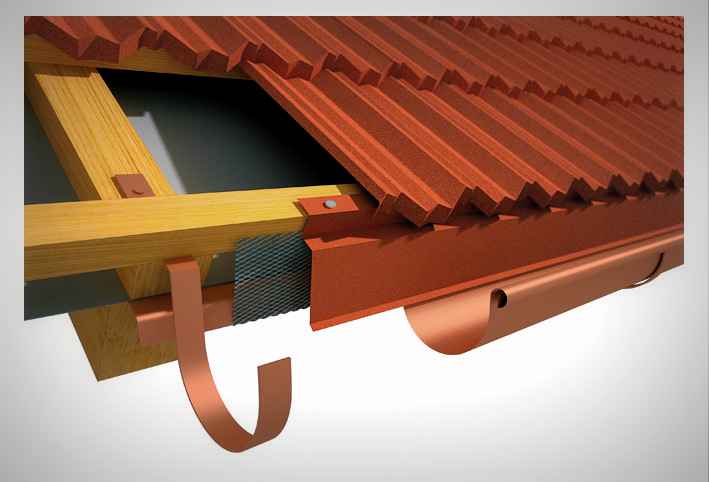
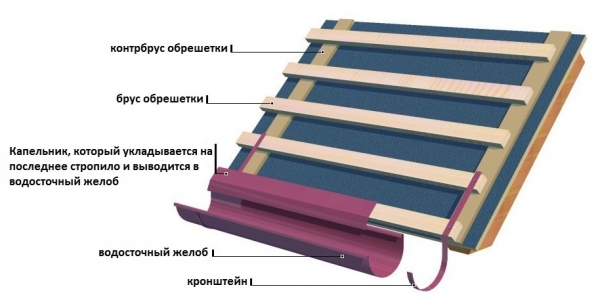
Carnise device
In addition to the cornice bar and drip, the roof cornice device from the professional flooring includes such elements as drainage and lower liner.
The drain consists of grooves, which are installed on the hooks attached to the crate on the self-tapping screw. The drain allows you to direct the liquid flowing from the cornice bar in one specific direction.
Thus, it prevents the wetting of the crate and other construction designs.
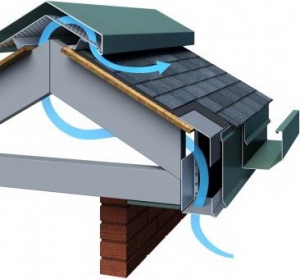
The cover of the roof of the roof of the roof is performing two functions: protects the lower edge of the eaves from moisture from entering and provides ventilation of roofing pie. These materials are coping with such materials such as Sofita, Siding, Profile.
For the roof of the corrugation optimal material The trim is professional flooring, but other materials are not excluded. The ventilation provides small holes made throughout the design area, or separate blocks of larger holes.
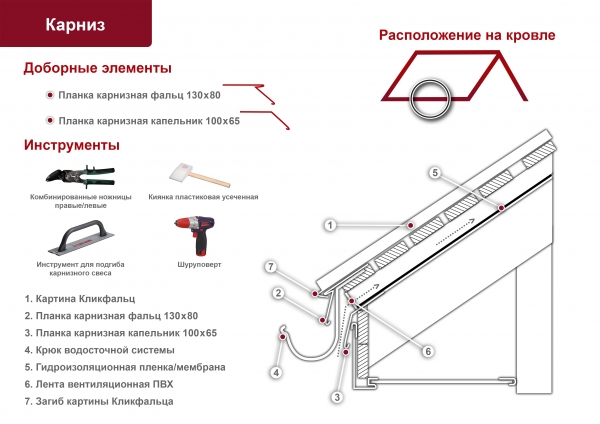
Carnise device
Sealing the skate and knots of the roof of the corrugated
Sealing the rod of the roof from the professional flooring from moisture and dust it is performed using skate slats and seals. Seals not only protect the roof from moisture, but also have good fire resistance and sound insulation. They are attached to the edges skown Plank. So that during its installation a trapezoidal structure is formed, where the side faces would be represented by the sealing material.
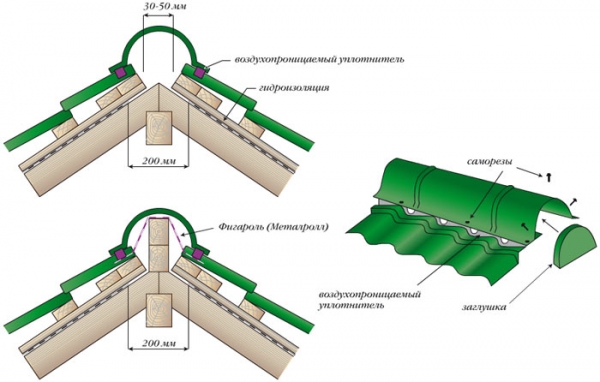
The device of the ridge of the roof from the corrugated
To install the skim plank on the upper edges of the crates, additional boards are mounted. Also at the place of the joint of the two-ropes is installed supporting board, Which is attached to both skates on the self-tapping screw with metal plates in the form of blunt corners. The skating bar is attached to additional boards on the self-tapping screw through the sheet of professional flooring.
Node of the passage of ventilation through the roof from the professional flooring is dobly elements that are performed in the form of pipes or valves. Their appointment is to increase the speed of the air masses in the space of roofing pie due to the differences in pressure in inner space And outside.
Pass of the air duct through the roof of the corrugated
Passages are set after the installation of internal ventilation is completed and must be directly related to its system, that is, pass through the roofing and the space of roofing pie.
Useful video
Installation of volunteers for professional flooring:
In contact with
On the modern market building materials There are many species roofing: Ceramic I. bituminous tile, Ondullin, Mtalchurch, profiled sheet (professional flooring). Each material has its advantages and disadvantages. Nevertheless, the attention of developers more and more attract the roof from the proflist.
Cover the roof of the professional owl is profitable, as it has the following operational characteristics.
- fast I. easy mount professional leaf, possible even at low temperatures;
- low cost;
- light weight, transportability;
- high fire cheap;
- resistant to burning in the sun;
- can be used when the minimum is 8º;
- low operational consumption.
There are several types of professional flooring depending on their thickness. The bearing professional is used to cover the roofs of garages, warehouse and economic premises. He needs ceiling overlapto which you need to do concrete screed And then kpped rolled material. The walls of the professional flooring are used for the construction of fences, partitions, cladding.
And the third type is used as roofing. In addition to the usual galvanized, manufacturers offer a professional sheet with a polymer coating from different colors. If you have already done, the supplier, as a rule, can cut the sheets of the desired length to 6 meters.
Device of roofing cake
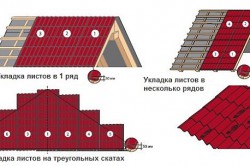
When the roofs are long enough, the laying of the professional leaf is made in several rows. If there are drainage grooves in the professional flooring, the mount is carried out as follows: on the first sheet of the bottom row, we put the first sheet of the second row of the pectorist 20 cm, then the second sheet of the lower row and the second sheet of the second row. It turns out from the professional flooring, which are connected to the following such nodes. However, in the absence of drainage grooves, the nodes are collected from three sheets: one sheet from the second row and two from the bottom, then one from the bottom row and two from the second.
Calculation of roofing material
In order to determine the consumption of the material, you need to know the skate length and the perimeter of the construction. Since the professionalist is lightweight, the consumption of wooden boards (bars) 50 * 50 mm or 50 * 100 mm will be less than with a solid crate. For fastening, you will need 35 mm with a length of 35 mm, for 80 mm nodes and screws with a rubberized washer. Fasteners are made in a wave deflection.
In order for the consumption of the material as little as possible, try to buy professional clothes, the length of which will correspond to the length of the skate, plus the nearest sv. Then there will be no horizontal junctions through which rain and snow water can be seamless. If the length of the skate exceeds 6 meters, and the angle of inclination is not more than 14º, then the fastening of the professional leaf is carried out by the brass 20 cm, which must be taken into account. At the corner of the skate of 15-30 degrees, observe the totaling of 15 cm, and with the larger angle of inclination - the backstage is 10 cm. It is possible to start laying from any lower angle.
In addition, making the calculation, do not forget about the insulation, waterproofing film and additional elements, for example, horse, endanda, etc.
A task self-mount . With this material, you can make a reliable coating on the roof, and highly budgetary. It will look modern and attractive for many years.
In order for all work to be conducted qualitatively, it is necessary to study the technology of laying material and its features, take into account the SNiP, know what kind of roofing nodes are from corrugated.
What proflist to buy for the roof?
- To do right choice Among the variety of options for metal sheets, you should pay attention to the height and shape of its wave. That material, the wave in which has a height of less than 2 cm, is designed for decorative purposes. If this figure is higher, it means that the professionalist is intended for constructive purposes. For the roof it will fit.
- The next thing is recommended to pay attention to when choosing a roofing coating from a corrugated floor, this is his brand:
- for light roof: brand sheet C8, C10, C13, C18, C21, C25, C44; The waveform may be sinusoidal or trapezoidal.
- for roofing and arrangement of walls: NS35 and NS44.
How many sheets of professional flooring will be needed for the roofing device?
There are two types of professional flooring: wall and roofing. The wall professional flooring is usually a smaller wave height.
- First of all, making the desired measurements, calculate the roof area. To do this, learn the length of the skate and its width.
- To the skate length add the desired width of the eaves.
- We take into account that it is made with the allen 10-15 cm.
- We add the necessary "stock" - 4-5% of the total area of \u200b\u200bthe roof.
- We choose a brand of professional flooring, calculating the area of \u200b\u200bone sheet.
- The digit obtained as a result of calculations of paragraph 1-4 is divided into the figure obtained in clause 5 and find the desired number of sheets of professional flooring to cover the roof.
If the roof is not a double, independently make the calculation of the required material is quite difficult. Specialist services will be required here. But you can do and as follows: Perform measurements of all skates loan roof and take advantage of a special program for calculating roofing.
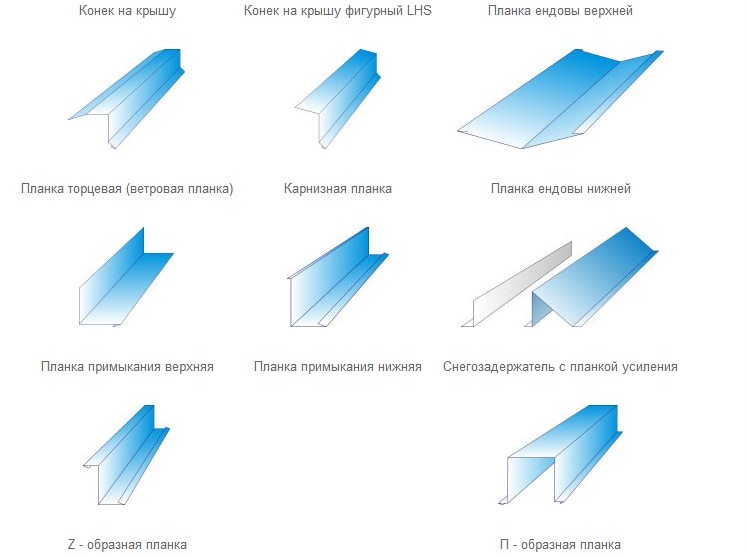
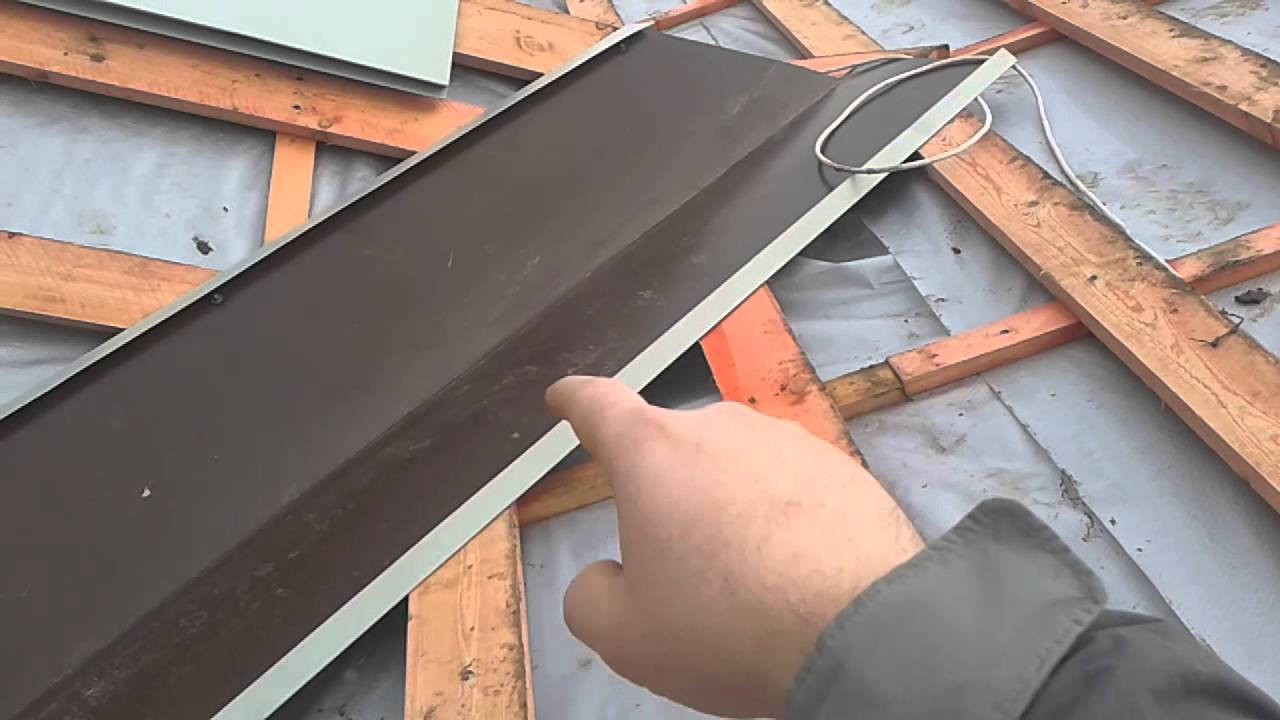
- Face plank. Designed for the finishing of the edge of the sheet of professional flooring. Fastened to it in two ways: either exactly in size or brass. The first wave of the proflist is closed with an end plank more than 5 cm. Refine the side with roofing self-drawing, and from above - skate. Installation end planks Produce before laying roofing material.
- Farmery plank. Performs a protective function: prevents water from entering the facade of the building. It is installed with an overlap for at least 10 cm. Mixed to the last board of the crate with the help of roofing screws of one color with a straightener with a step of 30 cm.
- Lightly plank. Designed to give the aesthetic attractiveness to the skate element. Located directly under it. It is important to secure well (screws) with the help of a light-free strap either sheets that are under the skate.
- Naschelniki: angle outdoor, angle internal, plane adjoining. Fasten after the installation of the roof will be produced. Performs not only the role decorative elementBut also protects the places of compounds from moisture and dust. Planks of the adjoining are installed in the places of the junctions of the roof and walls, pipes and roofs.
- Endow. Designed to connect roofing rods with different slopes. Installed before installing roofing. UNDODS perform the role of waterproofer.
- Snowstander planks. Mix at a distance of 30-35 cm from the cornice. In the event that the length of the skate exceeds 8 m, additional synchtercing planks should be installed.
- Konk. Connects the top sheets of roofing rods and protects the top line of the roof fracture. Always attached at the upper points of the warehouse of the professionalist. Between roofing material And the skate should be laid a sealing tape. Seams can be filled with sealant. The skate elements have different configurations for different roofs.
The main stages of the installation of the roof from the proflist
- Installing the crate. Boards are used, the thickness of which depends on the height of the wave of profiled metal products. If a sheet with a wave of medium height and thickness of more than 0.7 mm is selected, then the boards are stacked with a step of 150 cm. If the wave is low, then the lamp should be practically solid.
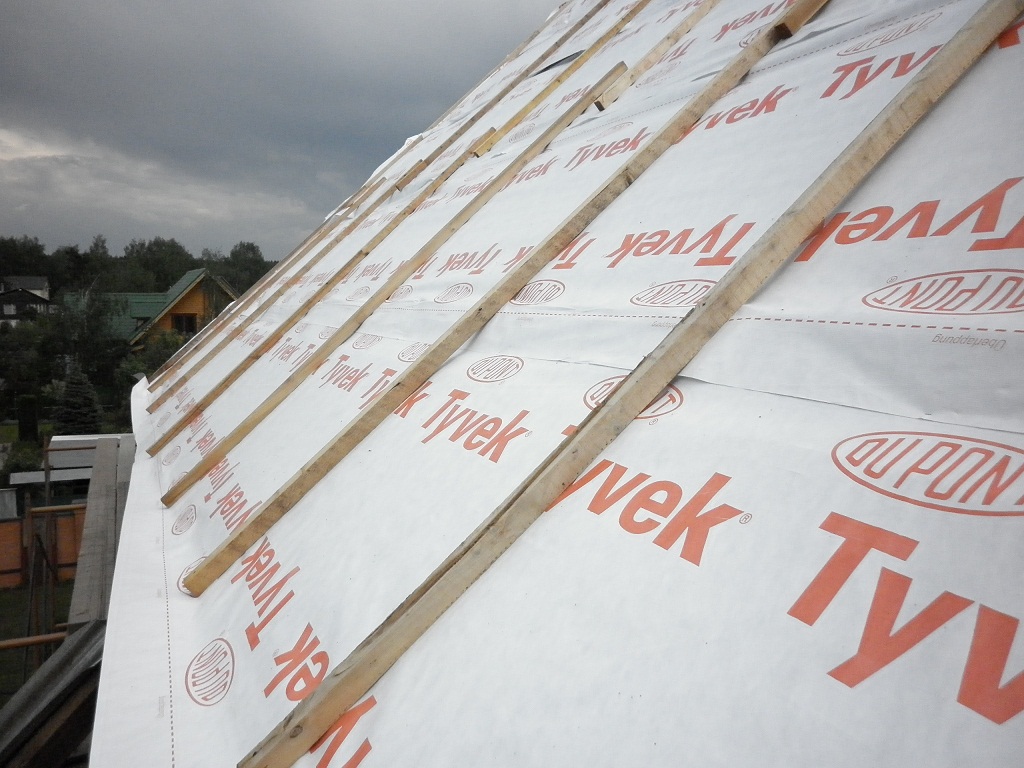
- Waterproofing device. The membrane is rolled in such a way that there are small saggings in the intervals between the rafters perpendicular to the roof slope. Claimer: The manufacturer's logo must remain outside. The waterproofing material must be laid with the allen, the joints of the joints should be sampled by the SP-1 ribbon.
- Installing a counterbalax. It is performed using wooden boards or bars. The counterclaim fixes the waterproofing membrane and simultaneously serves as ventilation. Installation steps:
- You feed two boards of the same thickness one to another one on the cornice sink. Usually use boards with a thickness of 5 cm.
- The waterproofing membrane should be displayed on these boards.
- We establish perpendicular to the shellboards of the Wooden Details of the counterclaim. For endand, it should be solid.
- Endament device for broken roofs. This is a roof element that is inner anglelocated at the junction of the skates. Depending on the design features of the roof, the upper and lower rtands are distinguished. The bottom planks are installed on top of the counterclaim. Top planks serve for decorative decoration Roof. They are fixed after a professional owl is laid. The main purpose of the endand is to protect the joints between the roofing nodes from the penetration of dust and moisture. Endow is fastened with self-reserves with seals to prevent water leaks in places of compounds.
Roofing Device: Fresh Professional
- Roof movement rules:
- it should be hoping only soft shoes firmly fixed on the legs;
- we occur in the deepening between the waves;
- the professionalist has a rather sharp edge, so when working with it, we use gloves.
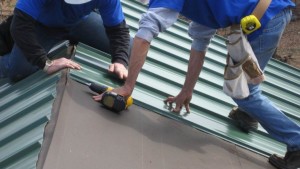
- Installation of the professional sheet:
- installation begins from the bottom: the first row of sheets is laid on the entire width of the skate;
- the laying is made by 1-2 waves. Thus, there is a prevention of moisture penetration into a subcoase;
- roofing screws with rubber gaskets are used as fasteners;
- the professional sheet of the upper row is laid in the bottom with the distance between their edges of at least 15 cm;
- self-tapping screws are attached only in the deepening between the waves. It is important not to drag the fasteners not to deform the professionalist and not damage its coverage.
- Installation of the skate element;
Fall during its laying is 20 cm. This node is especially important, as it performs the main decorative function. If the inclination of the roof is small, it is advisable to use the seal. Start a skate device from the side that is least susceptible to winds.
- Installation of layouts of adjoining and cornice planks.
The layers of the adjoining first is installed from the bottom of the pipe: apply and mark the top edge of the plank. Stroke and rinse seam. The edge of the adjoining plank is inserted into the stroke, seal and fastened to the crate. On top of the cornice bar, the waterproofing membrane is removed, fixed with a connecting ribbon and attach to the profrete. Places of adjoining in the roof from the corrugated floor are most prone to leaks. Therefore, the installation of the slats should be high quality.


