Instruction
First of all, decide on the location and type of future building.
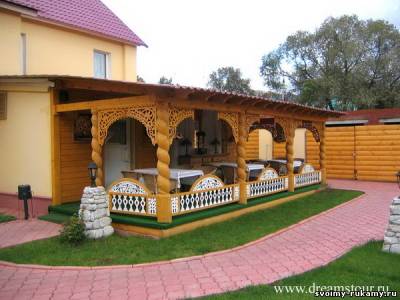
The terraces can be open (without specially elevated roofs over them), and closed (there is a roof on them). Open terraceSeveled with fusing plants and flowers, will decorate your home. But the roof installed on the closed terrace will protect you from rain and scorching sunlight.
Best when the terrace is adjacent to housethat provides access to it directly from home. If it is impossible, then exit from home and terrace You can connect using the gallery.
Outside the walls of the veranda, cover the edged board. On the inside, put waterproofing and insulation. Load wooden shields, which in the future it is supposed to be lifted with the clapboard.
For device single Roof On a wooden crate, adjust the polyethylene film. At the top, put ondulin, chosen in the color of your house roof.
Video on the topic
You can decorate the veranda with a carved ornament made of wood or plywood.
Evening family gatherings for tea on cozy veranda country house - What could be better! After all, the veranda is not only home decoration, but also a place to relax and leisure. And how to decorate it, so that she brings you not only joy, but also comfort?
Instruction
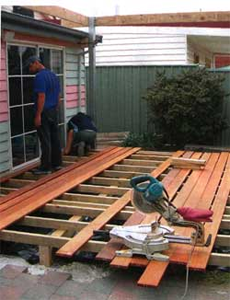
Next to the queue floor. Discove into the ground round wooden columns, Put the lags on top, and then reconnect the boards. You can warm the floor in the veranda, laying the linoleum on a warm-based basis.
Insert the windows. It is better to install plastic - with them fewer troubles. Yes, and warmly keep well.
Again go to the walls. Cement-stretched walls can be blocked or shove wallpaper on them. As a result, you should get a spacious, warm and bright veranda. The warmer brick will be a veranda laid out to the saman. But this material is practically not practically used.
The veranda is an additional residential area of \u200b\u200bthe country house; The construction is so popular that it is difficult to find building in garden partnerships or cottage villages that would have done without it.
Sooner or later, any owner comes to the conclusion that he basically needs a veranda, or I want to build another one.
The veranda can be both a continuation of the porch and an independent structure in which they fall from the interior of the house.
In this article, you will be offered one of the options, how to build with your own hands under one roof with an existing home.
Where to begin?
The construction of the veranda is worth starting from the selection of the material.
If it is really planned to carry out all the work independently, without attracting additional labor, it is necessary to abandon the use of round woods with a thickness of more than 15 centimeters in diameter and boards thicker than 40 millimeters.
The optimal choice will be the use of the finished bar "dozens" (10 per 10 centimeters) and a cutting board with a thickness of 40 millimeters, the width of all the same 10 centimeters.
It is not necessary to choose the dry material at all, but if it is, it is better to use it.
When determining the size of the future veranda, it is necessary first of all to navigate the size of the house, but it is worth considering another circumstance. The usual size of any lumber is 6 meters long.
Therefore, in order not to throw anywhere not suitable pieces, you need to put fit into an even number of cuts. For example, a veranda 6 is 3 meters, or 3 by 2 meters - options can be continued.
Ideally, it is better to do at least a simple drawing of the veranda before starting to build.
After determining the material used and the size of the veranda proceeds to its marking on the ground and the foundation device.
Foundation for veranda
The veranda is a very lightweight structure, so there is no need to build a tape concrete foundation under it.
What the veranda will be relying on, will correctly call the "base."
And the base of the surface embedding.
It is best for this to use ready-made concrete blocks - the so-called "custoders" having the shape of a truncated pyramid.
When buying in the store, blocks need to choose such that they can be raised without much voltage alone.
If there are no, even the old wheel discs from the truck filled with concrete solution will be suitable.
So that the veranda does not bother the powers in the first winter, it must be arranged absolutely "autonomously" from the entire design of the house.
The distance from the capital wall to the wall of the veranda must be centimeters 10, as you yourself do not know how to donate the house in winter (and this will make it necessary), but 10 centimeters will be just enough so that the capital walls cannot put pressure on the veranda.
With the markup of the base, the veranda is used in the same way, which was used in ancient Egypt using numbers 3, 4, 5. In the place where one of the corners of the veranda adjacent to the wall of the house will be clogged.
Along the wall using a cutting board with divisions from 1 to 5 (the distance between them is not important, but it is not worth it too much), noted at the level of the mark "3" the position of another quiant.
Now we must try in the direction of the intended direct angle to note another 4 divisions of the same measuring board. If the distance between additional pegs is equal to five divisions, then the angle is absolutely straight.
Thus, the position of the external corners of the veranda is placed, after which it is necessary to carry out additional checks on the equality of diagonals.
After that, on the placed places, the turf is removed and the shurt is shurt in the depth of the bayonet shovel. It is filled with gravel or rubble to the top, after which it is leveling horizontally and a bit trambed.
Foundation blocks are stacked on the prepared pillows. Aligning them relative to each other along the horizon at this stage is not required, waterproofing can also be neglected.
Once all the foundation blocks are laid, it is necessary to decide how high the base of the veranda.
The height of the base of the veranda depends on the two parameters - the floor level in the house and height of the ceiling of the future veranda.
Usually, the floor of the verandas are arranged at the same height as the floor of the house, but if we do the veranda "autonomous", then its rafter system should fit under the front of the roof of the house with the calculation so that it can be, not breaking anything, to mount the crate and roofing material .
If the corner of the roof is planned to do the same as the main roof, the ceiling height of the veranda can drop to one and a half meters, if the floor of the veranda is at the floor level in the house.
Therefore, the foundation of the veranda is best to do low, and the entrance to the house from it is equipped with an additional staircase.
On the prepared foundation bases arrange supports with a height equal to the selected base of the base of the veranda minus the thickness of the mortgage bar.
Columns can be lined with bricks on cement mortarBut it is quite suitable for dry sinking logs (ridges) that have no visible signs of rotting.
From the foundation base, both types of columns must be separated by a layer of waterproofing. For this, two layers of rubberoid are quite enough.
Wooden parts close to the ground should be treated with water-soluble antiseptics.
The upper edges of the columns must be aligned horizontally and form a single horizontal plane. If you have a laser level, then this operation will pass more successfully.
It is not worth upset if it is not possible to absolutely align all the columns: discrepancies in 1-2 centimeters are quite acceptable, these flaws are eliminated when the base base is tab.
Base bookmark veranda
The base layout of the veranda is that all base columns are binding to a bar into a single design.
First, two bars are placed along the long side of the veranda and the final alignment is carried out.
We carry out this by making and cutting the shallow grooves (traditional path), as well as the lining device from the boards.
The second method is preferable because it does not lead to a weakening of the structure.
Mortgage bars must be protected from columns with waterproofing and impregnated with antiseptic. The transverse bars are stacked on long mortgages and are connected to them by the method of writing "in Polterev".
In the four main corners, the veranda will not be superfluous to combine them with the help of a construction bracket. After that, there are two more long bar and two veranda on the outer walls.
They are also connected "in Polterev", and with lower Venalty Located with nails 200-250 millimeters. After that, the base of the veranda with finished lags of the floor is quite ready.
Construction of walls and roofs veranda
For the walls of light veranda use a cutting board with a thickness of 40 millimeters and 4 bar in the corners.
Immediately posting their necessary height should not, we only need to decide on its maximum value (from the upper bed bar to the edge of the roof rope).
First install angular bars. For this B. angular connection Mortgage bars find the groove on the junction and expand it to the thickness of the board (40 mm).
Brusted the bruises of the board and insert it into the groove. They clog the nail ("weaving" for this little, at least 120) the painter into the mortgage bar so that the corner stands without support.
Thereafter corner Bar. Align the vertical and secure in such a position by temporary slopes.
Further along the entire length of the mortgages, the bars make uniform cuts to a depth of no more than 2 centimeters width of 40 millimeters. More than one meter is not worth noting, since the frame racks are also formed by the size of the alleged windows.
They are installed in the wall frame boards and are fixed with one nail. After that, each rack is aligned vertically in two directions and is fixed by temporary slopes from the boards.
When a temporary slope device, the side of the triangle (catat) must be at least half a meter, otherwise the hard fixation will not work.
For this, a long edged board is taken and is temporarily nailed at the required level. Hats of nails can not be saved.
After leveling horizontally, its position on the racks is marked, and the board is removed. The markup makes the cuts in vertical racks on the depth, equal to the thickness of the strapping board, and make grooves.
In three sides, the veranda of the strapping board is installed outside, and on the wall adjacent to the house - from the inside.
Then the vertical racks can be fixed by a constant fastening for which metal fasteners are used.
Corners are best fixed with screws in paint. In total, the veranda belt should be three horizontal strapping belts: the second - at the level of the top edge of the windows, the third - support for rafter system and ceiling veranda.
The rafters are placed after the device of the second belt of horizontal strapping. This will give an idea of \u200b\u200bwhere to place the third belt.
To do this, it is enough to temporarily nourish the cutting board and visually check the correspondence of its position to the desired inclination of the roof.
 After the device of the third belt, the strapping and the device has rafted the remaining ends of vertical racks can be disappeared.
The roofing of the veranda is no different from the roofing device in the whole house.
The formed veranda frame is finally fixed everywhere, where possible, the same metal corners on the screws, after which temporary slopes are removed.
In a place where the entrance to the veranda is assumed, the board of the first horizontal strapping is scorn between vertical racks.
After that, outside and inside the framework of the veranda can be seen by any finishing material: clapboard, siding, block mobile panels. A porch or an internal staircase is attached to the veranda.
About the future it is worth taking care in advance. It is possible that in a few years they will have to sell, give or rent vacation homeAnd then you will need documents that confirm the legality of an extension. In the opposite, you will have to pay a fine and get the same papers, but more complex and long ways.
Create a draft veranda
First of all, you should contact the design organization so that according to the sketches made up drawing and the project of the future structure. In this case, there is no difference how the veranda is built at the cottage: do it yourself or with the help of a construction organization. FROM ready project, a statement, passport and documents confirming the right of ownership, you will have to visit several important instances and wait for coordination, after which you can start construction. The last legal barcode is a new registration of the house upon completion of the work.
Before visiting a project organization, you should create a sketch of the proposed veranda, where you need to specify the exact dimensions and location of the doors and windows
In addition to the documentary, there exists financial - the purchase and preparation of building materials. The main principle consists in accordance. For example, if the house is built of glued bar, then the extension should also be made wooden. The veranda attached to the brick building must be completely or partially made of bricks. Absolutely unacceptable combinations such as brick and foam blocks or wood and siding.
The main stages of construction veranda
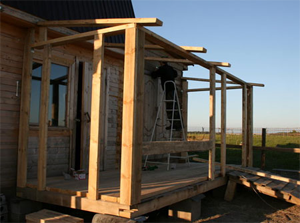
One of the options suitable for independent construction- wooden frame veranda Closed type. Fundament device, wall construction, roofing Do not require large material investments and the use of construction equipment.
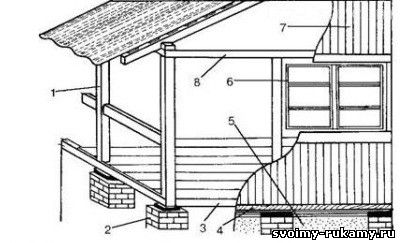
Scheme of component parts of the veranda: 1 - racks; 2 - foundation pillars; 3 - lower strapping; 4 - draining; 5 - Baby; 6 - double-glazed windows; 7 - lining clapboard; 8 - upper strapping.
Created drawings created by their own hands will help provide for any nuances and avoid mistakes. For example, the quantity, dimensions and location of double-glazes should be calculated in advance.
Stamp Foundation for the veranda
After the upper layer of the soil is removed and markup is made, proceed to the construction of the foundation. Excellent if it is an analogue of the foundation of the house, but it is not always possible. The simplest and fast is the column version.
To install columns use different construction material: Red funny brick, white silicate brick, concrete blocks, reinforced concrete beams, homemade concrete structures
Sequence of work:
- around the perimeter (necessarily - at the corners) of the future extension holes are digging for pillars depth 1 m;
- at the bottom of the pit, gravel and sand pillows are arranged;
- produce waterproofing (bitumen);
- make a 15-centimeter concrete basis;
- early bricks from conventional masonry.
The height of the posts is calculated, based on the height of the floor at home. So that at the end of the construction of the roof of the veranda fits under the coast of the roof of the building, the floor of the veranda is about 30 cm below than the floor of the building.
Build frame veranda
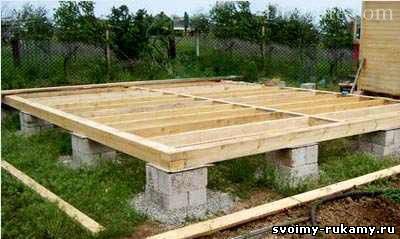
Creating a solid and stable frame for fastening wall elements is an important stage in the construction of a wooden veranda with their own hands. Perform the lower and upper strapping, the material for which is served logs (diameter 12 cm) or bars (8 cm x 8 cm, 10 cm x 10 cm). The connection occurs with the help of the "direct lock".
Construction of the extension framework is better to start with more powerful angular elements, gradually moving to the rest of the details - vertical and horizontal beams.
![]()
Having arranged the lower double strapping, the lags are embedded at the level of the 2nd log and install racks that are fixed with metal brackets and nails. At the top to equip the second strapping and install rafters. The upper ends of the rafters are connected to the beam under the row of the roof of the building. Bolts are used to connect horizontal elements and racks.
Build walls and roof veranda
How to make upholstery of veranda walls so that the framework sustain the weight of the design? For this use relatively lightweight materials - lining or boards. Each type of wood material has its own installation features. For example, as horizontal arrangement The elements (which is preferable) the lining is customized to the plank to the bar, and the boards are connected to the brass.
If the veranda is erected simultaneously with the construction of the house, one-piece roofing coating is used: the roof of the house smoothly goes into the roof of the veranda
On the inside, the heat-insulating material is laid in the form of plates or rolls. The decoration of the room is performed using drywall or chipboard panels. Decor options internal interior Many: Registration depends on the purpose of the veranda.
The configuration of the roof of the extension has several options, but the most popular is the one-sided type of roof - simple performed and, as a rule, perfectly combined with the roof of the house. The rafters are located under the tilt: the upper ends are fixed under the skate, the bottoms are based on the walls.
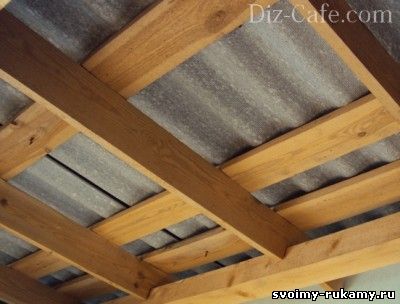
There are two options for design. ceiling overlaps: In the first case, they are sewn them, in the second - left in open form
As roofing Use the same material that was used for the roof equipment of the building. It is important that texture and color coincide. Usually, when they build a veranda with their own hands, the material is used, easy for installation, for example, soft tile, metal tile or rubberoid.
ORDER OF STOCK ROBEROD ROOF
- to the rafters fasten the boards in such a way that it turned out a dense flooring;
- the brackets rolled the regurgids cannon, fixing the edges of galvanized nails;
- additionally fix the coating by rails located at the same distance one of the other;
- the lower edge of the roofing is sweeten and drive.
Floor coating veranda
The best floor material is a wooden treated board with a thickness of about 30 mm.
Choosing a tone for painting a wooden floor, most often stopped on translucent paints, preserving a natural textural wood pattern.
The width may be different, but usually take the products about 85-120 mm. Boards put on lags using thermal insulating layer. The upper surface of the floor should be smooth and smooth. Each item is treated with a protective agent, and after laying is covered with paint or varnish.
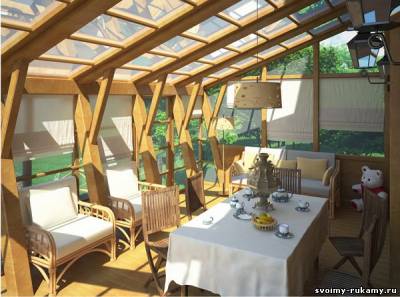
A closed veranda is a full housing, protected from weather trouble. Having thought out the appropriate interior, it can be turned into an office study room, a rest room, a dining room or a game room for children

The veranda in the country can be built using ready-made double-glazed windows. Their sizes depend on the total area of \u200b\u200bthe room and the degree of illumination. The greater the glass, the easier it looks like a ready-made structure. Especially good sliding structures that allow in warm time to turn closed veranda openly.
Construction of veranda video
An extension to the house will not just decorate your country cottage areaBut will allow you to enjoy a delicious meal in the fresh air to any weather. So as not to go around yes about, immediately proceed to step by step instructions Building veranda with their own hands.
Instruments
- a hammer;
- 4 meter level;
- yamobur garden;
- drill;
- a circular saw;
- shovel;
- wheelbarrow;
- rope;
Marking
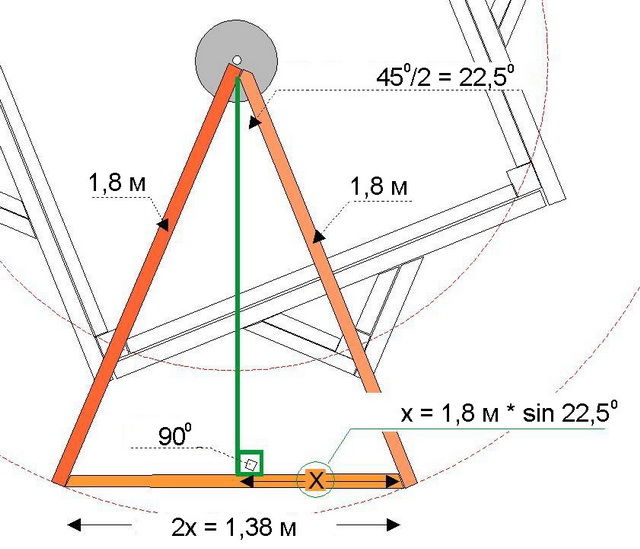
The diameter of the console formwork of the future veranda will be 3.6 m. Mark the distance from the house to the place where the central backup will be located - 1.8 m. In this place to drive the peg. Tie a rope with chalk at the end (or just holding it in your hand) and draw a circle with a radius of 1.8 m and the second one - 1.2 m (or mark it on Earth what you are comfortable). Do not forget to use auxiliary photos and video so that the veranda does with their own hands is built right from the very beginning.
Now you need to note the places for each of the 8 reference pillars. The first peg lead to the right of the exit from the house on the veranda (on the line marked earlier than 1.2 m circle). Further, counterclockwise, stretch the rope for 45 degrees - Wheel the second peg. Return to an angle of 45 degrees, lean the peg. And so 8 times. The last peg you will eat to the left of the exit of the house on the veranda. As a result, you should have it so that the distance (45 degrees) between the pegs 1 and 2 covered the doorway (exit to the veranda). Let the rope in a circle, tieting it to each of the 8 pegs.
Central pillar

Highway a hole (hole under the post) depth below the level of the landscape of the Earth is about 1 m (in the northern regions 1.5 m). Over the finished hole, place a pipe with a diameter of 25 cm. For these purposes, you can use a drainage or special casing. Before pouring cement to her, shorten the pipe so that the formwork lay down on its top edge. Prepared concrete pour to the top of the pipe. In the center insert a bolt with a length of 10 cm (top legs).
Other pillars

Now dig the wells with a depth of 1-1.5 m in the place of each of the 8 pegs. Insert the casing pipe with a diameter of 15 cm so that they look out for 8 cm from under the ground.
Alignment of the backup

In order for the construction of the veranda to give the perfect result, accuracy is important. Before pouring the concrete in the pipes, you need to set up the pipes to the top of the pipes in such a way that they formed the sides of the square. Fill pipes at number 1 and 3 (the first line of the future square (1-3-5-7)), then 5 and 7 (second edge) - odd messages. Further even - 2 and 8, then 4 and 6 (the second square (2-4-6-8)). Filling with a pipe with a solution, make sure that they are located so that in the future it turned out 2 squares (see photo).
Opal

Using self-tapping screws and holes in the backups, fasten the vertically located bars on each of the 8 prepared pipes. The height of each of them should be at the level with the central backup. Next, from the outside of the bars you need to attach 8 boards in such a way that the square (1-3-5-7) came out, each side of which consists of two boards, as shown in the picture. Next, out of 16 boards you need to make a second square (2-4-6-8), but in such a way that inside the first there are no edges of the second - so that the angles are only from the outside (as in the photo). As a result, you will have an 8-square - the base of the formwork.
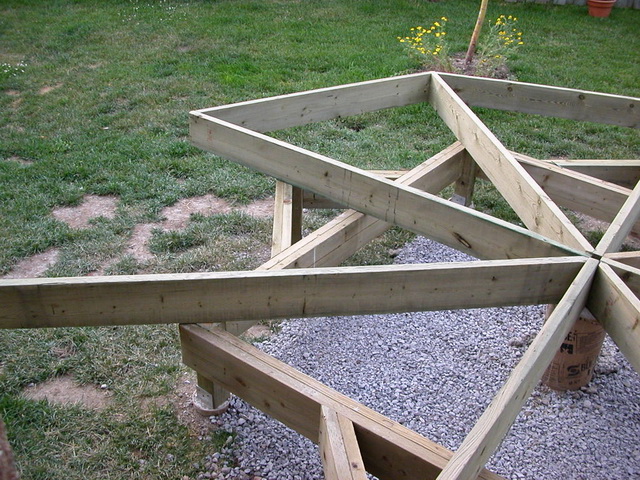
Leading boards

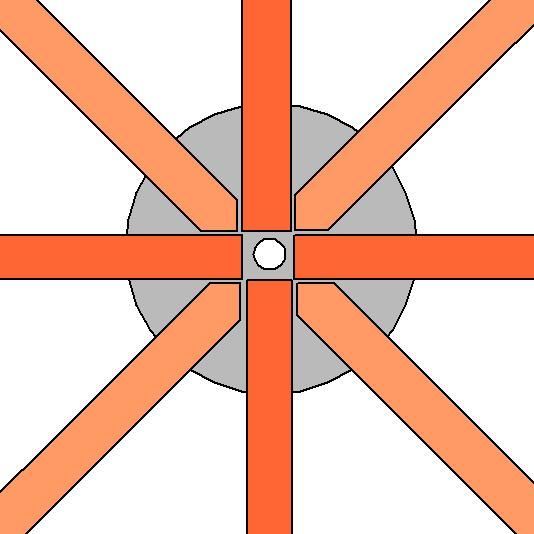
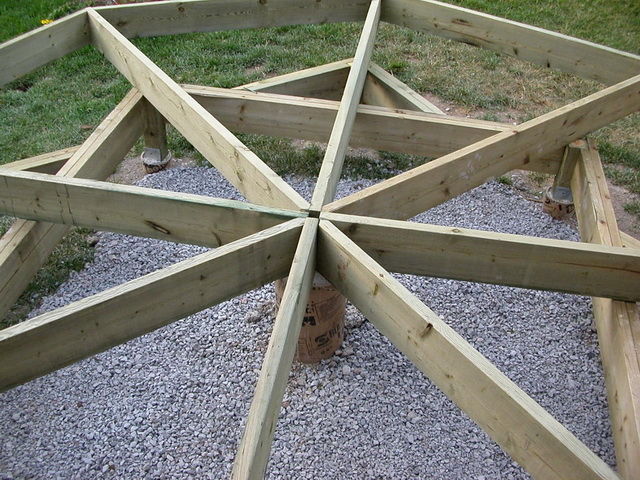
Next, you will need 8 leading formwork boards (1.8 m long), each of which, starting from the central pillar, crosses the point of each 8-coal angle. Each board is sitting at an angle of 45 degrees from the neighboring. It is worth noting, 4 of 8 beams have a peculiar form from the central backup (as shown in the figure) - for a dense landing.
In order for the construction of the veranda with their own hands, use the drawings provided. They will help in the next step - end beams.
Facial beams
If everything was done with the extreme accuracy, the ends of the end beam must be cut according to the scheme to come together with leading boards. Guide the rule "Seven times will die, once again."
When all end boards are installed, see for accurate location of the leading connections (center). If necessary, correct.
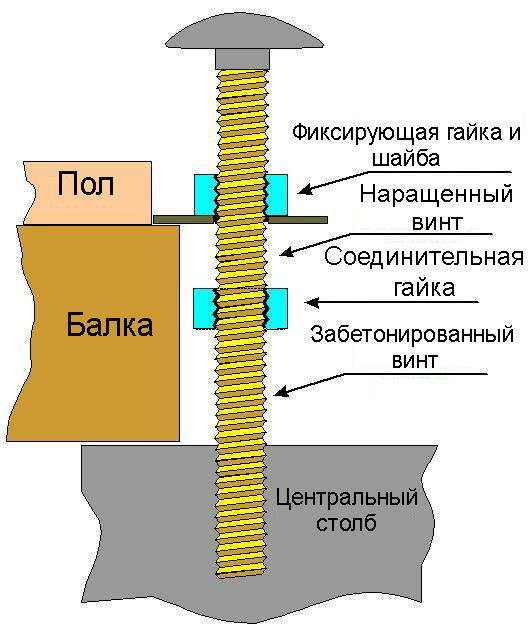
Now you need to make the drive boards: since 10 cm bolt is too short to climb over the level of boards, to it, with the help of a nut, attach the second bolt with a wide hat. But before that, on the second bolt, screw another nut and a large diameter washer. And then and connect.
Earth under the formwork Pull the gravel with a thickness of about 5 cm.
Of course, wooden veranda I'm not ready yet. Go to the next step.
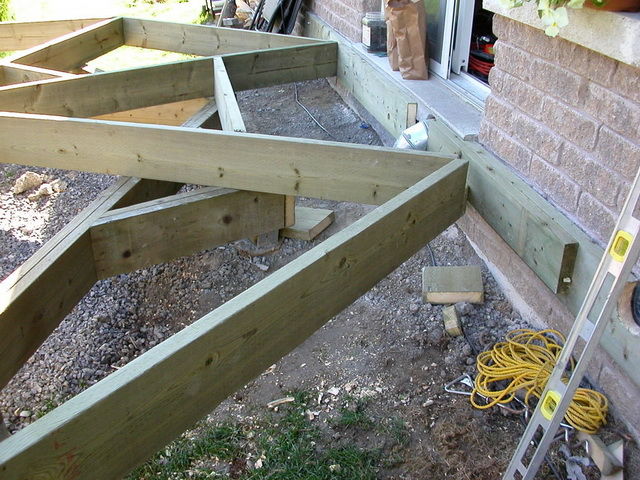
Cross beams

In each of the 8 sectors, 3 transverse beams are installed: the first two from the center in one distance (40 cm), the third separates the remaining space. It turned out 4 sections. We leave the first as it is, the second we divide in half perpendicularly located the beam, the third - two, fourth - 4. And so with each sector.
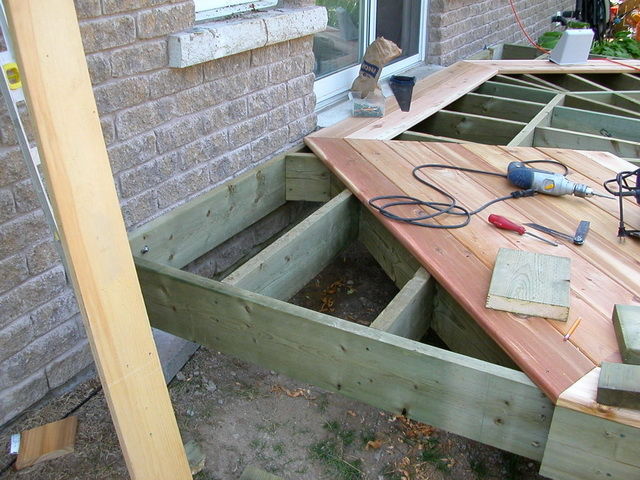
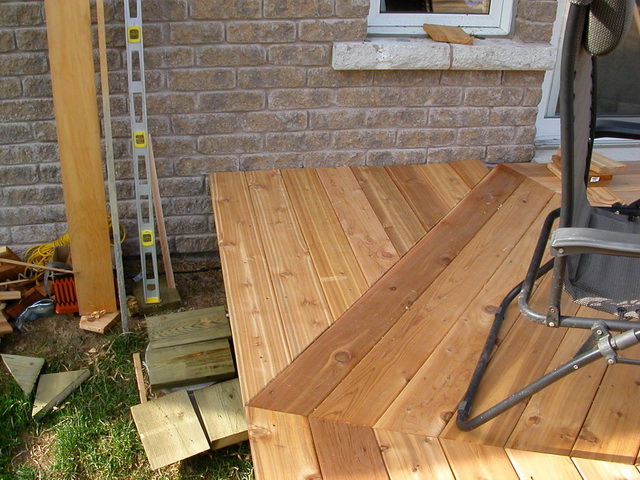
Floor

To summer terracedone with your own hands, had a beautiful view, you need to choose a good flooring, for example, cedar flooring. Start laying boards from the outer edge to the inner, using screws. The first row should be 2.5 cm for an end beam.

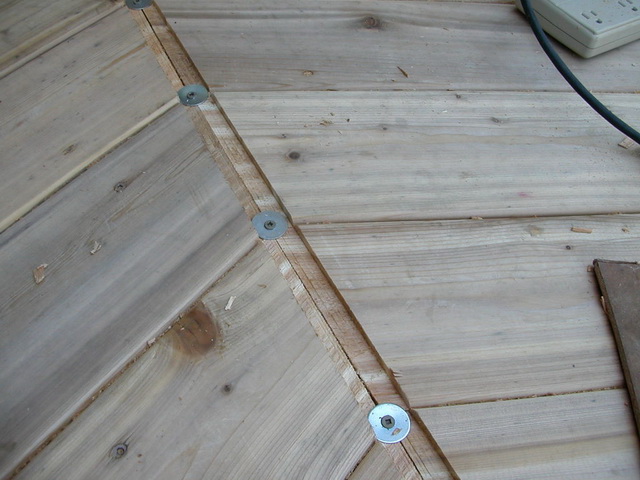
Divine
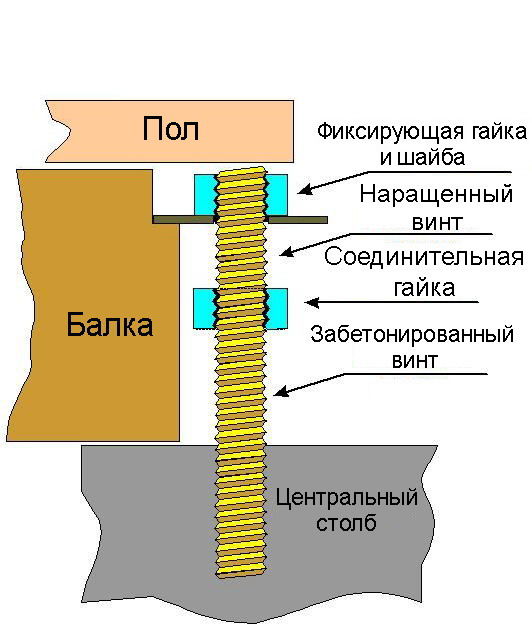
Now at the center of the central bolt requires adjustment. The top of the leading beams (in the center) must be cut in such a way that the circle (step) is formed around the bolt. Now under the bolt and the puck you need to place a large washer, which will fall on the step of the leading beams. Reduce the bolt to the desired length, if required, scout.

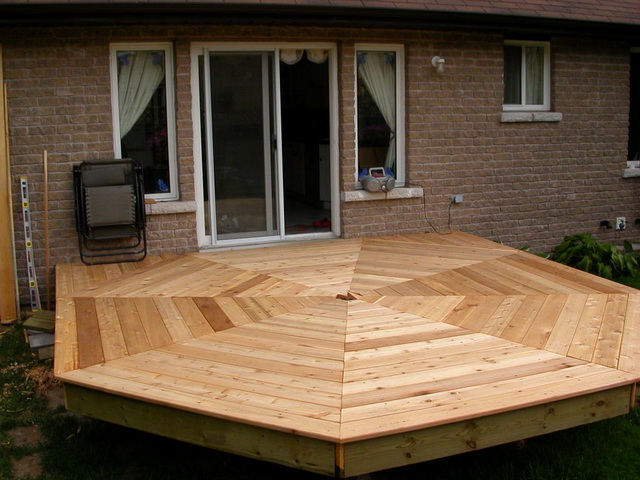
As the veranda joins the house with their own hands, you can look at the photo. This is one of many options.
A small but neat extension to the house, not just effectively decorate any country area, but will significantly expand its functionality. The veranda is the possibility of pleasant gatherings in the fresh air at any time of the year and, regardless of the weather. And in order to independently cope with the creation of the construction, it is enough just to use the available step-by-step instructions.
Required tools
Before you begin to fulfill the task, it is very important to make sure that all required tools. In this case, it should be prepared:
- a hammer;
- rope;
- wheelbarrow;
- drill;
- shovel;
- circular saw;
- level;
- yamobur.
The next step will be the creation of marking, the result of which largely depends the final result, as well as the lack of the need to redo the work again.
Creating markup
First of all, the distance from the entrance door should be measured and before the place where the central backup is planned. Since the diameter of the formwork, the verandas should be only 3.6 m, then 1.8 m to accommodate the backup.
After that, it is required to bind the rope with the fixed shallow to the installed element and gently draw two circles. The first radius should be 1.8 m, and the second is 1.2 m.
If it is not possible to use the chalk due to the characteristics of the soil, any other markers can be applied. The main task is to provide an accurate result.
The veranda in this case will be installed on the backups. Therefore, it is necessary to note the places where they will be installed.
The first of 8 pegs need to be installed to the right of the entrance door directly on the circle, the diameter of which is 1.2 m. After that, it is necessary to stretch the rope counterclockwise at an angle of 45º. The resulting point is a place to place the next element. This procedure will be required to do several times. After all 8 pegs are installed, you should evaluate the result. Between the first and last driven elements should be placed entrance door to the house.
In order to complete the markup, it will be necessary to just put a thread in a circle, reliably tieting to each of the peg.
Installing columns
To install a central pillar, you should dig a hole whose depth is from 1 to 1.5 meters. It depends on how much the land in the cold season. A pipe is placed in the prepared hole, a diameter of 25 cm. It is important to set the element as smoothly and neat as possible. 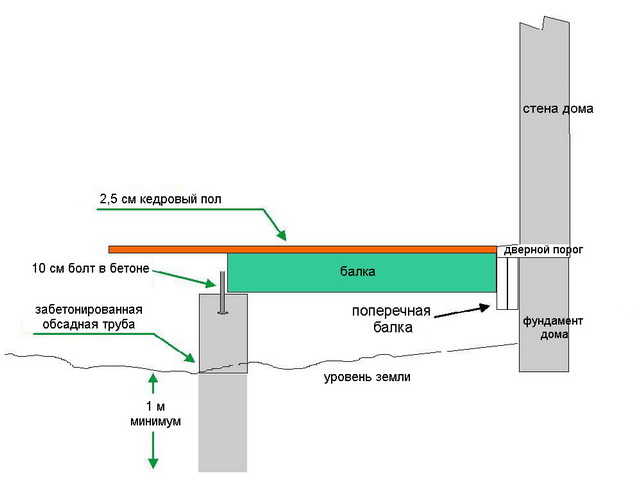
Before you begin further work, the pipe must be cut a little. And only after that you can pour into it a pre-prepared concrete mix. And in the center you need to place a bolt with a length of 10 cm.
After the main pillar takes its place, you should dig up the same pits for the remaining elements. It was for them that a circular markup was created. 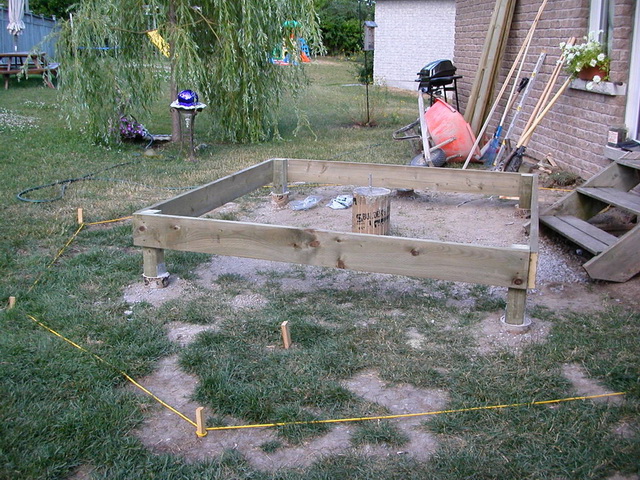
In this case, there will be enough pipes with a diameter of 15 cm. It is very important that they rise above the ground level at least 8 cm. These pipes in the same way as in the situation with the installation of the main pillar are filled with concrete.
Alignment of the backup
In order for the future veranda to be really reliable and durable, due attention should be paid to the implementation of settlements. Everything must be as correct as possible. 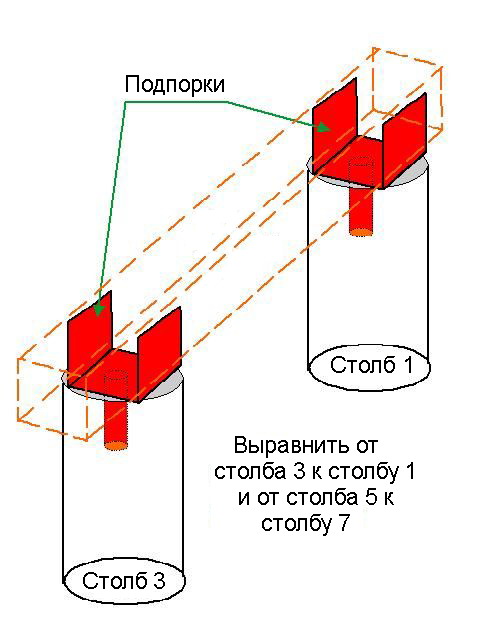
Before the pipes are poured with concrete, suitable backups are installed on them. As a result, a pair of squares should form. The first one consists of a backup 1, 3, 5, 7, and the second - from the elements below the numbers 2, 4, 6, 8.
Formation of formwork
When concrete mix Fully dried, you can start creating a formwork. To do this, wooden bars in a vertical position are installed in all supports using self-samples. It is important that the height of the resulting design corresponds to the central backup. The next stage suggests the compound of the backups 1, 3, 5, 7 with the help of a suitable size boards. As a result of the manipulations conducted, a square of 8 boards will appear. 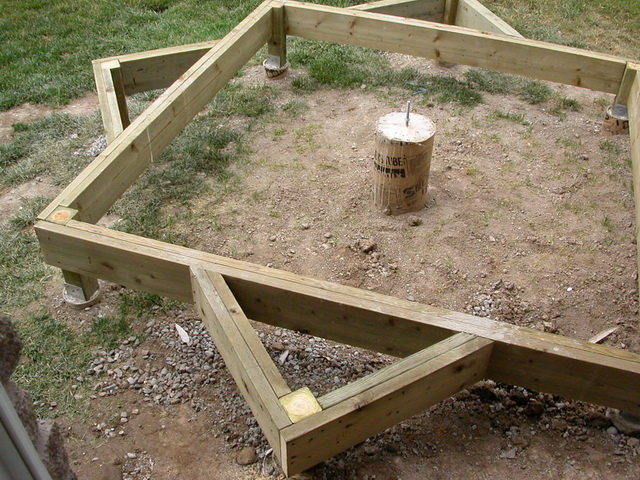
After that, you can form a second square. It will take 16 boards for him, and it will connect the backups 2, 4, 6, 8.
Works should be carried out in such a way that the verge of the second element did not enter the first. Accordingly, it turns out a smooth 8-square, which is the basis of the formwork.
Placing leading boards and end beams
To install the leading boards, you will need to prepare 8 elements with a length of 1.8 m. Place them stands in such a way that the beginning lay strictly in the center of the main pillar, and the end passed through different angles of the 8-square. 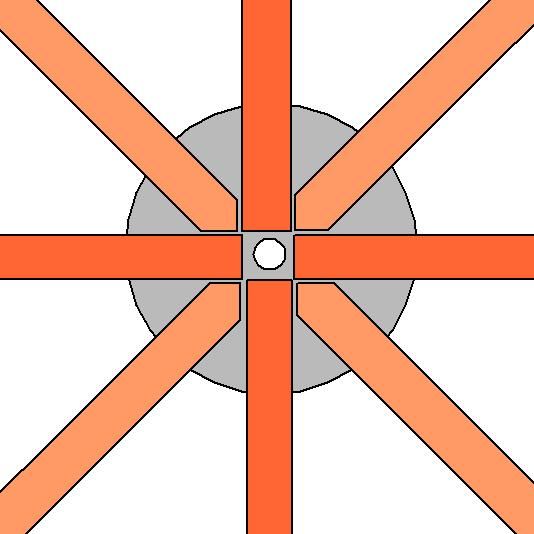
By installing end beams, it is very important to relate to calculations carefully. Before you cut them, you should check everything several times and only after that proceed to work. 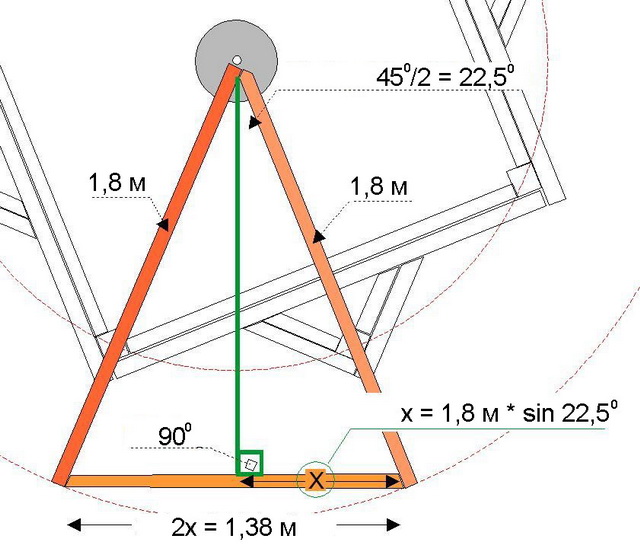
To fasten the leading boards to the bolt installed in the first stages, it is necessary to attach another bolt with a fairly large cap. In order to securely secure the result, it is recommended to use the nut and the washer by placing them from different sides. 
Next, it will be necessary to neatly fall asleep the ground under the obtained gravel structure so that it turned out the layer reaching 5 cm. 

Cross beams
As for transverse beams, each of the 8 finished sectors should be accommodated for 3 pieces. The first pair is fixed at a distance of 40 cm from the center, and the last element should divide the space that remains. Due to this, only 4 sections are obtained. The first should be left unchanged, the second - divided into two parts with the help of perpendicular beam, the third is to add two more beams, and the fourth - two pairs. This procedure is done with each sector. 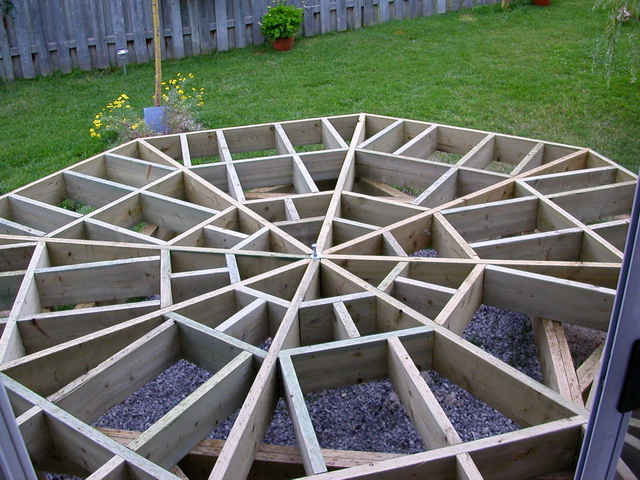
Floor and disguise
In order for the floor of the future veranda to be durable and practical, it is necessary to choose a suitable finishing material. An excellent solution will be, for example, cedar flooring. In the process of laying it is desirable to follow such recommendations:
- starting work should be started from the outer edge to the central part;
- the first row should go beyond 2.5 cm;
- during the installation, you must use bolts.
Next, you can attach the veranda directly to the house. There are many methods, among which can easily find the most optimal option for each specific case. 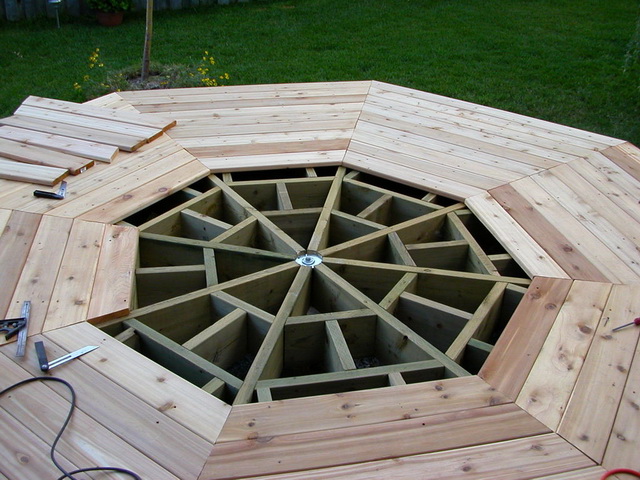
To give a veranda completed external view, You can use special panels. With the help of glue, they will be able to securely fasten on the surface. Thus, all bolts will be hidden from prying eyes. 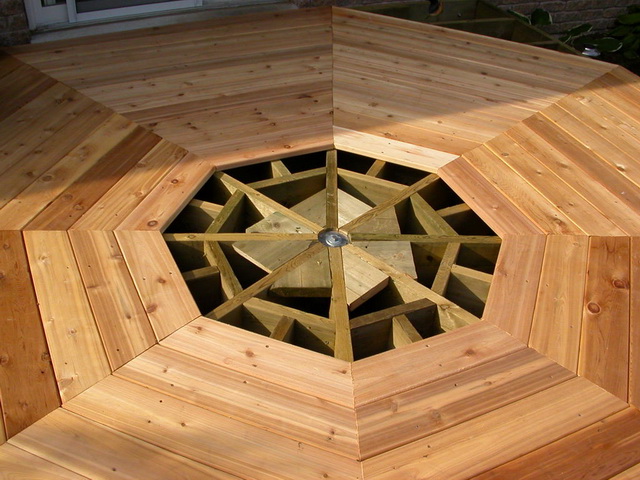
Today in the store you can buy ready-made steps and colons with the roof. This solution is the easiest and most convenient. In addition, high-quality products of this type are distinguished by a completely acceptable price. Due to this, it is possible not to easily save a lot of time, but also to avoid irrational material expenses. 
However, if desired, you can make them creating and independently. True, in this case, as in the construction situation in general, it will be necessary to pay due attention to the removal of measure. 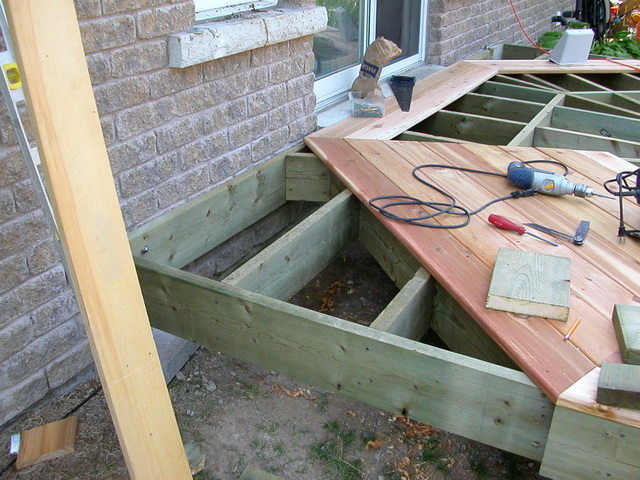

The finished veranda will not require complex care and will surely last for many years. 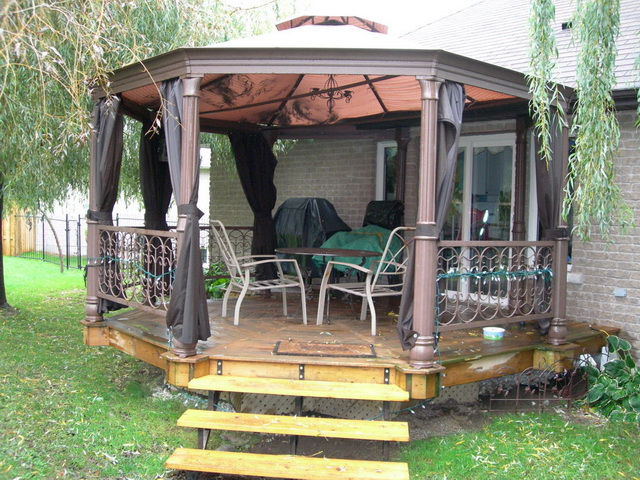
Video "Veranda (Terrace): How to build it with your own hands"