Any household plot looks defective if there is no gazebo on it. It not only expands the functionality of the courtyard, but also significantly increases the living space.
Build a gazebo with your own hands, the task is extremely simple. To cope with her forces to any person, you just need to choose the project in advance and refine it to your needs. But first it is necessary to figure out which there are arbors.
Views
You can divide the gazebo in different criteria. But in its pure form, these divisions are too confused and complicated the process of choice, for they complement each other and are accounted for.
In particular, buildings can be divided by:
- material;
- form;
- mobility;
- functionality.
But the same form may be at the mobile structure and in the stationary, while embodied from different materials. These moments are negotiated at the design stage of design and drawing.
Sketch Arbor B. japanese style
Only for an ordinary person who wants to assemble a gazebo with their own hands, there are several fundamental selection criteria that limit the flight of fantasy. In particular:
- the material should be cheap and convenient to work;
- the structure of the structure should be easy to assemble and not require the use of expensive equipment;
- the dimensions and functionality of the arbors should be limited to the urgent tasks. That is, do not seek to build a comfortable canopy for the anniversary, which will be in 10 years.
The simplest option gazebo for the garden
Summarizing the above requirements, it can be concluded that the following materials are most suitable for the garden gazebos:
- wood;
- polycarbonate;
- brick;
- metal.
And in shape it can be round, square or rectangular. More complex options, somehow: triangular, oval, arcuate (Fig. 12); I will require depreciation, they will entail the overrun of the materials, and the drawing will be done by itself problematic. So, for the construction, they are not suitable for the construction.
Benefits and lack of materials
Metal
The gazebo may be mobile or stationary. With an external inspection, there is nothing special in it. Simple design, without architectural frills. The advantages of this material can be recorded reliability and durability. In most cases, you can do without foundation. But the minuses prevail.
For the construction of such an object with their own hands, a welding machine will be required, welder skills, the ability to power the equipment and relatively expensive building material. In addition, the arbor from the metal looks too casseng. Full rest metal structures do not contribute. There are no natural strength in them that is inherent in the tree.
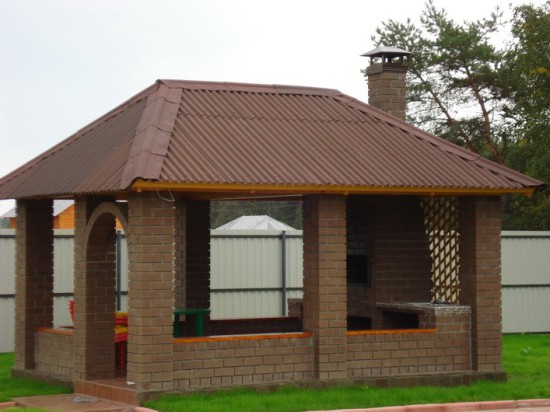
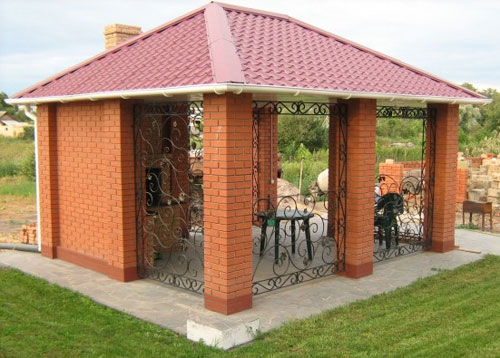
Brick
Brick material is solid, build from it for centuries. Consequently, the arbors of it are exclusively stationary and most often with advanced functionality. They integrate mangals, fireplaces, barbecue and other equipment. In such a constructure, if it is closed, you can even live.
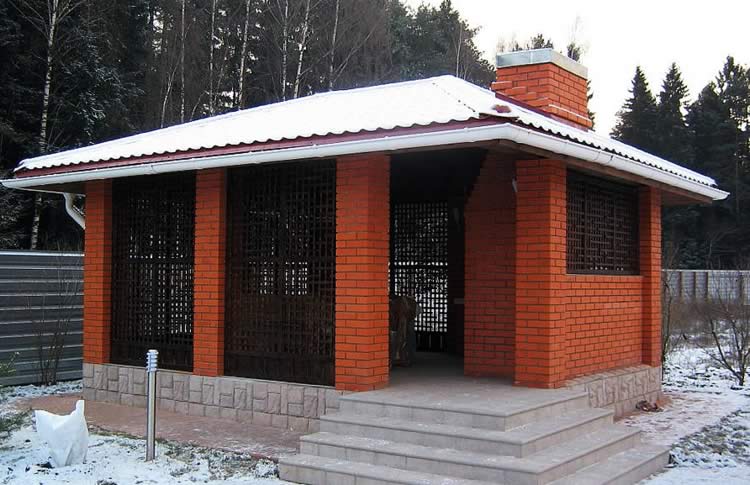
Here are just difficulties in construction will be abound, but it should be allocated:
- Brick masonry is a rather difficult lesson in which non-fair experience is required.
- Serious foundation - an integral part of any stone structure.
- Weighing financial investments.
- Scrupulously made drawings.
- Long construction deadlines.
Arrange garden gazebo From bricks on your site, you can only if you live there all the time. At the cottage, where the owners are hitting, such investments can afford wealthy people.
Polycarbonate
Polycarbonate, very promising material for the construction of the gazebo with their own hands (Fig. 17 and 16). It is easily processed, strong enough and light, relatively inexpensive. Of course, the frame will be made of wood, the foundation can be organized with a ribbon, but such buildings are elevated very quickly, and the scope for incarnation different species Design literally shakes.
In more detail in the article:
The cons of the gazes from the polycarbonate is also there, but they only create the visibility of inferiority. For example, polycarbonate can be split, after a few years of operation it will fit and lose transparency, with the wrong installation it can burst in the cold. Such arguments do not have any serious arguments.
Perhaps the easiest option for those who can work with the metal
Wood
This is a worthy choice of an experienced owner. The speed of the construction, low cost of materials, the ability to fulfill all the work with your own hands without inviting third-party specialists - all this positive parties.
Of the negative sides, combustion and weak resistance to biological destructive factors (rodents, fungus, rotting) can be caused. But all these nuances are perfectly leveled with special impregnations.
Thematic material:
Additionally, it should be recalled that the tree is perfectly combined with other materials. For example, if the construction is made of wood, it is very convenient to close the monolithic polycarbonate.
Gazebo
Here, only the fantasy of the builder can perform restriction. It will cost such a structure with a practically for nothing, but to naughntage the design and embody the idea of \u200b\u200blife, for only creative people.
Optimal form
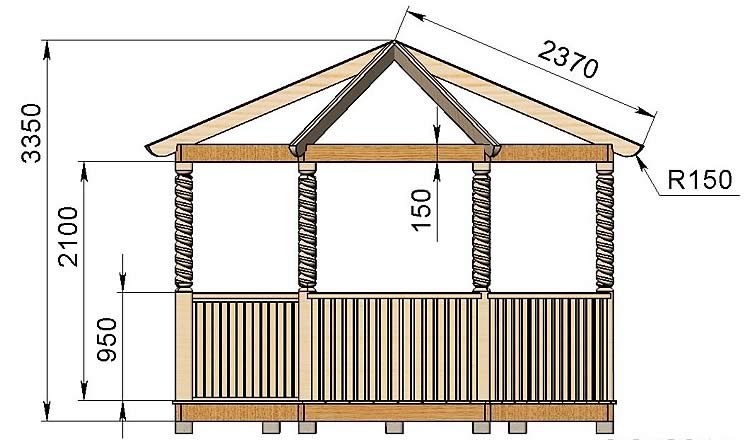
No doubt should be declared: the simplest and reliable form is square. In addition, with your own hands, it is much easier to build than the round or multifaceted one. And the waste remains the minimum number.
Dimensions
This is very important momentwhich requires a multilateral approach.
Firstly, it is more profitable to build a gazebo if its dimensions are multiple standard dimensions building materials . For example, standard width Polycarbonate 2.05 m. Consequently, in order to remain a minimum of waste, the width of the closed turnout must be multiple two.
Secondly, the inner area should calculate from the following data: one person is required - 1.5 m 2 + 2 m 2 on the furniture. For example, for 4 people, an area is necessary: \u200b\u200b(1.5 x 4) +2 \u003d 8 m 2.
Outcome
The simplest gazebo can be collected without a drawing, one person, literally in a couple of days. But these are just four walls and roof. But the design and design developments can be embedded many more years after passing the object.
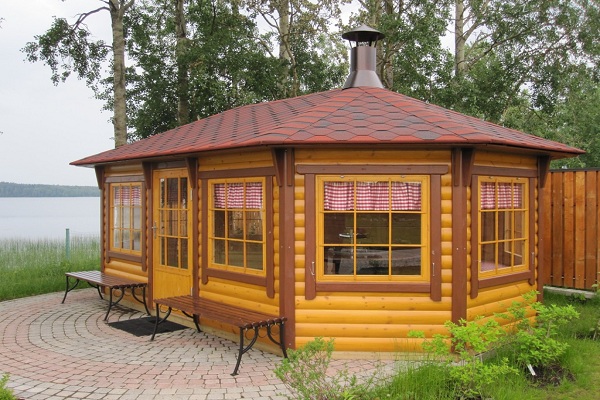
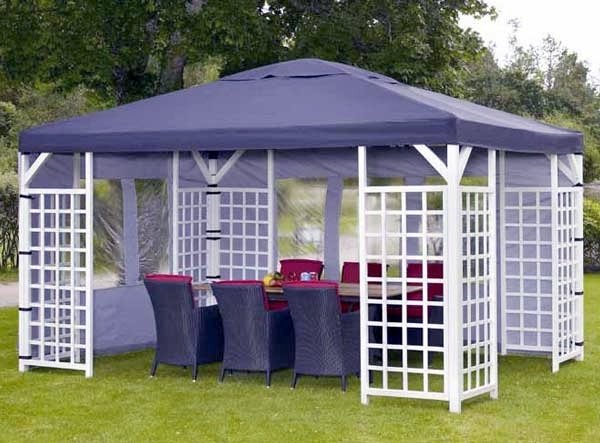
Many owners of private houses and summer cottages dream of a cozy place in their garden, where it would be possible to take a break from work and just a pleasant time. The most optimal option for these purposes is a gazebo. Material for it can serve metal, wood or polycarbonate.
Garden gazebo is the place of rest and decorating the garden plot.
Arbors can have a different shape. They can be decorated with lattices or wrought elements. In any case, most completely under the power make this building with their own hands, without the help of third-party persons.
Types of garden arbors
Arbors differ in shape and material. Depending on the material used, they are:
- Wooden;
- Brick;
- Polycarbonate;
- Metal;
- Forged.
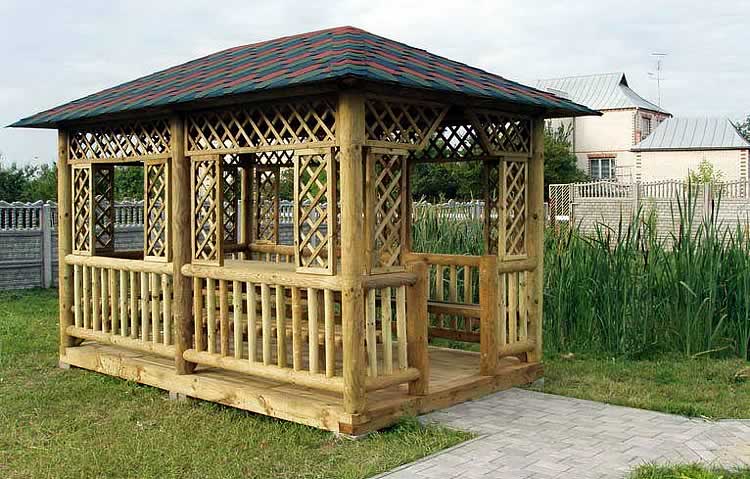
Wooden arbors are environmentally friendly, but to build them easier and faster. To install such a design, you will not need to construct monolithic foundation. The main thing is to make a robust frame from a wooden bar. Wooden design is easy to dismantle if necessary.
A favorable microclimate always reigns inside the wooden gazebo, and construction or installation takes at a minimum of time.
The brick gazebo is stationary, durable and durable building. It is important for it to lay a strong base in the form of monolithic or belt Fundament. In such a gazebo, it is convenient to equip as summer kitchenAnd the place of rest with barbecue and mangal.
The construction of a brick gazebo requires special skills. Smooth masonry is the pledge of the strength of the structure and a beautiful appearance.
Polycarbonate gazebo is a lightweight, fast, economical construction that does not require the presence of a foundation. It is easy to dismantle during bad weather or with any changes in the design of the yard and garden. Polycarbonate structures perfectly carry the temperature differences and resistant to aggressive impact ambient. Powder painting will give an elegant and colorful appearance.

The gazebo from polycarbonate should have enough openness for ventilation.
The metal gazebo will require certain efforts and the presence of special equipment, in particular - the welding machine. Metal designs are easily installed on any surface. Any foundation is suitable for them. It can be just supported by concrete. Prepare a drawing, to build a gazebo will be much easier. Constructive elements are fastened with bolts or welding. Metal gazebos are stationary and collapsible. They are easy to insulate and use in winter.
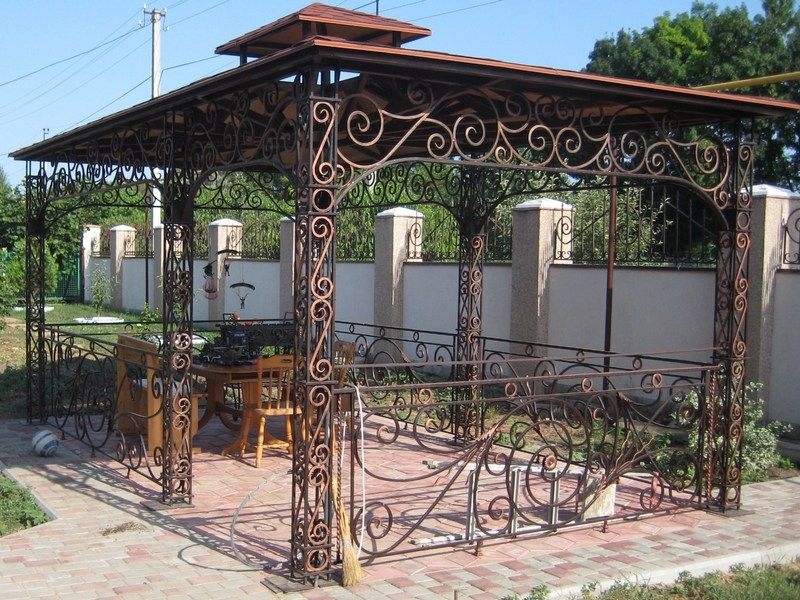
Forged gazebos look very impressive and expensive. You can use them only in the warm season, as it is very difficult to insulate them. Despite the fact that the forged buildings are absolutely impractical, they have a lot of fans.
Shape gazebo
Garden structures can have the following forms:
- Circular;
- Square;
- Rectangular;
- Polygonal.
Rectangular design - universal and most simple for playback. In addition, it can be made of any material - brick, wood or metal. Roofing for a rectangular arbor can have any configuration.
Drawing of a rectangular arbor
The rectangle is the most simple form of the arbor.
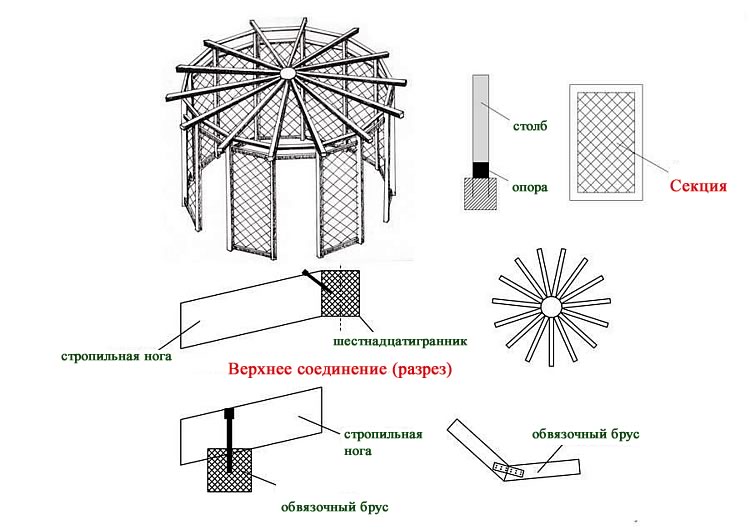
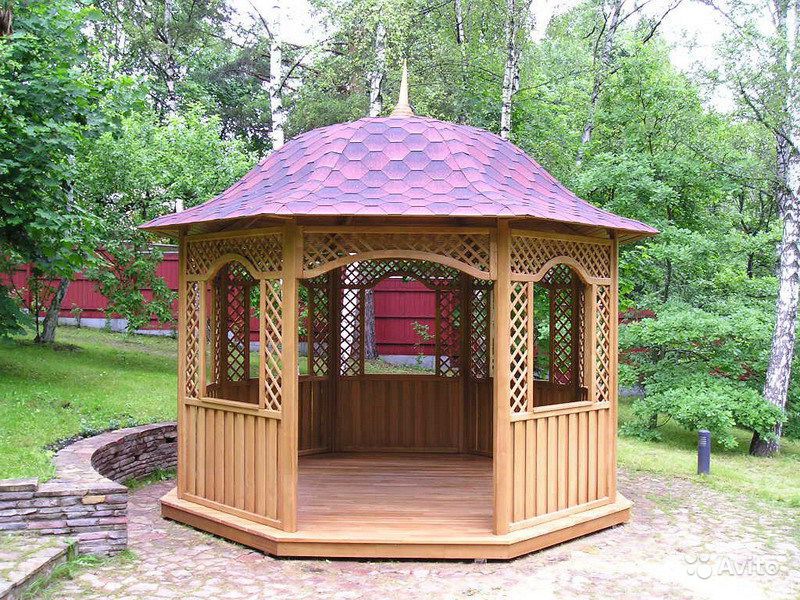
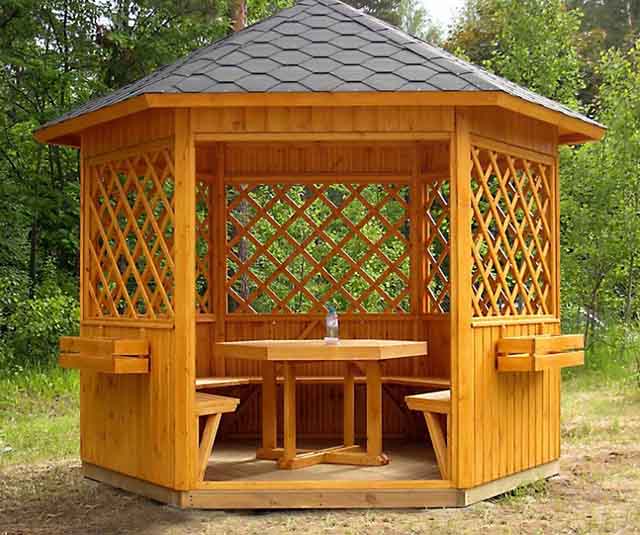
In six or octagonal buildings easily accommodate from 7 to 10 people. Polygonal gazebos are built of wood or metal. Wooden design It will cost much cheaper and make it easier.
Drawing of hexagonal arbor
The hexagon gazebo successfully fits into any landscape design. In addition, it takes a minimum of space.
Stepitary construction of an octagonal arbor with drawings
The octagonal gazebo 4x4 m has undoubted advantages - it is roomy and stable. It will comfortably accommodate up to 10 people.
Choosing a place to build, first need to decide where the input will be. It is better not to install the design in the sun, so that the summer there is no stuffy and hot.
To begin with, perform marking on the ground. In the middle, the pillar is driven and, using a peg and an inelastic rope, draw a circle on the ground. It is divided into eight equal segments. At the same time, one of them should be in place of entry into the future building.
Make it easier to build a wooden gazebo using minimum set Tools and sweater materials. But before this, it is necessary to treat wood to the wood to protect against moisture and insects.
Foundation
It is possible to exclude wood drawdown using a reliable foundation, the best time. At each point outlined on Earth, the octagon is a hole, a depth of 80 cm and a diameter of 15 cm. In the wells set supports in the form of a pipe segment inside which the reinforcement is inserted. She should perform over a pipe for several centimeters. After that, the foundation is poured by concrete and give it time to frozen.
Video: Filling the foundation for octagonal arbor
Before making the estimates and purchase materials, you should draw a drawing.
Drawings of octagonal arbor
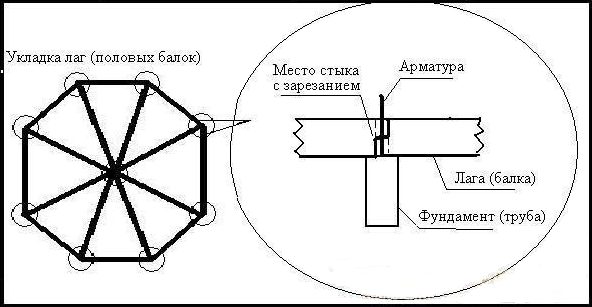
Scheme of the base of the octagonal arbor.
Estimation to build a gazebo
Materials for wooden gazebos must be purchased based on the estimates.
Fellow floor
The foundation lays waterproofing material. Wooden bar. Install the contour of the future structure. Where the bars will touch with each other, make cuts and put them on the reinforcement. For this, the holes are done in the bars. The latter of the future floor is fasten with nails, or screws. The resulting frame is trimmed by boards that are passing up under the desired size. If the gazebo floor is located too high above the ground level, then the steps will be needed.
Support and fences
At the bottom between the supports, thinner bars are fixed, mounting the pillars to the floor. Similar bars are fixed on the sides of the supports. Railings are installed on them.
Roof
Stiffness of the design should be chosen taking into account the climatic conditions of your area.
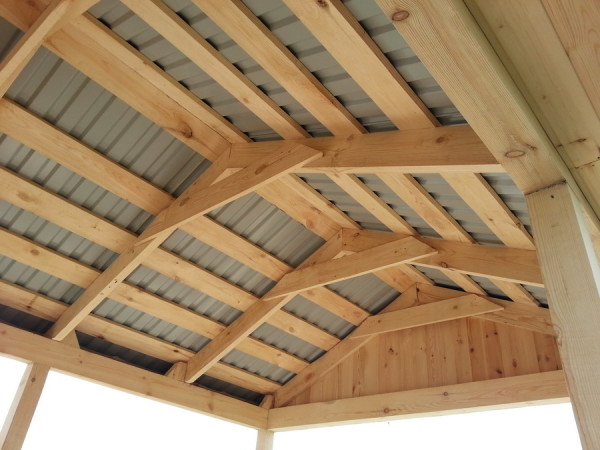
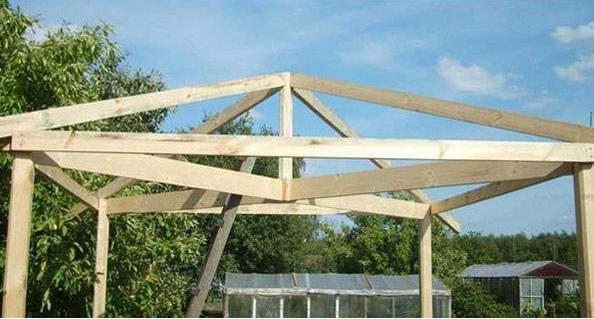
The outline of the future roof is made from the board of 20x10 cm. It is naked at the top of the supports. The roof rafters are performed from the same bar as the main supports. They are installed on four, arbitrarily selected, pillars.
In order to increase the area of \u200b\u200bthe joint between the supports and rafters at the place of their compounds with the pillars, 5 cm inserts are performed. The rafters are attached to the pillars of nails. The mounting places are enhanced by means of metal. The joints of the rafter saw vertically, configuring them in length. You can make a construct with a more rigid way with the help of boards attached crosswise at a distance of 1 m from the roof vertex.
The roof frame is coated with boards in a circle direction from the contour to the center. After the sheat on the roof, the material selected in advance. Depending on the design of the construction, it can be polycarbonate, slate, wood or tile. Bottom roof is trimmed by cheaper and less presentable material - clapboard or plastic.
Finishing the building
The finish is chosen depending on the design. For example, plastic or wooden lining will look beautiful. The tree can be painted or just covered with a verse. In this case, the gazebo will have a natural look. Waterproof varnish will help keep the tree.
On the pillars you can fix the lamps, having engaged in the construction of electricity. Beautifully look at the bamboo curtains, covering the openings.
Flooring can be traditional, such as linoleum or edged board or unusual, for example - marble crumb.
For ceiling, plastic lining or polystyrene foam plates are used.
Armor
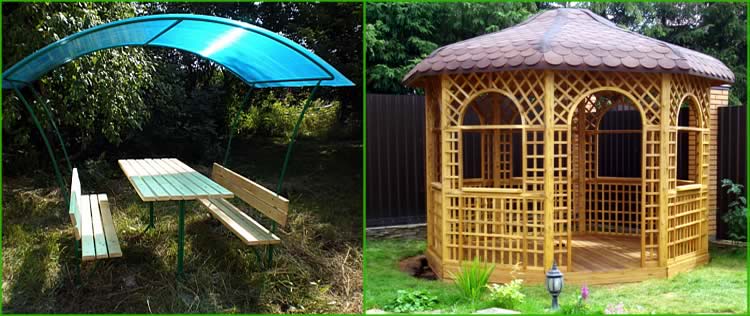
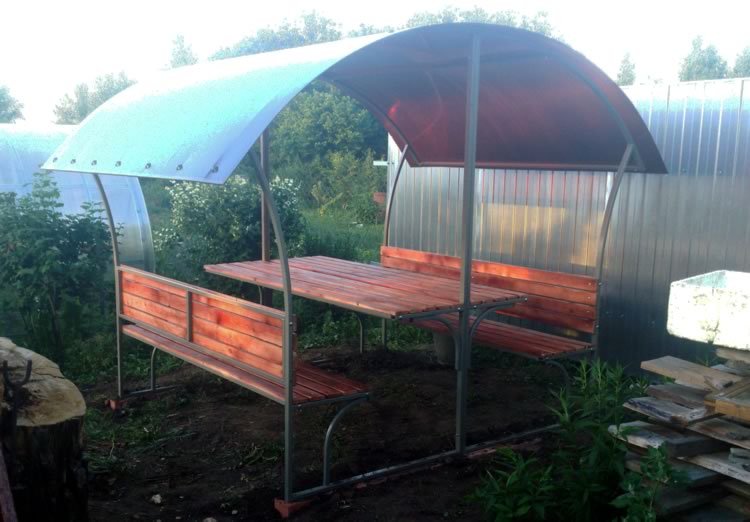
Very often, the owners of private houses do not want to clutter their sites with extra buildrs either do not want to spend too much time on their erection. In this case, an excellent output will be a gazebo in the form of a canopy. It is an open-type construction, where the vertical racks retaining the roof are taken as the basis.
This type of gazebo carries two semantic loads. The first is the savings of the garden space, the second is practical: the entrance to the house is protected from wind and rain.
Designs of open arbors-canopies may differ:
- Separate buildings or made in the form of attachments to the building.
- According to the assembly method, such arbors are divided into team-collapsible and stationary.
- The roof structure is also different. The roof can be straight or having a tilt, that is, to fight one- or twin. Round the roof has the kind of dome.
- Depending on the material of the manufacturer of the gazebo-canopies are wooden or metal. The roof can also be made of slate. For tents, the canvas are often used, which is stretched on a metal frame.
Just like for other types of arbors, for canopies you need to choose appropriate place. It can be an extension to the house that performs the function of the veranda. If it is a separate design, it must be harmonized with a decor in the yard and garden design. The best place For a canopy there will be an elevation where the beautiful view offers.
Materials
During the construction of a canopy, the following materials are used:
- Wooden bar,
- Board,
- Roofing material.
The optimal version is a pine timber that has excellent operational properties and an acceptable price. For it, a colorless or tinted impregnation is used.
Construction of the carcass

Reliability and durability of the frame - security and durability.
Supports for canopy must be established clearly perpendicular to the surface of the Earth. They are simply bought into the ground. The work is performed in stages:
- Marking at the selected place.
- Drop holes for mounting supports. The depth should be a quarter from the height of the pillar itself.
- The bottom fall asleep with rubble, carefully tamping.
- Install the supports vertically, checking the angle with a plumb.
- Pullen supports concrete and wait a couple of days to frost.
- Conduct trimming racks under the tilt so that they have the same height.
If you plan to install single roofIt is much easier, then one row of racks should be higher than another 20-30 cm. The cutting angle of the racks must correspond to the corner of the roof of the roof, then the rafter will be well to fit to the heads of the pillars.
Roof mounting
Even for the simplest canopy you will need reliable rafters, without them the roof will not succeed. For them, it is suitable for a cross section of 15x5 cm. Stages of the construction of the roof look like this:
- Mount the reference pillars or boards. They are then installed rafters.
- Docking and fixing rafters is made using wood screws. For a bartal roof, an additional amplification in the form of metal corners will be needed. The rafters are mounted in a step in 1 m.
- From above, a cutting boards of a width of about 16 cm and a thickness of 3 cm are performed.
- Stay roofing material, for example, slate. It must be screwed with galvanized screws.
Having learned how to build arbors with your own hands, you can equip a comfortable corner for a summer holiday or even in winter. Especially, if you spend electricity there, install a brazier or just equip the fireplace gazebo. The original building will decorate the plot and give the landscape design of the necessary completion.
Is there enough space for small architectural structures on your summer cottage or railway? Then use it for the construction of an open arbor, where in the summer you can have a snack and relax in the shadow or celebrate an important event. If you do not have this experience, then for the manufacture it is better to take the firing materials from the tree - bars, boards and logs, the construction of walls from stone or brick - the task is more complex. But before you need to figure out how a wooden gazebo is built with your own hands, as described in this article.
We select the project Arbor
The first stage is a choice of design suitable for your cottage. If everything is correctly calculated from the very beginning, then nothing will have to redo, which means that the construction will cost inexpensively. To do this, give answers to the following questions:
- What area are you ready to highlight to make a gazebo? Sketch detailed plan The site and indicate not only the future structure, but also the other planned and existing objects - the garden, the garden, street hungal and even children's swings. This will help determine the exact location of the structure and its size.
- How many guests and living in the house will be simultaneously in a gazebo?
- What should be the design and decor of a new building, including the interior?
- That from materials is available and how much it will be necessary to buy.
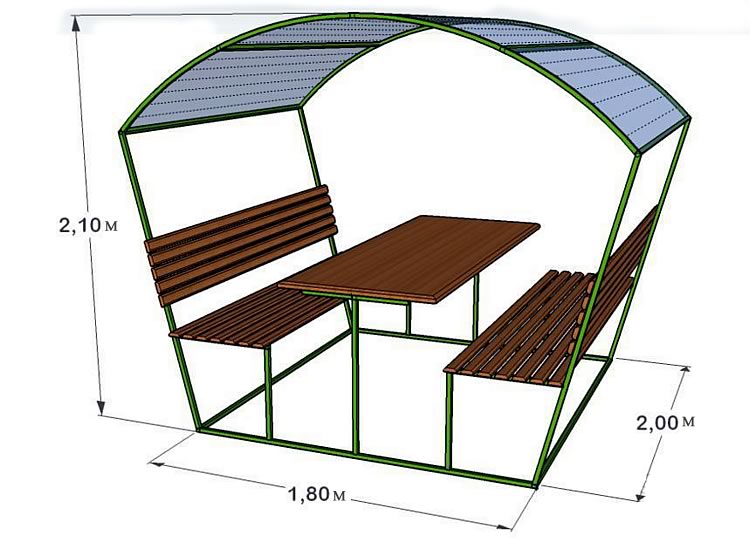
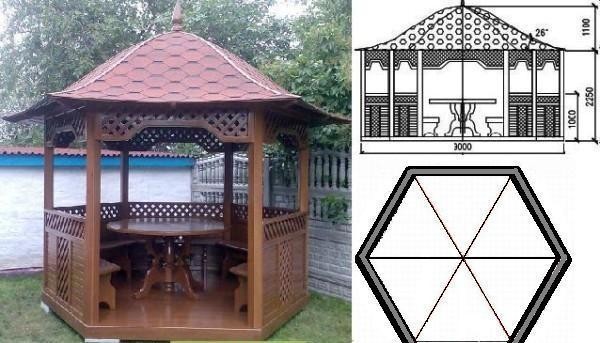
Note. Open pavilion dimensions depend on the planning number of vacationers. To freely fit 2-3 people, there is enough room 2 x 2 m (taking into account the table and benches), and for 10 guests it will already need 4 x 4 m.
Homeowners without experience construction work The design of a rectangular or square shape is recommended, it is the easiest and cheaper option. Hexagon and octagonal arbors look much more beautiful, but also to build them more difficult. The same applies to round structures, where in the process of assembly it is necessary to provide smooth turns of the walls. Example original ArborMade with your own hands, is shown in the photo:
The main difficulty in the construction of hexagonal and round structures is a roofing device. It will not be a budget version with a single one or duscal roofWhat the square pavilions are overlapped. We will have to make a four-piece roof in the form of a tent or dome shown below in the photo, and this complicates the task.
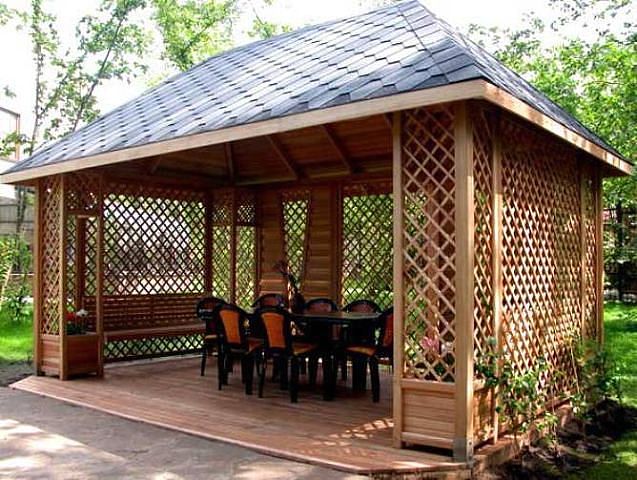
Reference. IN landscape design Unusual architectural forms are applied, not having roofs at all. These are pergolas - canopies closed on top of grapes and other curly plants. Roofing in such arbor dooms from boards or timber, which is subsequently wrapped with a vine.
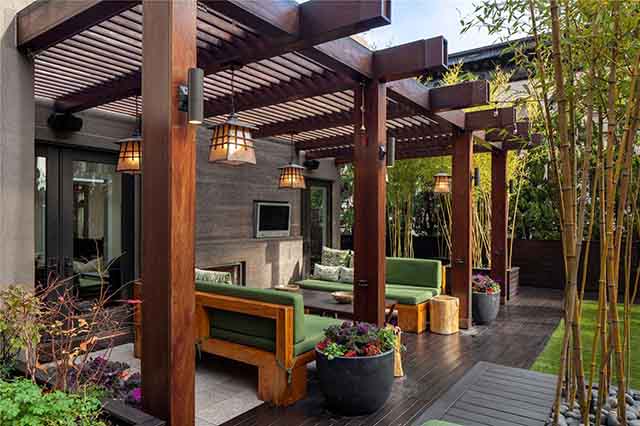
It looks like pergola - a gazebo without a solid roof
As for building materials, the beginners are better to build their first altanka from wood - boards, timber, OSB plates. People with experience can take up a metal gazebo with a polycarbonate roof, shown in the picture. But it is necessary to understand that the metal, in particular the pipes and profile, will cost more timber.

The internal design of the arbor remains at your discretion. But the alignment of furniture objects and different devices need to be thought out in advance in order to have enough space. The minimum set - the table and shops for vacationers, how to compose them, is shown in the photo. The interior can be added to the furnace with a barbecue grill, a fireplace and various furniture, such as wicker chairs and lockers.

How to make a simple gazebo
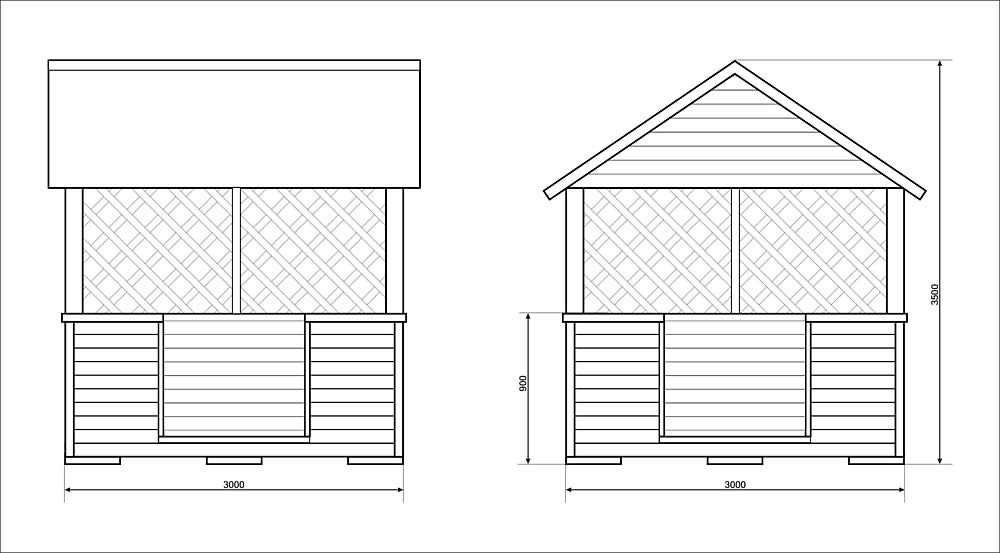
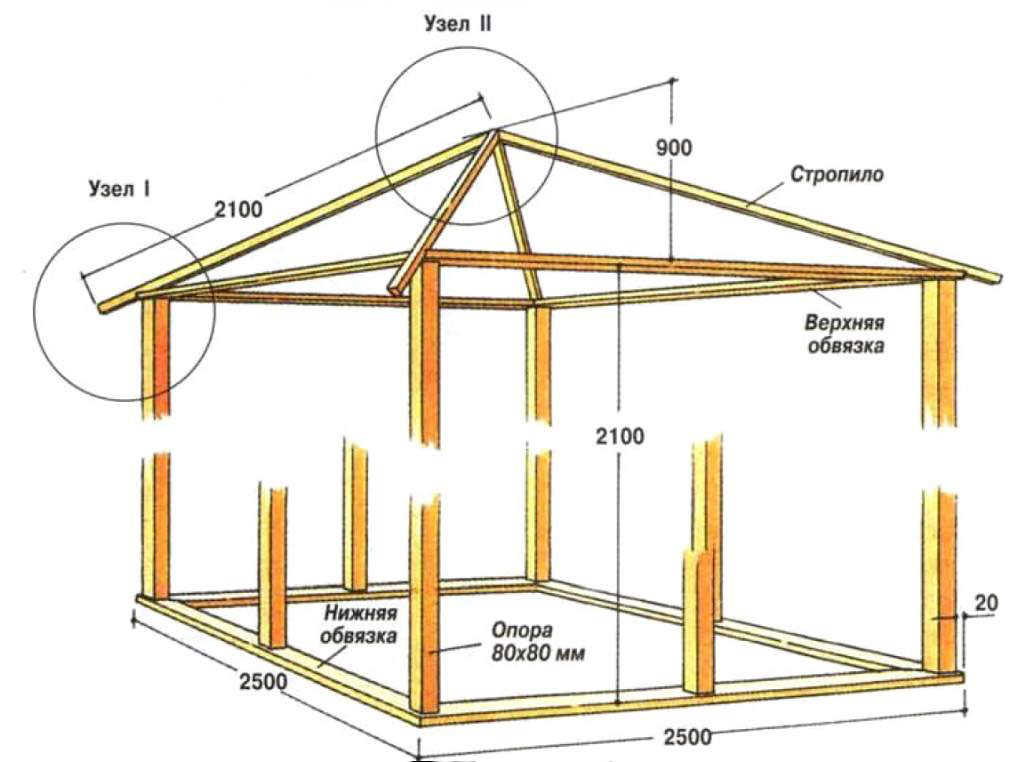
We present a rectangular design with dimensions of 2.2 x 3 m, collected from the boards with the help of only two tools - the screwdriver and the electric jig. For the construction of a ledge from a tree shown in the scheme, you will need:
- board 150 x 40 mm - approximately 1 m³;
- ondulin's sheets either professional flooring - 10 pcs;
- konkovye shaped elements - 5 pieces.;
- self-taking galvanized 4.2 x 75 mm - 450 pcs.
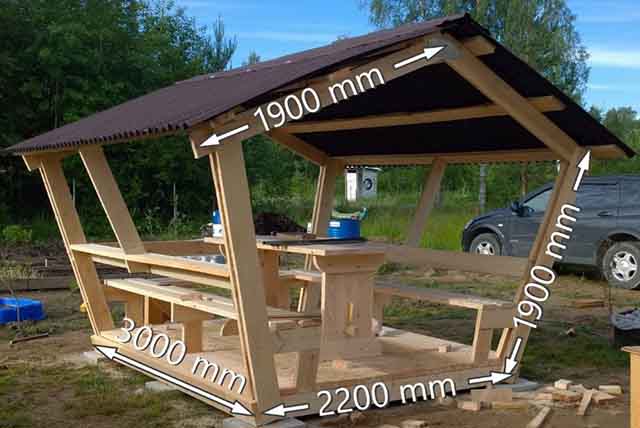
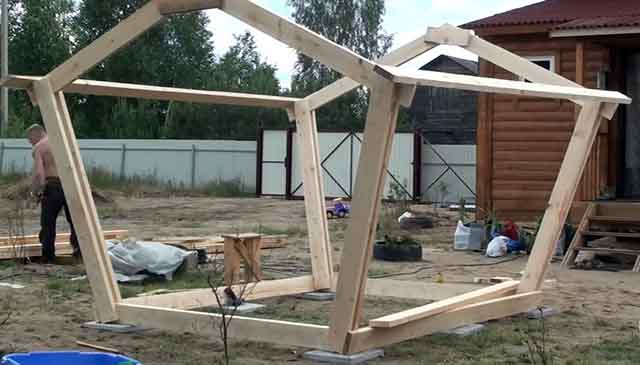
The idea of \u200b\u200bthis building is to apply the method of quick-erection frame housesWhen all the walls are harvested on Earth, and then put in a vertical position and are connected to each other. Due to this, you can make the gazebo literally in one day, which is shown on the video at the end of the section. Further, we consider the performance of the work in stages, starting from the foundation device.
Preparation of the foundation
Before building a simple garden gazebo to give, you need to clear the platform, remove all interfering items from it and align the land. Since the construction is very light, then the sediment of the soil under its weight will be minimal. Here, a column foundation will rather serve as an anchor so that the structure does not move from the place from the strong gusts of the wind.
Note. Below in video it is shown that the master does not make the foundation for its design, but only puts concrete tiles.

Slak Blocks
For a Foundation Device, use the next step by step instructions:
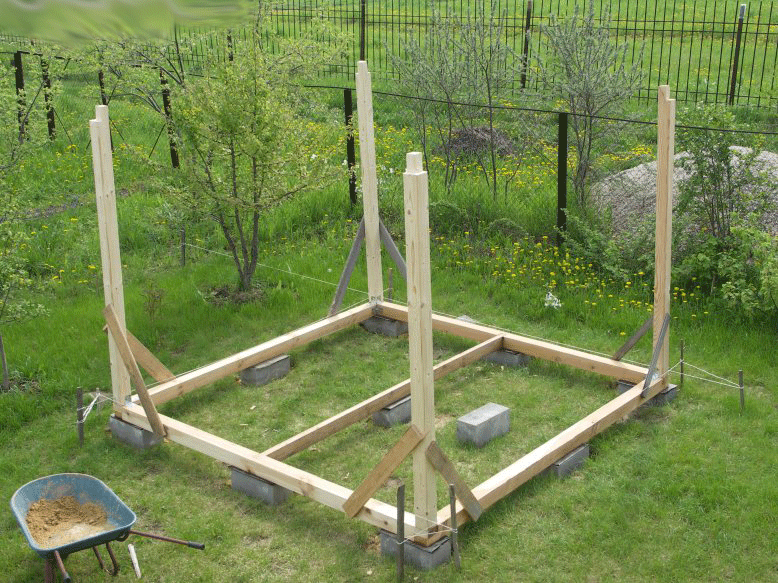
- Follow the platform and locate 4 angular racks. Drop in the intended points of the pit under brick columns 380 x 380 mm. Depth of mini-pitchers - 0.7-0.8 m.
- Match the bottom of the holes and pour a sandy pillow with a thickness of 10-15 cm. Prepare 4-5 buckets of concrete M150 and put on the sand to get the playground.
- After froze concrete mix Put the columns in a cross section in a brick. Also suitable slag blocks laid pairwise with dressing.
- Pillar walls cover bitumen, after which falling off the remaining sinuses with soil. From above on the foundations, put waterproofing from 2 layers of rubberoid.
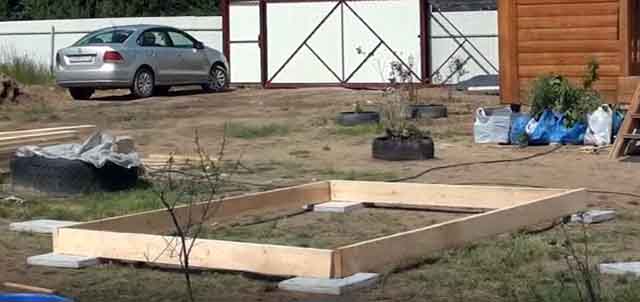
For subsequent mount wooden carcass Iron rods are inserted inside the columns. There is another way - installation of beams on anchor bolts. The base of this type is also suitable for building a pavilion on the frame of iron, cooked from round and profile pipes.
Important moment. If you plan to lay out the oven and brick inside the arbor, then a separate foundation is needed. How to build it correctly, told in.
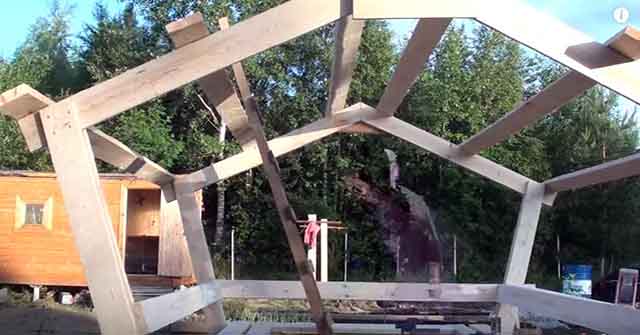
Construction of walls and roofs
If we say briefly, that your task is to twist 2 end walls, set to vertical position and connect beams. Step by step it looks like this:
- Make frame wall frames, as depicted in the photo. For corner racks, use 2 boards, between which the lower crossbar and rafters are mounted on the self-drawing. For stiffness, screw the small jumper between the boards forming the lip of the roof.
- Install the frameworks in the project position and fix the backups. Connect them between the boards below and from above.
- Cut poland Lag. And secure it in the middle of the construction between two boards connecting the frontaths.
- At an altitude of 0.8-0.9 m, attach the railing, which will serve as an additional rigidity. Tie them vertical racks with the bottom board of the roofing crate.
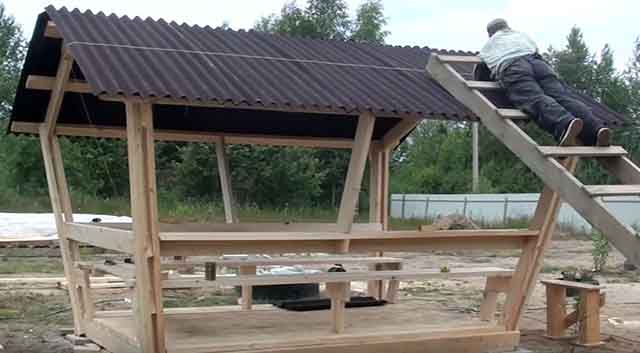
- Finally form a roof frame from longitudinally laid boards. Sleep on top of Ondulin either straw and screw the skate elements.
Council. It is not necessary to repeat the inclined design of the walls, as the master in the photo does. For simplicity, make frontons with vertical racks, and then act in the same order.
Do not forget before assembling the frame to impregnate all the wood with an antiseptic composition and give it to dry. This operation is mandatory if you want to extend the life of the structure. Printing and painting will do at the end of the construction.
Flooring and decoration
In this design, the floors are found very simple: on 3 existing lags need to lay the boards, aligning one edge. Then scum them with self-draws to lags and crop ends sticking on the other side. Between the gender boards, leave the gap of about 1 mm so that they do not rub together and did not creak.
Council. Before laying the floors, attach vertical racks to the central lag, it will serve as supports for future benches.
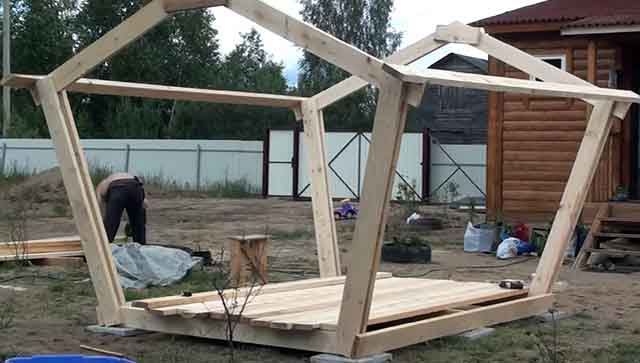
When the floors are ready, along the side walls it is worth moving stationary benches from the same boards. To do this, you need to install short racks in the corners (the average already exists) and connect their crossbars. The role of the backs will play horizontal jumpers mounted earlier.
For the design of the resulting arbor, you can give the full will of fantasy. Instead of unsightly ondulin on the roof, you can put mats from the cantham, and the side openings decorate decorative lattices. It will not hurt inside Altani lighting and paint it into the desired color or to cover wood with several layers of varnish.
The process of building on video
Construction of hexagonal arbor
Build Altanka with six angles is somewhat more complicated, although the order of work is preserved. For the construction, such materials are usually used:
- bar 15 x 15 cm - on horizontal beams;
- bar 10 x 10 cm for racks;
- the board 10 x 5 cm goes to the roofing device.
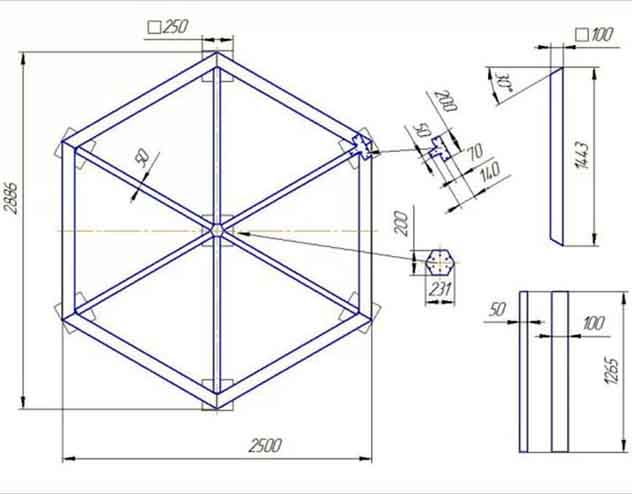
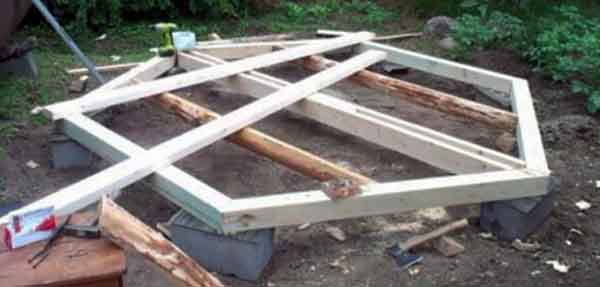
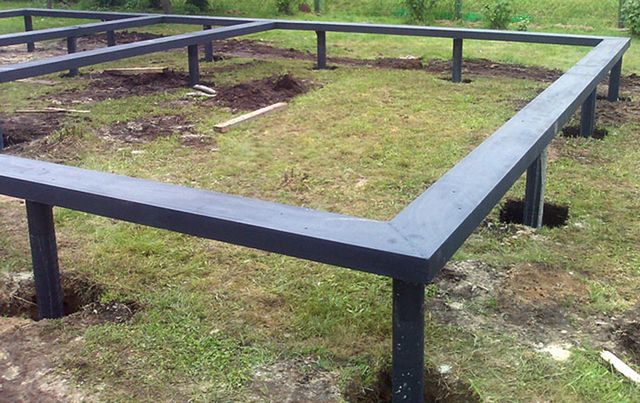
Foundation drawing with laid beams
To begin with the plan of the site, draw a sketch of the future structure - the right hexagon. Enter it in the area allocated for construction, and locate the design center. Now you can proceed to markup in the yard.
Since hexagon garden gazebos differ in shape, the markup of the site takes more time. To mark the points of installation of pillars of the foundation and vertical stands of the arbor, find the center of the structure and lean the peg in the ground, turning with the drawing. Then bring the rope to it, whose length is equal to half the external size of the pavilion, and at the end, fasten the stick. It turns out an improvised circulation, which you draw a circle on Earth. After breaking it on 6 equal segments, you define the position of the supports.
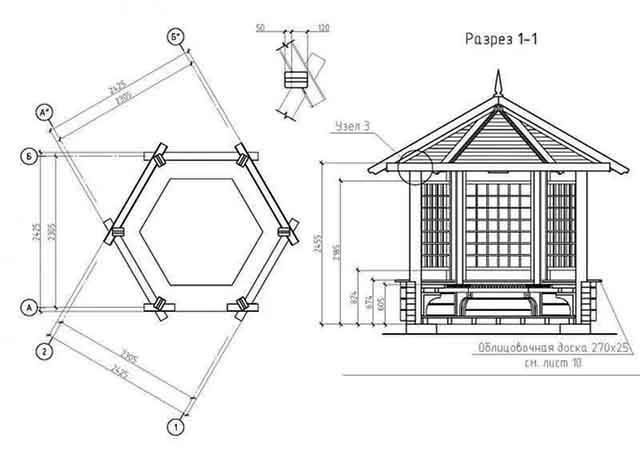
- Lay out in scheduled points foundationsAs described about it in the previous section.
- Putting on the foundation columns Ruberoid, attach the beams from the bar, interconnected by all of them. In the middle, set 3 intermediate lags (you can drive from the floors.
- Put 6 vertical racks and secure them to beams on the corners. Connect the top ends of the boards and put the railing, thereby tightening the box of the arbor.
- Collect the rafter system. The base should be the hexagon element squeezed out of the tree, the rafters are adjacent to it, which comes from each angle and the middle of the face (shown in the photo). Make the crate and seat roofing from the selected material.
- Sept the floors and finish the walls.
Note. Slinge system It is not necessary to assemble at the place, at the height. The design can be led on the ground, and then raise it along with the helpers and attach to the racks.
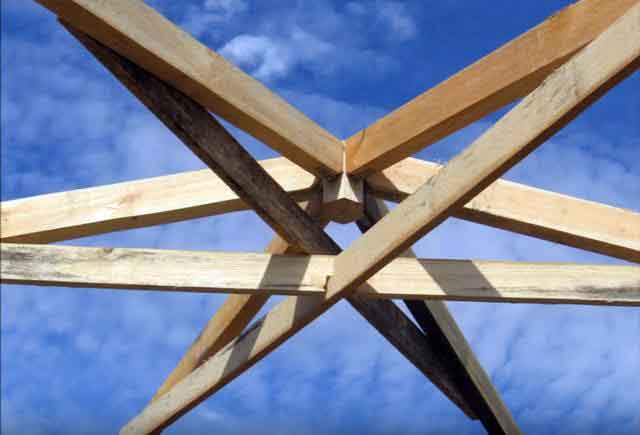
Device of the rafter system
If you wish from a large hexagon gazebo, you can make a winter garden. To do this, you will need to glazate all the openings and provide for the installation of the chimney stove. The order of construction work is shown in detail on the video:
Conclusion
Garden gazebos do not belong to capital structures, because they differ in low weight and do not need massive foundations. Therefore, their construction does not take much time, provided that there are all materials available. As you might make sure, in some cases you can manage alone. For the construction of more complex designs, for example, gazebo in Chinese style or a dome roof, unambiguously need to attract assistants.
In summer, it is always nice to spend time in the family and friends. Where more convenient to do it in a cozy garden gazebo. Increasingly, such buildings are made of wood, because the material is reliable and safe to health. In the article we will tell about how to build country gazebo And how to choose the option that is suitable for you.
Classification Arbor
There are several criteria for which such structures classify.
Highlight two main types:
- stationary - installed at the placement place and do not move during operation;
- portable - Can be collected and disappeared with many times (for example, for the winter).
Depending on the type:
- closed - more often with wooden floors, although there are options where it is missing; With proper insulation, in such a building, it is possible for a long time even in winter;
- open - with the foundation and floor or without them, are exposed to any atmospheric phenomena;
- the average between the open and closed option.
Open and enchantable
Depending on the geometric shape: Square, circle, rectangle, design with three, five, six or eight corners. The most common - square, round and hexagonal arbors. By individual projects Perform non-standard options.
Depending on the materialwhich is used for construction, facilities are: from wood, metal, brick or plastic.
Depending on the distance with other objects: Standing apart and adjacent to home or other building.
Depending on the style:
- classic solution;
- east style;
- rustic option.
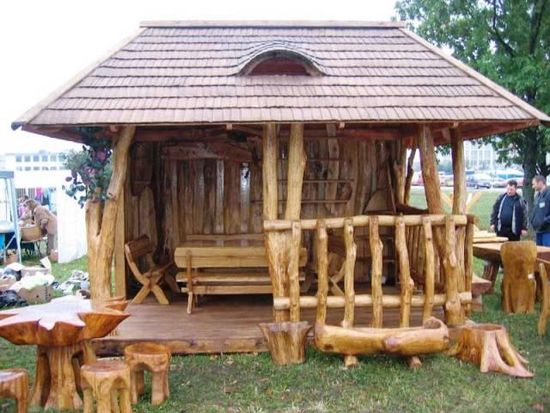
Arbors in East (left) and rustic (right) styles
The recent difference of garden buildings - roof shape. This is the division on:
- classical is the most common and often erected;
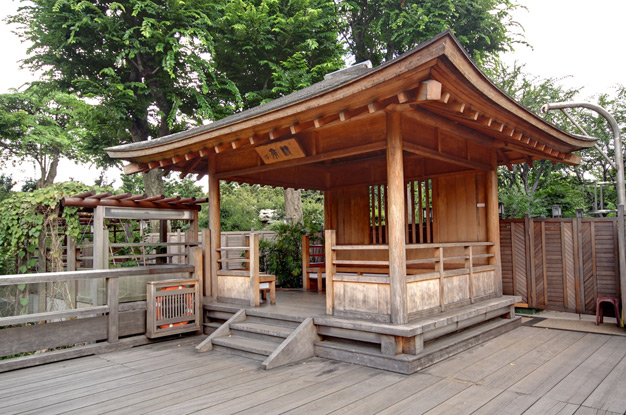
- in Japanese and Chinese styles;
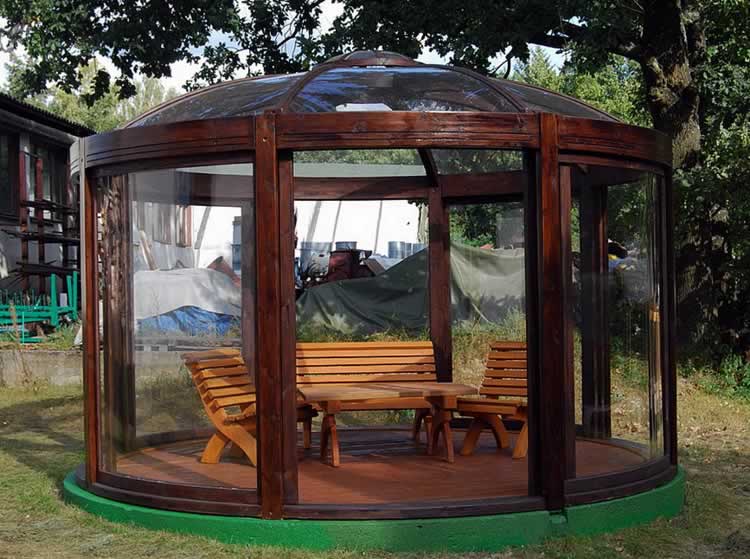
- in the form of a dome (rarely built due to installation difficulties).
Materials and Tools for the construction of garden gazebos
Before starting construction work, it is worth choosing the main material for the construction of a garden building.
To date, used:
Wood. This eco-friendly, safe, durable and durable material goes into leaders due to their unique properties. For the construction of the gazebos, it is suitable for a rounded or chopped log and profiled timber. So that the lumber remains safe, it is important to treat it with antiseptic compositions.
Wooden gazebo
Metal. Lost long yearsdoes not require the installation of a weighty foundation. It has pleasant appearanceEspecially if the manufacture of decorative wrought elements are used. There are disadvantages - quick heat heating and frequent care during operation.
Metal gazebo
Plastic. It can be PVC, polypropylene and so on. Plastic structures are good because they do not require frequent tinting, standing for fire and do not lose external attractiveness. Cons: may allocate substances harmful to humans and are deformed at high temperatures.
Plastic gazebo
Brick. The plus material is practicality and durability, it does not require constant care and is not affected by atmospheric phenomena. Cons There are also: such a construction requires reliable foundation and considerable financial costs.
Brick gazebo
As for the working tools, you will definitely use: hammer, roulette, screwdriver, hacksaw, level and plans.
Garden gazebo of wood with their own hands
To the construction of such a structure, as a gazebo, should be approached seriously and carefully. The whole process can be divided into the main stages. First of all, you need to know the dimensions of the future resting place, form, total material and prepare everything you need. An important and responsible point is to draw up the drawing and marking of the territory. Wooden construction should harmoniously fit into and successfully complement it.
Foundation and foundation
High-quality foundation is the key to a reliable and sustainable structure. Therefore, its laying should be given time and attention. For wooden arbors Often used screw piles.
Their total quantity depends only on the size of the future design. Consider on the example. We need a foundation for a garden house 3 by 3. In this case, the amount of piles - 9. They should go into the ground half a meter, while the diameter is 1-1.5 cm. Then I mount them, focusing on the level. This will help avoid distortion in subsequent work. For greater strength, a reinforced grid is used.
Next steps:
- It should be waited until the foundation hardens and only after laying out the timber. Optimal dimensions: 150x150 and 100x150. Five bars are stacked on piles (with a length of 3 meters). Four are installed around the perimeter, before this you need to make holes for anchors. The bar in the corners is connected "in Polterev". The place of the fifth timber - the center of the arbor. You can additionally be made in any convenient way.
- Now install columns in each angle (in the example of them 4). Self-tapping screws and corners (metallic) will help here. It is recommended to make a strapping wooden beams. They should be connected only by direct lock (they are also fixed with self-pressing).
Installation of the rafter system
The resulting frame serves as a support for the roof of the structure. Now install the rafter design, following the recommendations:
- Calculate the required number of rafters. With a standard roof with two slopes, 6 units will be required. With a square form of construction (as in this case), a hip roof will be an excellent solution.
- Twisting rafters in the amount of 8 pieces and raise up. First we install those that are diagonally, then those in the middle. As fasteners, brackets or nails of the desired length are used.
- C are determined before the start of construction work. The optimal solution will be Ondulin (about 10 square meters. M.). It stacked on a pre-prepared crate. The latter are cast.
Finishing work
Final stage - wall decoration and decoration. After mounting the railway frame, the bottom is sized with a suitable material (more often by clapboard, block house). The decorative lattice is skipped at the top.Aesthetic attractiveness can add curly plants that will also create a pleasant shadow in the summer.
Wooden gazebo for giving is an economical and advantageous way to spend time in the fresh air.


