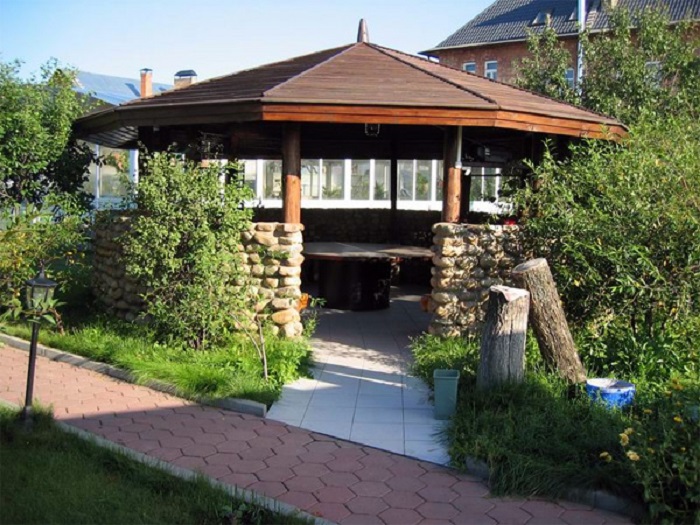
"Good gazebo, yes pour rarely"! And if there is no gazebos in the yard - then guests will remain at all unhappy with the event. The first problem can be easily solved by making a small investment in several boxes of "fuel material", but with a gazebo it is not so simple. Here you have to be moderately rich or quite hardworking.
Many construction companies and individuals offer to build arbors for the price from 60,000 rubles for a simple wooden structure 3 by 3 meters. Beautiful and exclusive arbors are already from 450,000 and up to 3-3.5 million rublesAn important role in pricing plays the area and materials (log house and metal is always more expensive). But this amount is not everyone can lay out for some small architectural form in my yard.
It is not a secret that the materials for the construction of the arbors are a penny (compared to its market value) and up to 85% of money takes the work itself. Even consider the cost of foundation and land work. Now we will look at the detailed guide to the construction of the arbor do it yourself and with it, we will make a high-quality wooden product that will not give way to "factory" options!
Choose a place to build a gazebo
The gazebo is built to solve many tasks. It should simultaneously take a large noisy company and serve as a place for a romantic dinner, so the owner itself should choose its location on his site. In most cases, this is the most secluded place that is not viewed from all sides and where there are no drafts. It is also necessary to take into account the following points:
- The construction of wooden arbors should be carried out away from septics, sewer channels and septic tanks on the private site. Nothing should interfere with your holiday, especially unpleasant odors.
- It is necessary to take into account not only the upcoming stages of construction of the arbor, but what will happen later. Mangal or tandoor can become a problem in the future if the construction is near the house. It is better to retreat at least 3 meters from all buildings.
- You certainly want to look at the pond or forest after the satisfying dinner. It is better to arrange it in the most picturesque corner of the yard.
- Pay attention to the drainage. The deepening in the yard should be excluded - the high probability of laying the foundation.
- Locked from the wind place. Sweep silently - you will go further.
With Azami selection of the dislocation site, we now turn to the phased construction of the arbor and consider how to make an excellent construction from low-cost materials, without throwing huge money to the wind.
Foundation of garden gazebo do it yourself
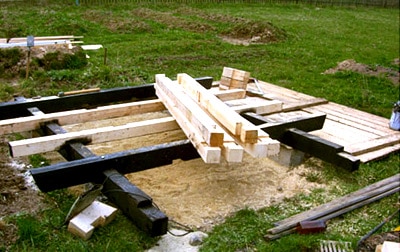
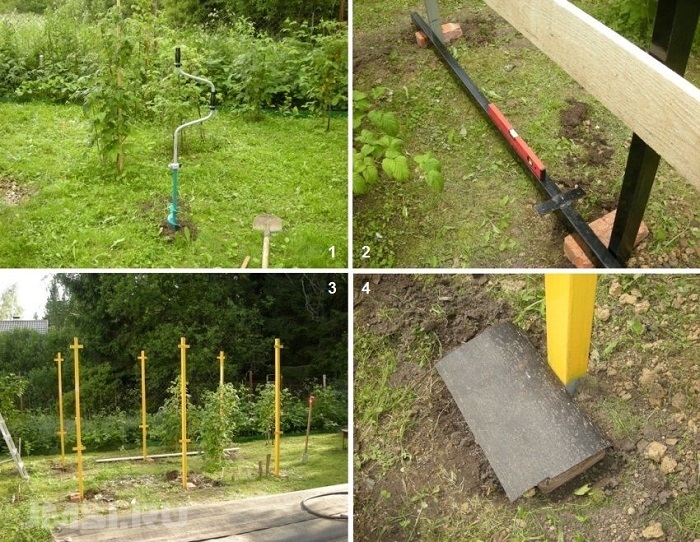
Does it be necessary to do the foundation? No, it is possible without it, if you do not bother the peashed structures and periodic spring restoration of the arbors. Without the foundation, the supports will cover under the weight of the roof and the entire structure, they can be flown by spring waters or just go away after glaciation / thawing soil in the spring. In any case, it is necessary to do it - so correctly. Consider several options how to set the foundation without unnecessary costs.
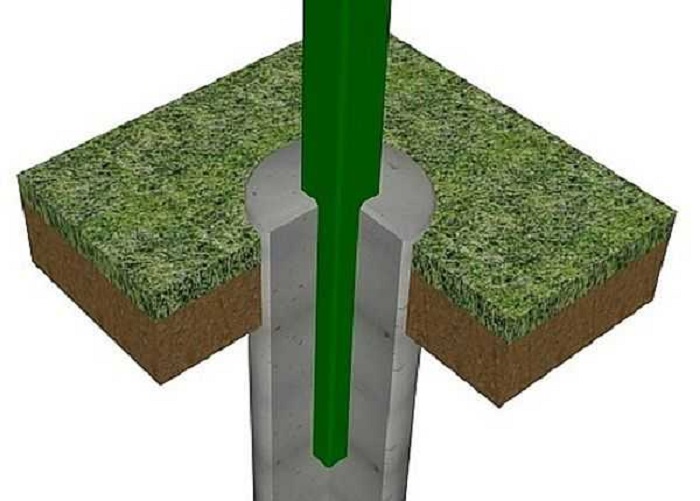
. It's easy to make it enough. We take the car with a diameter of 50-60 centimeters (it's easier to borrow from a neighbor) and begin to make a gazebo from the tree with your own hands. We make markup (for example, 4 by 4 meters) drills 4 holes 1 meter depth, pour concrete. You can use cement M300, proportion with sand and rubble - as for foundations. After 15-20 days, it is safe to build a terrestrial part of the structure.
Brickwork
. A very simple way that comes up to everyone who knows how to paint a shovel and a trowel. The essence of this method is as follows: Easy the pit 60x60x60 cm, then pour 1-2 buckets of concrete to the bottom, lay 2 silicate bricks along and 1 next to across. All subsequent rows of bricks lay in a chess order until "Colon" will not be higher than the level of the Earth for about 20 centimeters. So lay out 4 columns (or 6 pieces, if you have conceived to make a hexagonal wooden gazebo With your own hands), after 15-20 days you can proceed to further construction. 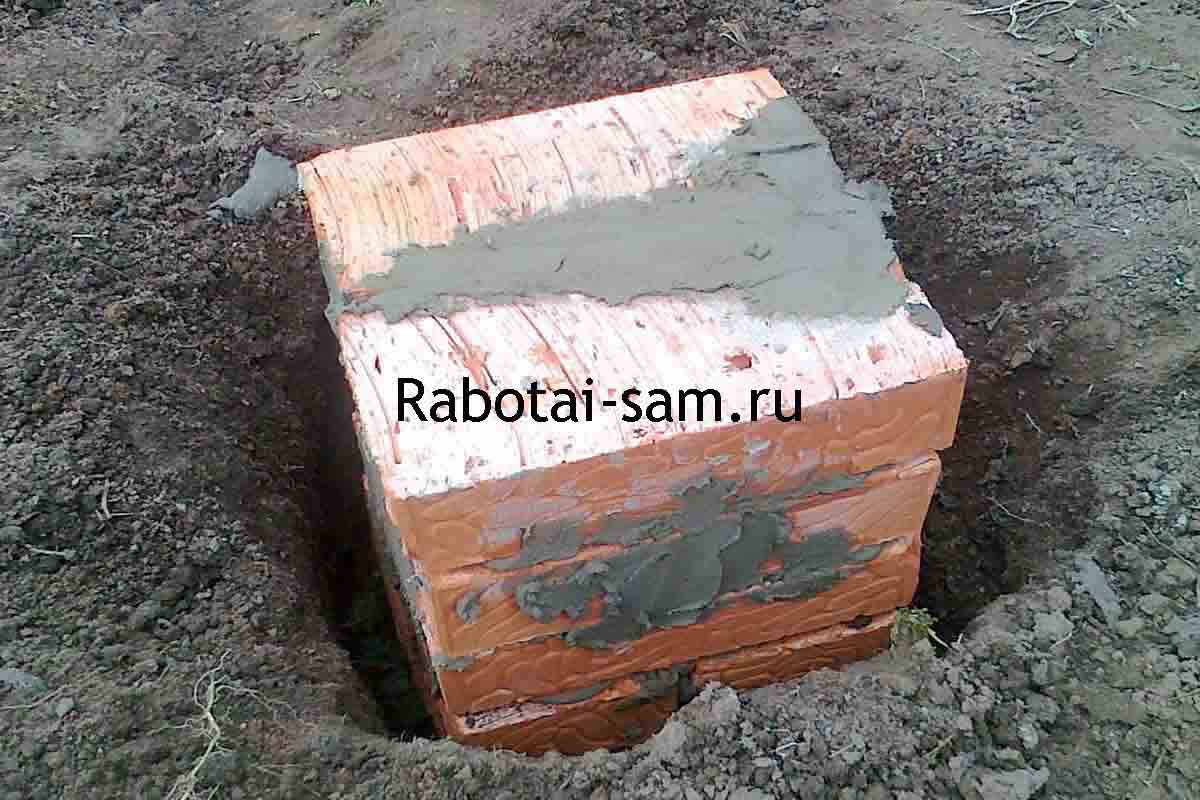
Burned block
. We take a shovel and go to roast the treasure in the yard. A conventional concrete block is suitable for a long 50-90 centimeters. It is necessary to pull out the appropriate pit, pour 10 cm rubble (if it turns it to rub - generally excellent), 5 cm of sand and omit the block. So repeat for each column. 
All the above methods are suitable in case you make a simple gazebo with your own hands (up to 30-40 square meters). Heavy structures (including with multi-level roofs) are installed only on tape and deep columnar foundations, since the mass of the structure can deform brick masonry, blocks or poorly made concrete. In some cases (for example, two-story arbors) even drainage will need. 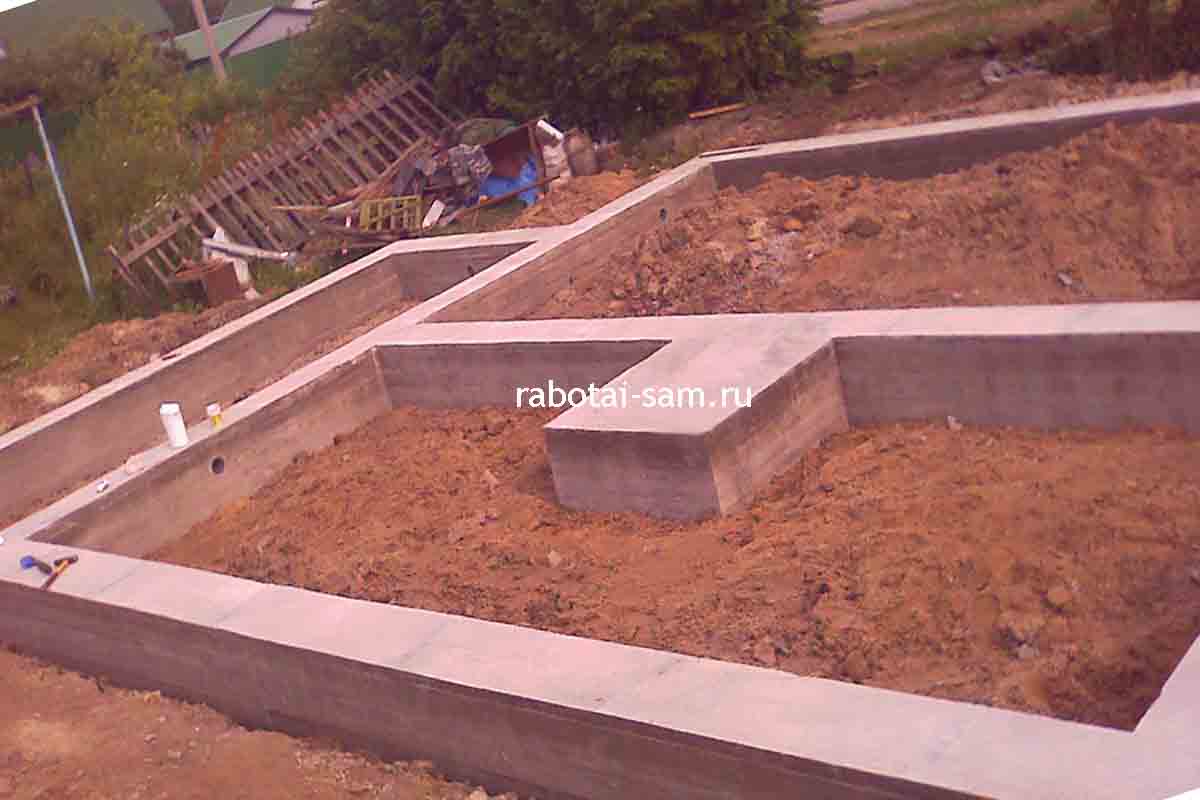
For all the SNiP and recommendations, the foundation should be set at least 24 days, but the actual period of its curing is much smaller, since it will not be influenced by heavy loads until the construction of the roof and the installation of all furniture. You can start the "light" work already on 5-10 days after His fill - nothing will be. Now is the time to consider the features of the adjustment of the arbor do it yourself, drawings and the size of the structure, materials.
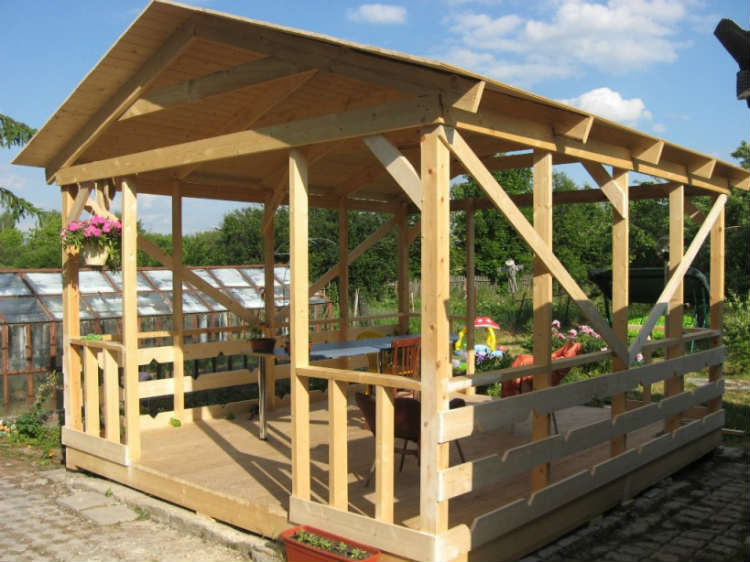
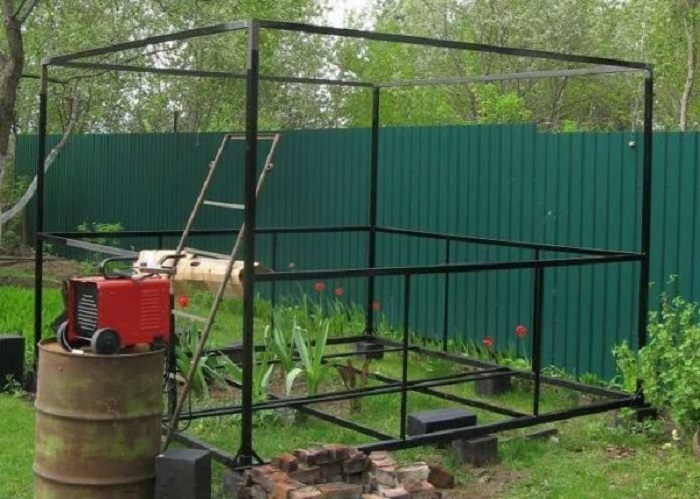
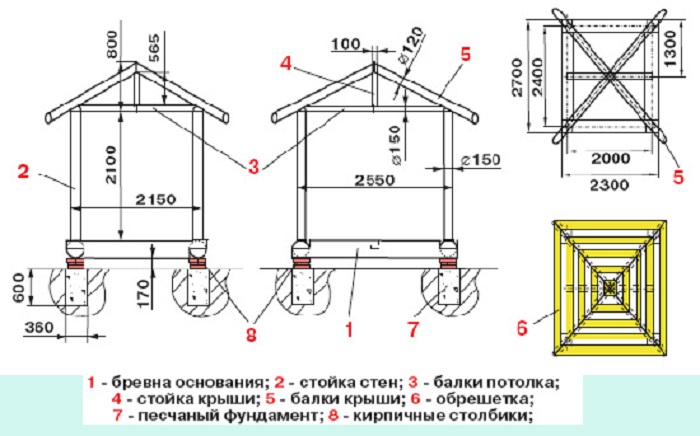
We make a wooden frame
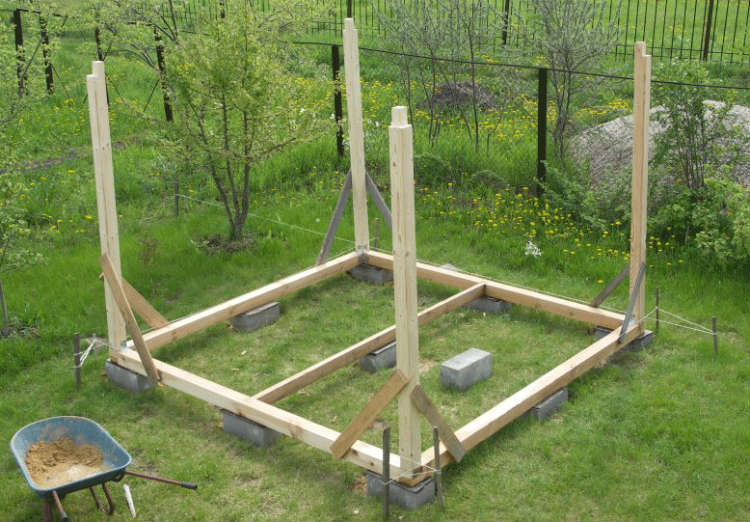
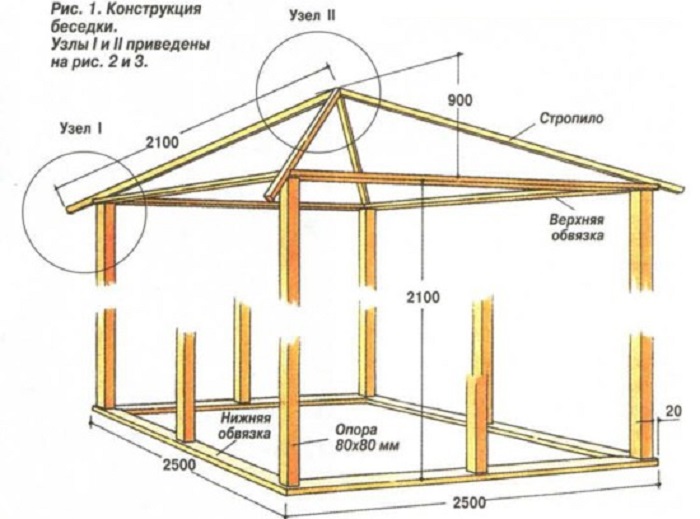
Let's start with the racks. Actually, it will not work from another. We will use wooden bar. 30 by 30 centimeters, since it looks much better (massive details are always in fashion) and it will be easier to mount the body kit. The minimum size of the bar is 10 by 12 cm. Now you have 4 supports that need to be fixed on concrete columns, and you can do this in several ways.
By implementing the construction of the arbor from the tree with their own hands, you should use the level as often as possible, especially in the case of concreting supports, because it will be impossible to fix it. It should form a straight corner with concrete base And be perfectly even about the plumb.
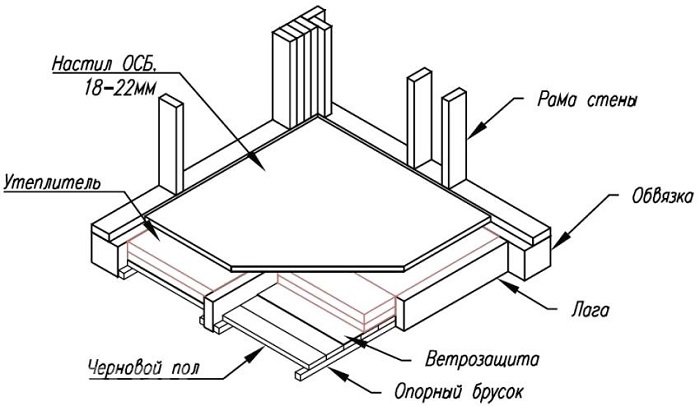
Now you can go to the bottom strapping of supports and laying lags. It is necessary to make the most stable surface that will easily endure the weight of the flooring and a large number of people who will be on it. Consider the process of building the floor Arbor for giving with their own hands step by step.
STEP 1 : Binding. We use the timber 10 to 15 cm (this is with a margin), which must be put between concrete column column and scunning downstairs. It must go strictly horizontally, measure the level. When the angle is deviated, it is necessary to put something on the support that is below the level. 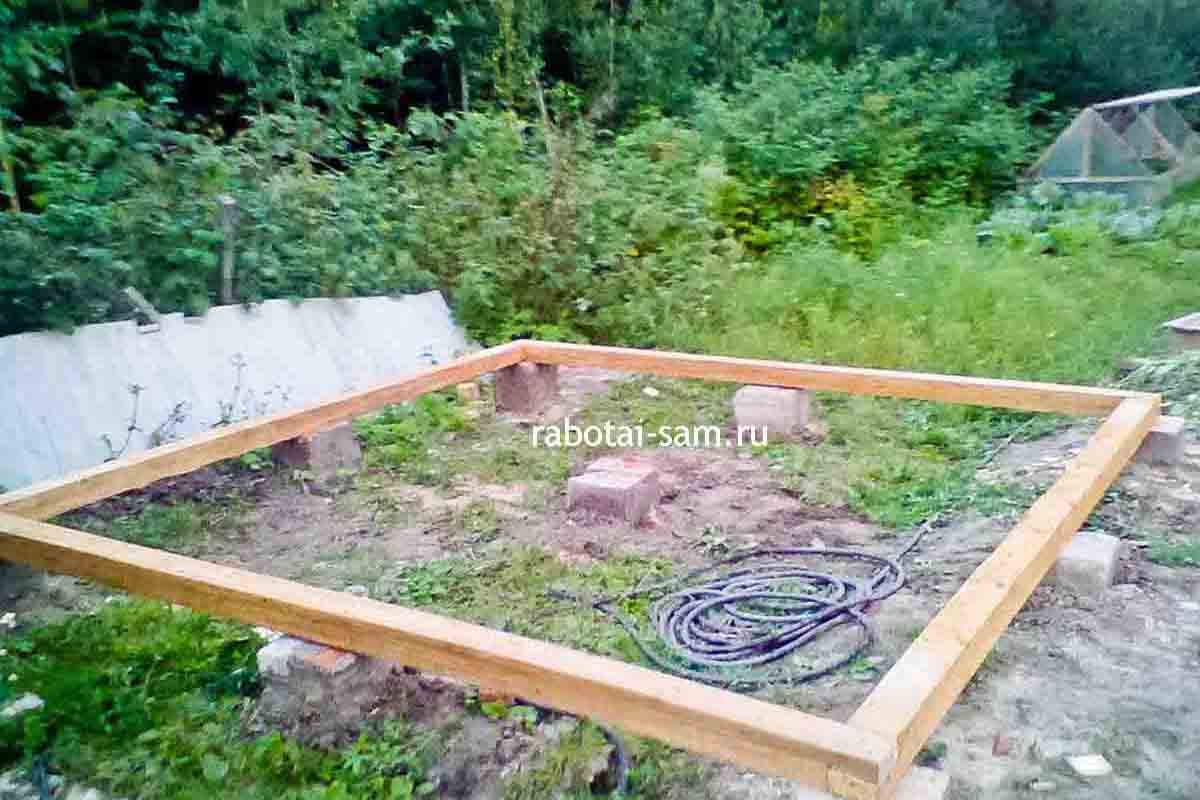
Step 2. : Make a central jumper-gain. Fresh bar 5x10 cm exactly in the middle of two sides of the strapping of the arbor. It will prevent the seating of boards or any other flooring in the gazebo. If the construction has the parties more than 3 meters, the number of jumpers must be increased. Approximately 1 amplification of 120-150 centimeters. 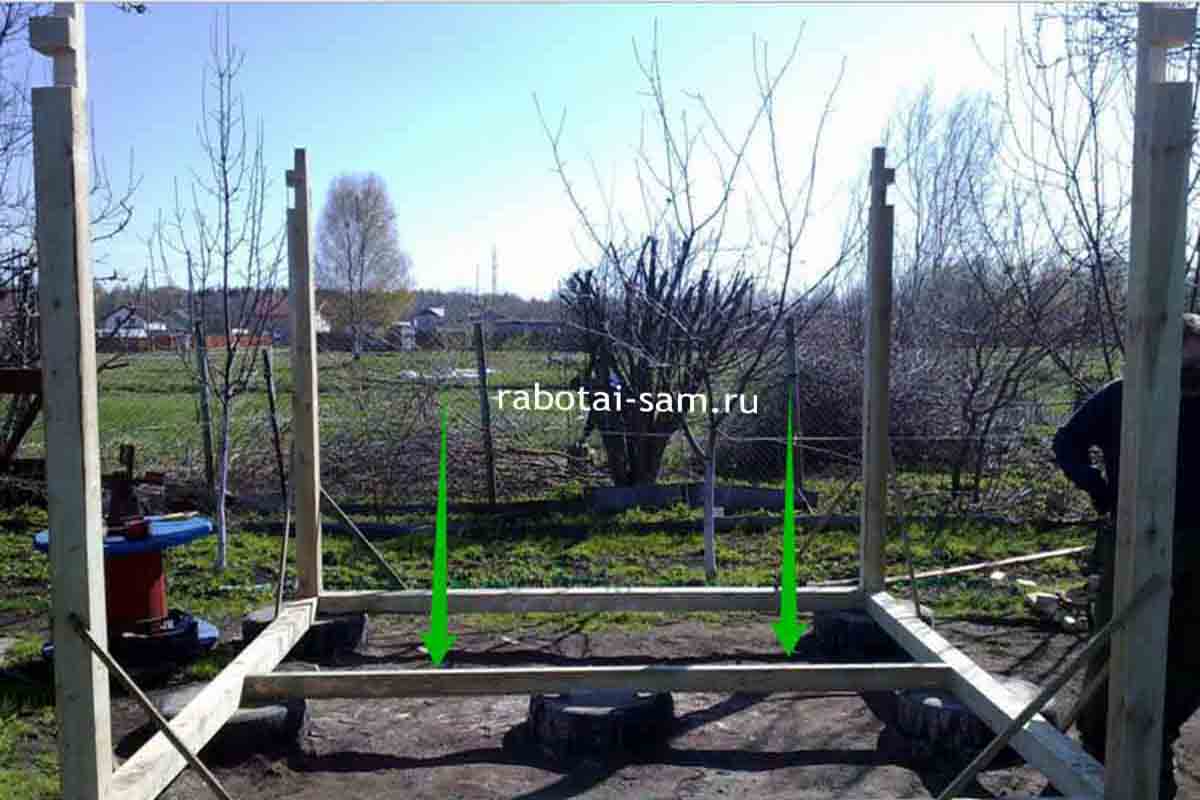
Step 3. : Put on top of the board. You can use the boards 250 width and 3-4 cm thick - the optimal version for solid loads. The length can be chosen both complete (across all the gazebo and fasteners) and partial (only between amplification). It is better to use short boards, they will last much longer and their cheaper will replace in case of damage. You can use both nails and screws, not fundamentally. 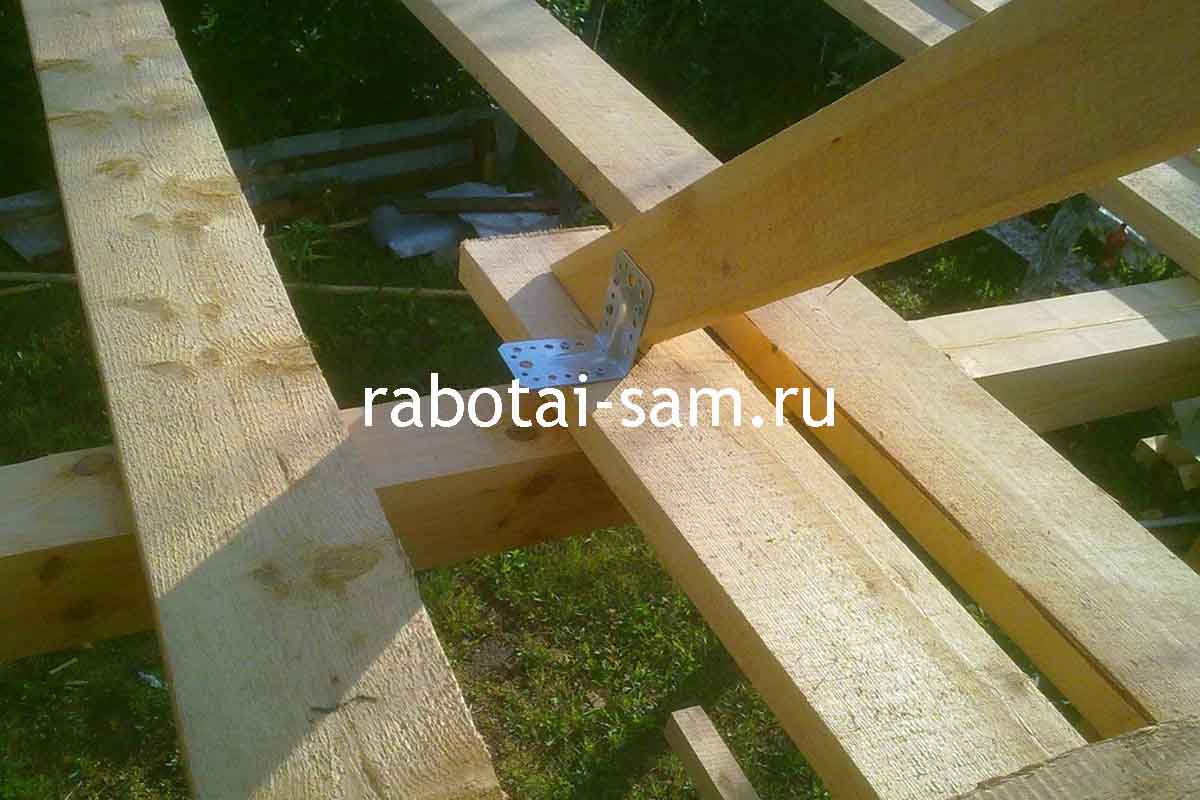
Step 4. : Open anti-corrosion protection. The usual inexpensive impregnation is suitable. A good varnish can be processed after the end of all works, its consumption will be much smaller after the primary impregnation of the tree that you will do now. 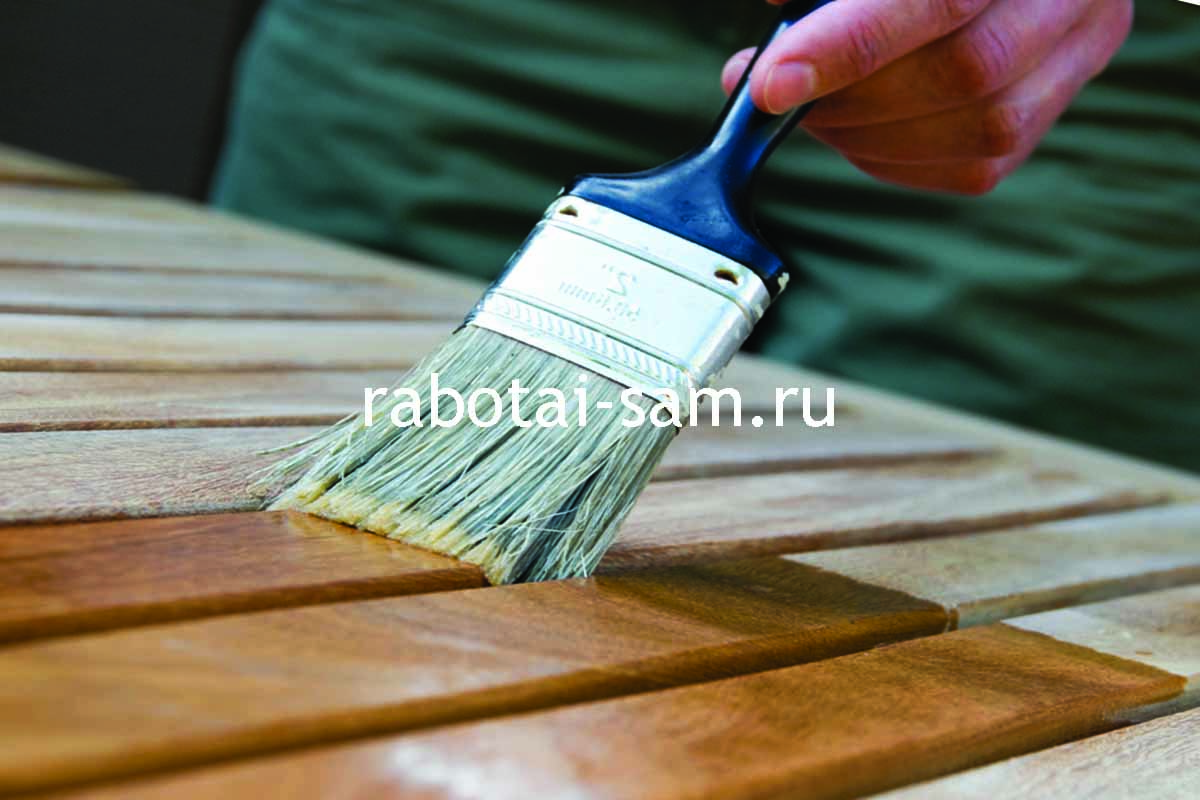
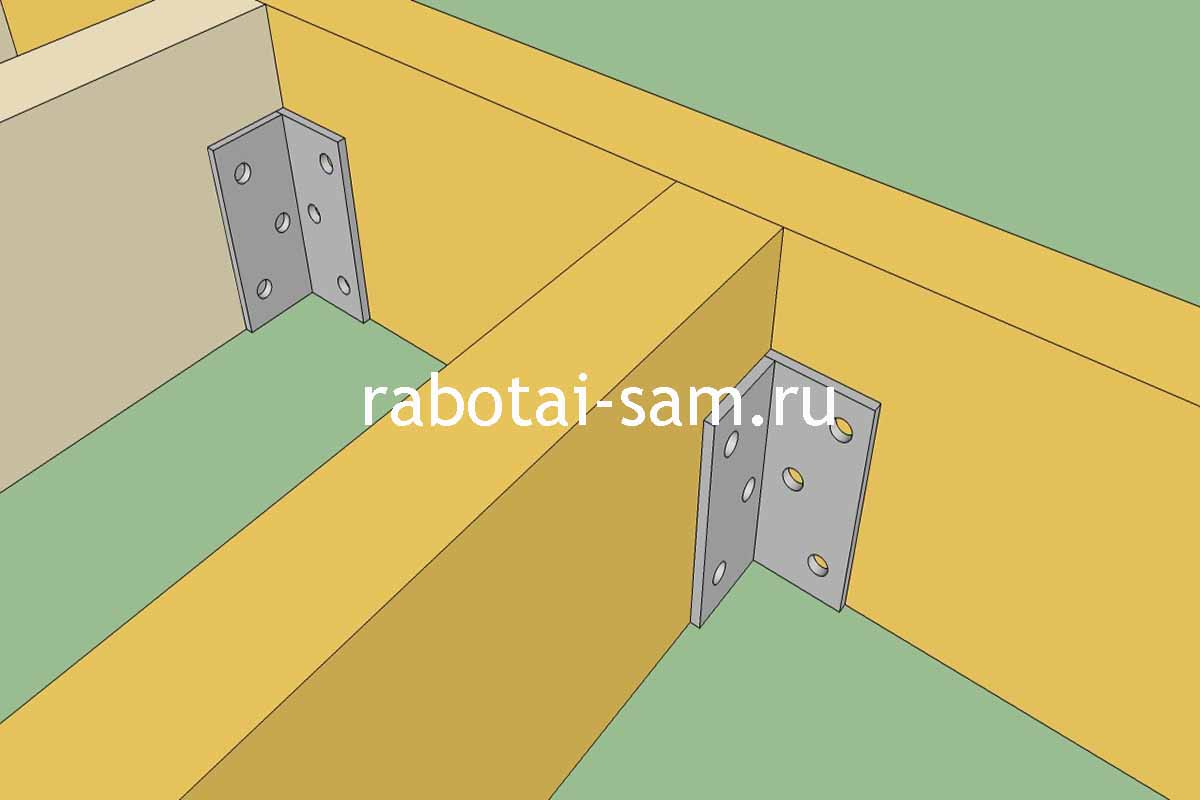
When fixing gender lags and all amplification, it is better to use metal angles with perforated sides. You can find them in every construction store. The height of the clamp is better to pick up the height of a wooden bar to secure it as much as possible. It would be appropriate to start a powerful screwdriver, because you have to screw up a lot of big screws, you can do a screwdriver, but it is quite difficult.
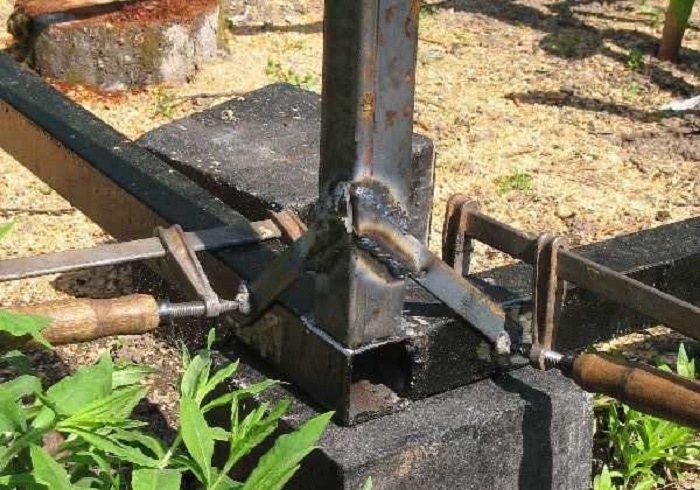
Additional reference racks at the length of the arbor up to 4 meters can not be used, if the design is more, then you need to strengthen the upper strapping. In the middle of the wooden bar of the lower strapping, it is necessary to fix the metal rack (square 30-45 mm) and align it in terms of level, it will "maintain" the upper wooden strapping that we will be installed in the next section of the article.
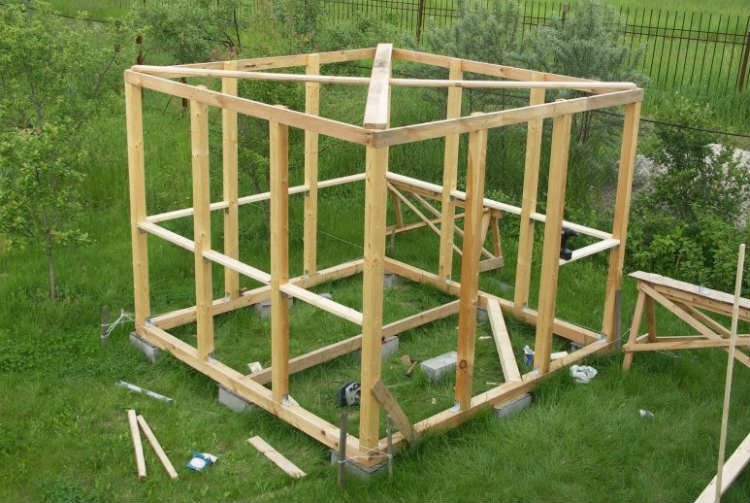
Construction of the roof of the arbor do it yourself - step by step instructions
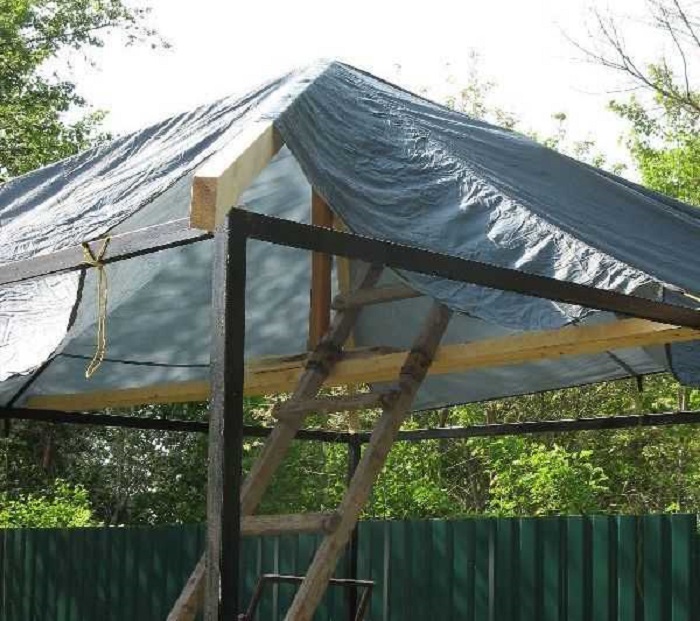
We now turn to a more complex process - the construction of the roof. Options, how to make it very much, up to the construction of multi-level Chinese structures with curved corners. But our main goal is a gazebo with their own hands from healthy materials, which can be found on any market or in the stock store, so we will do a simple and reliable design.
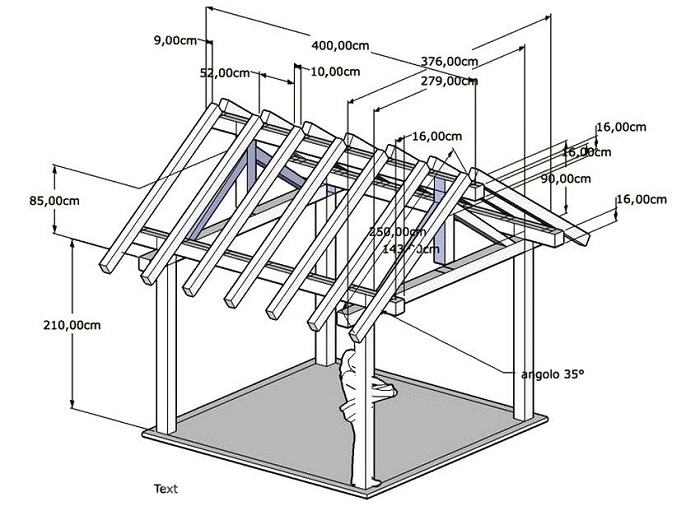
STEP 1 : Upper strapping. All exactly as below, only now we use the rear of 10x10 centimeters. The load on it will be much smaller than the floor, so it makes no sense to lose design and translate money. If the roof is from a flexible tile or runneroid, you can put a timber and 50x60 mm at all. In the middle, twist with additional support racks that we have considered in the previous section. 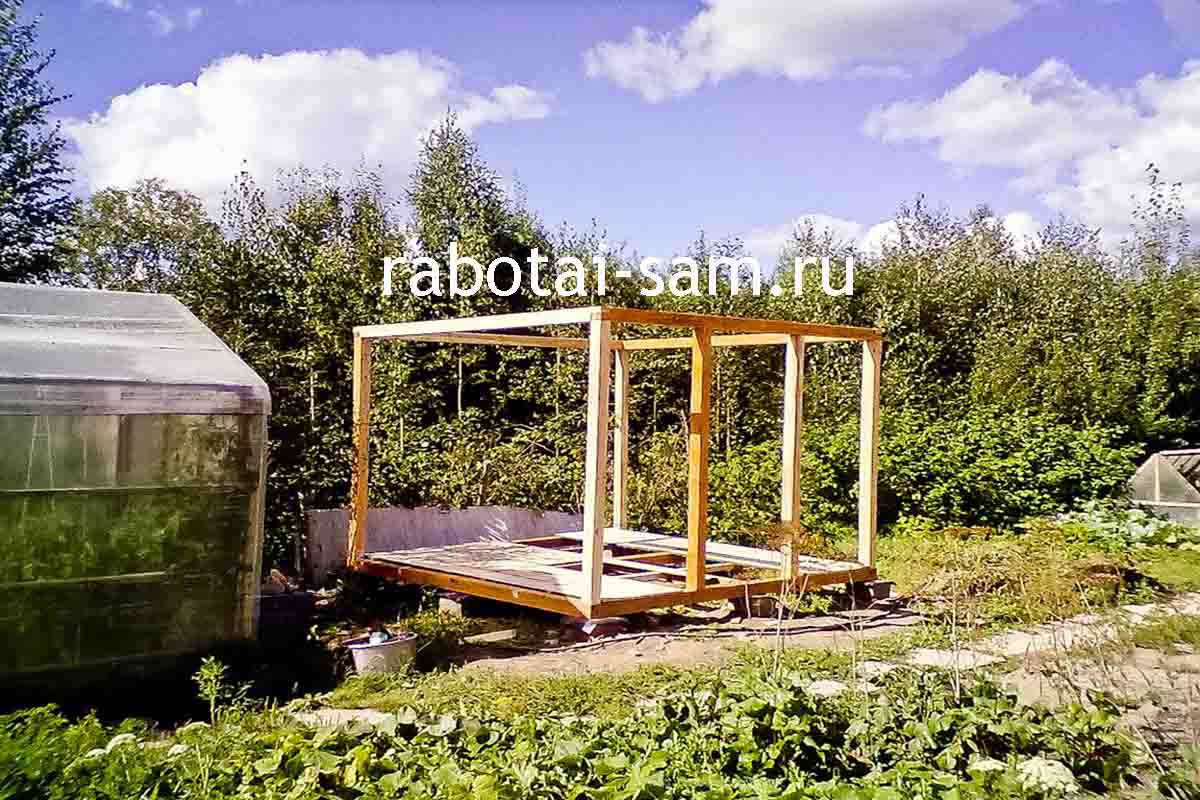
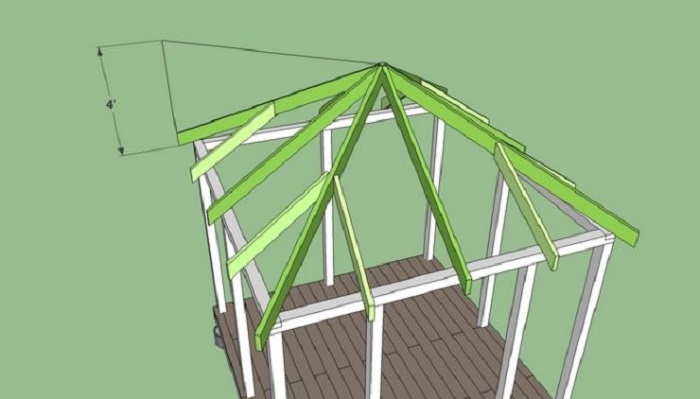
Step 2. : Main rafters. A wooden timber 80x30 mm is suitable for a gazebo with parameters 4x4 meters and less. Install from the corners of the upper strapping to the middle of the room, it will be better to use a plumb and professional levelIn order to set the same and consolidate all 4 rafters. The top edge of the bars is cut off at an angle of 45 degrees so that the rafters come together in the center of the room without intervals and protrusions. 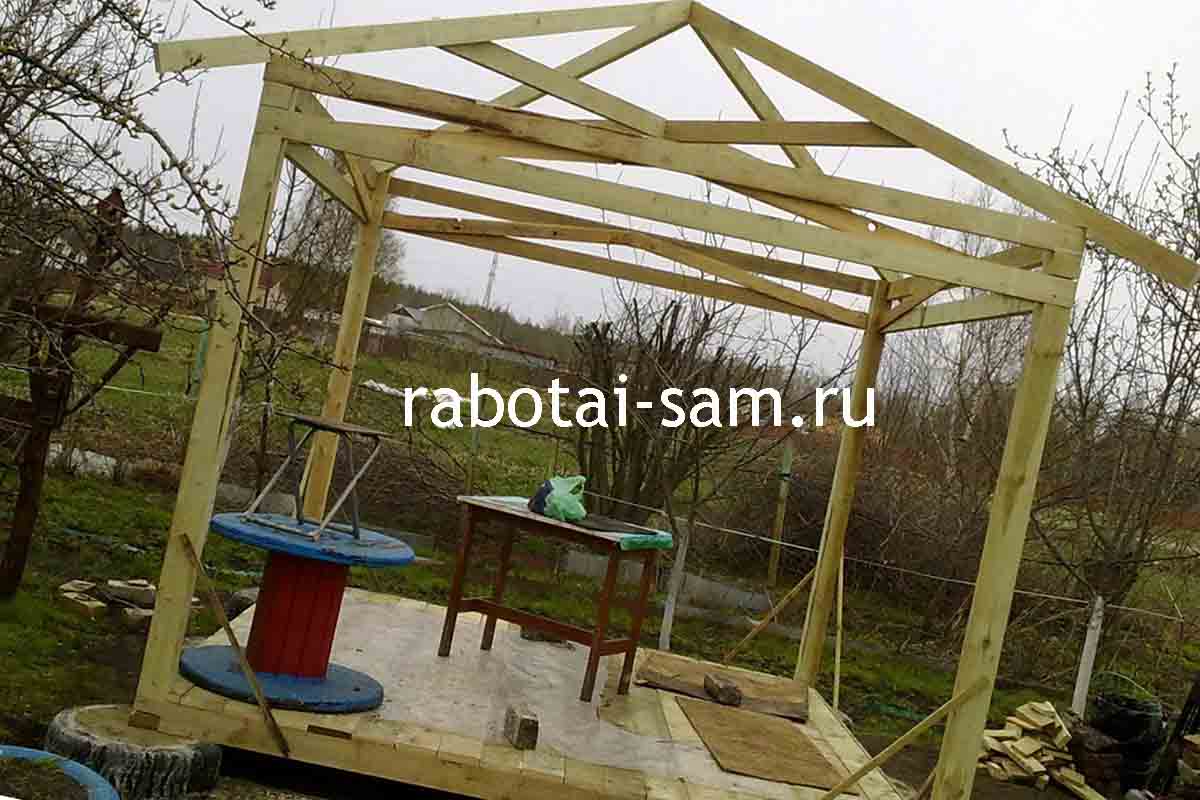
Step 3.: Auxiliary rafters. We find the center at each side of the upper strapping and install auxiliary bars (40x30 mm) up to the center. They will maintain roofing materialPrevent the roof seating. Be sure to lay everything in terms of level, to withstand the same value. Check the flatness of the design, if anything else does not perform, you can twist all the screws and fix with metal clamps at the top. 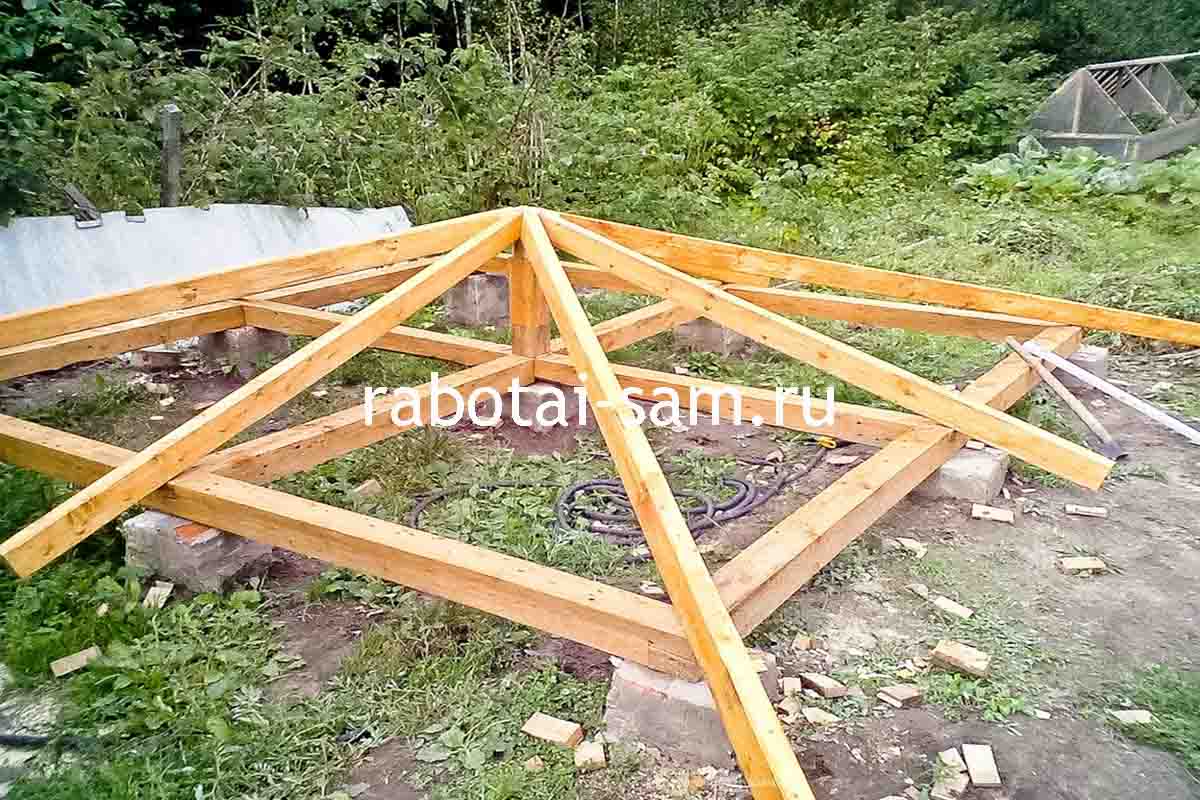
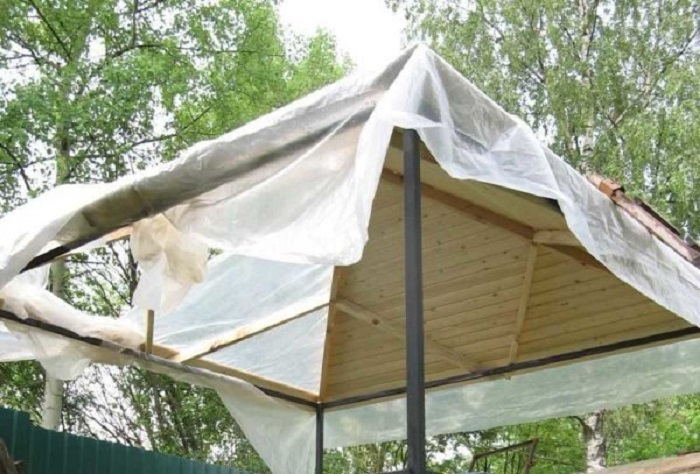
Step 4. : We are placing plywood or OSB. Everything is simple here if the rafters are pre-aligned. Screw every 20 centimeters to the main and auxiliary rafyles. You will definitely need to cut sheets, make it easier on Earth, previously noting the right lines. 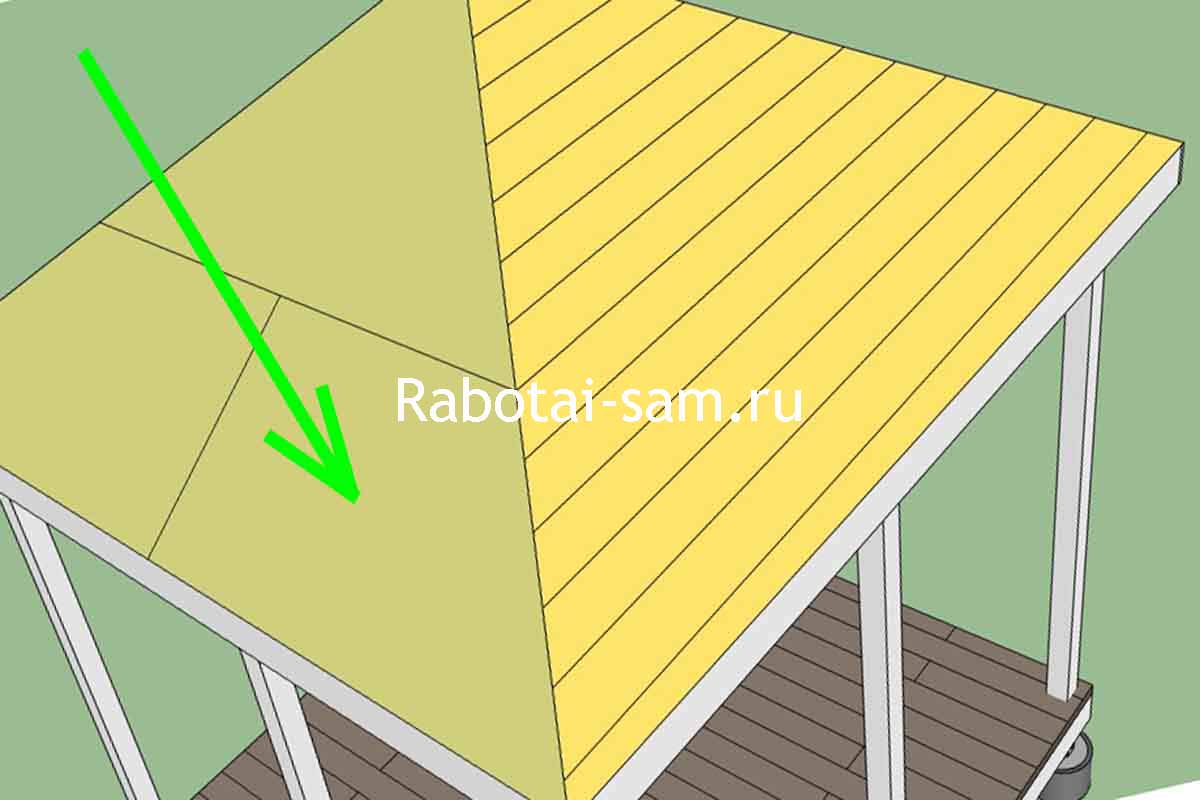
Step 5: Roofing material. Now you can lay anything, but it will look beautiful to watch euruberoid or flexible tile. We begin to put it from below, or on top, appling each next sheet under the bottom of the previous one with the overlap of 4-5 centimeters. From above, you can make a "horse" to prevent moisture from entering. On the main rafters, you can easily access the edge of the material and scril it to avoid ugly metal protection from water. 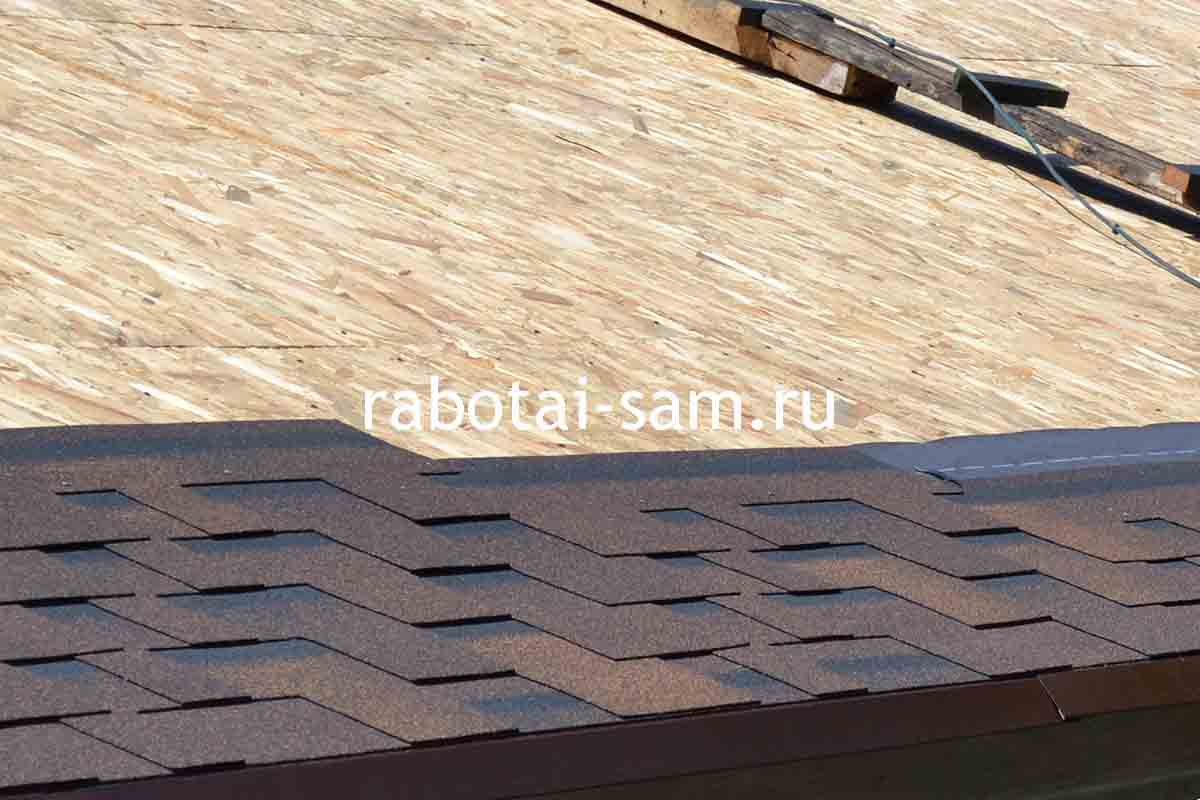
We looked at how to build a gazebo with our own hands and you only need to additionally open all the tree to be lacquered so that it is not subject to corrosion. It is best to do it at the end, because in the construction process, materials are always damaged and have to be interested.
If you wish to decorate the construction, you can install braided panels on the bottom strapping or put a wooden bar - it will be much more comfortable and neat inside. But if you are looking for a way to make a gazebo with your own hands with minimal investments, then you will have to abandon such decorations. One panel (400 per 80 centimeters) from a woven vine or slats will cost at least 4000 rubles.
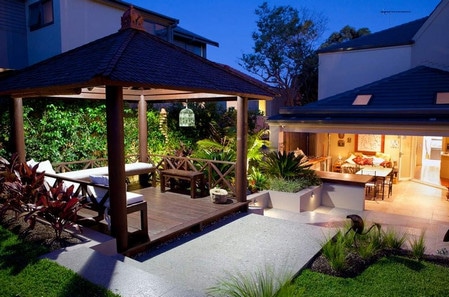
You brought the plot to perfection: with even rice grocers, gorgeous flower beds are adjacent, pulls cool from the artificial pond, we rustle, secret, trees and smiling garden figures. You can admire such magnificence by day, but in the open sky you can't arrange for a long time. The gazebo will help diversify the country leisure and decorate the territory. From buying a finished design, unnecessarily high prices scare up, and the gazebo does with their own trees from the tree will cost and embody your ideas about the perfect place of rest.
Step-by-step video: Stages of construction of a wooden arbor from scratch
Tree gazebo: Maximum advantages at a minimum of flaws
Serious lack of a tree one - it cannot serve forever. But the advantages in favor of applying this material there are many.
- Naturalness. Taking care of health, we increasingly appeal to the truly natural. The tree is breathing and does not contain harmful substances.
- Full harmony with surrounding shrubs and trees.
- Low cost.
- Incomitant to the professionalism of the master - working with a tree is not difficult.
- The speed of construction - if you do not work out, but to devote all days to the occupation, the construction grows in front of the eyes.
How to prepare for construction
You must clearly imagine what you want. Decide which gazebo will be:
- open or closed;
- huge for reception of guests or a little for relaxing in a family circle;
- round or rectangular - these are the most common types of design, you can decide on others;
- with wooden, stone or brick pillars.
If you do not plan to grasp the structure, it is suitable for an elegant open gazebo on bars supports
Work will go like oil, if you first decide all the problems associated with the future construction:
- make a drawing;
- calculate the consumption of materials and buy them;
- prepare the tools to be in a responsible moment to send household to neighbors per drill or bolts;
- clear the plot from vegetation and garbage;
- follow the territory;
- provide a free passage around the built-up facilities for at least one person;
- srepe top Soil - water will not accumulate under the floor;
- imprete wooden design details with antiseptic or moisture protection solution.
Wooden elements Pre-process moisture protection impregnation
Wooden arbors with their own hands: Phased construction in all rules
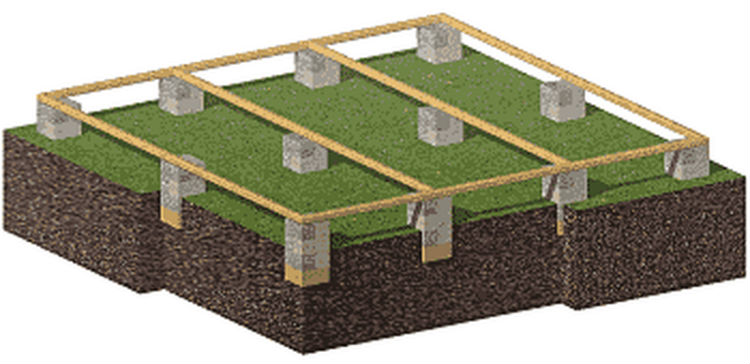
Create a solid foundation
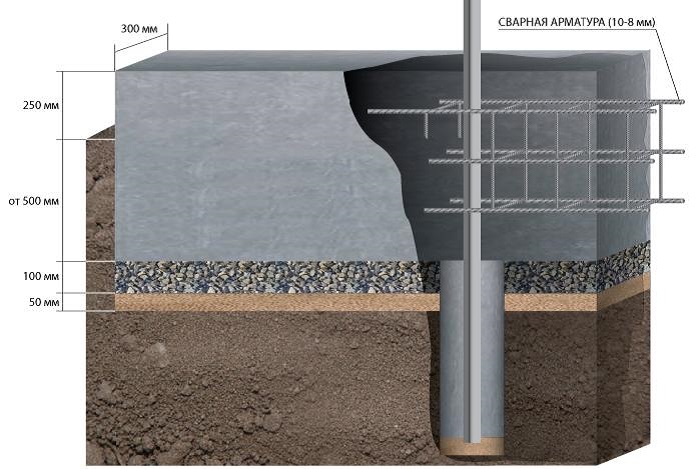
The foundation depth is directly dependent on the type of soil. If the groundwater is lowered low, 50-centimeter crashes will be enough to install the supports, and you can fill the base with a solid casting.
Dug out, if you wish, further strengthen it with reinforcement: corners or metal rods. You can put the pits on the bottom of the pits: stones, crushed stone, broken bricks, all the remaining garbage. By pouring the construction of concrete, make sure that the resulting surface is horizontal. Within three days after this work, you can relax peacefully: such a term is provided for grazing concrete.
With the proximity of underwater sources to the surface of the Earth and on the clay terrain, such a foundation is not recommended - the construction can "swim". In this case, it is better to build a gazebo on the poles.
Another danger of clay soil is its uneven freezing. So that the structure does not bother, wrap the supports with a polyethylene film.
On the ground soils and at the proximity to the surface of underwater sources, install a column foundation
Foundation Actions:
- Carefully check the territory, put the pegs, pull the ropes.
- Dock the pits: one is in the center of the construction, others in the corners. The dimensions of the recesses correspond to the parameters of the columns, for support 100x100 mm there is a fairly square with a side of 150 mm.
- The strength and durability of the columns will give the processing of their lower part by bitumen, antiseptics or tar.
- Pull with rubble pits and sink it.
- Put the pillars strictly vertically, checking the position level.
- Fill pit concrete solution.
- Leave for a complete burden for two to three days.
The next part of the work is the strapping. In places of intersection of bars, the tree is removed, the parts are connected to each other and are fixed with self-drawing - it is better to use special, intended for wooden structures. If you do not want to get a cleaning ugly house, do not forget about the right assistant - Level, check the horizontality when placing each row.
We make the foundation of the building
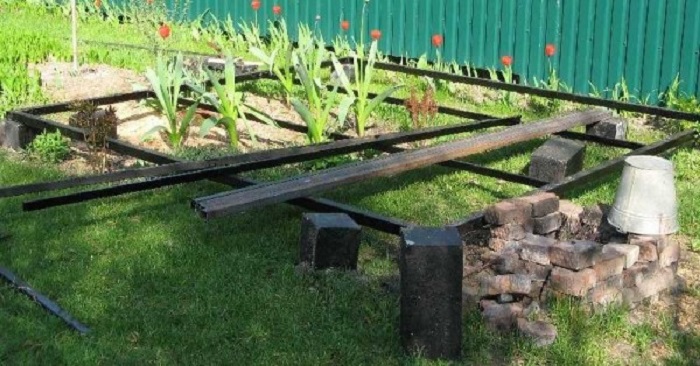
The easiest way to build from wooden bars. A gazebo from a bar is rapidly being built. First, vertical supports are fixed to the base, then the parts of which are gradually fit, the optimal size of which is 100x100.
The floor is better to lift a little so that he does not get wet in the rain and was warmer
Build the bottom design
The floor can be flattened at the ground level, but it is better to raise so that it is not a wet in the rain and was warmer. In this case, the base is arranged using an additional screed: stretch between supports, as well as central points of opposite sides of the bars. Floor Construct, tightly laying smooth boards. To the raised gazebo lead steps, the edged material is also suitable for their construction. If you do not want to rise construction, use concrete or paving stone as the base.
Build a roof
Both possible roof options: double and quad - fit to wooden design. The basis will create 4 rafters. In the first case, they are connected by a horizontal rail in the form of the letter "A", and in the second to the additional, additional, coming from the centers of the parties. There are one-sided roofs - canopies, erect them easier.
The original decoration of the building will be bright tiled roof
Collect the roof base is more convenient on Earth. On the inside, the design is not particularly beautiful, there is a desire and possibilities - bypass this part with the clapboard. What will be the coating - to solve you. Note that the leaf iron will ring during the shower, and the usual slate with hurricanes will split in different directions. Modern materials - roofing stone, tile and others - it is easier to lay, and the choice of color is impressive, but the costs of them will be more.
Interior decoration: Give fantasies
Think about the walls
A thorough construction with windows and doors will be the refuge in cool and rainy days. Side with prevailing winds Leave deaf. Eliminate the gaps when equipped with windows and insertion frames eliminate with the assembly foam.
Decide how much time and money you are willing to allocate on the processing of the walls, and act - to choose from:
- warboard;
- use stucco;
- secure plasterboard sheets;
- paint;
- stick wallpaper.
What to do with floor
Natural wooden floor looks at the same time naturally and stylish. Cover him with varnish and boldly walk barefoot.
Excellent solution - duplicate the female structure of the wooden floor in the design of the walls and supplement the interior of the gazebo woven garden furniture
For durable laminate and linoleum, it is easy to care for. If you stopped on such a coating, do the basis of the material from the dry chipboard. It is desirable to strengthen it with Olifa.
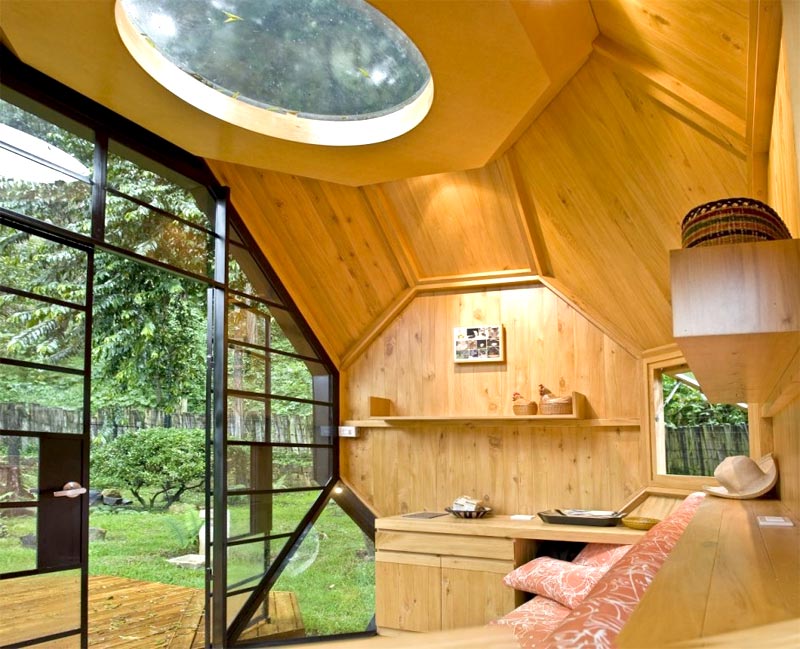
How to decorate the ceiling
Well, when the top and bottom of the house correspond to each other. The lining, which was concluded above, and the wooden rail was perfectly combined in style with natural floors. If there is a skill work with finishing solutions, the ceiling can be plastered. To the laminate and linoleum, pick up the panel of polystyrene foam, they are mounted quickly and do not require high costs.
Not necessarily stop on traditional forms
Attention!
We work only in warm dry days, otherwise your efforts will go as shock - the finish will foam, will disappear, and the construction will require repair.
Electricity in the gazebo: safe and easy
Spend electricity to the construction, and you feed it instantly. In the fresh air, "Newtonian" ideas come to the head - connect the laptop and work. Children will quickly turn a well-lit giggle into the favorite game.
Lighting in the gazebo will help make her favorite place of the whole family
All Wiring Installation Works Conduct to finish: cable wiring, mortgage installation. Note that the tree easily flashes and quickly burns. For laying an electrical cable, use a special corrugated box, it will protect from the fire when the voltage and closures are jumps.
Quality lighting - security and security deposit
The end of construction will prompt you to a new surge of self-expression. Wooden gazebo - immense space for further creativity. Sit near the curly plants, put the pots with flowers, launch interesting tracks to the house. Cute curtains, funny lanterns, children's toys will emphasize your personality and turn the construction into an extraordinary, amazing paradise. Enjoy your holiday in a cozy gazebo!
Wooden gazebo for cottages - light and relatively cheap street construction for summer holidays (as well as spring-autumn, and sometimes - winter) and an integral part of a beautiful country site.
Depending on the appointment, budget and opportunities, you can quickly make a simple (temporary) design of girlfriend. And you can attach the soul and make a product - a carved gazebo. Here we are in detail and gradually describe in the form of a step-by-step instruction, how to build a ledge from the tree with your own hands.
Stage 1 - Selection of Styles Arbor
From this the work on the construction of the arbor begins. Since it should be not only functional, but also to decorate the country's cottage.
Garden gazebos differ:
For functions: stationary and portable.
Note. Wooden gazebo, because of its gravity, it is rarely portable. Usually portable arbors are made of lighter polycarbonate on aluminum frame.
At the place of installation: attached and separately standing.
By structural features: closed, semi-closed and open.
The most popular is an open wooden gazebo. But the closed gazebo of the tree is more like a guest house and can be equipped with heating for permanent or periodic accommodation.
By number of floors: single-storey and two-storey arbors
On the basis of the base:
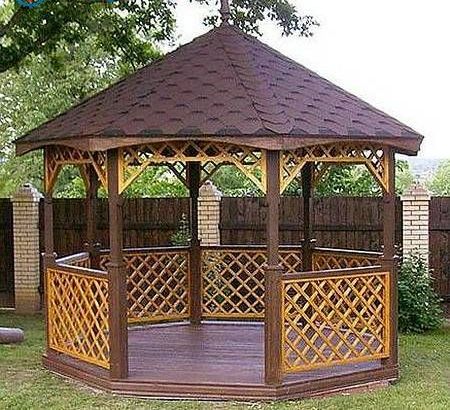
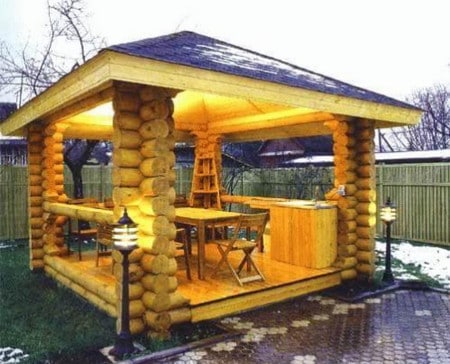
rectangular Tree gazebo, Hexagonated wood gazebo, octagonal wood gazebo
Style:
Classic Arbors (Classic Style)
Country style gazebo
Eastern gazebo (in oriental style)
Arbor Ethno (in ethnic style)
Forest-style gazebo
Gazebo in style minimalism
2 Stage - Select Places for Setting Arbor
Solving the issue where it is better to establish a gazebo from the tree in the country area depends on many factors.
Choosing a place under the arborement you need to consider:
dimensions of the arbor. Simple gazebo From wood can be installed anywhere in the yard, plot or garden, but for a more cumbersome structure you need to highlight a large area. In addition, it should not be put in lowland in order to prevent the destruction of the action of melting water;
relief area. The base under the arboretum should be as even as possible to simplify its further construction and operation;
place of green plantings. Gardening Gazebo Create a unique color. Therefore, it must be installed, so as not to damage the flower, flowers, shrubs, perennial plants;
specificity of use. The gazebo can be installed next to the house. In this case, it will be convenient to use as a dining room. Or put in the depths of the garden - a place to relax and privacy.
Note. The gazebo often becomes a place for children's games. Therefore, it is better to have a nursery in the visibility zone.
accounting wind load. Construction is better to organize part of the site protected from the wind. It is also desirable that the gazebo is in the shade;
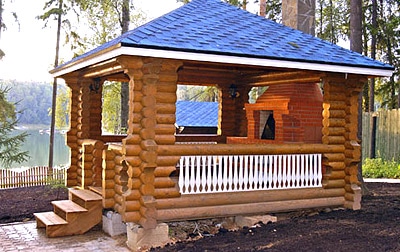
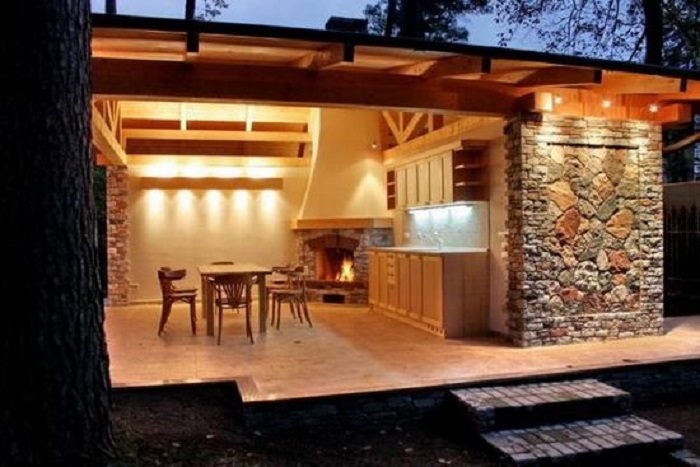
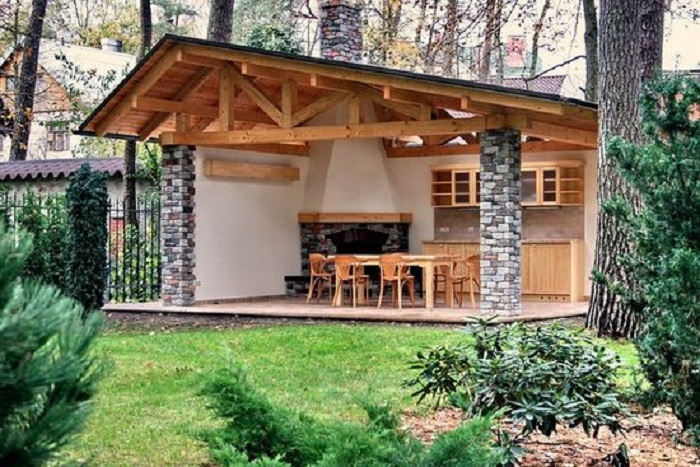
additional devices. There are constructions that combine the recreation area and, for example, an economic block. But the growing popularity today acquires a mangal or barbecue tree gazebo.
Note. It should be placed a gazebo so that electricity can be carried out and, if necessary, water.
the presence of a beautiful view from the arbor. If possible, it should be removed from the economic buildings, toilet, entry into the courtyard, garage, etc.
3 Stage - Tools and Materials for Construction Arbor
To work, you need to cook: shovel, construction level (with the size of the base over 3 meters, it is advisable to use water), plumb, roulette, rope for marking, stakes, hacksaw, jigsaw, hammer, drill, screwdriver.
From the material you will need: sand, crushed stone, cement, lumber, hardware and fasteners, wood processing materials (impregnation, paint, protective compounds), roofing material.
About how to choose a tree for a gazebo need to tell in more detail. After all, despite the low cost and availability of a tree, its environmental friendliness and the ability to fit into any design of the site, it has such disadvantages as the short-life and the need for constant care.
To extend the service life of the country gazebo from wood, you need to pay attention to such factors as:
wood breed: coniferous breeds (larch, pine) or deciduous (oak, ash);
Note. The beech wood does not oppose wood bugs and does not breed in the sun. Fir is subject to damage to the fungus.
view of lumber. For the construction of the arbors use log, timber (profiled or glued), board. Today, it is fashionable to make a landscape of a plot in a Russian style, which is part of the part of which are arbors from a bar or a gazebo from the rounded log. The use of these materials is good as well as they do not require additional protection or decorative finishes (cladding);
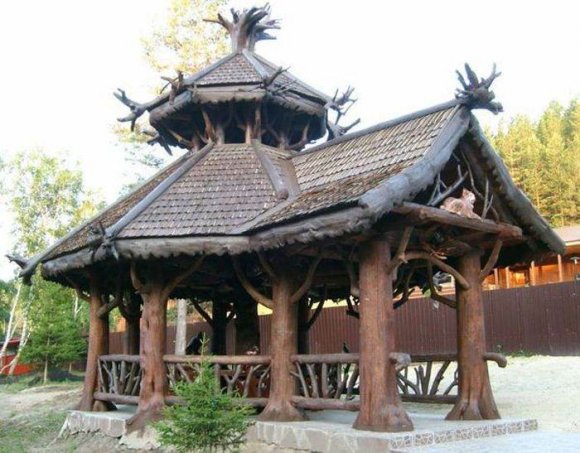
You need to choose wood, taking into account the style of the arbor. Classic style requires the creation of the effect of lightness, and therefore, it is necessary to work for work - a bar for supports and racks for decoration. Summer gazebo East-style wood is characterized by an open design and a significant number of decor elements. Ethnic style, for example, Russian, involves the use of rudely treated logs. Style "Forest" requires the material to make the most harmonized with environmental. In this case, treated trees with large branches (bits) are often used in the form of supports.
4 Stage - Drawings Tree Armors
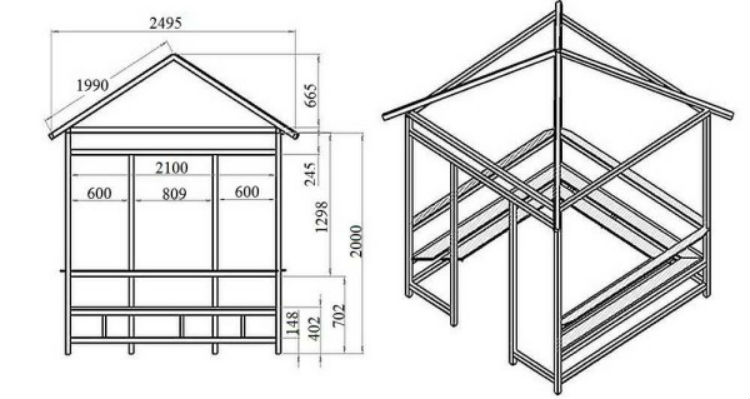
Explain how to make a wooden gazebo, without a drawing or a scheme is difficult, and it is practically impossible to build at all. Projects Arbors from wood take into account the mass of components, among which:
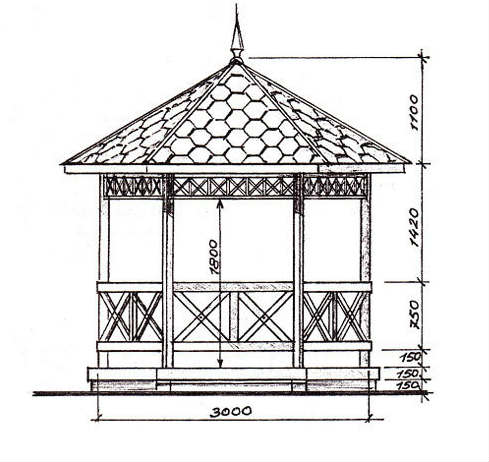
dimensions of the arbor. Note that GOST or SNiP does not regulate the parameters of the arows, they are selected by the user arbitrarily. The only thing that is worth using in this case is the recommendations on the height and minimum size.
The height of the design of SNIP 2.08.01-89 (for peculiar purposes) should be at least 2,300. In practice, the gazebos rarely exceed 2-2.5 m (it means the height of the ceiling, the roof dome itself can rise by another 2-3 meters Up depends on design project).
The area of \u200b\u200bthe arbor - comfortable for the residence of one person according to the said standard, is 2x2 m. Thus, it is possible to calculate its size, based on the number of people at the same time in the construction.
plan of a plot that contains information about the location of the house, housekeeping, trees, garden tracks, well, pond, septic, etc. It is needed to be able to accurately calculate the place of installation of the arbor;
wooden arbor scheme with dimensions.
Below are drawings of wooden arbors, taking as a basis that you can easily adjust the size of the construction in accordance with the desire of users.
In the detailed form, the drawings of the arbor from the tree will have this kind:
How to build a gazebo from the tree do it yourself
5 Stage - Preparation and markup of the site
The preparation of the site includes the definition of the place of installation of the arbor, eliminating the extra green plantings and removing the upper layer of the turf, as well as applying the markup of the future design.
How to make marking under the arbore
A rectangular or square wooden gazebo is the easiest of the options for the arbor framework. However, carrying out marking, it is important to withstand an angle of 90 degrees. In order not to make a mistake, you need to use the square.
How to put straight corners under the arborement?
To do this, make markup, check the corner of the salt, and you can rip yourself with the diagonal of the rectangle. They should be equal.
The second method is used if there is no square, it is a product of measurements with a tape measure. The basis of the method is the triangle of Pythagora. To check the angle, you need to note on one side to the distance of 3 m, to the other in 4, when connecting points, a length of 5 m should be obtained with each other.
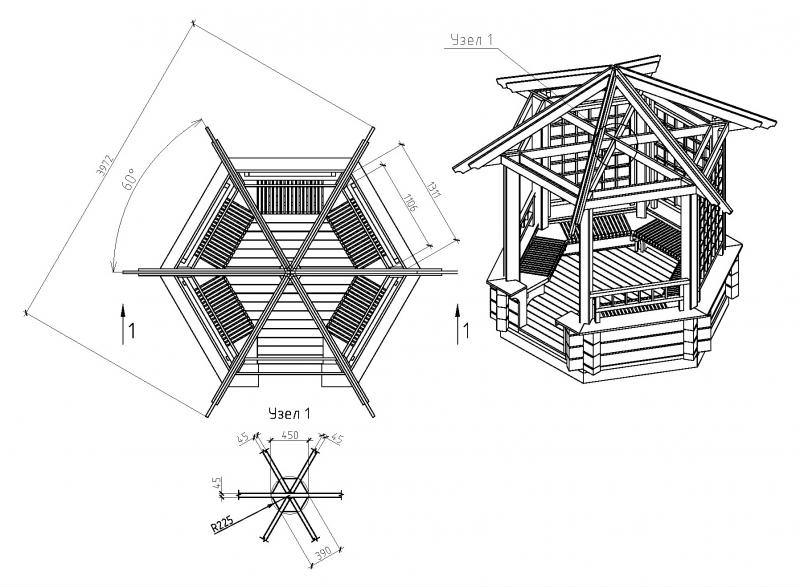
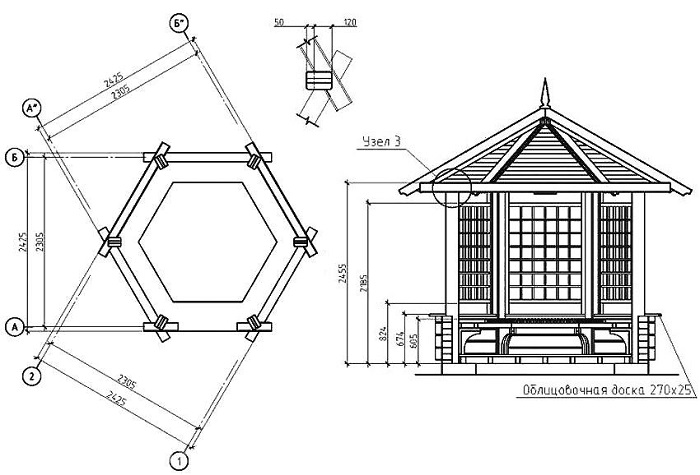
Marking of a hex gazebo from a tree
Since polygonal arbors are more popular, we will show schematically how to make a markup for the bases with several angles.
Hex gazebo from wood, or rather, its base can be calculated (place, draw) in three ways:
1 method - trapezing
2 method - two equal triangles (among the masters it is called with the help of a six-poin star David)
3 way - circle
To lengthen the hexagon of the foundation of the structure can be diagonal. To do this, you need to draw a rectangle, one side of which will be not subject to change. Next, between them are conducted direct and diagonal. Then the direct stable parties are transferred parallel to the already marked, and directly extended to them. Thus, the markup of the elongated hexagon is made.
The octagonal ledge from the tree is also designed using simple figures.
The polygonal arbor from the tree is designed by overlaying another shape on top of the rest.
6 Stage - Foundation for Arbor
In some cases, it is possible to build a gazebo without foundation. As a rule, it is suitable for light, portable structures. An alternative to the foundation can be:
Laying the base by stone, brick or tile.
Setting the base of the arbor on the paving slabs or natural stone.
Norwegian foundation.
The easiest that does not require waterproofing method of the foundation device. In order to build enough two stones. The lower, wider, is the basis of the foundation. He plays the role of scene, protecting wood supports from moisture, dirt. The second stone, smaller, serves as the basis for support. This design allows the base of the support to quickly surf.
Foundation made of tires for a gazebo (from tires, auto strokes, wheels).
This option can be used as an alternative to slab or foundation. The base of the foundation from the tire is not exposed to the factors of the external environment. For greater tire strength you need to fall asleep cement mortar. Users advise consuming automotive tires using a long metal pin. However, experienced masters, consider this measure unnecessary, because Not slainable tire will still spin around the axis.
Wooden chocks (hemp).
Such types of foundation for wooden gazebos are suitable if the ground is stable in the portion: not prone to deformation and is not shaped in soil waters.
Types of foundations for gazebo
The country gazebo from the tree will be much stronger if they do a qualitative base under it.
Foundation arrangement - important aspect Construction. Listed below, what a foundation for a gazebo can be used (four types are isolated):
Columnar
Pile (similar to the column, but the base are piles)
Tape
The specifics of the use of each of them are shown in the table.
How to make a foundation for gazebo
We think that step-by-step instructiondescribing the manufacture of each type of foundation here will not be appropriate. But here are the overall fill nuances we give.
- for the foundation of any kind, you need to make a sandy-crusched pillow. Silence exception;
- the foundation concrete will be more durable if it is periodically moistened or covered with a rag. Dampness is the best condition for uniformly drying concrete. Otherwise, the upper layer will dry faster and possibly cracking the foundation;
- ready foundation you need to isolate. Typically, it uses bitumen, rubberoid (cost cheaper) or more expensive rolled materials;
- a more simple setting of supports on a column foundation is possible if at the stage of their bookmarks to establish the installation of threaded stacks;
Note. The need for laying of reinforcement is determined by the weight of the future gazebo.
Foundation under the arbor with barbecue or mangal
If a mangala device is planned or a brick barbecue in a wooden gazebo, then you need to consider the foundation on the construction stage, which will be able to withstand the weight of the design. In this case, it is advisable to make it slab. However, users recommend to save on the pouring of a solid sole, and make a combined foundation under the BRAIN, as shown in the photo.
Note. You should also consider the drainage system so that water from the roof does not blur the surrounding soil.
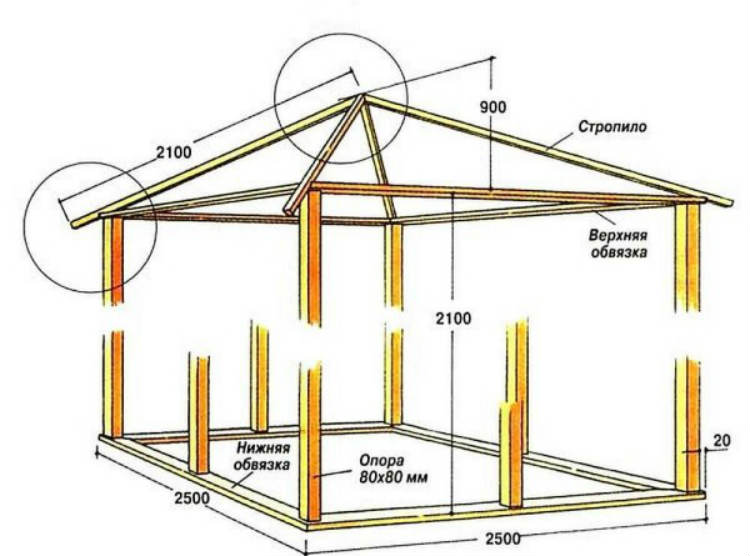
7 Stage - Wooden Arbor Frack: Binding and Supports
The blockage (lower lumber) is performed only after the concrete is completely frozen. Depending on the type of foundation, it may take 1-2 weeks. For the strapping is used only dry lumber. Otherwise, the foundation of the structure can turn it on, which will affect the strength of the floor and the entire structure.
To stick the timber (or another lumber), it is enough to cut a quarter in it, lay, and also fix the foundation with each other.
Fastening options for logging during the construction of the gazebo from the logs are shown in the photo
Note. If the supports are installed in the soil, then the strapping is installed on them.
Important moment. Poles (supports) of polygonal arbors are installed in the corners of the design at mandatory. Moreover, at the entrance to the gazebo, two additional supports are installed if necessary. The columns are interconnected by temporary, and then constant horizontal jumpers. Usually, in the future, they are used as a fence or rail. On top of the supports are also binding to each other one of the methods shown above. This will give the design additional rigidity. And the installed bars will be used to binder roofing or canopy.
Council. The decaying unit (stops that are installed at an angle of 45 ° to the support) at the bottom of the support will give them greater stability. Obsoles are hidden by benches.
In order for the future floor to be noticed under the severity of users, you need to install additional bars - lags.
Note. Lagges are set perpendicular to how the floorboards will be laid.
If the base design is large enough, or the polygonal should be provided for the installation of additional bars in several layers, as shown in the photo. Then the lower row will perform the function of the supports, and the upper is the function of the supports and lag for fastening the geepboard. In addition, for additional bars, laid in the form of orange, the floor board is complicated.
Note. Lagges are set at a distance of 500-600 mm. Friend from each other and 230-300 mm. from walls.
8 Stage - Roof for a gazebo
The configuration of the roof of the arbor depends on the two factors - the shape of the roof and the material that it will be covered. I solve the question than to cover the roof of the arbor from the tree, each is guided by its preferences. Among popular roofing materials:
polycarbonate - light, transparent, inexpensive material that allows you to install the roof of the arbor do it yourself and in the shortest possible time;
bituminous tile - Allows you to implement any designer plan. Requires the arrangement of a strong smooth base. For example, laying OSB or plywood, which makes the design more expensive;
metal tile or professional flooring. Excellent solution for those who have a ledge from a tree with a single-table or two-tie roof.
ondulin. Despite the ease and low cost, its substantial minus in the short time;
natural tile.
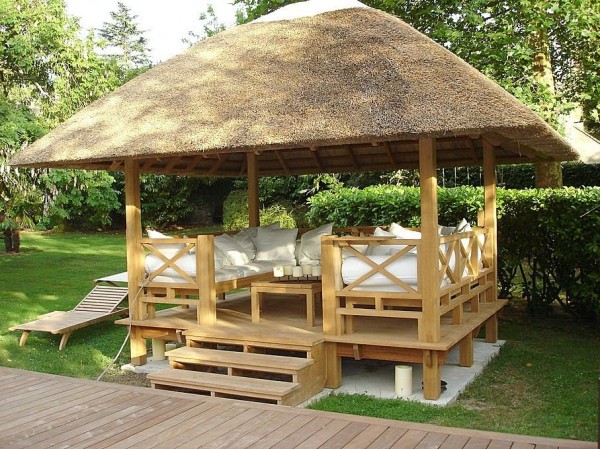
other natural materials: reed, straw, moss, tree, etc.
original solutions. For example, the roof of the bottles for the gazebo.
Roof configuration and selected material determine the view rafter system.
A wooden gazebo with a two-tie roof or single-table is quite simple. The arbor roof device diagram is shown in the figure.
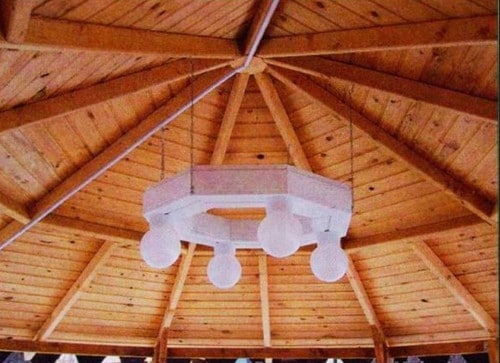
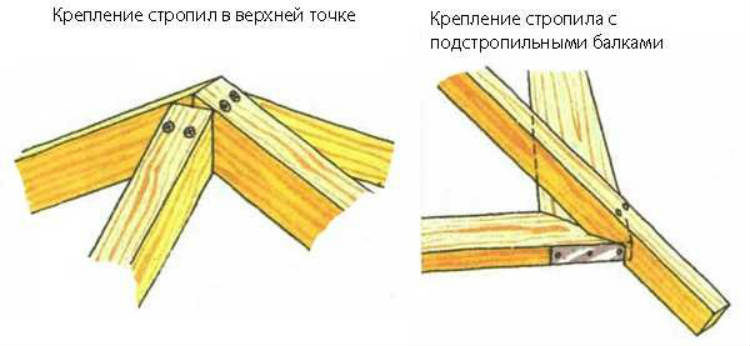
But for a polygonal roof you need to withstand some rules. So, for a hexagonal structure you need to do six rafters that are installed on the upper strapping (Maurylalat). At the top of the rafter are connected to each other. The connection method is shown in the photo.
The diagram shows how to make the flow of the chimney through the roof of the arbor with a barbecue or barbecue (passing knot of the pipe).
In order for the roof of the finished look, it can be bored below it. To do this, make a crate from the rails, on which the plates of OSB, boards, wooden lining, DVP, chipboard are then mounted.
Working out the roof project for a gazebo should be foreseen. Their presence will better protect the arbor from the rain (the role of the visor, a canopy). Thus, the greater the roof slot will be outside the frame of the arbor (walls), the beam. Professionals believe that it is enough to make a protrusion of 300-500 mm.
Stage 9 - Wooden floor in a gazebo
The floor in a wooden gazebo is preferably done by wooden. But, in practice, he may be flooded concrete screed or laid out a cafeter. We will look at how to make a wooden floor in a gazebo of a tree.
Since the frame of a wooden arbor is ready, lags are already installed, it remains only to put hand board. There are several ways to lay it:
1 method - solid floor. To do this, use a tipped floor board (with grooves). It is necessary to ensure that the boards are tightly adjacent to each other. This will help to avoid drying and destroying wood due to moisture ingress;
Council. Feed the boards tightly help the use of Dobochnik. In addition, its use will save in the integrity of the groove of the board.
Possible gaps need to be embedded with a putty on a tree and polish.
2 Method -theventilable floor. To ensure the ventilation of the floor, the flow of the water inwards can be leaving the gaps of 3-5 mm. When laying floor boards made of edged reservoir. Boards before starting work it is better to prepare - remove the edge at an angle from them. Boards with favors look more beautiful and serve longer.
Note. Provide the same gap On the entire floor area, you can use calibrated gaskets - thin planks installed between adjacent floorboards.
For any method of furnaceing the floor in the gazebo, it should be remembered that the first floor board is screwed by methms to lags, and the rest are attached to the groove. The boards should choose such a length so that it is enough to install along the entire length of the floor. If you have to make a junction, make sure that he fell on the lags.
Council. The length of the nail should exceed the thickness of the floorboard twice.
Sex boards can be additionally fixed by hardware closer to the corners, and the mounting place to close the plinth. If the aesthetic requirements are less severe, the boards can be knocked through, while it is necessary to ensure that the hatch hat is recessed by several mm. This will avoid the tool blunt when removing the provisions. In addition, the tree is erased over time, and the sticking hat can be painful.
How to paint the floor in the gazebo
Press the floor additional aesthetic properties and protect it from bad weather by additional processing. Users argue than to cover the wooden floor in the gazebo better. What coating will give it additional resistance to abrasion and the effects of other factors.
To properly and reliably process the floor in the gazebo, you need to use several special solutions:
process the board with an antiseptic. It will save wood from rotting and damage to woody bug;
Note. Disassemble the primer penetrating and film-forming. The first penetrates deep into the pores, the second creates a film on the surface. The choice depends on the material that will be used for the finish finish.
covered with wax, varnish or paint. What paint paint the floor in a gazebo of the tree depends on how often the gazebo will be operated, what kind of it has (closed or open), as it is often possible to update the floor.
Important. The wooden floor in a gazebo with a brazier is made in compliance with the following rules:
floor board is not installed in bulk to the mangalu, barbecue or furnace;
the distance of 0.5 m. From the mangala should be closed by tin (metal sheet, steel) or laid by stone / brick / flooded concrete;
all used in the barbecue area of \u200b\u200bthe sawn timber (including sex board, lags and frame) should be treated with antipiren.
Since a furnace or a brazier in a wooden gazebo is a potential source of fire danger, all measures can be taken to prevent its manifestation.
10 Stage - electricity in a gazebo
Created as a seating area from a midday heat, the gazebo quickly turns into place of collecting the whole family, at any time of the day. Therefore, electricity is most often in the gazebo. Think over the wiring needed at the construction stage. The main thing is not even aesthetic properties, but ensuring protection against water. For this, the cable is placed in corrugation or box.
With regard to how to arrange lamps in the gazebo, in practice there are several options: general, local, functional, decorative lighting. Their view in the interior of the arbor is shown in the photo.
The warm light will create the necessary comfort in the gazebo, and the bright, cold - the working environment. Spotlight will highlight the desired places.
Council. If the gazebo is small and open, it is better to place a lamp under the ceiling, so it will be maximally protected from moisture.
11 Stage - Decor Arbor
The last stroke in the construction of the arbor is the device of fences, railings and decoration. This stage can be described infinitely. Because every owner seeks his wooden gazebo, made by her own hands, was as comfortable and stylish as possible. We will pay attention to some little things, whose accounting will allow you to build more functional and aesthetic.
"Walls" Arbor. Many users trying to protect their backs from the fall of water on a rainy day, set between the fences and the roof of the sheets of transparent polycarbonate. They are used to "make" a gazebo for the winter.
furniture. You can make a gazebo from the tree more comfortable by placing garden or woven furniture (from the vine, rattan). With it, it is possible to zonate a country gazebo, for example, separating the place with the brazier from the recreation area;
waves or Swing - Stationary Seats
fences. Allow to turn outdo the outdoor arbor into a finished object and ensure safe use. In addition, the railing can be an excellent decoration of a wooden arbor.
wooden grill for gazebo. An integral attribute of the arbor in the classic style. Decorative grille From a tree for a gazebo gives the design ease and at the same time completeness.
How to make a wooden grid for gazebo do it yourself
Making a grid will not work independently. We describe how the assembly is executed. For this, a bar 20x45 mm is used. The first thing you need to make a frame in size of the opening, for which the lattice is intended. You need to think about whether the lattice will be removable or not. Next, 10x20 mm rails are fought on the frame. The setting step is arbitrary, the main thing is that it is the same. With the help of the grid cells, you can visually change the appearance of the arbor.
Note. Winning the rake on the frame is better with the allowance. Excess you can cut off after work, and the grid will look more accurately.
curtains for a gazebo - this is a way not only to decorate the gazebo, but also protect yourself from the sun;
Note. For a gazebo, it is better to use organza or acrylic tissue. They are easily erased and resistant to ultraviolet.
disembarking plants or set colors in vases.
Painting Tree Arbors
Many users are thinking than to process a wooden gazebo. After all, natural shades of wood are already the decoration of the structure. To maintain the beauty of the tree and protect it, various impregnations are used (protect the tree from rotting and bugs), primers (close the pores of the tree for moisture, simultaneously having to breathe it) and the surface layer (most often there is a lacquer or oil wax).
How to paint a wooden gazebo
Actual question for structures in ethno style or in the style of Provence.
In this case, attention should be paid to the stability of paint to burnout, the number of layers of application, environmental friendliness and the need to update the paint. According to user reviews, Belinka, Tikkurila, as well as a novelty in the market - "Liquid plastic" paint has proven well. Oil paints are not recommended, because They peel out over time.
Council. Paint is not applied in the evening, because Evening moisture creates a film that cracks the painted surface into a web on the painted surface.
Original Tree Arbors - Photo
Ideas that can inspire on a creative experiment
Wooden gazebo
Care is to update the protective coating of wood (varnish or paint) in time, care for floorpads, preventing snow pickups on the roof of the arbor, refresh the decor and care for plants. The gazebo follows from time to time to air (for closed designs) and ensure that the sun periodically fell into it. Special attention in leaving the gazebo is given to the cleaning of the mangala. Only in this case the gazebo will last long and will retain its original appearance.
Why do you need a gazebo on the territory - the personal business of the owner. For short recreation, barbecue installations - arbors are used differently. Accordingly, the choice of materials for their construction is made individually. In relation to the small country or receiving site, perhaps the best option is wood.
It is perfectly combined with the general design of the garden, easy to handle, not a deficit, is inexpensive - enough advantages of such a solution. This article will help the reader to deal with the nuances of the construction of a wooden gazebo without any help, with their own hands, as well as to choose its optimal sizes and familiarize themselves with the typical drawings.
If there is enough experience in the construction of dimensional structures from a tree, then start with small arbors, simple configuration. This is true for the country or typical areas in the private sector. On several acres, the massive construction is unlikely to be appropriate, especially if the owners are maximized to use the Earth for growing agricultural crops.
Specified size - indicative.
Shape gazebo
Square. The most common handwriting option for small areas. If you correctly decide on the size, it will be easy to place some furnishings along the walls or in the corners - a table, stools or shops, a bedside table.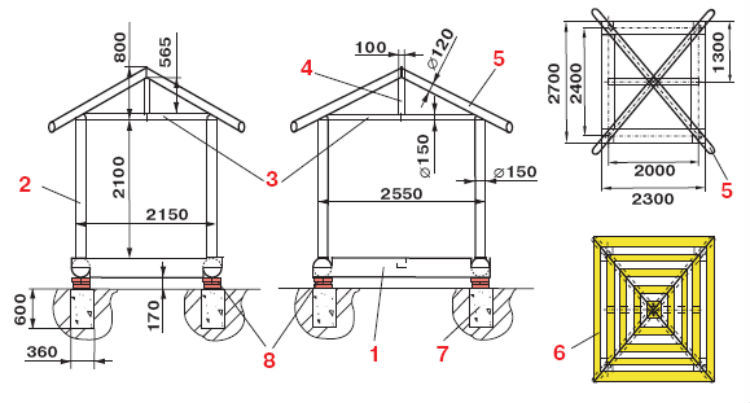
For cottage plot Such schemes are quite enough. There are other types of wooden arbors. For example, performed in oriental style. But the difficulty of installing the roof having the original rounding at the bottom, as well as the mandatory presence of a plurality of carved elements make this and a number of other structures complex in manufacturing with their own hands.
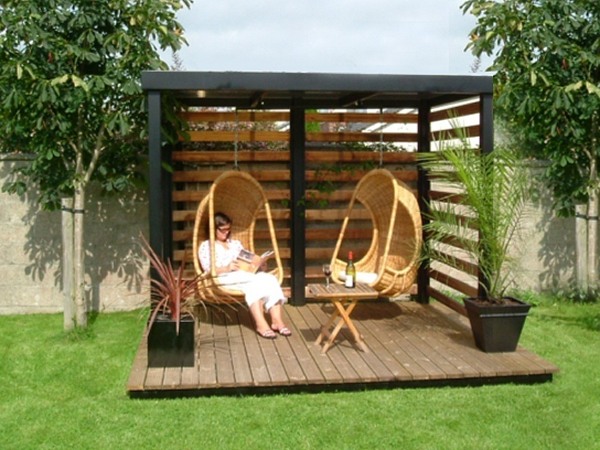
Frame gazebo
Options are enough. Arbor open and closed; with stationary glazing or removable; Combined, which are solid or some part of the wall, or separate sectors. Actually, how the drawing is drawn up, such a gazebo and will be on the plot.
Floor
Here the choice is small - wooden flooring is mounted or it is missing. In the latter case, the role of the floor can play ground with grass, concreted platform, paving slabs, and so on.
We proceed from the fact that the sizes of the gazebo are already defined and drawings are drawings of all structural parts.
Selection of sawn timber
Recommendations for the use of logs are unlikely to deserve attention, especially if practical experience is not enough. It is more expedient to take such blanks as (bars, rails) and a board. In the above drawings, the main dimensions are indicated. The main thing is to ensure sufficient strength of all items.
More difficult to breed wood. Coniferous trees are resistant to fungus and rotting, but if the gazebo is located on a lit place, then when the material is heated, it will distinguish the resin + the corresponding fragrance. By the way, not all can withstand it, especially if the gazebo of the closed type and in the segment of the territory that is protected from the wind.
It is necessary to take into account the porosity of the wood. For example, a fir should not be purchased - there will be problems with the reliability of fixing fasteners. Optimally - pine or larch. The latter is preferable, since, absorbing moisture, it becomes only stronger. This feature of the tree and should be used, taking into account the fact that the gazebo is located on the territory.
From deciduous trees (if you can focus on the acceptable price of wood) you can recommend oak, maple, birch. Lipa just like fir, does not fit. With all its advantages, it does not differ density.
The fact that the workpieces should be dry, without visible defects and mention does not make sense. These are the basics of any work with a tree. But about two moments should be said.
Preliminary impregnation of soil
When working with wood more than rationally. First, the drug will fill the pores and partially reduce the body's ability to absorb moisture. Secondly, increase its adhesion. Thirdly, provide more economical consumption of the composition for the "finishing" processing (varnish or paint).
Grinding
This will have to do, and to avoid, and for the subsequent design of the tree. If it were about one smalltest speech, it is your own hands, a planer and emery paper, it is easy to handle. Earring the gazebo, you will have to prepare a large volume of wood. Hence . It is enough to rent if it is inappropriate for a household for a reason.
Foundation
"Patient" question for any subsidence, since the prospect of leading in the area volumetric excavation No one suits. What basis to choose?
Pile
If purchased screw piles, there is nothing particularly difficult in their installation. The only thing to consider is the depth of freezing. Less than 1.75 m piles are not recommended. But if the stone falls, you will have to start first and in another place. And since the choice of a segment under a wooden gazebo in the country is small, then the pile base is not the best solution.
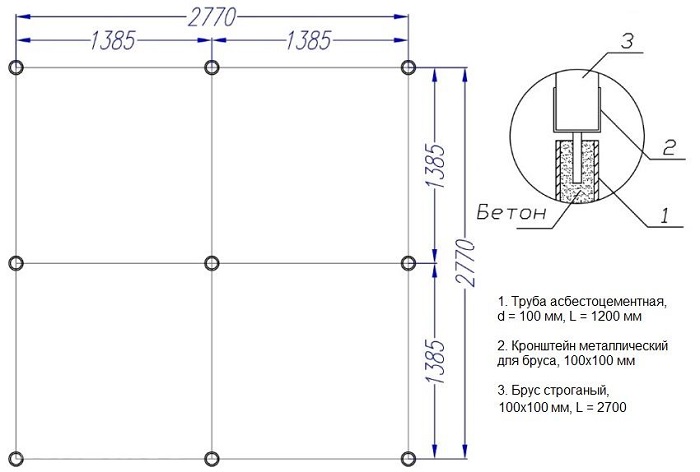
Tipped
The difference in the installation is that the wells will have to dig (drill). Problems are the same - depth and boulders in the thickness of the soil. Who does not stop, maybe as supports to use pipes (metal, asbestos cement), log or bar.
What is the technology?
- On the perimeter of the arbor, a small trench is broken, in which the timber will be laid. Its depth to calculate is easy - half of the section of the workpiece + 100 mm per submission and "sand pillow). Total - no more than 30 - 35 mm. The bottom of the trench is necessarily compacted.
- Behind the fat clay falls asleep and also tram. First, it partially compensates for the soil movement, secondly, will become the first layer of waterproofing.
- From above - PGS. For a wooden arbor - the optimal version, given the small weight of the design.
- The second layer of waterproofing will be a film (n / er, thick), which is covered with a bottom of the trench with overhearst on the edges. Ruberoid, so common in the private sector, use undesirable. In such conditions, it will not last 2 years, rotates.
- Then the timber is stacked with such a calculation so that each element is buried about ⅓. If the depth of the trench is defined inaccurately, you can plug a PGS. This is another advantage of such a foundation in addition to the fact that its construction does not require professional skills, a lot of time and essential material investments.
What to consider
- The bar is desirable to further protect against moisture. By the way, instead of the antiseptic of the shopping can be used "folk" - machine oil. Specially buying no need; Enough work out. After his absorption, it's not bad on top to deceive melted tar, on all sides. If the timber is made of conifer, then even better - to smoke. The old processing technology based on the fact that, with a significant increase in temperature, resin is abundantly and covers the workpiece with a impermeable durable layer. Such a ram will fly up in the ground dozens of years.
- It is necessary to prevent axial offset elements of the foundation. To do this, in each bar, another 2 - 3 holes are done before mounting the brown.
- Align all elements. How carefully it is done, it will work as more convenient. Yes, and the gazebo will be symmetrical from any side, without distortion, even minor.
- Pin driving. They are easy to make from the reinforcement bar. After assembling the foundation, the pins are installed in the prepared holes and ride into the ground.
Another plus of such a base is the simplicity of the frame of the frame. A tree is used for the gazebos, and the vertical rack with a bar is much easier than with a metal or concrete. Plus to this - you do not have to install the support frame. Its function performs a wooden foundation.
Assembling framework arbor
- It is not worth using nails as the fasteners. They often split the tree, and it is quite difficult to replace a separate element of the frame or roof. Only long self-tapping screws or screws.
- Given the load on the design, including wind, hope only for such fasteners is not worth it. It is necessary to provide a strengthening of all compounds with metal planks, triangles, corners, brackets.
- To give reliability racks, they are fixed by bonds. To install them in a strictly vertical position, it is desirable to use a plumb (thread + ship). The construction level gives an error, therefore the curvature of individual frameworks are not excluded.
Floor
After laying the flooring it should be immediately painted. Otherwise, in the construction process, it will be the desired, and the surface processing of the boards will be reused. Experts recommend using the compositions tinting. They are based on oil, so the texture of the tree will be visible.
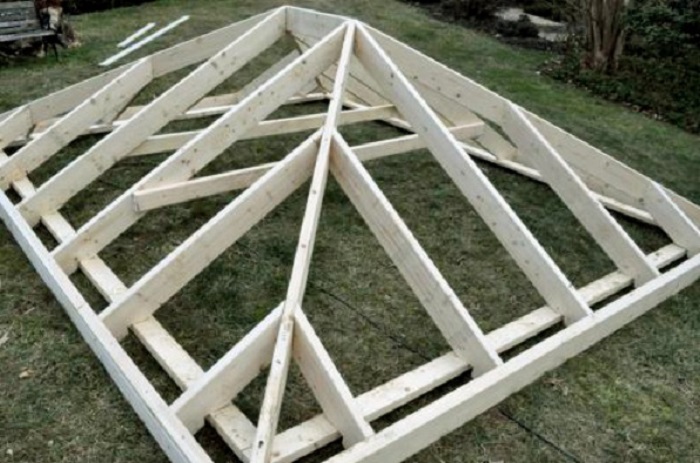
Roof
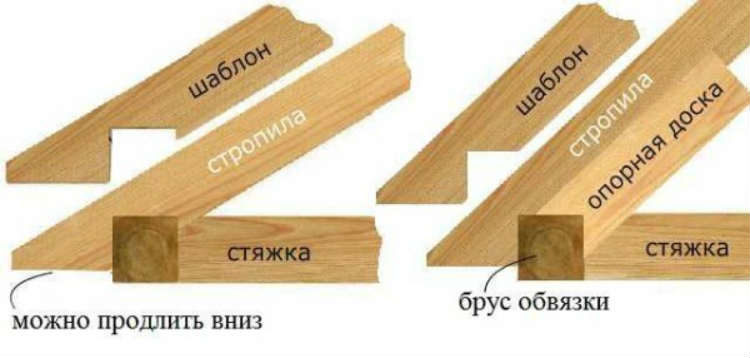
It needs to be done with a small skelet. Optimal solution - gable roof. One of the simplest options with a simple rafter system. To keep symmetry, a template is made for the feet to be manufactured. In the photo - an example.
The rafters are mounted on the elements of the upper strapping frame of the arbor.
What to use for roof
Given that the gazebo is wooden, it is worth choosing from the following materials:
- slate;
- proflist;
- tile (metallic or soft).
They are better than the rest of the roofing materials with a tree.
The author hopes that the recommendations given in the article will help the reader choose the optimal size and shape of a wooden arbor. If you carefully deal with all the nuances, then nothing complicated in its erection is not. Good luck in construction!
On the country plot An indispensable attribute is a gazebo. It can be nice to spend time with your loved ones and friends. In addition, the construction protects against rain and sun rays on hot days. Despite the diversity of modern materials, many people prefer to make it out of wood.
With little experience, as well as learning the instructions, the construction can be made with your own hands. In this article, consider several options for the construction of a wooden arbor, which will decorate the plot.
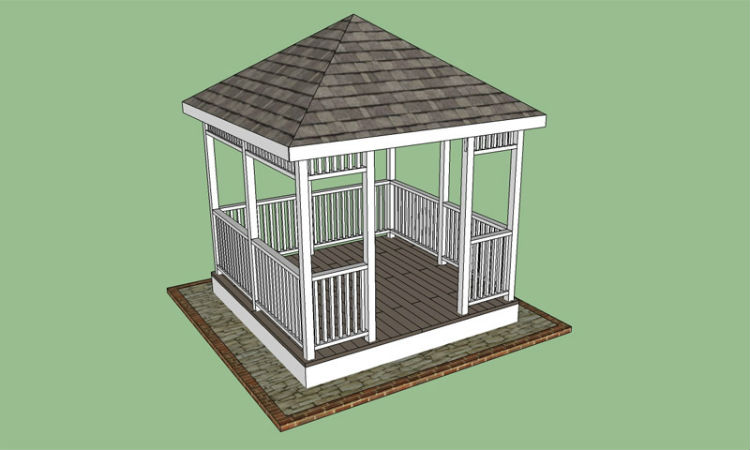
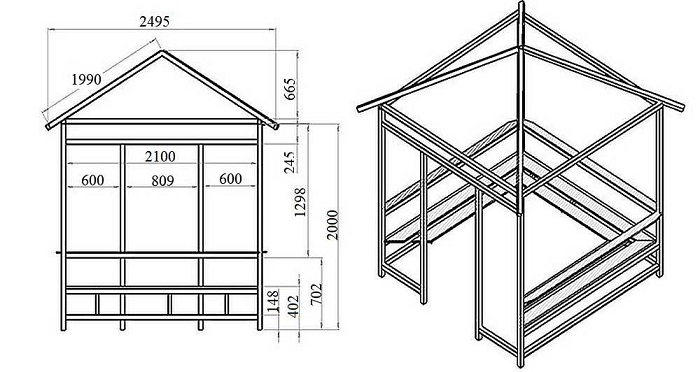
Designs made of wood can be the most different. If you first decide to build a building, it is better to choose the simplest shape - square. The drawings of such a gazebos are quite simple, so every person will be able to figure them out.
First you need to choose appropriate placeand also decide on the appearance. After that, create drawings of the structure or take advantage of the finished solutions. In the diagram you need to designate all sizes, the design form, the entrance place and other parameters. If you plan to build a shop and table in the construction, they also need to be specified in the sketch.
You also need to prepare a separate drawing of the roof and the foundation, with its specification. In addition, it is necessary to take into account the flow of wood processing. In the scheme, you must specify the water supply, as well as the electrical wiring and place of installation of lighting devices, if it is assumed.
It is important to note that the success of the construction depends on the competent drawing, so you need to seriously treat the project.
If you doubt that you can independently prepare a sketch, you can use the services of professionals.
It should be understood that the construction of the structure is a time-consuming process, so you need to stockday and patience. It is recommended to strictly adhere to the prepared project. Subject to the consistent implementation of all stages of the construction, the gazebo can be made with their own hands in a couple of days. To do this, you need to buy all the materials in advance and prepare the necessary tools.
Foundation
After you decide on the place of the future design, you need to clean it from garbage, and if necessary.
In the next step, it is necessary to make marking by drivening wedges in the corners between which to pull the lace.
The strength of the square structure depends on right cornerwhich should be 90 degrees.
If you want to build a gazebo of small sizes, it is best for a column or ribbon foundationSince the square design will have a small weight.
To prepare the base, it is necessary to dug a pit, depth, which does not exceed 80 cm. Then to fall asleep with its 5-centimeter layer, after which the 10-centimeter layer of cement mortar.
When the mixture hardens, you need to install vertical racks that are temporarily fixed by special bodies. Pre-in the pit need to put small metal pipes The same size, pour concrete into them, then fasten an anchor. In about two days, the racks are attached.
Paul design
At the next stage, with the help of a bar of 50x150 make the strapping reduce the racks. Then laid out lags in 45 cm increments, which are attached to the horizontal strapping to Brus with special corners.
To mount the upper strapping, you need to install intermediate racks that are fixed to lags using conventional nails. It is important to note that the racks must be strictly vertical. They are also needed so that the design can withstand the mass of the roof.
As outdoor coatingIt is recommended to use a cutting board that must be previously treated with special means to increase its service life. Material is fastened on both sides. It is better to use selflessness, as nails can split the board.
At the next stage you need to make upper strapping. To do this, you need to prepare a timber with a cross section of 10x10 cm. In the image below, an example is clearly shown as it should be done.
Roof
Since the design has a square shape, it is recommended to make a four-tight roof. For the manufacture you need to prepare inclined rafters from the bars and secure them with nails. One edge of the pitch must be fixed to the rafter feet, and d swear to the horizontal strapping.
The roof is covered with a cutting board and is attached to a screw. Some experts recommend using Phaneur. You can use flexible tile as a coating.
At the finish stage, all the wooden elements need to be covered with a double layer of varnish. On this construction of a square gazeboo is completed. If necessary, indoors can be placed furniture for a more comfortable stay.
You can also watch the video on this topic:
A gazebo of wood and polycarbonate with their own hands
After the place is chosen under the future design, and a reliable basis has been prepared, you need to start mounting the frame. As a racks, it is recommended to use the bar, with a cross section of 60x60 mm, which are fixed with wire, and then the corners on the self-tapping screw.
At the next stage, proceed to the bottom, upper and medium strapping. Horizontal bars are fixed with metal corners. From the side where the door will be installed, the average strapping is not needed.
If the design is small, then you can do single roof. Height higher Point It should not exceed 40 cm. This will be enough to roll water from the roof, and a lot of snow has been accumulated in the winter. The tilt must be directed in the opposite side from the doorway.
For rafters, it is possible to use bars with a cross section of 60x40 mm. First of all, side rafting legs are attached, in the center of the beam, after which the inclined bars. As a result, there should be five bars.
Now comes the most responsible process of construction of the arbor - the attachment of polycarbonate. To do this, drill in the holes of the hole at a distance of 30 cm under the self-tapping screws that need to be neatly screwed.
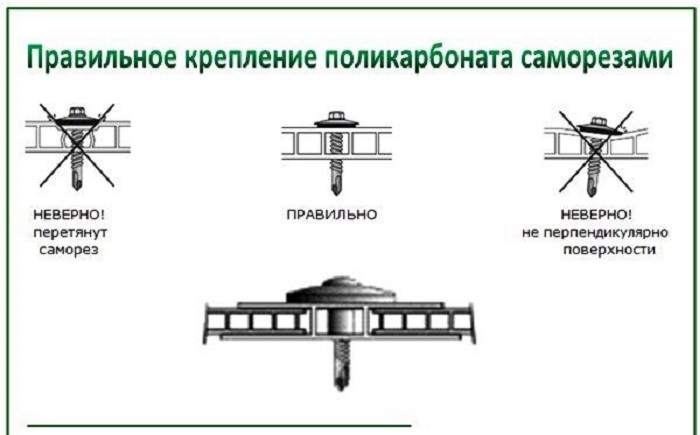
If it is necessary to cut the sheets, it is better to use the metal with small cloths. On the sides you need to install a special profile.
For such a roof, you will need only a few sheets, so you do not spend much time. Only the job needs to be performed very carefully.
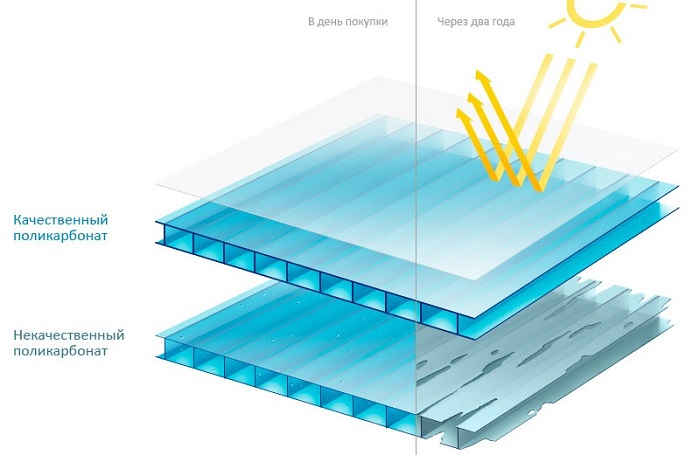
If necessary, carbonate sheets can be fixed on the walls of the gazebo, if it is assumed that it will be closed. With the trim, there should not be difficulties, the main thing to buy high-quality polycarbonate.
Metal and wood: how to make a gazebo with your own hands?
If you decide to build metal designIt is better to use a profile pipe, the thickness of the walls of which should be at least 2 mm. This is explained by round pipes More difficult to cook.
If it is supposed to use a roof from a lightweight material: a flexible tile, a professionalist or slate, then a profile is suitable for the racks with a cross section of 50x50 cm. And in the case of tiles, it is recommended to use a pipe with a cross section of 75x75 cm. You can use as jumpers metallic profile, whose cross section does not exceed 50x50 cm.
The selected area needs to be cleaned of garbage and grass so that it does not rot under the floor. Then pull the pit, fall asleep its sand layer. Pipes can be installed directly into the ground.
Using a bera, make shallow pits, about 90 cm. Pipes are inserted into them and fall asleep with rubble or construction garbage, after which it is thoroughly trambed. The rack must be pouring cement mortar.
Vertical racks need to be checked with a plumb.
If you need to slightly lift the design, it is recommended to use foundation blocks. Then place them across the area, as shown in the image below.
At the next stage, the lower strapping is made, for this pipe with a cross-section of 50x50 mm fit into concrete blocks. Coals are welded with the device. For jumpers, a profile is suitable with a cross section of 40x20 mm, boards will be laid.
The profile needs to be covered with primer, especially in places of connection. The height of the racks should be a little more than two meters. To strengthen them, you should fight the dash.
 The average binding should be at an altitude of about one meter. To do this, use a pipe with a cross section of 40x20 mm. To give stiffness, it is recommended to fix the vertical racks, as shown in the image below
If a bitumen tile is used as a roof, then the roof rafters should be made from a wooden bar, with a cross section of 75x40 mm. The crate can be made of wooden lining. At the top of the rafters are attached with the help of self-tapping screws.
In the middle consolidate the board, and to navigate the bar to which the rafter system will rely on.
The image below shows how to secure wooden bruises from a bar with a cross section of 75x40 mm.
After that, you need to spread bitumen tiles.
For the floor, the board is used with a cross section of 70x40 mm, and for the walls of the board 70x20 mm.
In this way, you can build a design in a few days using a two-type of material. For installation of the design, you need to experience work with the welding machine, and at other stages, difficulties should not occur.
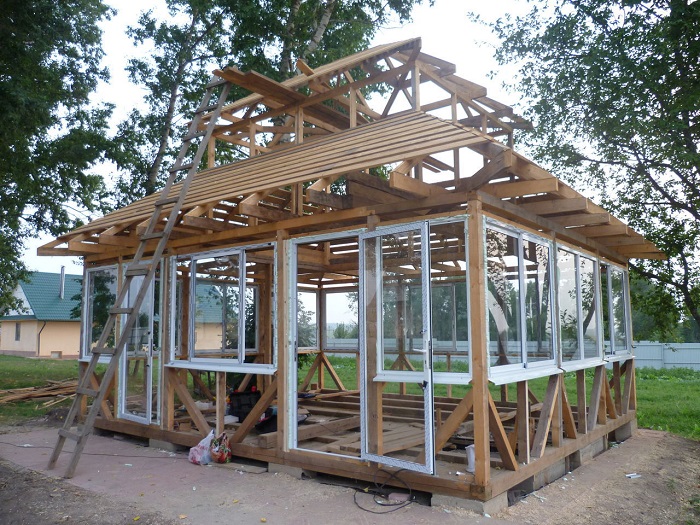
Tree and metal gazebo
Before starting construction work, you need to prepare a drawing or use ready-made options. The reliability of the manufactured framework depends on this.
The platform under the future gazebo needs to be cleaned well, after which it is to remove the 15-centimeter layer of the soil, and then fall asleep with sand, tamper and pour with concrete solution.
When the mixture hardens, you need to install the support racks throughout the perimeter, to a depth of about one meter. For the bottom strapping, a channel with a cross section of 10x10 cm is used, and from above profile pipe 4x4 cm. The central strapping is also made except the side with the doorway.
To weld the rafting system, it is necessary to prepare a flat site. It is made of metal pipes, with a cross section of 20x20 mm. First you need to prepare a horse, after which the angular parts. After lifting the design, it must be additionally strengthened with pipes.
The finished frame must be cleaned of corrosion, after which it is to treat primer and paint.
Outside the construction can also be separated by clapboard, after processing it antiseptic means. For additional decoration of the gazebo, forged details are used.
With an assistant, such a design can be collected within a few days, subject to availability required tool and drawings.
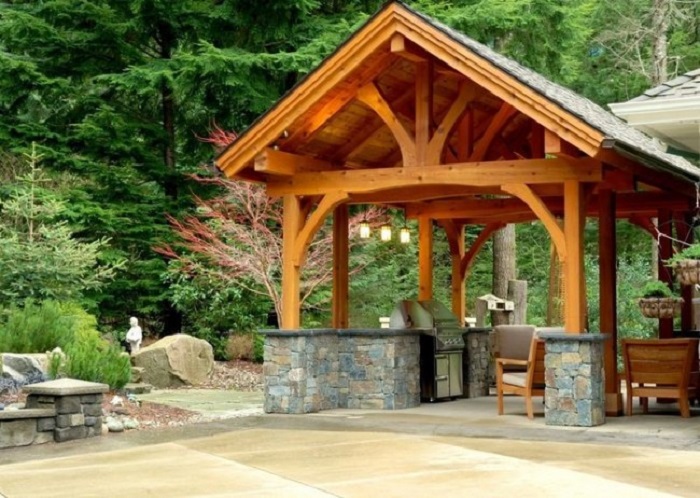
Beautiful gazebo of stone (or brick) and wood
Before proceeding to construction work, I need to competently develop a drawing. Today it will not be difficult to find ready-made solutions. If you have the skills of work in a graphic editor, then there is a possibility to create a bulk scheme. It is recommended to include in the project the costs of materials.
After that, decide on the place and prepare the basis. Since the design of the stone will be heavy enough, it is recommended to make a ribbon foundation.
To do this, it is necessary to pull a hole by 70 cm, and at the edges you can drill with a half-meter depth. Then pour a 20-centimeter sand layer.
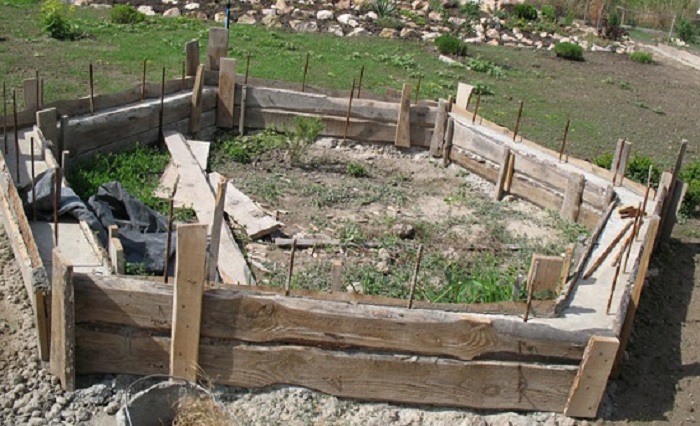
At the next stage, install metal pipes, make wooden formwork around the perimeter. Also in the trench it is necessary to install a frame of welded reinforcement. After that, pour cement mortar.
Metal pipes to pour concrete and start to lay out natural or artificial stone around them.
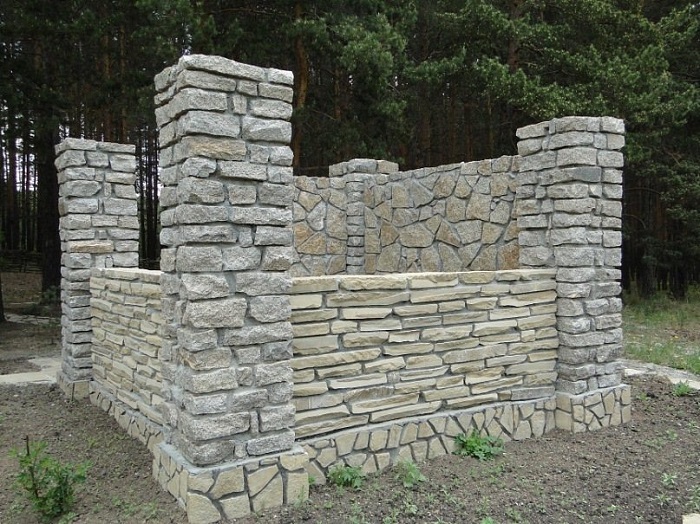
To build a stone arbor, you need to have a certain work experience, as the stone is harder to lay out, compared with the brick. If the design is closed, then you need to build walls between supports or parapet.
Roofing works do not differ anything, from the construction of any other facility. If assumed double roofYou must first make a horse. After that install the main rafters, after which intermediate.
When the frame will be ready and installed on the supports, it is necessary to cover it with a layer of waterproofing and defend the rail. Then secure the roofing material. The ceiling is recommended to be separated by a clapboard or edged board.
To create a comfortable atmosphere, the gazebo is recommended to furnish with wooden furniture objects. The stone is perfectly combined with a tree.
If you do not have experience working with a stone, it is better to turn to professional craftsmen who in a short time will build a facility for relaxing in nature.
Designs that people have done with their own hands:
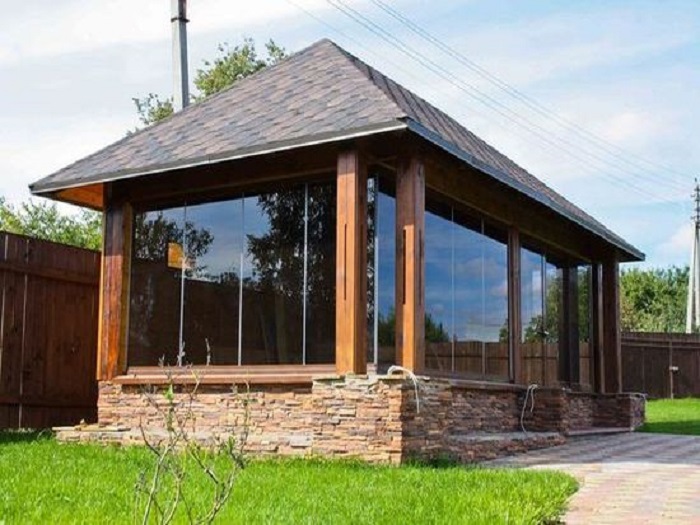

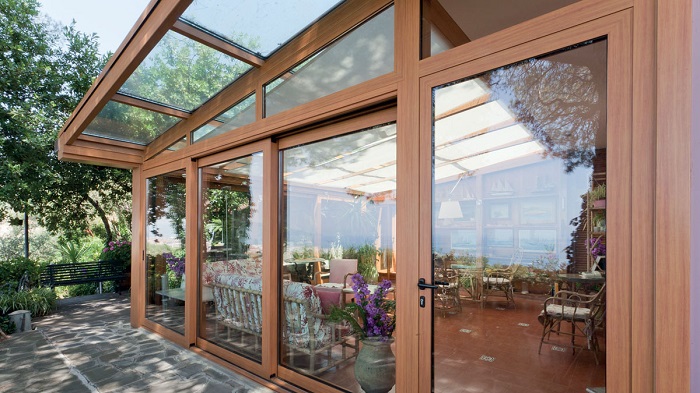
A gazebo of wood and glass. Covered glazed gazebo
Now you know how to build a gazebo, using wood. But to protect against the winds and rain, the design is recommended to be glazed. There is nothing complicated in this, so almost every person can cope with such a task.
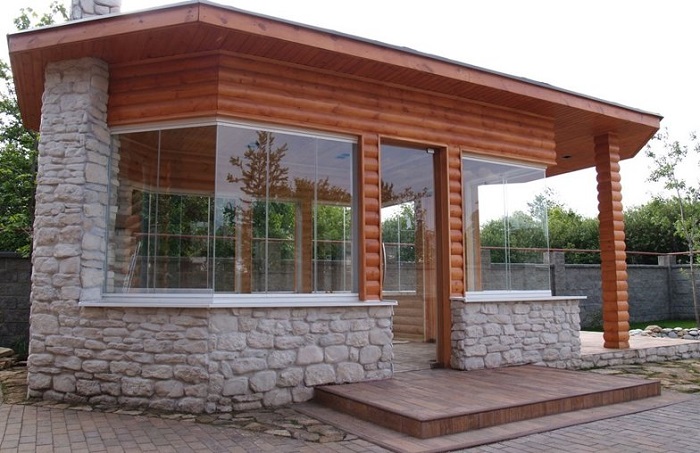
If you want to make a roof from glass, then the place for the arbor must be shaded to avoid sunlight, otherwise, on hot days, indoors will be impossible.
The gazebo can be glazed with a warm or cold option.
- Warm glazing. If you are going to use the design not only in the summer, but in the winter, then you need to cut thermal losses. In this case, experts recommends applying an aluminum profile.
- Cold glazing. This option is suitable if you are going to spend time in a gazebo only in the warm period.
For the glazing design, you can use various systems.
Aluminum
This method has many advantages:
- You can use for glazing complex structures.
- The profile allows you to make a convenient opening system.
- Large selection of double-glazed windows.
- Reliability.
- The ability to install a large window.
- Well keeps warm.
Solid or frameless glazing
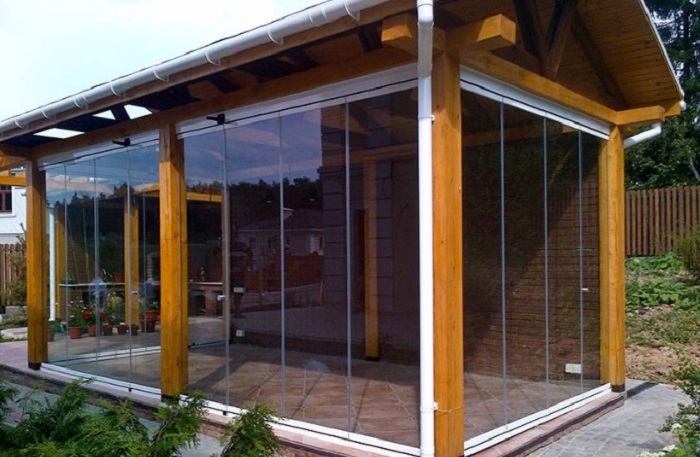
In this case, the walls of a wooden arbor will be completely transparent. The advantages of this option:
- Attractive and easy design.
- Wide panorama.
- Combined with any style.
- The ability to ventilate at any time.
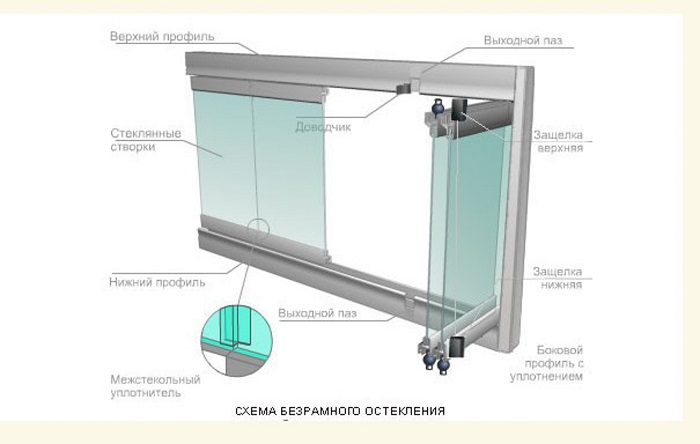
Glazing can be ordered to be the specialists, but if there is experience with glass, then all work is better done by yourself.
Video with examples of arbors of wood:
Thus, in the presence of the necessary tools and materials, you can independently build a beautiful and reliable design, where you can meet friends or relax alone.