- The roof is one of the most important structural elements
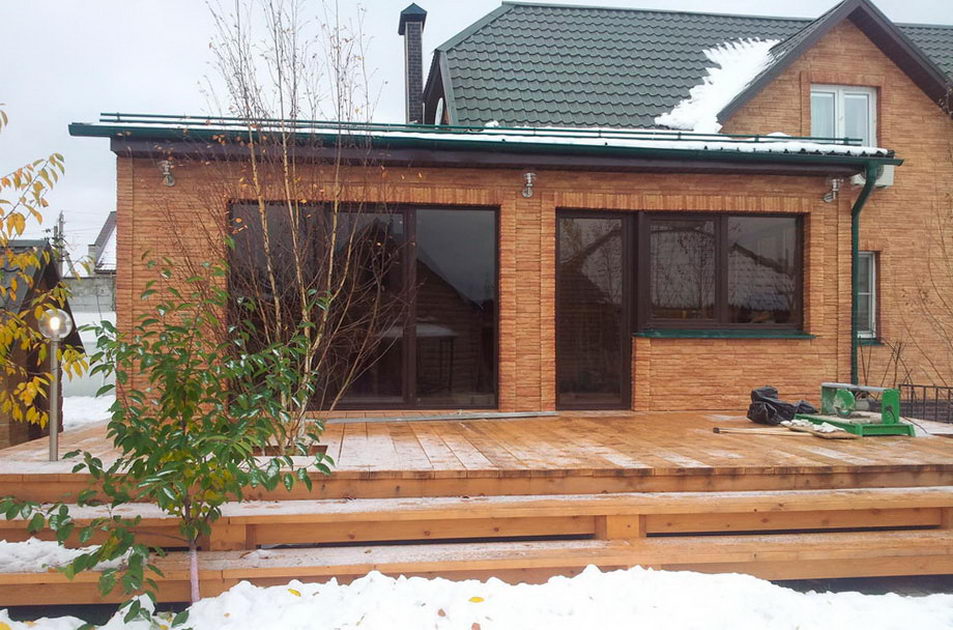
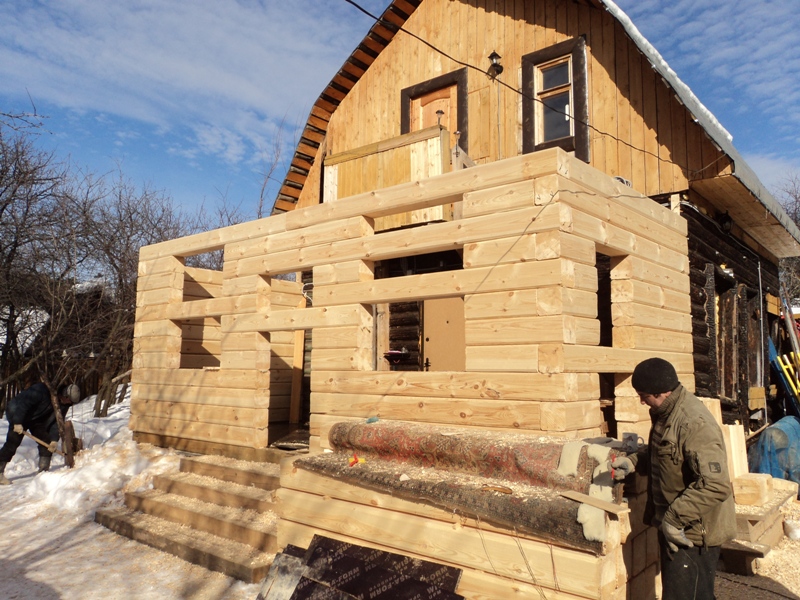
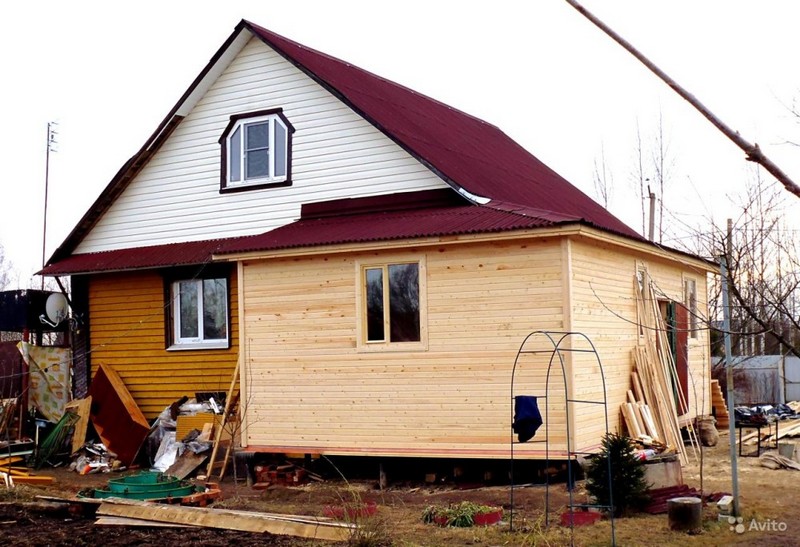
- The final stage of creating an extension to the house
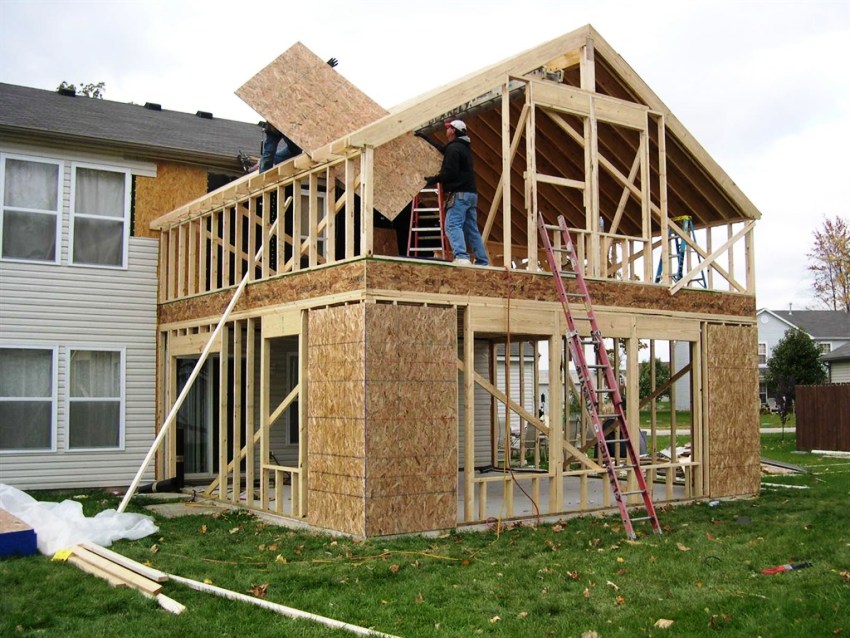
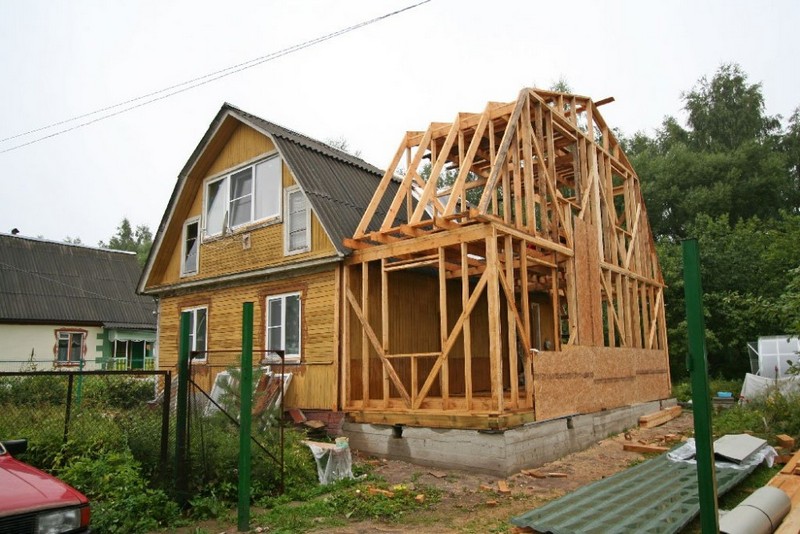
- Possible during the construction of an extension
Many owners of country houses dream of making their homes more spacious, and therefore begin to plan to expand the area by creating an extension. Today, there are many ways to solve this problem. The fastest and most budgetary option is the frame extension. Frame construction is preferred by those who value efficiency, comfort and convenience. It is best to make such an extension to wooden house.
Features of modern frame extensions
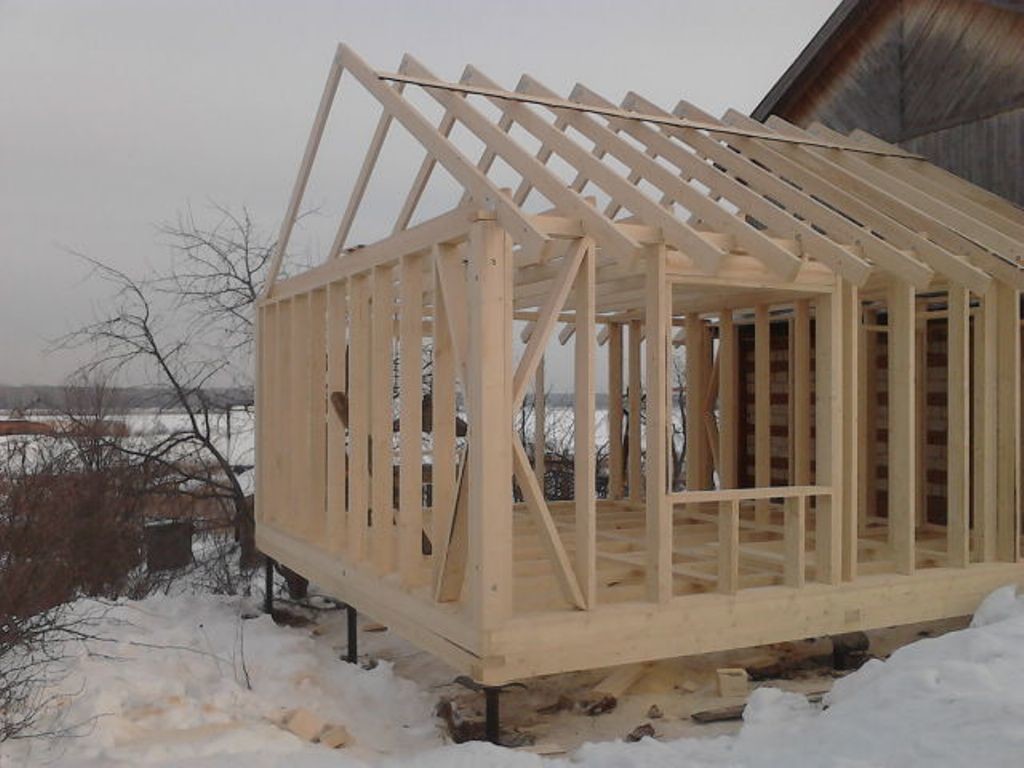
Already from the name of the structure, it is clear that this extension assumes the presence of a frame, that is, a kind of supporting skeleton. This frame is made of edged timber. From the same material, such elements of the future building are made, such as corner posts and the lower trim of the building. Horizontal lintels and ordinary posts are made of boards.
In addition, future door and window openings of the room are indicated with the help of boards. The thickness of the racks, as a rule, is made equal to the intended thermal insulation layer, and the step between the racks is selected along the width of the insulation.

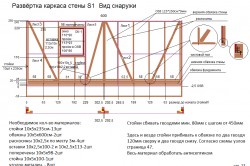
For example, if your house is located in central Russia, it is best to use material 15 cm thick for insulation. Therefore, lumber for upcoming works will need to be used from the 150 line (at 150, at 100, at 50 and at 40). The step of the racks for the considered frame extension will be 59 cm, because the width of the sheet of thermal insulation material is 60 cm.
The step of the horizontal lintels of the future structure frame will be 99 cm (you need to be guided by the fact that the height of the sheet of heat-insulating material is 100 cm). These simple and straightforward calculations can be used as an example to plan a future frame extension to a house.
The assembly of the frame is best done using hardware fasteners - this is the most common option.
Such mounts are very convenient and reliable in use. They differ in their affordable cost.
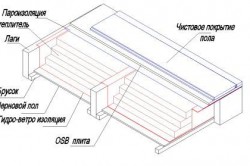
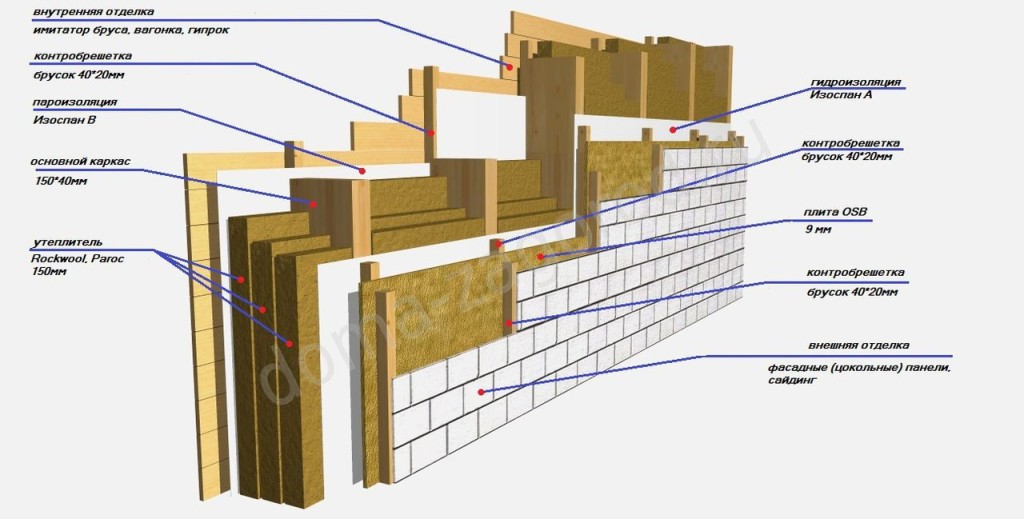
After the supporting skeleton of the future extension is assembled, it is necessary to insulate the structure. In this case, you need to remember about such intermediate operations as waterproofing and vapor barrier of the attached room. The next step in the work, as a rule, is the rough sheathing of the insulated frame. For this, sheets of DSP, LSU and OSB are used.
After that, the final finishing of the new premises is carried out. The result is a multi-layer construction, which, due to its multi-layer structure, will become sufficiently strong and will acquire excellent characteristics in terms of heat conservation and sound insulation.
Such work is relatively inexpensive, and for those who want to get a reliable annex to the house without significant damage to the budget, this option will be the best. Owners can save money not only on various building materials, but also on the services of skilled workers. Having at least basic knowledge, you can build a frame extension with your own hands. All of the above steps will be discussed in more detail in the following sections.
Back to the table of contents
The main features of the frame extension
Currently, many different structures are being built using frame technologies all over the world. So, in many European countries this technology is confidently leading. By frame technology not only extensions to existing buildings are being built, but also low-rise private houses.
Work on frame technology can be carried out in several versions at once: these are, in particular, frame-frame and frame-panel construction.
Concerning frame-panel construction, then the future extension to the finished building will be built from pre-fabricated panels that have built-in openings for doors and windows. It will simply be necessary to just collect the panel data into a single whole and fix them correctly - it is somewhat reminiscent of an ordinary constructor, only on a large scale.
Of course, such panels are made to order, at special factories. The size of the panels must necessarily match the size of the foundation. If it is planned to build a more complex structure, frame-frame construction technology is used. It is understood that in this case, the main assembly and fitting of all elements is not performed in advance, but directly during and on site.
It is imperative to emphasize the point that in terms of their operational qualities, modern frame extensions, and even whole houses built using this technology, are absolutely in no way inferior to other construction options, and in some moments even surpass them. By the way, it is believed that such extensions are one of the oldest human experiences in construction (for example, these are the houses that the Indians built).
Among the undoubted advantages of a frame extension to the house, one can note its high thermal insulation characteristics. Such a room can be warmed up quickly enough. Agree, this is a significant advantage, especially if you like spending time in the country in winter.

As for the finishing of frame extensions, there are no problems here. you will be able to complete all the finishing work immediately upon completion of the construction of the structure. There is no need for a break for shrinkage, in the case of it is excluded. An extension of the frame structure to the house can be made not only in the warm season, but also in any other weather, moreover, rather quickly.
It is impossible not to mention that one of the most important points the use of frame technologies is the so-called. thermos effect. Heat in such structures will last up to 5-7 times longer, therefore, you will have the opportunity to additionally save on heating. As a result, the savings, according to the reviews of the owners, are quite significant.
If necessary, you can easily continue expanding the site and attach various additional elements to the finished frame structure.
Back to the table of contents
Step-by-step instructions for building a frame extension
Prepare tools and materials for work:

- hot bitumen;
- crushed stone or gravel;
- concrete mix;
- broken brick;
- trimmed boards for lathing;
- building level;
- slats for roofing on the surface of the slope;
- steel corner;
- cord;
- electric drill;
- grinder;
- electric saw;
- electric screwdriver;
- a hammer;
- shovel;
- ax;
- sledgehammer;
- screws;
- nails;
- wooden wedges;
- wood shields;
- dry tow;
- gypsum solution.
Any construction begins with planning the land, drawing up a project and preliminary preparation for the correct organization of work.
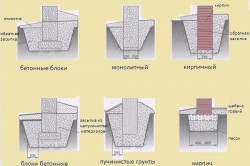
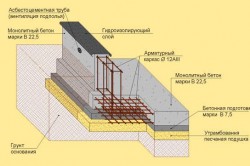
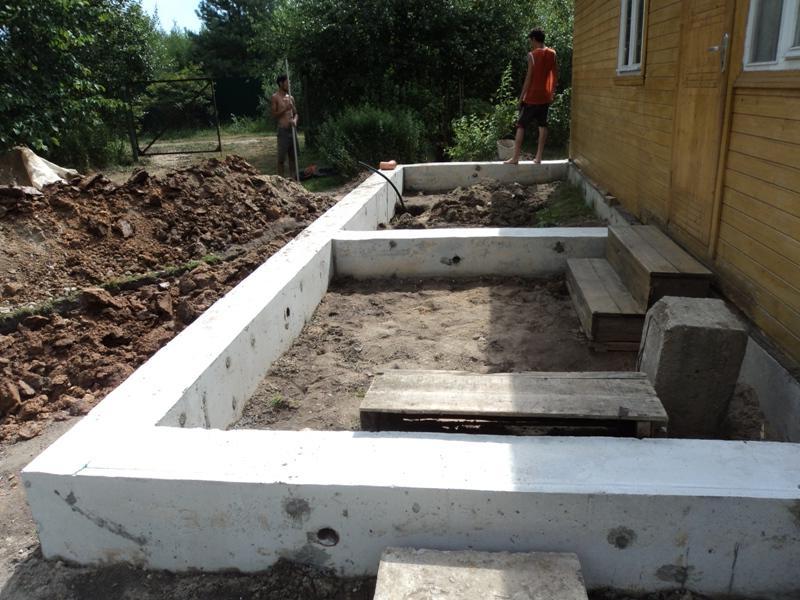
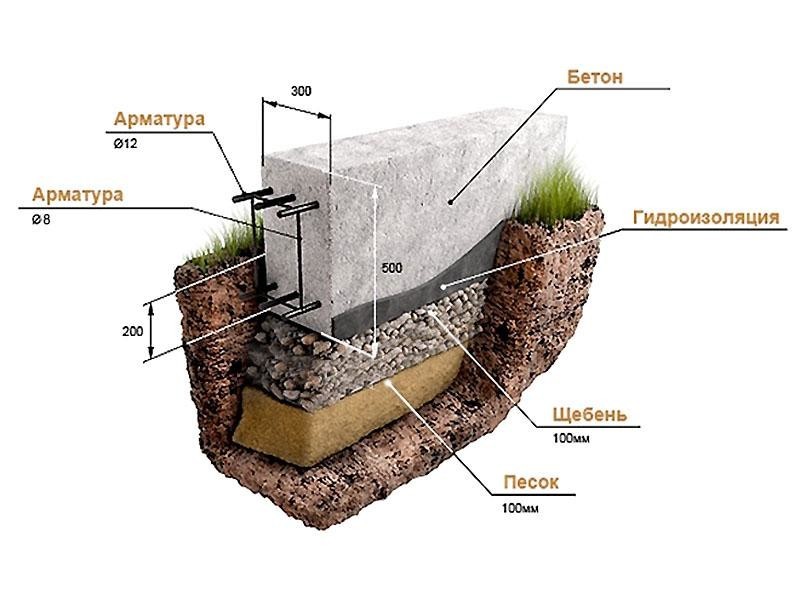
The first stage is filling the tape concrete base... The foundation is created in 4 stages:
- sand and crushed stone pillow;
- reinforcement cage;
- installation of formwork;
- pouring concrete mixture.
Under the floor logs, you need to install supports at a distance of about 130-150 cm. The logs are best placed from each other at a distance of about 90 cm. If such supports were not created when installing the main foundation, then be sure to do them. To the same depth to avoid seasonal vertical movement.
Before pouring concrete into the pits, a layer of sand of at least 10 cm should be poured onto their bottom. After that, rubemast or roofing material is laid in 2 layers on all surfaces of the base for waterproofing. This will prevent the timber frame from rotting.
After that, it is necessary to lay a 150 mm wide strapping bar around the entire perimeter of the extension. This size is the most optimal. You can take a thicker timber, but in no case thinner, otherwise it will be quite cool in winter.
The lower bar must be treated with an antiseptic. If you are on a budget, you can use used car oil. It is still drained, and in its properties it surpasses many modern impregnations.
Fastening in the corners is done in half a tree, otherwise in the paw. After that, the piping is leveled.
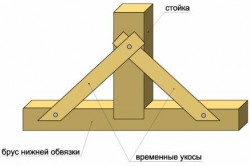
The next step is to install the corner posts. It is best to make them from a bar of 150x150 mm, but you can also make them from edged boards 100 and 150 mm wide and 50 mm thick. Everything is exposed strictly vertically in level or plumb line. Racks are fixed with technological braces from available boards.
Those racks that will be installed next to the wall of the house should be slightly below the eaves of the building's roof, so that in the future, the roof of the annex can be brought in with an apron made of a strip of galvanized steel under the eaves. The outer racks of the outbuilding must be lower than those mentioned. And the shorter they are, the better rainwater will drain from the roof of the structure and snow will blow off.
The slope should be about 1 m per 5 m extension. More is possible. In view of this, the height of the outer racks is regulated at 2 m or slightly more. This is necessary so that after the filing of the ceiling and flooring, you do not cling to the ceiling with your head. After the racks are installed, it is necessary to throw a ceiling strapping ring on top of them, which is best made from a 150x50 edged board.
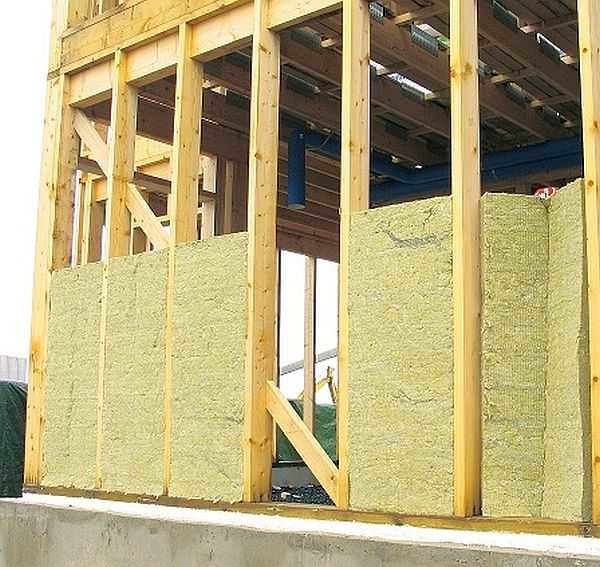
At the next stage, additional racks are installed along the entire perimeter of the frame extension. As a rule, they are installed at a distance of about 1 m.More precisely, at least every 90 cm, as a maximum - every 150 cm.The place of installation of intermediate racks depends on the thickness of the sheets of thermal insulation material in order to cut them less, and on the width of future doors and windows to be installed in the annex.
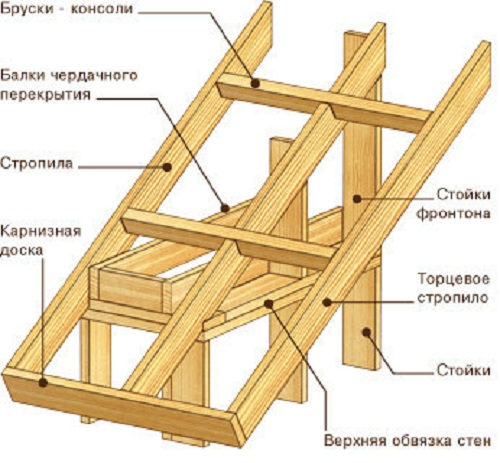
After completing the indicated work, it is necessary to strengthen the corner posts with inclined braces, which are installed at an angle of about 45 °. After that, the technological braces are removed from the edged board. Next, the rafter boards are laid on the upper strapping ring. The boards are laid on the edge. Outlet for the crown - 30 cm (more). Edged sheathing boards are laid on the rafters. Board thickness - 25-35 mm.
On the boards of the crate, it is necessary to lay glassine in 1 layer with an overlap of 5-7 cm along the edges.It will serve as a safety layer from moisture, if the main roofing material will leak.
Over time, private structures need to be enlarged for completely different reasons. For example, an increase in the number of people living, equipping a house with a sewage system or a desire to fence front door from direct exposure to cold air. Because of this, there is a need for another room, or expanding the kitchen area, bathroom, or simply adding a veranda. A frame extension is what you need.
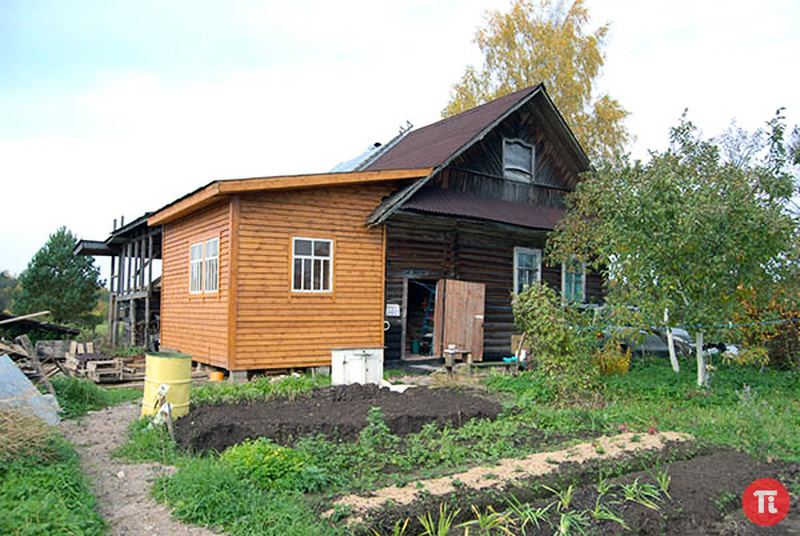
Frame extension to a wooden house
Building a frame extension is an excellent solution to the problem with the need to expand the area. Do-it-yourself extension to the house is usually made of timber, brick or in a connected version. In order not to have to make changes, it is best to initially think over all the features of the structure, because each one needs an individual approach.
Additional living room
If there is a need to add another room, you need to try, because all these actions are tantamount to building a small house.
If a living room is planned, then it must be insulated, heated, interior and exterior decoration
The entire building must be insulated, otherwise the heating carried out will be absolutely useless. It is also necessary to carry out waterproofing so that there is no problem with dampness and fungus.
Bathroom or kitchen
Before installing the foundation, engineering communications are brought to the construction site. Sometimes you have to carry out a separate water supply.
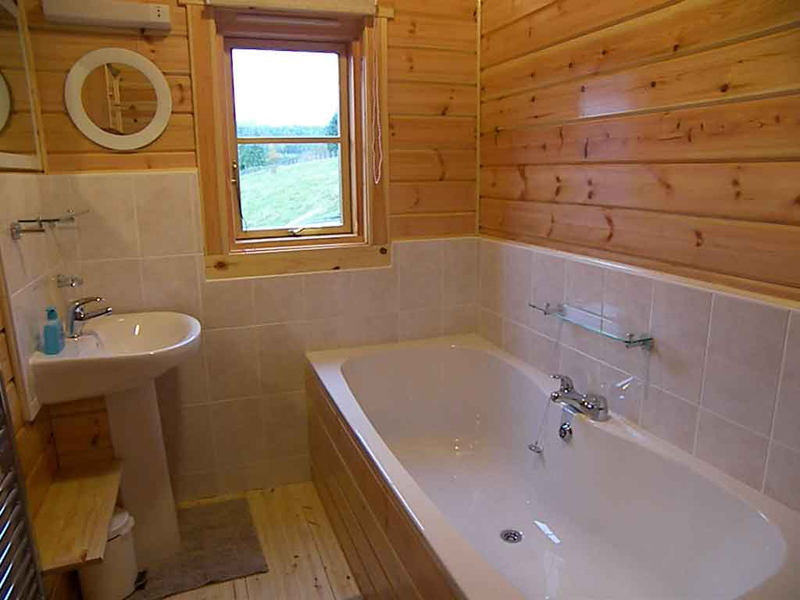
In addition, it is necessary to pay attention to the insulation of absolutely all the details of the building and to think over in advance a thorough waterproofing of the floor.
Veranda
A simple structure, which is built to protect the front entrance to the structure from rain and wind, and is also used in the summer.
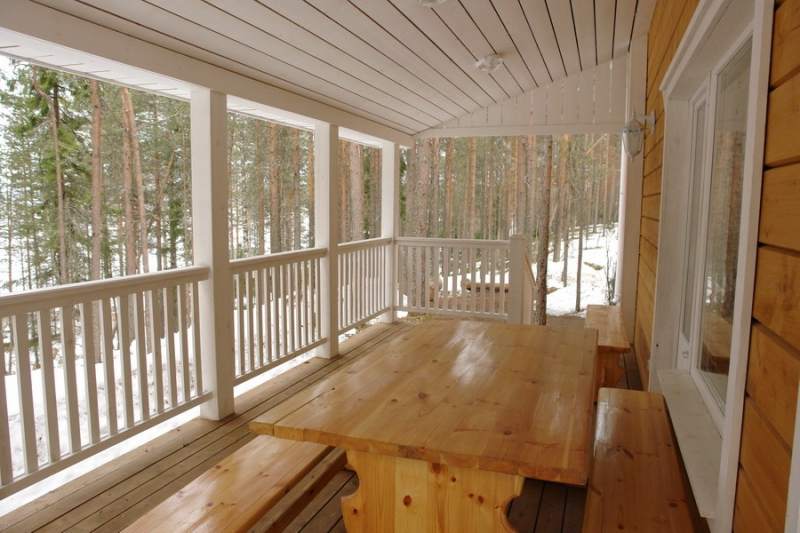
An extension to the house can be in the form of a veranda
It can be closed or open. This building does not need special insulation, but waterproofing is mandatory in any case.
Construction project creation
In the case when there is a large area on the site, then there will be no problems with the construction of an extension, even if all the work is planned to be done by hand. In order not to be mistaken with the required outbuilding area, it is imperative to draw up a thorough plan.
First, design the extension in the program or on a sheet of paper, calculate the costs
Here are a few basic tips to consider when planning:
- Determine exactly the purpose of the extension. This will not necessarily be a living area, it is likely that a person needs a veranda, a garage or just a separate place like a personal office-workshop. All subsequent nuances of construction work will directly depend on this choice: the volume of materials, area, number of openings and much more.
- Another circumstance can be called the presence of communications in the projected construction site.
- In addition to the number of materials, you also need to know their type. Thus, it will be possible to calculate the cost of future construction and take care of the quality, which affects the service life.
Thus, an annex from a bar needs a foundation corresponding to that which is under the main structure. If the house was built with his own hands, then the owner of the building knows exactly what the basis is. Therefore, it won't be particularly difficult to do this.
The main nuances that you need to know:
- the size of the foundation and the depth of the laying of the base;
- material and the right decision.
As a result, it will be necessary to tie the erected foundation to the existing one. After this stage, walls can be erected. When the owner of the house does not have any information about the foundation, then research is carried out to help choose the material and installation. After filling the foundation, you need to wait about 30 days for it to harden and to become strong. Individual attention should be paid to the joints of only the made base to the old one.
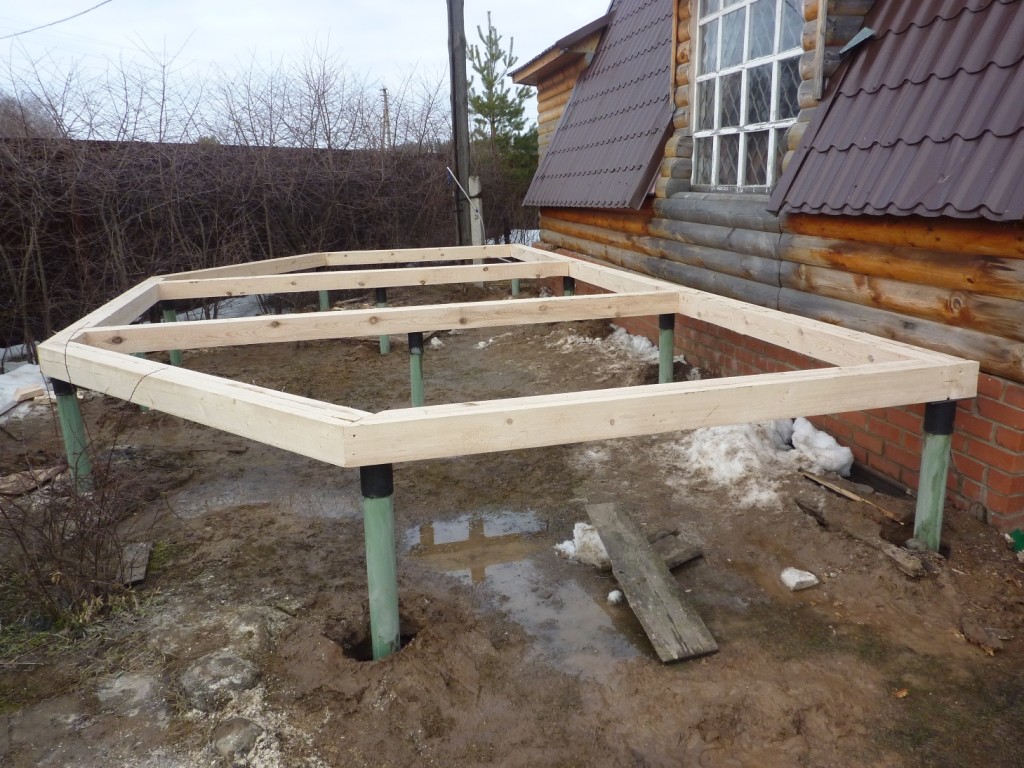
The pile foundation can be made even in winter
You can make a pile element, its installation is not associated with already built ones.
Erection of the walls of the extension
After the foundation is ready, they begin to equip the walls - 3 walls, because the 4th is already there, the one to which the room is attached. However, there are also such options when 2 walls are enough, it all depends on the design of the building. An extension to a wooden house is usually not difficult at all. Metal plates and other specialized parts are used as fasteners.
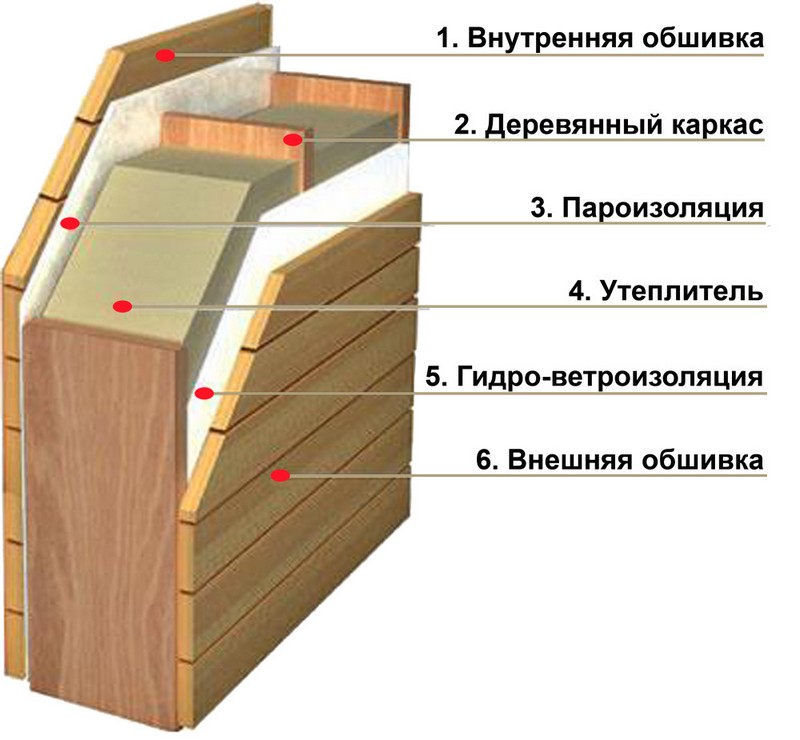
The cake of the wall of a frame house is not much different from the wall of an extension, if it is a living room
If the additional area is made of timber, then you need to take into account that the size of the material should not be less than 200 by 200 millimeters, in the case when permanent residence is planned. It is required to know that the timber is a rather heavy material, and subsequently it shrinks. Only at the end of this process can the new building be properly and firmly fixed to the house itself.
In terms of the time required for shrinkage, this is about a year, or a little more. The duration of this period is influenced by the area of \u200b\u200bthe extension, the quality of the material, as well as the condition of the structure to which the extension was made. The main rule in this matter is not to rush.
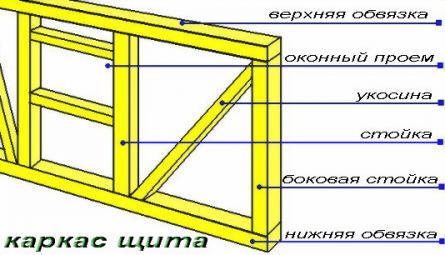
The frame of the shield is slightly susceptible to shrinkage if the used timber has been dried to the required level
At the end of the shrinkage, the originally supplied fasteners are removed and fixed in a new location. During the period of precipitation, the structure should be insulated with felt, cotton wool, or some other material.
To lead construction works can all year round, in winter prices for construction materials and work are several times cheaper
To improve the quality of thermal insulation and to give a good appearance to the joints, a special element made of wood is used. At the moment of shrinkage, it may shift slightly, so there is a need to remove and reinforce it again.
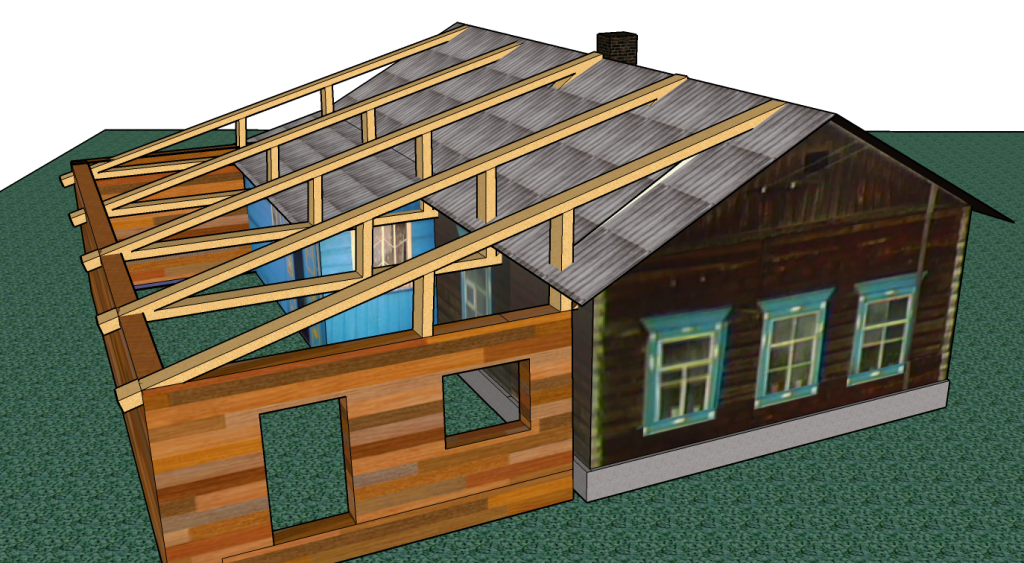
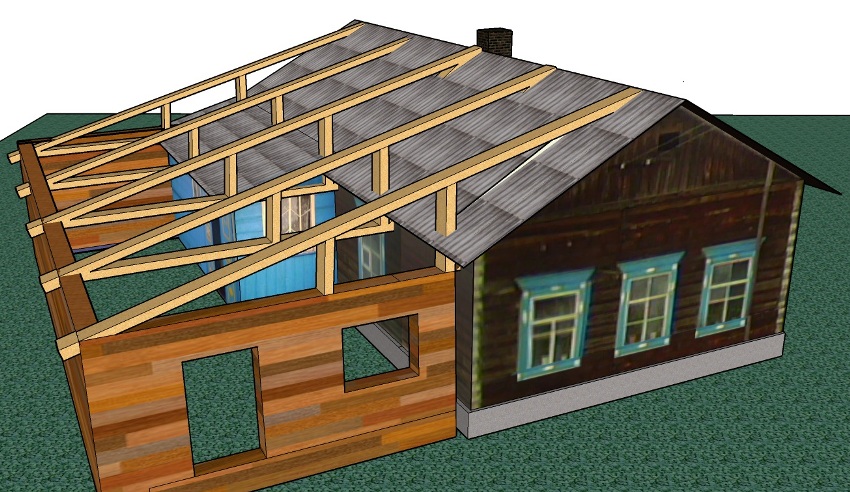
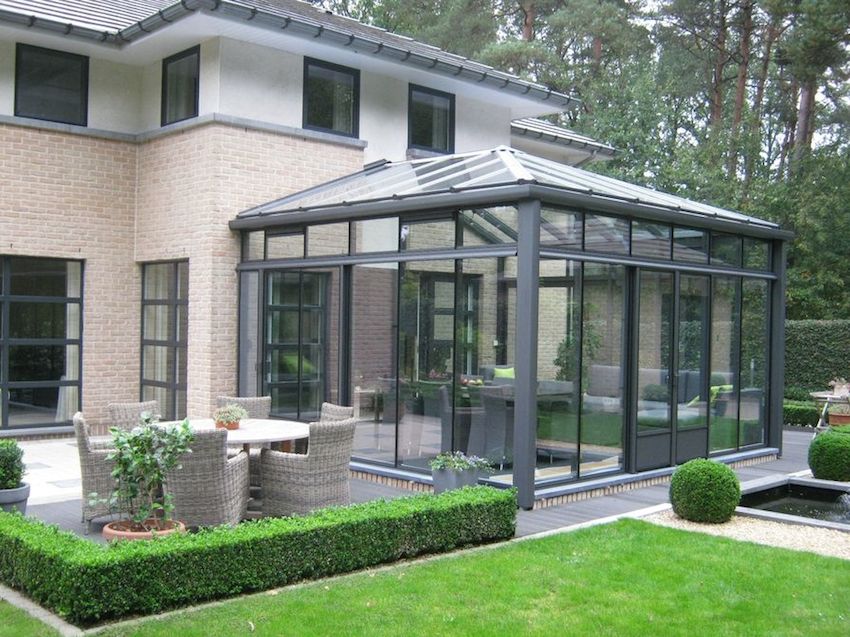
Do not forget about the roof to the extension, it can be made as a continuation of the roof of the house, flush with the wall or with an overhang - all at the discretion of the owner or designer
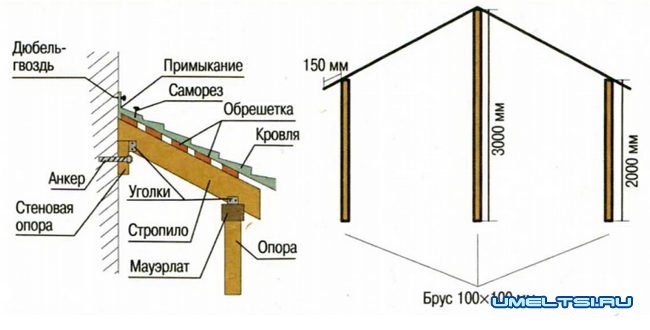
When the size of the house is increased, the issue of roofing arises. Everything happens in the usual way according to standard technology. The approximate order of roofing is as follows:
- First of all, equip the rafter system. Do not forget about compliance with all load characteristics.
- At the end of the installation of the rafters, they proceed to the creation of the lathing, use bars and slats. Instead of this design, a solid flooring is sometimes performed - in the role building material boards or plywood will do.
- Facing the gables.
- Eaves filing.
- Installation of wind elements.
- Directly installing the roof. The material is chosen independently, based on the personal taste of the owner of the house.
Further - the floor, ceiling and other interior finishing work. Installation of openings is not particularly difficult. If the extension to a wooden house is made of the same material, then other details are best done using lumber.
Features of the construction of the extension
Consider important tips from builders who are experienced specialists in this field:
- Actions with the tree must be performed during the cold season. When work is carried out at such times, the weather tends to reduce shrinkage.
- Thermal insulation of a timber structure is most expedient inside. This preserves the neat appearance of the building. You can also save a lot on the amount of insulation material.
- It should not be forgotten that an extension to a wooden house needs to be coated with an antibacterial agent, which has protective characteristics against the effects of moisture. Refractory processing is a must in this type of construction.
- It is best if the number of metal fasteners is kept to a minimum. With all this, it is worth stopping at galvanized ones. This is very important in order to protect the wooden house extension from corrosion.
A frame extension, the construction of which takes place rather quickly, can be erected by anyone.
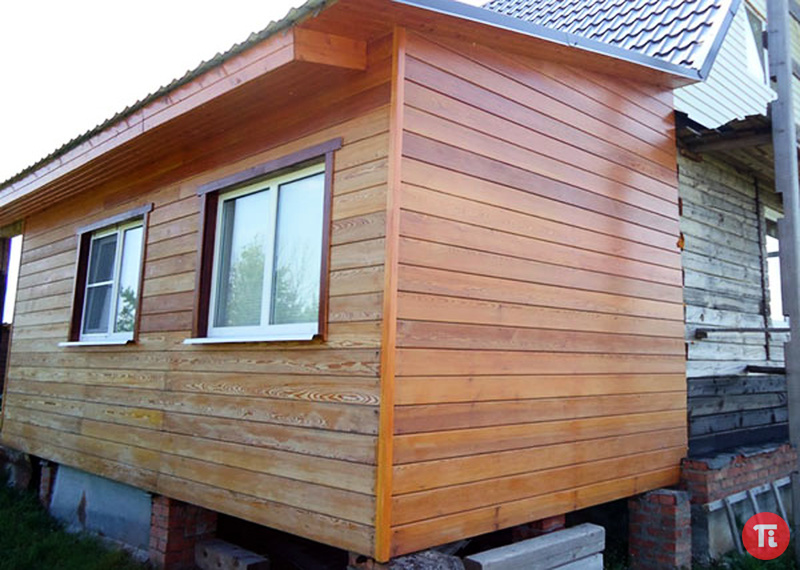
The extension can be decorated in the general style of the facade of the house and outwardly will not stand out
An extension to a wooden house, if all standards are observed, will last a long time, and it will not be difficult to build it.
Today we have not an ordinary homemade product, but a very complex project: we will tell you how you can make an extension to the house yourself with the help of straight hands!
First of all, construction begins with a floor plan. Having calculated the required area, I marked the ground with a size of 3 m by 5 m and dug a trench for a strip foundation 50 cm deep and 40 cm wide.Then I laid a bunch of reinforcing rods and welded brackets to the rods. Further in the article there will be a description and photos for what I made these brackets. The process of manual mixing of concrete with a shovel and pouring it does not want to even remember)) I can only say one thing: it would be better if I called a mixer with ready-made concrete and filled it in))). Having exposed the formwork from the boards, I brought the foundation 20 cm above the ground level and leveled it. Cement grade M-400 was mixed with sand screening in a ratio of 1 to 3. The result of strength was impressive. After the concrete hardened, he proceeded to pour the podium out of concrete to install a gas boiler 1m by 1m in size, laying it in two places with a grid and exposing the formwork.
Filling the staples sticking out of the foundation with concrete, I got pillows for laying floor beams (lag) on \u200b\u200bthem. I needed the staples to prevent the pillows from sinking into the ground and, as a result, from skewing the floors. I arranged them in accordance with the recommendations for floor installation. That is, at a certain distance from each other and strictly in level. At this, the foundation work was completed. Then he proceeded to the construction of the walls. First of all, I made the waterproofing of the wall material from the foundation by spreading roofing material over the entire area. After all, concrete conducts moisture very well and if moisture insulation is not made, then mold may appear on the walls, the walls themselves may crack. My next step was to mark the wall itself. The distances of the sides from the wall to the opposite wall did not differ and the diagonals of the corners were the same. Having outlined the corners, I proceeded to lay foam blocks measuring 20x40x60 cm. The plans were for exterior wall decoration with siding, so I set the block with a lighthouse rail and a corner from the siding in such a way that after finishing the siding of the extension, it would not “dance” from the siding of the house. To bond the blocks together, a mixture of cement and sand was used in a ratio of 1 to 3. Special mixes and glue are also sold. Before placing on the mortar, the blocks were soaked in water. This greatly facilitates the masonry process. The blocks were squeezed into place with a rubber hammer. Any masonry is erected from the corners, so I was no exception and did exactly the recommendations, adjusted for doorways. To obtain blocks of shorter length, an old hacksaw was used) She did her job perfectly. But there are special saws on sale a. To connect the walls with the main house, I made T-shaped brackets from reinforcement and drilled them into the wall with the expectation of hitting the seam between the blocks. He erected the walls taking into account the window and doorways using a building level one and a half meters long and a plumb line. Those. the blocks were stacked strictly vertically and horizontally. This is especially important for door and window openings. The thickness of the seam can be used to adjust the height of the blocks relative to each other. When the height of the walls reached the required level, U-shaped channels were made from a metal corner measuring 5 cm by 10 cm for stacking blocks over door and window openings. The length of each was the sum of the opening plus 40 or 60 cm for wall mounting. To do this, I put the corners on the block with the long side facing each other and welded them together using a welding machine and fittings to obtain a gap between them. The gap is needed to screw the screws into the blocks during the installation of doors and windows. Then he simply put the channels on the blocks and screwed them with self-tapping screws for full fixation. It would be possible to turn them over in a different way and put blocks on top, but I put a board in them from below to fix window frames and doors. Having laid the foam blocks on top of the channels, I sawed a 100x150 cm beam and laid it out on top. With 200 mm self-tapping screws, I screwed it to the foam blocks and fastened the bar together with reinforced corners. It is necessary for ceiling beams and rafter system... Having screwed a block of 50x75 mm to the wall of the house. I got a support for the ceiling beams. Important!!! For each roof, the thickness of the roof beams and rafters, as well as the distance between them, are calculated individually. Beams 50x75 mm. screwed to the timber with corners. Since the height of the extension was the same as the level of the house, after installing the beams, I had to remove part of the slate above the house to get the roof slope above the extension. After that, the rafters were assembled. To fasten the rafters, 250 mm nails were used. I laid a crate of boards 25 mm by 150 mm in size on the rafters, put heat and vapor insulation on the rafters and proceeded to lay the metal tile. The metal tile was bought practically from the factory and had the length I needed. It did not even have to be cut or adjusted to each other in length. Having laid out the sheets on the roof and slipping them under the old slate, I aligned them with each other and the walls. After fastening, I cut off the excess parts of the crate. I laid the logs on the pillows, laid the floors from 40 mm thick boards. Further doors were installed and
By designation, all extensions to the house are divided into:
- living room;
- garage;
- terrace;
- summer cuisine;
- veranda;
- porch.
By the type of material used, extensions are:
- frame;
- brick;
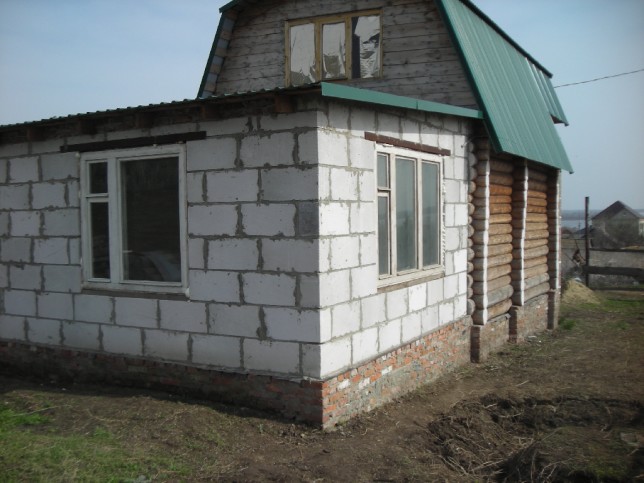
- from foam blocks;
- from a bar.
At the first stage of preparation for construction, it is necessary to decide whether it is planned to build a capital structure or not. The device of a shed or terrace is quite possible without a project that is carried out by a specialized organization, a plan or diagram may be enough. The construction of a living room or garage is best done using a specially designed or tied to specific conditions already finished project annexes to a wooden house. Savings at this stage, as a rule, turn into additional, much higher construction costs.
Capital structures
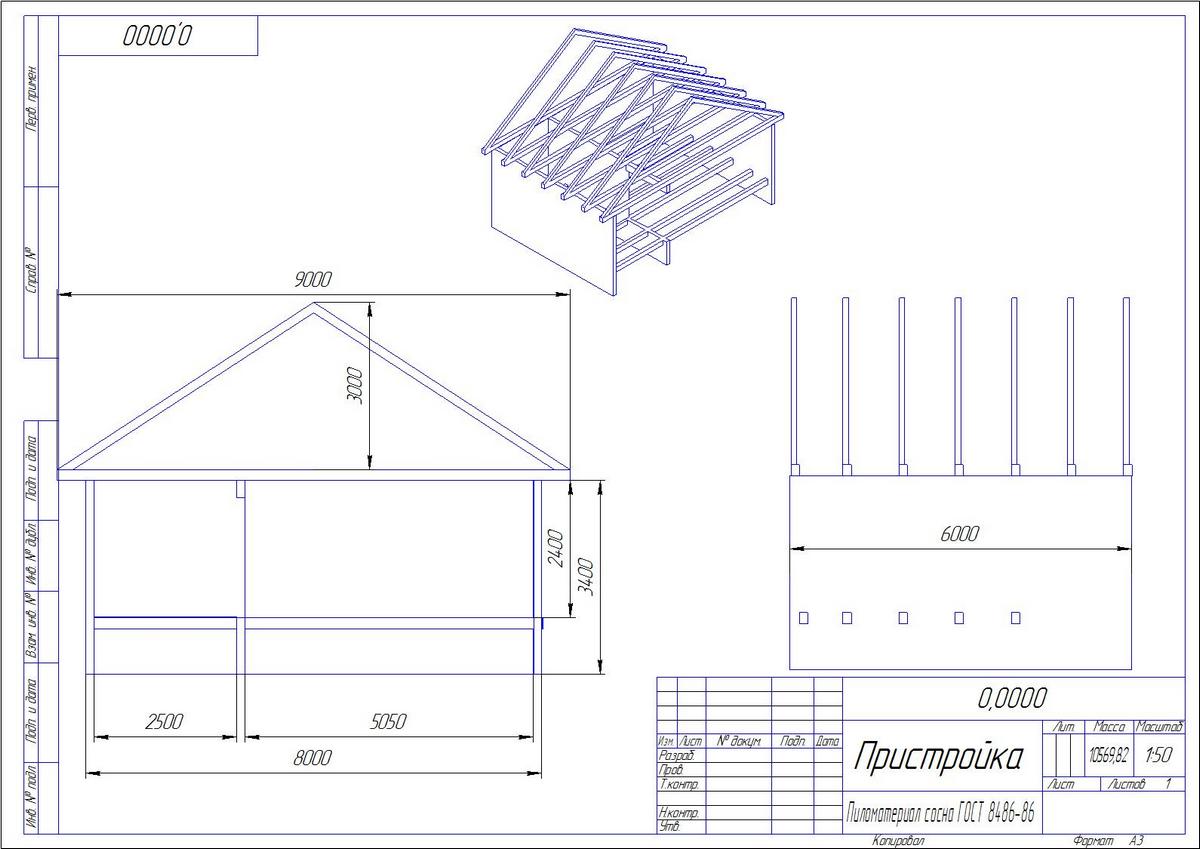
The project of the frame extension of the room
Advantages of using a frame structure:
- construction speed;
- no upsetting of the structure at the first stages of operation;
- small load on the foundation, and as a result, minor requirements for it;
- excellent compatibility with wooden structures main private house.
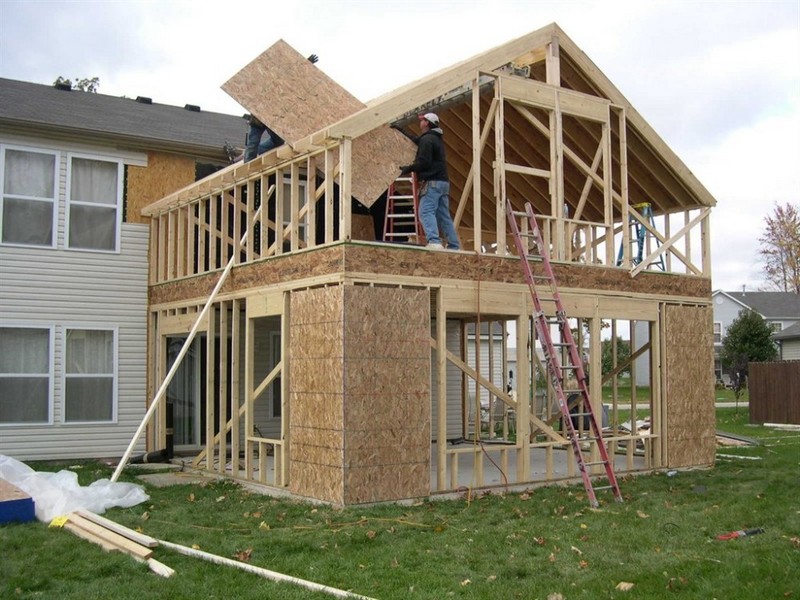
The frame structure is especially suitable in the case of the construction of a two-story extension to country house, since it is much lighter than other types of construction.
Extension project from foam blocks
A foam block extension is one of the most common options, since it simultaneously combines the relative cheapness of work and their simplicity. In addition, these are far from all the advantages of using this technology.

Advantages:
- construction speed;
- durability of the structure (at least 50 years);
- small load on the foundation (a base on the pillars is enough instead of a strip);
- structural strength;
- simplicity of construction technology;
- the ability of the material to "breathe".
Disadvantage:
- necessity exterior decoration facade because of the unattractive appearance of the blocks.
Project of an extension from a bar
Structurally and technologically, everything that was said about frame extensions can be attributed to structures made of timber. In fact, the combined option is most often used.
The main points when building an extension from a bar:
- the foundation for it must be similar to the foundation for the main building and be connected to it;
- it is possible to use a more economical pile foundation, of course, in the case of a design calculation;
- it is necessary to create an expansion joint between the house and the extension, which will prevent damage to the walls when the new structure shrinks;
- the technology for erecting the structure of the walls and roof of the extension is similar to the technology for building a house.
Non-capital buildings
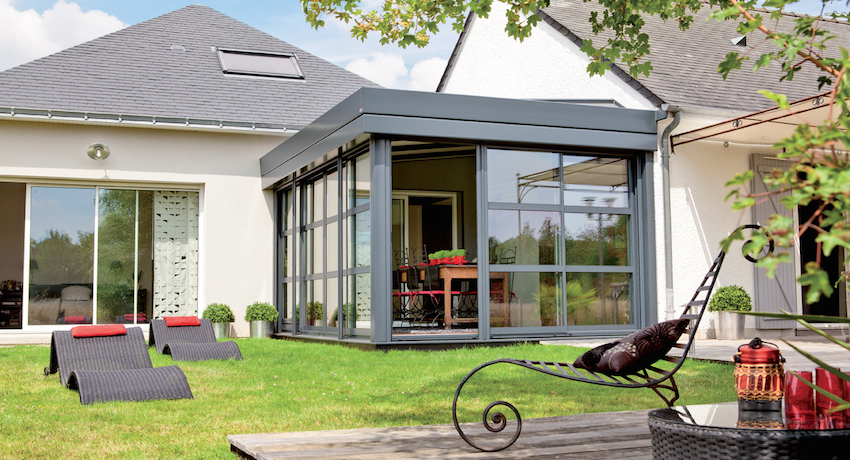
Polycarbonate veranda
The well-established opinion that the veranda is a warehouse for storing unnecessary things (tools, bicycles, skis and other junk) is fundamentally wrong. In fact, this is a great opportunity to create a comfortable and beautiful seating area. Especially if you use modern designs and materials for this.
Highlights when building a veranda:
- can have almost any configuration - rectangle, square, semicircle with a roof in the form of an arch;
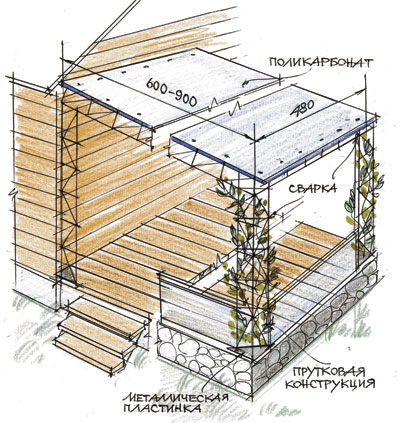
- the lightness of the structure allows it to be erected on a minimum foundation, for example, a tape depth and width of only 30 cm. on a sand cushion 20 cm thick;
- it is advisable to build a small base, to which the frame structures are attached;
- polycarbonate itself, due to the properties of the material, is easily cut and mounted on an already assembled frame.
Canopy

A canopy is usually built to protect any used space from precipitation. Thus, you can equip almost the entire territory adjacent to the house for a summer dining room, playgrounds and much more.

A canopy structure usually consists of:
- pillars dug in to a depth of about 0.5 meters and filled with concrete;
- horizontal beams, and one of them must be attached to the wall of the house;
- rafters and lathing on them;
- roofing material.
The existing variety of materials and various structural elements allows you to create a variety of combinations in the construction of sheds. But most often, when building an extension to a wooden house, wood and metal tiles are used.
An extension to a frame house is in demand among many land owners. Its construction allows you to significantly expand housing, to do it quickly. The construction of a frame structure does not require large financial costs. This type of construction is chosen by those real estate owners who are interested in a high speed of construction and in the construction of comfortable housing.
Features of structures
All annexes erected using frame technology involve the construction of a supporting skeleton. Edged timber is widely used for the manufacture of the frame.
Corner posts, as well as the lower trim of the extension, are made of this building material. For the construction of ordinary posts and horizontal lintels, it is recommended to use a regular board. In addition, you will need a board for the construction of window openings and openings for doors. Choose the correct thickness of the posts. It should match the thickness of the insulating layer that you will lay to insulate the building. If we talk about the width of the insulation, then it is selected depending on the step between the racks.
The thickness of the insulation should be selected based on the climatic zone. If the building is located in the middle lane, then it is enough to put insulation 15 cm thick. To assemble the frame, buy special hardware fasteners. This method is the most common today. You will love these mounts because they are very reliable and easy to work with. In addition, they are inexpensive.
After you fully assemble supporting frame buildings, insulate the structure. Remember to make a high-quality waterproofing. Do not forget about the vapor barrier device. Use modern materials in your work, then the extension will be warm.
Rough skin the structure. To do this, purchase OSB sheets in advance, LSU and DSP sheets are also suitable. The construction of the extension is being completed by the finishing of the new premises. If you build a building in full compliance with the technology, then you get a modern building. Such an extension will perfectly retain heat; the use of modern materials guarantees a high level of sound insulation.
You can build an extension with your own hands. This does not require large financial costs, because the construction uses common materials that can be found in any specialized store.
Features of the construction of the extension
It should be noted that frame construction technology is widely used all over the world. Many countries have been building individual residential buildings using this technology for a long time. Frame construction occupies a leading position in the construction market in Europe and the USA, in these countries, individual residential buildings are being erected using frame technology.
The technology offers 2 construction options. It:
- frame-panel buildings;
- frame-frame construction.
If you decide to build an extension to a wooden house, using the developments of frame-panel construction, then you will have to purchase ready-made panels in advance. They are manufactured at the factory, the panels already have openings for windows and doorways.
You only need to assemble the structure into a single whole. Be sure to pay attention to securing the panels, because the stability and safety of the structure depends on it. Enterprises manufacture such panels according to individual dimensions, while the dimensions of the foundation must be taken into account.
If you want to build a structure of a complex structure, then it is best to stop at the frame-frame technology. It differs significantly from the frame-panel method, because the slabs are not made to order. They are adjusted at the construction site.
It must be said that modern buildings erected using frame technology are not inferior to houses that were built in the usual way. For a number of characteristics frame structures superior to ordinary houses. Frame houses easy to warm up, which is why such construction is widely in demand among summer residents. Houses and annexes to a wooden house turn out to be very warm, the heat will remain in the room 5 times longer than it would be possible in buildings erected using other technologies. This makes it possible to significantly save on heating.
You can start finishing the extension to the house immediately after the completion of construction. There is no need to wait for the building to shrink, because it has frame extensions not visible.
![]()
You can build an extension at any time of the year, it is easy to do in winter.
It won't take much time to erect the structure. If in the future you wish to expand the extension, this can be done without difficulty.
Stages of erection of a frame extension
To complete the work, you will need materials and tools. Draw up a project for an extension to the house, this is necessary for the correct organization of construction. The diagram should be in front of your eyes when you start building the extension. Calculate the amount of building materials.
The construction of the extension begins with pouring strip foundation... Since the extension cannot be classified as a heavy building, such a foundation will suffice.
The base is erected in 4 stages:
- arrange a sand and crushed stone pillow;
- a frame is erected using reinforcement;
- install formwork for the foundation;
- the foundation is poured with concrete.
Place the logs for the floor every 90 cm. Be sure to make supports under them, they are buried to the depth of the foundation. The thickness of the sand and crushed stone cushion should be at least 10 cm. When the foundation is ready, put 2 layers of rubemast on it. In addition, roofing material can be used for waterproofing. This will protect the extension frame from rotting.
Buy a beam 15 mm wide, make a strapping from it. Such a bar is best suited, you should not buy a material of less thickness, otherwise it will be cool in the room in the winter.
Buy antiseptic, be sure to process the lower bar with it. If you don't want to spend money on this, replace the antiseptic with used car oil. Attach the timber to the paw in the corners. After that, take a level, align the harness.
Install the posts in the corners of the structure. Use an edged board or timber 150x150 mm. The racks should be located strictly vertically, they are fixed with technological braces. Simple boards can be used for this purpose.
Position the uprights you plan to install against the wall of the house, slightly below the edge of the house's roof. In the annex, the outer racks should be lower than the inner ones. This is necessary in order to make the roof sloped. The height of the outdoor racks should be at least 2 m, then you will be free to walk indoors without bending over.
After installing the posts, make a strapping ring. For this, you can use an edged board 150x50 mm. Install additional stands at a distance of 1 m from each other. Reinforce the corner posts with inclined braces and remove the technological braces. Place the rafters over the strapping ring. Boards must be laid so that they extend beyond the crown by at least 30 cm. Make a crate, cover the roof with roofing felt or other material.
The frame extension must be well insulated. First, a rough floor is made, then insulation is laid. A clean floor is laid on top. You can buy glassine for wall insulation. This material is inexpensive. In addition, you can use penofol.


