Have you ever come across a topic about "correct" or "incorrect" frame house? Often people poke their noses into the fact that the frame is wrong, but they find it difficult to explain clearly why it is wrong and how it should be. In this article I will try to explain what is usually hidden behind the concept of a "correct" framework, which is the basis frame house, just like the skeleton in humans. In the future, I hope we will consider other aspects as well.
Surely you know that the foundation is the foundation of the house. This is true, but the frame house has another foundation - no less important than the foundation. This is the frame itself.
Which frame house is "correct"?
I'll start with the basics. Why is it so difficult to talk about the correct frame house? Because the only true correct frame house does not exist... What a surprise, isn't it? 🙂
You will ask why? It's very simple. A frame house is a large constructor with many solutions. And there are many decisions that can be called correct. There are even more decisions - "half-correct", but "wrong" in general a legion.
Nevertheless, among the variety of solutions, one can single out those that are usually meant when they talk about "correctness". This is a frame of the American and, less often, Scandinavian type.
Why exactly are they considered to be examples of "correctness"? Everything is very simple. The overwhelming majority of private houses for permanent residence in America, and a very significant percentage in Scandinavia, are built precisely according to frame technology... This technology has been used there for more than a dozen and possibly even a hundred years. During this time, all possible bumps were filled, all possible options were sorted out and a certain universal scheme was found that says: do this and with a probability of 99.9% everything will be fine. Moreover, this scheme is the optimal solution for several characteristics at once:
- Constructive reliability of solutions.
- Optimality in terms of labor costs during construction.
- Optimal material costs.
- Good thermal performance.
Why step on your own rake when you can take advantage of the experience of people who have already stepped on this rake? Why reinvent the wheel if it has already been invented?
Remember. Whenever we are talking about a “correct” frame or about “correct” nodes of a frame house, then, as a rule, this refers to standard solutions and nodes used in America and Scandinavia. And the frame itself meets all of the above criteria.
What frameworks can be called "semi-regular"? Basically, these are those that differ from typical Scandinavian-American solutions, but, nevertheless, also satisfy at least two criteria - structural reliability and good solutions for heating technology.
Well, I would classify all the others as "wrong". Moreover, their "incorrectness" is often conditional. It is not at all a fact that the "wrong" frame will necessarily fall apart. Such a scenario is actually extremely rare in general, although it does occur. Basically, "wrong" lies in some controversial and not the best solutions. As a result, it becomes difficult where it can be made easier. More material is used where less is possible. A colder or uncomfortable design is made than it could be.
The main disadvantage of the "wrong" frameworks is that they give absolutely no benefits in comparison with the "correct" or "semi-correct" ones - neither in reliability, nor in cost, nor in labor costs ... nothing at all.
Or these advantages are far-fetched and generally questionable. In extreme cases (and there are some), the wrong frames can be dangerous and will lead to the fact that a major overhaul of the house will be required in a few years.
Now let's consider the issue in more detail.
Key features of the American frame
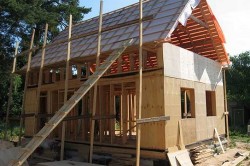
The American frame is practically the standard. It is simple, strong, functional and reliable as an iron saw. It is easy to assemble and has a large margin of safety.
Americans are tight-fisted guys, and if they manage to save a couple of thousand dollars on a construction site, they will definitely do it. At the same time, they will not be able to stoop to outright hack-work, since there is strict control in the construction industry, insurance companies will refuse payments in case of problems, and customers of would-be builders will quickly sue and rip off careless contractors like sticky.
Therefore, the American frame can be called a standard in terms of the ratio: price, reliability, result.
American frame is simple and reliable
Let's take a closer look at the main points that distinguish the American wireframe scheme:
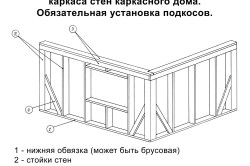
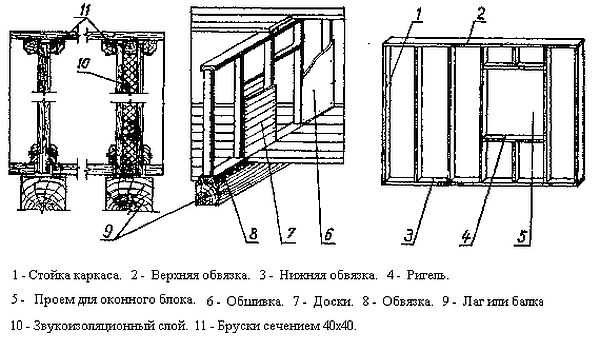
Typical nodes of a frame house
A bar in racks and straps is almost never used, unless it is due to some specific conditions. Therefore, the first thing that distinguishes the "correct" frame house is the use of dry lumber and the absence of timber in the walls. By this criterion alone, you can discard 80% of Russian companies and teams operating in the frame market.
Moments that distinguish the American frame:
- Angles - there are several different schemes for implementing corners, but nowhere do you see a beam as corner posts.
- Double or triple racks in the area of \u200b\u200bwindow and doorways.
- Reinforcement over openings - a board installed on the edge. The so-called "header" (from the English header).
- Double top rail from the board, no timber.
- The overlap of the lower and upper row of the strapping at key points - corners, different fragments of walls, places of abutment of internal partitions to external walls.
I did not specifically mention Ukosin as a distinctive moment. Since in the American style, if there is OSB3 (OSB) sheathing on the frame, there is no need for jibs. The slab can be viewed as an endless array of jibs.
Let's talk in more detail about the key features of the correct framework in the American version.
Correct corners of a frame house
In fact, on the Internet, even in the American segment, you can find a dozen schemes. But most of them are outdated and rarely used, especially in cold regions. I will highlight three basic corner patterns. Although realistically, only the first two are basic.
Nodes of corners of a frame house
- Option 1 - the so-called "California" corner. The most common option. Why “Californian” - I have no idea :). Another OSB board or strip is nailed from the inside to the extreme pillar of one of the walls. As a result, a shelf is formed on the inner part of the corner, which later serves as a support under interior decoration or any inner layers of the wall.
- Option 2 - closed corner. Also one of the most popular. The bottom line is an additional rack in order to make a shelf on inner corner... Advantages: the quality of corner insulation is better than in option 1. Disadvantages: such a corner can only be insulated from the outside, that is, this must be done before sheathe the frame with anything outside (plates, membrane, etc.)
- Option 3 - "Scandinavian" warm corner. A very rare variant, not used in America. Seen in Scandinavian frames, but not often. Why did I bring him then? Because, in my opinion, this is the warmest version of the corner. And I'm thinking about starting to apply it to our facilities. But before using it, you need to think about it, since it is constructively inferior to the first two and is not suitable everywhere.
What is special about all these three options and why is a bar a bad option for a corner?
Corner from a bar, the most losing option
If you have noticed - in all three versions of the boards, the corner can be insulated. Somewhere more, somewhere less. In the case of a bar in the corner, we have 2 drawbacks at once: firstly, from the point of view of heating technology, such a corner will be the coldest. Secondly, if there is a timber in the corner, then there are no “shelves” from the inside to attach the interior trim to it.
Of course, the last question can be resolved. But remember what I said about the "wrong" wireframes? Why make it difficult if you can make it easier? Why make a timber, creating a cold bridge and thinking how to attach trim to it later, if you can make a warm corner from boards? Despite the fact that this will not affect either the amount of material or the complexity of the work.
The openings and top trim are the most significant difference between the American frame scheme and the Scandinavian one, but more on that later. So, when they talk about the correct openings in the frame, they usually talk about the following scheme (window and door openings are made according to the same principle).
Correct openings in a frame house
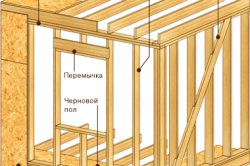
The first (1), which is usually paid attention to when talking about "wrong" openings, is double and even triple racks on the sides of the opening. It is often believed that this is necessary for some kind of reinforcement of the opening for installing a window or door. In fact this is not true. A window or door will be good on single racks. Why, then, are cohesive boards needed?
Everything is elementary. Remember when I said that the American frame is as simple and reliable as an iron saw? Pay attention to Figure 2. And you will understand that cohesive racks are needed solely to support the elements lying on them. So that the edges of these elements do not hang on the nails. Simple, reliable and versatile.
Figure 3 is one of the simplified versions, when the bottom trim of the window cuts into the torn pillar. But at the same time, both window trims still have supports at the edges.
Therefore, one cannot say formally about the fact that if the racks are not doubled, then this is "wrong." They can be single, as in the Scandinavian frame. Rather, it is a mistake when the racks along the edges of the openings are cohesive, but do not bear the load from the elements resting on them. In this case, they are simply meaningless.
In this case, the horizontal elements hang on the fasteners, so there is no point in doubling or tripling the racks on the sides.
Now let's talk about an element that is already more critical and the absence of which can be considered as a "wrong" opening. This is the "header" above the opening (header).
Window "Header"
This is really important element... As a rule, some kind of load will come from above on the window or doorway - the floor joists of the second floor, rafter system... And the wall itself is weakened by the deflection in the area of \u200b\u200bthe opening. Therefore, local reinforcements are made in the openings. In American terms, these are headers. In fact, this is a board installed on the edge above the opening. Here it is already important that the edges of the header either rest on the racks (if the classic American scheme with cohesive racks of openings is used), or be cut into the extreme racks, if they are single. Moreover, the section of the header directly depends on the loads and dimensions of the opening. The larger the opening and the stronger the load on it, the more powerful the header. It can also be double, triple, built-in, etc. - I repeat, it depends on the load. But, as a rule, for openings up to 1.5 m in width, a header from a 45x195 board is quite enough.
Is the absence of a header a sign that the framework is "wrong"? Yes and no. If you act according to the American principle of "simple and reliable", then the header should be present at every doorway. Do this and be sure of the result.
But in fact, you need to dance from the load on the opening from above. For example, a narrow window in one-story house and the rafters on this section of the wall are located along the edges of the opening - the load on the opening from above is minimal and you can do without a header.
Therefore, the question of the Header should be treated as follows. If you have one, great. If it is not there, then the builders (contractor) must clearly explain why, in their opinion, it is not needed here, and it will depend, first of all, on the load on the opening zone from above.
Double top rail
Double plank top harness, also a distinctive feature of the American frame
Double top rail
The double strapping again gives reinforcement along the top of the wall for deflection from the load from above - the load from the floor, rafters, etc. In addition, pay attention to the overlaps of the second row of the strapping.
- Overlap in the corner - we tie two perpendicular walls together.
- Center overlap - connect 2 sections of one wall together.
- Overlap on the partition - we tie the partition together with the outer wall.
Thus, the double harness also performs the second task - to ensure the integrity of the entire structure of the walls.
In the domestic version, you can often find the upper strapping from a bar. And this, again, is not the best solution. Firstly, the timber is thicker than the double strapping. Yes, it may be better for deflection, but it is not a fact that it is necessary, but the cold bridge at the top of the wall will be more significant. Well, it is more difficult to implement this overlap to ensure the integrity of the entire structure. Therefore, we return again to the fact that why is it difficult to do, if you can make it easier and more reliable?
Correct jib in a frame house
Another cornerstone. Surely you have come across the phrase "jibs are made incorrectly." Let's talk about this. First, what is a jib? It is a diagonal element in the wall, which provides spatial shear stiffness in the lateral plane. Because thanks to the jib, a system of triangular structures appears, and the triangle is the most stable geometric figure.
So, when they talk about the correct jib, then usually we are talking about this option:
Correct jib
Why is such a jib called "correct" and what should you pay attention to?
- Such a jib is installed with an angle of 45 to 60 degrees - this is the most stable triangle. Of course, the angle may be different, but this range is best.
- The jib cuts into the upper and lower harness, and does not just rest against the rack - that's enough important pointso we tie the construction together.
- The jib crashes into every pillar in its path.
- There must be at least two fastening points for each node - adjacent to the harness or rack. Since one point will give a "hinge" with a certain degree of freedom.
- The jib cuts into the edge - this way it works better in the structure and less interferes with insulation.
And here is an example of the most "wrong" jib. But nevertheless, it is found all the time.
It's just a board stuck into the first opening of the frame. What is so “wrong” about it, because formally it is also a triangle?
- First, a very small tilt angle.
- Secondly, in such a plane, the jib board works worst of all.
- Thirdly, it is difficult to fix such a jib to the wall.
- Fourthly, pay attention to the fact that in the places of abutment to the frame, cavities that are extremely inconvenient for insulation are formed. Even if the jib is carefully trimmed and there will be no gap at the end, there is no way to get away from an acute angle, but to insulate such a corner with high quality - difficult task, so most likely it will be done somehow.
Another example, also common. This is a jib cut into the posts, but not cut into the harness.
The jib is not cut into the harness
This option is already much better than the previous one, but, nevertheless, such a jib will work worse than one cut into the strapping, and the work will take 5 minutes more. And if, moreover, it is fixed to each rack with just one nail, then the effect from it will also be minimized.
We will not even consider the options for any small defective "jibs and struts" that do not reach from the upper strapping to the lower one.
Formally, even the very curve of the jib makes at least some contribution. But again: why do it your way if you already have a good solution?
This concludes with the American frame and move on to the Scandinavian one.
Correct Scandinavian framework
Unlike America, where wireframes are practically standardized and there are very few differences, there are more variations in Scandinavia. Here you can find both the classic American frame and hybrid versions. The Scandinavian framework, in fact, is the development and modernization of the American one. Nevertheless, basically, when they talk about the Scandinavian frame, we are talking about such a design.
Scandinavian frame
Corners, jibs - everything is like that of the Americans. What should you pay attention to?
- Single strapping along the top of the wall.
- Power transom, embedded in the posts throughout the entire wall.
- Single racks on window and door openings.
In fact, the main difference is this very "Scandinavian" crossbar - it replaces both the American headers and the double harness, being a powerful force element.
What, in my opinion, is the advantage of the Scandinavian frame over the American one? The fact that it has a much greater emphasis on minimizing all kinds of cold bridges, which are almost all cohesive boards (double straps, openings). After all, between each cohesive boards, a gap can potentially form over time, which you may never know about. Well, it's one thing when the cold bridge has the width of one board and another question is when there are already two or three of them.
Of course, you shouldn't get hung up on cold bridges. There is still no way to get away from them, and in fact, their importance is often exaggerated. But, nevertheless, they are, and if it is possible to minimize them relatively painlessly, why not do it?
Scandinavians in general, unlike Americans, are very much confused about energy saving. The colder, northern climate and expensive energy sources also affect. But in terms of climate, Scandinavia is much closer to us (I am talking primarily about the Northwest region) than most American states.
The disadvantage of the Scandinavian frame is in its slightly greater complexity, at least in the fact that in all the racks you need to make cuts under the crossbar. And the fact that, unlike the American one, it does require some kind of mental effort. For example: in large openings, double struts may be required to support horizontal elements, and additional transoms and headers. And somewhere, for example, on the gable walls of one-story buildings, where there is no load from the log or the roof - maybe the crossbar is not even required.
In general, the Scandinavian frame has certain advantages, but it requires a little more effort and intelligence than the American one. If the American frame can be assembled with the brains completely turned off, then in Scandinavian it is better to turn them on, at least at the minimum mode.
"Semi-regular" frames
Let me remind you that by "semi-correct" I mean exactly those that have every right to exist, but differ from typical Scandinavian-American solutions. Therefore, one should be careful to call them "semi-correct".
Here are some examples.
An example of how you can "overlook"
The first example from our own practice. This house was built by us, but according to the project provided by the customer. We even wanted to redo the project completely, but we were limited in terms of time, since we had to go to the object; in addition, the customer paid a tangible amount for the project and formally there are no structural violations, but he resigned himself to the voiced shortcomings of the current solution.
Why then did I classify this framework as "semi-correct"? Please note that there are Scandinavian crossbars, American headers, and double straps not only on the top, but also on the bottom of the walls. In short, there is an American scheme, and a Scandinavian one, and another 30% of the stock in Russian is thrown on top, just in case. Well, the prefabricated rack of 6 (!!!) boards under the glued ridge beam speaks for itself. Indeed, in this place, the only insulation is isoplat outside, and cross insulation from the inside. And if there was a purely American scheme, then there would be no insulation in this section of the wall, a bare piece of wood from outside to inside.
I call this frame “semi-correct” because from the point of view of constructive reliability there are no complaints about it. There is a multiple safety margin "in the event of a nuclear war." But the abundance of cold bridges, and a huge overconsumption of material for the frame, and high labor costs of work, which also affects the price.
This house could be made with a smaller, but sufficient margin of safety, but at the same time, by 30 percent to reduce the amount of lumber and significantly reduce the number of cold bridges, making the house warmer.
Another example is a frame based on the "double volumetric" frame, promoted by a Moscow company.
The main difference is actually a double outer wall, with racks spaced apart from each other. So the frame fully meets the criteria of strength and is very good from the point of view of heat engineering, due to the minimization of cold bridges, but loses in manufacturability. The problem of eliminating cold bridges, which, first of all, is solved by such a frame, can be solved by simpler, more reliable and correct methods of the "cross-warming" type.
And, what is curious, usually "semi-correct" frameworks somehow have Scandinavian-American solutions. And the differences are more in an attempt to improve the good. But it often happens that "the best is the enemy of the good."
Such frameworks can be safely called "semi-correct" precisely because there are no gross violations here. There are differences from typical American-Scandinavian solutions in attempts to improve something or come up with some kind of "trick". To pay for them or not is the customer's choice.
"Wrong" frame houses
Now let's talk about the "wrong" wireframes. The most typical, I would even say, collective, case is presented in the photo below.
The quintessence of "directional" frame housing construction
What can be immediately noted in this photo?
- Total use of natural moisture material. Moreover, the material is massive, which dries out most of all and changes its geometry during the drying process.
- The beams in the corners and on the straps and even on the racks are cold bridges and inconvenience in further work.
- Lack of headers and reinforcement of openings.
- Do not understand how a jib made, poorly fulfilling its role and interfering with insulation.
- Assembly on corners with black self-tapping screws, the purpose of which is to fasten the gypsum board during finishing (and not use in power structures).
The photo above shows almost the quintessence of what is commonly called the "wrong" frame or "RSK". The abbreviation RSK appeared in 2008 at FH, at the suggestion of one builder who presented a similar product to the world, called Russian Power Frame. Over time, as people began to figure out what's what, this abbreviation began to decipher as Rashen Strasen Karkashen. As the apotheosis of meaninglessness with a claim to a unique solution.
What is most curious, if desired, it can be classified as "semi-correct": if the screws do not rot (black phosphated screws are by no means a sample of corrosion resistance) and do not burst with the inevitable shrinkage of the timber, this frame is unlikely to fall apart. That is, such a structure has the right to life.
What is the main disadvantage of "wrong" frameworks? If people understand what they are doing, they quickly come to the Canadian-Scandinavian scheme. Fortunately, there is now a lot of information. And if they do not come, then it says one thing: they, by and large, do not care about the result. The classic answer when you try to ask them why this is exactly - "we have always built this way, no one has complained." That is, the entire construction is based solely on intuition and ingenuity. Without trying to ask, how is it generally accepted to do this.
What prevented you from making a board instead of a bar? Do you reinforce the openings? Make normal jibs? Collect on nails? That is, do it right? After all, such a frame does not give any advantages! One big set of not the best solutions with a claim for super strength, etc. Moreover, the labor input is the same as that of the "correct" one, the cost is the same, and the material consumption is possibly even higher.
Summarize
As a result: it is customary to call the American-Scandinavian frame scheme "correct", because it has already been repeatedly tested on thousands of houses, proving its viability and the optimal ratio of "labor input-reliability-quality".
All other types of frames are referred to as "semi-correct" and "incorrect". In this case, the frame can be quite reliable, but "suboptimal" from the side of the above.
As a rule, if potential contractors cannot substantiate the use of certain design solutions other than the “correct” American-Scandinavian ones, this suggests that they have no idea about these “correct” solutions and are building a house solely on a whim, replacing knowledge with intuition and ingenuity. And this is a very risky path that may come back to haunt the owner of the house in the future.
Therefore. Do you want guaranteed correct, optimal solutions? Pay attention to the classic American or Scandinavian frame house construction scheme.
- Which design is best?
- Bottom design for panel board wooden house
- Frame building
- Benefits frame housesmade of wood
- House architecture: an individual approach
- Some features
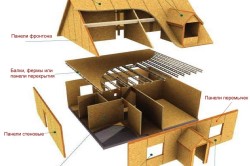
One of the fastest-built, light enough wooden structures is considered a frame house. Its basis is a frame made of wooden logs. Sometimes such a frame is made using metal parts. The frame has:
- strapping;
- sheathing;
- vertical racks;
- thermal insulation materials.
The outer part of the house, i.e. its walls are sheathed finishing materials.
Which design is best?
Frame and panel structures have the same structure, in other words, they have a frame. However, there is a fundamental difference during the construction of these buildings, which is important when choosing any option for the construction of frame-type houses.
The frame panel house is built from panels, completely ready for use and created at the factory.
They are installed on already ready foundation... Almost always installation panel house make on a strip foundation.
The construction of a panel building necessarily requires special equipment. To transport the shields, you cannot do without a truck here, most often they use a lengthy one.
You will need to rent a crane to install the shields to lay the roof of the house. Construction will require a team of workers. All this will cause additional cash costs.
Before starting the installation of boards at home, you must first make a base.
Back to the table of contents
Bottom structure for panel timber house
The construction of frame-panel houses is, in fact, the assembly of a house from pre-prepared panels of the LEGO type.
At the base there are special wooden trusses that are attached from below and from above with a powerful strapping. Lagami is called the upper harness, it is on it that the floor is laid.
Only in rare cases is the installation of shields carried out directly on the lumber crown. Moreover, the floor logs are laid completely separately, they do not have a connecting link with the walls of the house, they are separated from the mortgage crowns. The logs are laid in the same way as in the flooring technology and the frame building.
After the complete installation and fixing of the boards, the interior partitions are installed, the roof is installed.
The shields are fastened using the classic thorn-in-groove connection; in some cases, steel plates are used. When the final installation of the shields has been carried out, they are fixed with an upper strapping, while a bar is used.
A frame house always has a rafter roof. The rafters are mounted directly to the house, sometimes a rafter truss is made.
Today, houses are assembled from a frame made of steel profiles. The roof is made of panels that can be installed immediately.
The installation of a panel house has many advantages:
- The installation of the house is carried out from the boards made, as a result, time is saved. When construction is carried out, the owner of the construction site may not be present when installing the walls of the house, when installing the roof.
- Such houses have walls of high strength, they are very stable. Such positive properties, they are given by the frame strapping.
- The installation of the walls of the panel house is absolutely independent of the vagaries of the weather.
- After finishing work on the installation of walls, laying the roof, blocks for windows and doors are immediately installed, finishing work begins inside the premises. This became possible due to the fact that any panel house never shrinks.
The panel house also has its disadvantages:
- There is a need to use special equipment. Without it, it is impossible to install the walls, it is impossible to lay the roof of a wooden house.
- To install a panel house, you need a pre-prepared base.
- During the purchase of ready-made panels, it is difficult to visually determine the quality of the existing waterproofing.
- Repair of floors is difficult, especially when it is necessary to replace the lags. Vapor barrier interferes, the installed thermal insulation creates difficulties.
- There is no good soundproofing of the room.
Back to the table of contents
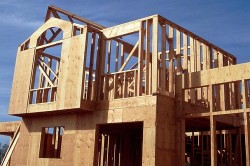
Frame building
This type of building can be installed directly on the site of the building. The frame is made from a log crown laid on the foundation.
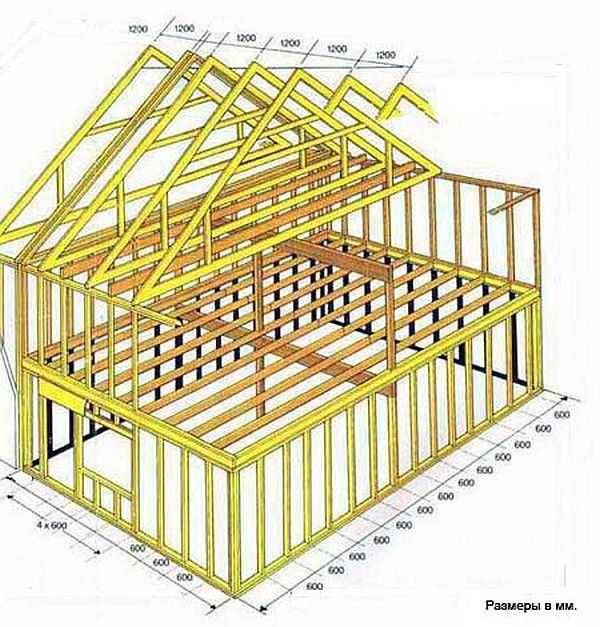
First, a frame is made using wooden beams. The connection of the frame racks is performed by strapping, from below and from above. To obtain a more rigid, durable structure, special jibs are installed between the frame posts.
When the final installation of the frame walls is completed, the manufacture of the roof begins. Roof trusses are mounted, the sheathing for the future roof is laid directly on the rafters.
After the construction of the roof is completed, roofing materials are placed on it, and it is not necessary to sheathe the frame of the house with other materials. Further finishing can be carried out on it immediately.
The construction of a frame-frame room has certain advantages:
- House installation can be performed directly at the location of the construction.
- No seasonal restrictions.
- There is no need to use special equipment.
- The cost of frame frame buildings is much lower than panel buildings.
- There are no restrictions on the choice of architectural design.
The negative qualities of frame frame construction include:
- For self-development, you will need to purchase building materials... It will take a lot of time to build a house.
- The work will take about six months by a special team of five people. A similar construction of a panel house will take only 2-3 months and a team of two people.
Each developer himself chooses what type of house he needs. The choice depends on a variety of factors. Perhaps this will be related to finances, construction time.
Back to the table of contents
Advantages of timber frame houses
- The timber frame (house) builds very quickly. There is no need to wait for a drawdown at home. You can do construction works continuously, which is absolutely impossible when log houses are being built.
- The design is highly durable.
These frame houses are endowed with excellent durability, they are not afraid of earthquakes. Buildings are able to withstand an earthquake reaching seven points. On top of that, these timber frame houses are able to withstand a gusty hurricane wind. In America, they remain standing after a third degree tornado.
These houses are especially popular among the Japanese. This country is distinguished by a large number of earthquake-prone regions. Scientists in Japan have planned to test the frame house on a magnitude 9 earthquake.
Back to the table of contents
House architecture: an individual approach
The roof of a frame house can be sheathed with any materials that the developer likes. The main thing is that this process is carried out in compliance with all rules and regulations.
When carrying out the construction of frame-type buildings, there are no restrictions on the manufacture of your own architectural form. Such restrictions apply when mounting panel buildings, the reason was factory panels, however, this is a very conditional restriction.
One of the design features of such frame buildings is the fact that all communications to be laid are easy to hide in the wall. For this, there is no need to lay special niches or mount boxes. The only restriction is that no water supply networks should be laid in the niches of the walls.
The frame house is lightweight, so the pressure on the ground is much less than that created by a log house, by about 35%. Therefore, it is possible to lay a lighter foundation, to carry out construction in those areas where there are weak soils, for example, swampy soil.
If the built frame house is designed only for summer period, there is no need to worry too much, even without heating during the cold period the walls of the house will remain intact. A rigid frame protects the walls of the house.
The negative qualities of frame houses include the following:
- It is impossible to redevelop the house.
- Short service life.
- Cool in the winter.
- Soundproofing not good enough.
The construction of houses and baths using frame technology is becoming more and more popular. This is because the technique is such that even alone you can build, not only a bathhouse, but even a decent-sized house. Despite the fact that the structure turns out to be warm (with sufficient insulation), it is also lightweight and inexpensive. Perhaps its only drawback is its high fire hazard, but this is the trouble of any wooden structure, and not just a frame.
Often, construction is stalled due to the fact that you do not know how to properly plan a bath, so that it is convenient and safe. This can help finished projects layouts. Ideally, if one of them suits you completely: no need to rack your brains. Although, if necessary, you can make adjustments. And sometimes just an idea is enough for you to "fall into place" and a plan for your frame bath, which you will build with your own hands. For this we have selected several projects frame baths different sizes with different room layouts.
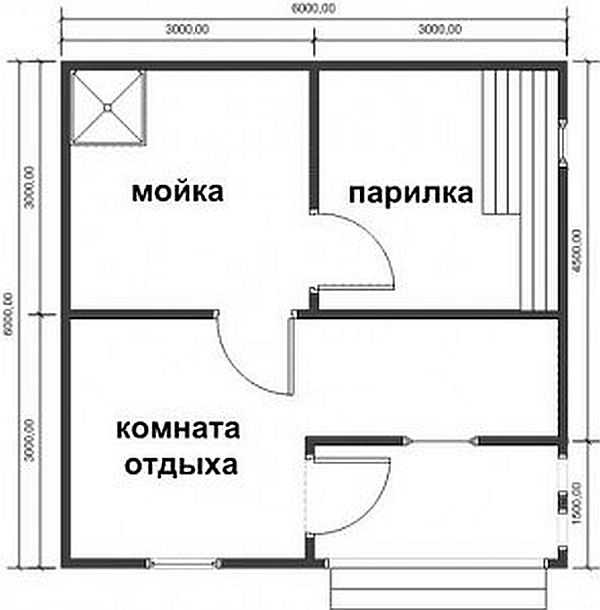
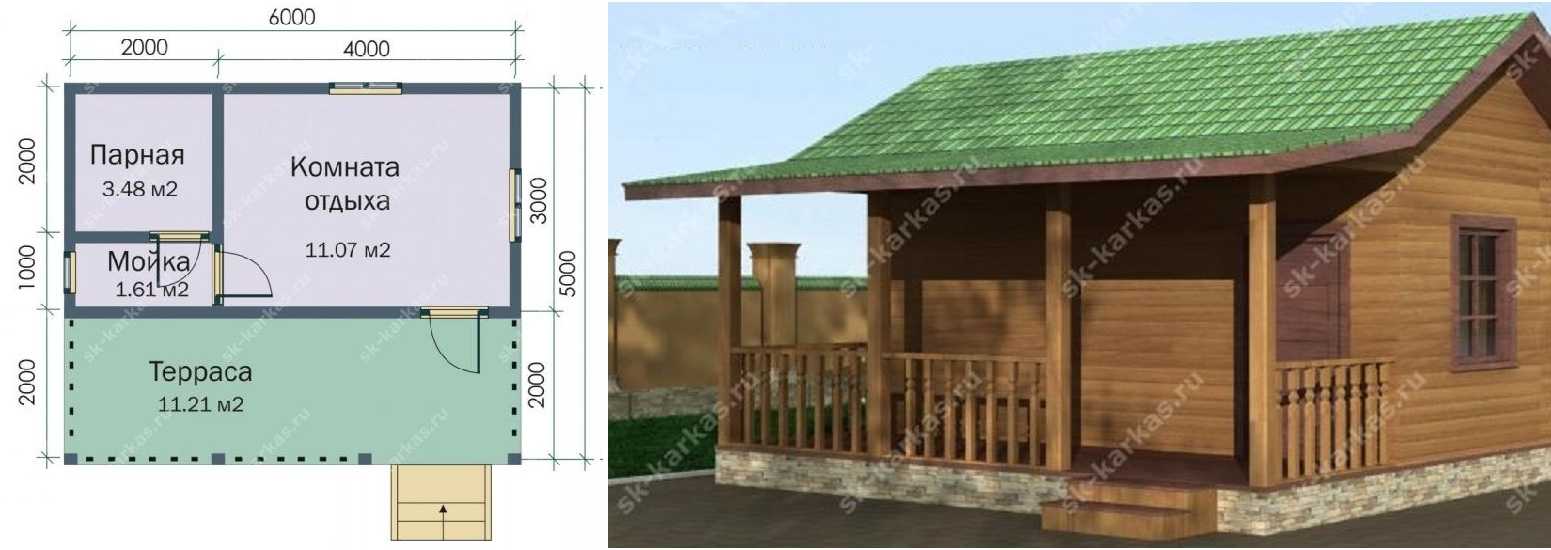
Bath layout 4 * 5 m
This is a bathhouse with a large relaxation room, a small bathroom and a 4.8m 2 steam room. The foundation - tape shallow - depth 70 cm, plinth 40 cm high (total height of the foundation with plinth 110 cm), gravel cushion 20 cm.There is a small porch, which can be sheathed and turned into a vestibule if used year-round. Then cold air will not enter the premises every time the doors are opened.
The finished drawing of a frame bath 4 * 5 m
Total area 20 m 2, premises and their dimensions:
- Rest room 8.5 m 2;
- Steam room for 4.8 m 2;
- Bathroom 2.2 m 2
Required materials for creating the frame:
- racks, lower and upper straps are made from a board of 100 * 50 mm;
- floor beams - from a board 150 * 50 mm with a step of 0.58 m;
- rafter system - from a board of 150 * 50 mm with a step of 0.58 m.
In this project, the baths are a fairly spacious rest room and with such a small building size - 5 by 4 meters, a fairly spacious steam room - in a "clean" size of 4.8 square. According to the project, the stove is heated from the steam room, which is problematic for such a small room: there will not be much oxygen anyway. In this version, you can, leaving it in the same place, put a bath stove with an elongated firebox. In this case, firewood will be laid from the rest room, and the stove and the main “stove body” will be in the steam room. With this arrangement of the stove, the problem of heating the rest room is solved at the same time.
Project of a frame bath 6 * 6 m
The photo shows the layout of a fairly solid bath 6 by 6 meters. There is a small veranda, a dressing room, a full set of necessary premises.
This option is good because in almost any room lumber of a standard length can be used: 6 or 3 meters. This is convenient as there is little waste left. The foundation can be piled, columnar. A shallow tape or slab will do.
But there are some notes on the layout. The washing room for this project of a frame bath is spacious. This is an option for those who prefer to relax after a steam room not in a cool (relative to a steam room, of course) relaxation room, but to continue to relax in the humid and warm atmosphere of the washing room. Then the temperature of the order of 30-35 ° C and rather high humidity are maintained in it (due to the increased power of the oven and the open door to the steam room). And they also install loungers, similar to the shelves in the steam room. Then a large sink is justified.
Looking for a larger size sink if you plan on. If there is only a shower and a few small shops, then you can either fence off the changing room or increase the size of the steam room.
Bath plan after changes - with dedicated vestibule
The second note concerns the entrance. If you plan to come to the bathhouse in winter, it should have a fenced-in entrance - not directly to the recreation room. And this option is easy to implement. You just need to swap the window and doors and put a partition.
About where and how best to place.
The total area is 36 m 2. Premises and their sizes:
- veranda 4.5 m 2;
- rest room 13.5 m 2;
- sink 9 m 2;
- steam room 9 m 2.
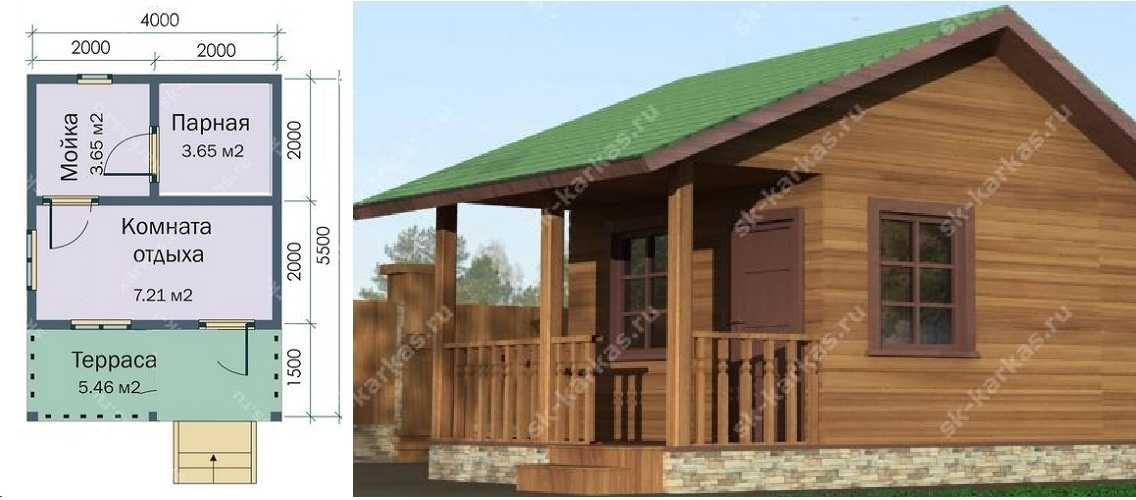
Frame bath 6 * 3 m with a terrace
This option was developed by the Karkas construction company. The bath itself is small - 6 by 3 meters. But an extensive terrace is attached to the front, slightly smaller than a bath: 2 by 6 meters. The premises in this project of the baths are quite small, in the steam room no more than three people can sit, and if one is lying, then only two. Moreover, the "recumbent" shelves can be located only opposite the door and their size will be small - a tall person can no longer lie down (2 meters, minus the thickness of the sheathing on both sides by at least 15 cm, total shelf length will be 1.7 m).
In this version of the layout of the bath, the stove can only be placed in the corner at the entrance to the steam room. It will be heated from the rest room, but you will need to choose some kind of high and narrow model - very little space is obtained for its installation. You can try to fit the stoves, there are also small stoves, if you need a reliable inexpensive stove under a brick screen, you can try to fit. There are other small ovens and quite a few. It is necessary to decide on the maximum dimensions that will "fit" into the allocated space or move the door a little. In general, in an amicable way, it would be nice to move the wall at least half a meter. By increasing the size of the functional rooms, in the summer, most likely the recreation room will smoothly move to the veranda.
And one more nuance: if you plan to use the bathhouse in winter, then you need a vestibule or dressing room. In this embodiment, you can move the entrance to the veranda and fence off part of the area by making the entrance to the room through the vestibule.
Project of a frame bath with a terrace. Good because it is easy to do it yourself
The total area is 18 m 2. Premises and their sizes:
- rest room 11.07 m 2;
- sink 1.61 m 2;
- steam room 3.48 m 2;
- terrace 11.21 m 2.
Key node materials:
Bathhouse 4 * 4 m with a terrace
The bath itself measures 4 by 4 meters. A terrace 4 * 1.5 meters is attached to it. This bath layout differs in that the steam room and the washing room have the same dimensions. Two, maximum, three people will feel comfortable in the steam room at the same time. If a dry air sauna is planned, this layout fits without question.
For a Russian pair, the option is not the best: at least one person is lying here, but for comfortable vaping in a Russian bath, the shelves must have a size of at least 2.1 * 0.7 m (and preferably 2.2 * 0.8 m). In the washing room, if you are not going to put loungers there to relax after the steam room, they usually just wash. It is better to reduce its size a little by expanding the steam room. Then at least one full-fledged shelf can be entered. Although the stove will still be tedious to be small: firstly, the volume of the steam room is small, and secondly, there is not much room.
The dimensions of the premises in the basic design of the bath are as follows:
- total area 16 m 2;
- rest room 8 m 2;
- sink 4 m 2;
- steam room 4 m 2;
- terrace 6 m 2.
Key node materials:
- binding of a bath from a bar 100 * 150 mm;
- floor logs 150 * 100 mm with a step of 90 cm;
- ceiling slab - 150 * 40 mm through 60-70cm;
- rafter legs edged board 100 * 50 mm;
- roofing material - metal tiles, corrugated board, ondulin.
Frame bath 5.4 * 6.3 m
In this frame bath project, the steam room has an area of \u200b\u200b5 square meters. There is also a terrace with a size of 2 * 5.4 meters.
![]()
The total area is 22.2 m 2. Premises and their sizes:
- rest room 11.3 m 2;
- sink 5.9 m 2;
- steam room 5 m 2;
- terrace 10.8 m 2.
The advantages of frame structures
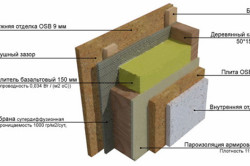
The frame building is a skeleton made of timber, sheathed on both sides with finishing materials. A vapor barrier and insulation are laid between them. It immediately becomes clear that, if necessary, the construction can be low-budget. After all, it is possible to use inexpensive thermal insulation materials (straw, sawdust, etc.) which, despite their availability, retain heat well.
It is clear that the weight of the walls with this technology is very small. And this leads to the fact that the foundation can be made lightweight. During the construction of baths, most often they make or pile-grillage,. But also suitable monolithic slab or a foundation of blocks.
Lightweight foundation - lower costs for materials and construction, because the foundation sometimes "pulls" half the cost of the entire construction. And in this option, the costs will be relatively small.
No complicated equipment is required to build a frame house. All that is needed is a saw, a hammer, a screwdriver, and to check the verticality of the walls. If there is another technique, use it for health, but this is the minimum that can be done.
An important plus is that you can work alone, only occasionally inviting assistants for some operations. A vivid example is presented in the video: a woman herself, with her clearly not athletic hands, has almost completed a small two-story house using frame technology.
disadvantages
On increased fire hazard frame structures already wrote. And this is the main disadvantage of houses built using this technology. Therefore, it is advisable to process all materials with fire retardants (means that reduce the flammability of materials).
The flammability of the walls leads to the fact that all electrical wiring must fit into metal boxes or special non-flammable corrugated sleeves. For this reason, electrical work becomes more difficult and more expensive - the cost of casings and corrugated hoses is added.
The frame bath has additional disadvantages: high humidity makes its own adjustments. We will have to pay increased attention to the vapor barrier of the walls. When using mineral wool, it will be necessary to protect the insulation from moisture very carefully: when wet, it loses its properties. Moreover, when dry, it restores them only partially. If it freezes wet, it just crumbles. Therefore, we choose a high-quality and reliable vapor barrier (not "hydro", but "steam"). When laying, we follow the technology down to the smallest detail (overlaps, gluing joints and attachment points, etc.).
Necessary materials
The basis of the frame house is frames assembled from wooden beam... Depending on the planned dimensions of the bath, a beam of 100 * 150 or 150 * 150 mm is used for their assembly. For jibs, and crossbars that are nailed between vertical uprights, bars of smaller thickness are suitable.
When installing a roof for a Mauerlat, you will need about the same timber - 150 * 150 mm or so. For the rafter legs, all the same bars are 100 * 150 or 150 * 150 mm. Depends on the configuration of the selected roof and the weight of the roofing material. By the way, a very heavy roofing material - such as ceramic tiles - it is undesirable to use for frame frames - the load on the walls is too great.
You will also need slats to create lathing, counter-battens, and all kinds of auxiliary work. And there will be a lot of them: the crate is needed both on the walls on both sides and on the roof. Although, in some versions, the outside panels are sheathed with plywood (as in the video above). There are a lot of construction options, as well as the materials used.
You will also need sub-floor material. What will it be - unedged or edged board, plywood or other slab material - you decide. But all the wood will need to be processed. And fire retardants - to reduce flammability, and protective antibacterial compounds. About,
The materials for covering the frame inside and out are selected based on personal preferences or the purpose of the building. If we talk about frame baths, then usually everything is sheathed inside with clapboard (they put tiles in the washing room), and outside with an imitation of a bar or a blockhouse.
It is advisable to use mineral wool as a heater for the bath: they do not burn. The thickness of the insulation layer depends on the region. For central Russia, basalt wool is mainly used for baths, with a layer of 15-25 cm. If you are worried about the possibility of formaldehyde release (much has been written about this), then you can take non-woven mats. They contain emission harmful substances is minimal.
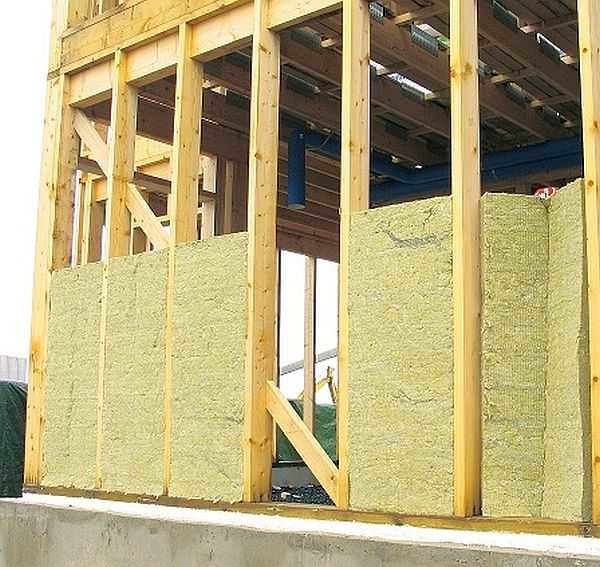
More often frame bvni are insulated with mineral wool
- it cannot be used in a steam room - temperature conditions do not allow;
- it melts and sustains combustion;
- this insulation costs a lot (we are talking about extruded polystyrene foam).
You will also need a lot of nails and screws. For the construction of a bath, it is advisable to use galvanized ones: so that they do not rust and do not leave ugly streaks on the wood. They will be needed of different sizes and diameters - for assembling the frames are large, for the lathing and sheathing is smaller.
From all that has been said above, we hope you have concluded that a frame bath can be built with your own hands. To be sure of this, watch the video. A house with the participation of only one person was built using frame technology. It describes in more detail the construction technology of some nodes.
If you have picked up a frame bath project, decided to build it yourself, but have no idea how to proceed, we recommend watching the video. In it, the experienced American carpenter Larry Hon tells and shows the technology of erecting the walls of a frame house. The video is very detailed, and takes more than an hour, but by the end of the viewing the technology frame construction it will be clear to you.


