It will be about the skeleton partition in the bath from a log cabin, separating the pre-banker and the waters. The choice in favor of these premises is made so that you can show how to make a partition with your own hands between such, it would seem different in their functional accessories with bathrooms.
The wooden partition, which will be told in this article, is wooden frame, warmed by mineral wool and clapped by clapboard.
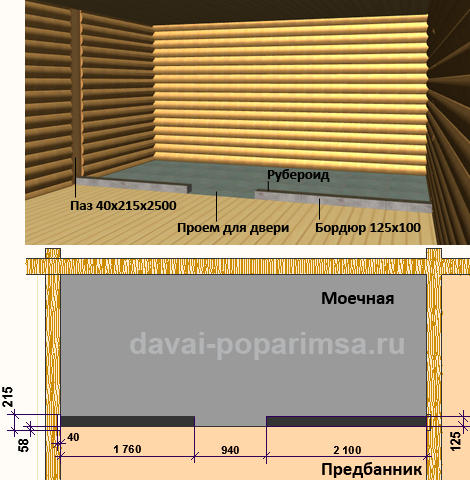
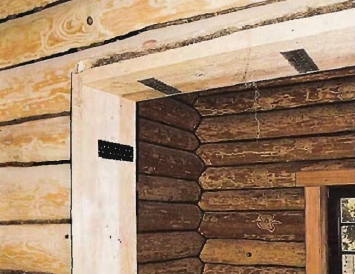
Considering that there is insulated and reinforced in the wretched department concrete screed 150 mm thick, then a concrete border of 125 mm wide and 100 mm height is made to set the frame base. In addition, the concrete curb will allow to lay ceramic tiles along the partition, isolating the wooden wall overlooking the walls.
Concrete border can be done both during the pouring of the screed and in the process of mounting the partition, using homemade wooden formwork. For a better bundle of poured concrete with a floor, its surface should be treated with deep ground and a betokontact, for example, from Knauf.
Vertical frame racks and made of planed bars: internal - 50x100 mm, and extreme and in doorway - 60x100 mm. Horizontal binding bars (upper and lower) have a cross section 60x100 mm. All jumpers are made of 50x100 mm bar.
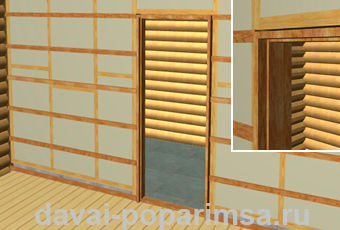
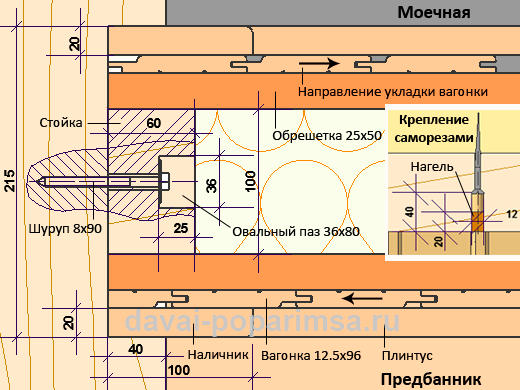 The base of the base to the concrete curb is made using an anchors of 16 mm. The extreme racks are installed in the grooves in and are fixed to it 8x90 mm hexagon screws. In order for the frame to keep the cut from the cutter, oval longitudinal grooves are made in the racks. This will give screws to slide together with the wall and do not create an excessive stress on the frame, and with it to the entire partition.
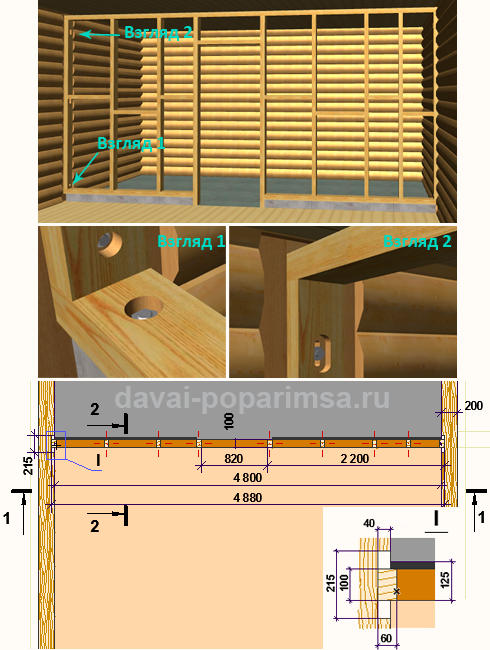
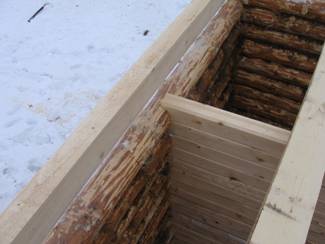
The upper binder bar does not reach the ceiling by 30 mm. This gap is used to compensate for precipitation or expanding a cut as a result of atmospheric phenomena and seasons change. The groove in the wall is cut on the entire height, ranging from the floor in the pre-banker and ending the ceiling.
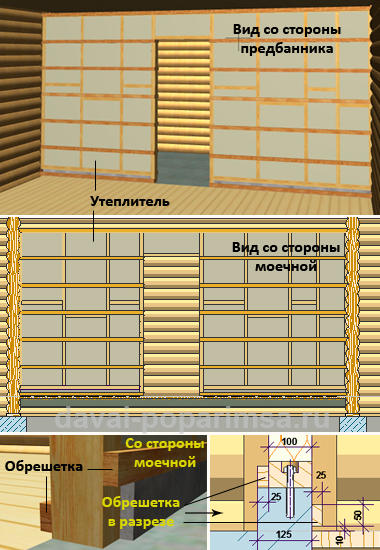
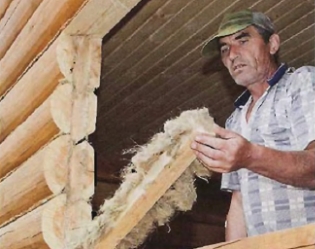
As a heater, a mineral (basalt) cotton wool is 100 mm thick, such as Rockwool. Some frame cells have a size of 600x1200 mm, which corresponds to standard dimensions produced wool. The wool closes and fixes the stapler on both sides of the frame of a polyethylene film, which prevents moisture penetration inside the wool, thereby preserving all its heat-insulating sound-absorbing properties.
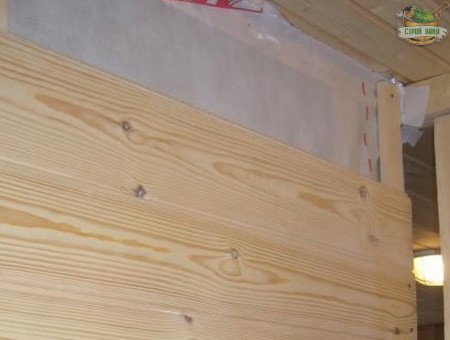
The eurvagon mount is made by kleimers on the crate of 25x50 mm planks. The cheek itself is mounted on top of the polyethylene film and is attached to the frame of the wood self-assembly. The direction of laying the lining - from the corner of the septum by the method of "spike in the groove", and not vice versa. From the side of the pre-banner, the lower line of the crate is additionally fixed to the floor, and in the washing department - put on a concrete border and is attached only to vertical frame racks.
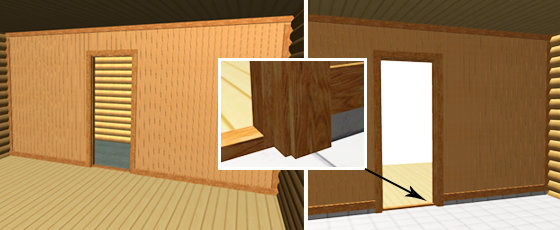
The final finish of the partition is made after installing the door frame. First, plinths are installed, which one end begins in the walls of the wall. The edges of the septal board (platband) are then closed, which are also reached in the same grooves.
The upper platband is attached directly to the ceiling with the condition that it will move freely with it in the process of cutting a log, without affecting the partition itself. The gap between the ceiling and the riding partition is closed by cotton or other thermal insulation material.
Compounds of wooden elements are made using galvanized wood screws. Open details are also attached with self-draws. So that the screws are not visible, it is possible to pre-drill a stepped hole, and after screwing the self-pressing of the same diameter after screwing the screw (pin).
From the side of the waxing the wall is separated ceramic tilesAnd then the cladding is put on her face. To the bottom of Vogonki along the entire partition to the frame racks, a plank (plinth) is fixed, which closes both the lining and part of the tile.
The order of works on the construction of the frame partition with their own hands
Perhaps I did not cost me so detailed to describe the structure of the wooden partition, and start immediately from the order of work on its installation. However, what is done, you will not return. And to whom it will not be interesting, he can immediately go to this section of the article, taking advantage of it.
Preparation of concrete base and log walls
Montage of wooden partition frame
Note: At this stage of work, you need to pay special attention to the accuracy of the framework of the frame frame, as it will affect the quality of the entire inner wall. Vertical, horizontal, flatness, dimensions - all this will affect how our partition will turn out.
Warming and installation of crates on the frame
Note: The film can be placed under the base of the frame already at the stage of its installation. Then the question of fixing it at the bottom will be immediately resolved.
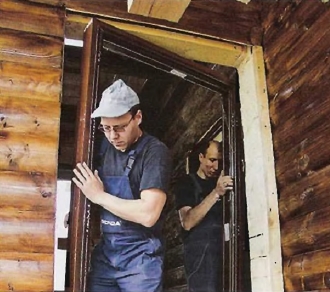
Installation of the door frame in the opening of the partition
Facing with ceramic tiles in the oil compartment
This operation can be performed both before weaving with clapboard and after it. The main thing is that the seat of the trampling and end of the ceramic tile was made accurately and without gaps. As for laying tiles to the floor, it can be done at any time.
Clapboard clapboard
You need to start from the corner itself. Cathrootting is triggered by the method of "spike in the groove". That is, the last fixed element must have an open groove. 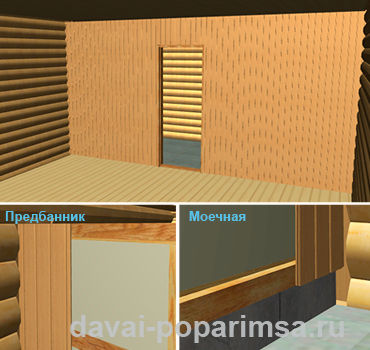 Each subsequent element is inserted with a spike in the groove of the previously attached lining, and with the help of metal kleimers (fastening brackets) is fixed to the crate. The last lining is cut under the desired size and is fixed by screw screws. In detail how to mount the lining, you can see.
Installation of platbands, plinths and sealing edges partition
Finally
This design of the wooden partition design is designed for a shrue of a bath that has surrendered the time and gave full sediment. The compensation gap (30 mm) between the partition and the ceiling is calculated only on the change in the sizes of the cut under the influence of atmospheric influences and weather conditions.
If there is a need to build a partition in the bath until the cut is completely sediment, then this gap should be increased to 60-80 mm.
On the side of the washing branch, the framework of the frame can be made from waterproof drywall. In this case, the wooden crate should be replaced with a metal profile. This partition can be easily bled with ceramic tiles and easy to equip there.
It should be remembered that the carved grooves in breeding wallsah reduce their strength. Moreover, the deeper and wider the grooves, the less the strength of the wall. To protect the logs from rolling (deformation), it is necessary at the stage of the construction of the walls to bind the logs in the place of the proposed partition with wooden brazers, as a rule, with a diameter of 30 mm. How to do this, you can read in the article about.
Go to main article content: SergeyWhen the walls of my bath from the bar were finished, it's time to think about separation indoor space On separate rooms. The total Siruba Srub is 6x4 m, so I turned on the required minimum pair, washing and tambour. Tambour was drizzled back in the construction process. It remained to decide how to separate the steam room and washing. Shifting the mass of literature, came to the conclusion that the easiest thing to do such a partition frame technology. First, it is built very simple and quickly, I managed for 3 days. Secondly, the price came almost a penny. Thirdly, (very important!) The frame is lightweight and practically does not load the foundation. I will describe how construction was carried out.
Step 1. Assembling and mounting frame
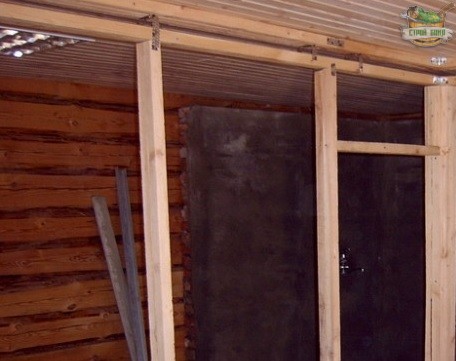
The most time consuming part of the work is to assemble the frame from the bars of 50x50 mm. I decided to collect it immediately in place. Initially, the lags of the floor were pinned the lower bar (lower strapping), extreme racks were attached to it and the walls. The top bar is laid on top and secured.
Installing a framework of a barrack
I want to note that only 4 months passed from the construction of a cut before editing the partition, the shrinkage still continues. Therefore, between the upper strapping and the ceiling, I left a 2 cm gap - to compensate for shrinking shub shrink deformations. The clearance filled with jute felt. All this is done based on the fact that when the log house will sit down, the ceiling level will decrease and will be installed just on the upper cutting of the partition.
For greater rigidity in the locations of the side racks and the strapping, metal corners are screwed.
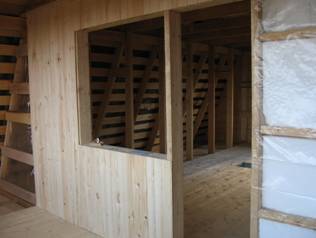
With a step of 600 mm, the rack is installed, the opening is made for door Block and brick screen oven. It is important to note that the furnace is planned to be dried out of the washing, so its frontal part with a brick shield must be mounted in a partition.
All the slots between the walls, the brick shield and the bars of the frame are filled with jute felt.
Step 2. Warming Partition
I decided to embody the internal filling in such a scheme:
Scheme of internal filling and siding frame partition
As a insulation, I used basalt wool "Technobock Standard" (TechnoNIKOL) - in the form of plates with a thickness of 50 mm. At the manufacturer's applications, this material must withstand the heating to 400 ° C, not to burn and not melted. Also, basalt wool is not hygroscopic, suitable for wet rooms. Even if the moisture drop falls into the partition (despite the vapor barrier), the inside will not start rot. Well, it is important that basalt wool is absolutely safe for health, it does not release anything when heated.
Watches width - 600 mm, when installed between the racks, it was necessary to compress them a bit. To cut the plates (if necessary, the installation of parts, for example, above the shield, above the doorway) was used a sharp knife.

Basalt Wool Plates Between Partition Racks Partition
Step 3. Waste Foil insulation (from the steam room)
From the side of the parley, the insulation was covered with a foil in 2 layers. I consider foil with the best vaporizoator for the wage. First, does not miss steam and drip moisture. Secondly, increases the thermal insulation properties of the partition (or walls), as it reflects infrared radiation.
The foil bought by me was thin, so I decided to lay it in 2 layers. Initially, the first layer was shot with the sickling of the seams with foil scotch. The mount was carried out with the help of a construction stapler, on the frame racks. From above, in disintegration with the first layer (so that the seams do not coincide), laid the second layer. Suts, holes from the stapler, the corners are also punctured by scotch.
When I discarded Foil, then pulled it on the frame, in some places it thinned, began to wrinkle. There was no hole, but, for your own calm, these damaged areas I also stuck with scotch.
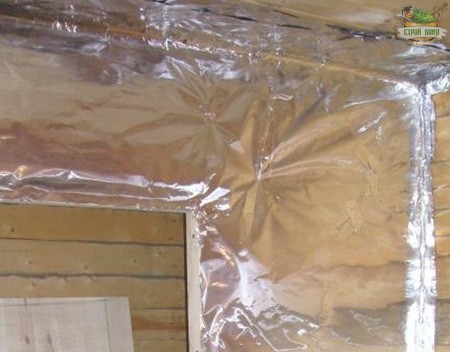
Insulation of the Heater Foil (vaporizoation) from the steam
The joints between the brick shield and the foil are passed with heat-resistant silicone sealant (anti-Greybkov). Such such sealant quickly, combines diverse surfaces well.
Step 4. Waterproofing (Waterproof)
From the side of the washer foil, you can do without waterproofing. To do this, I bought a roll of the vapor-permeable membrane "Izosan A". On the one hand, it will not allow a splash of water splash in the insulation, and on the other, it will allow the insides of the partition "Breathe", ventilated.
The sheets of "Isyospan A" I fixed the brass, to the frame racks. The seams and holes from the stapler overlap scotch tape.
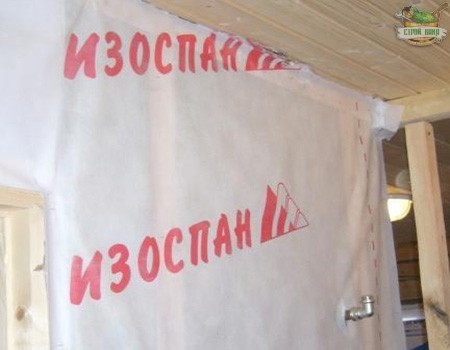
Fastening sheets of waterproofing "Izosan A"
Step 5. Fastening the wall paneling (from the side of the washing)
The lining clapper was carried out from the side of the washing. Here I was waiting for the meditation. A neighbor argued that the Ventzor between the vaporizolator and the clapboard is a useless thing that occupies a place and is completely not affected by anything. At the same time, the familiar builder proved the opposite. It seems like the gap allows condensate if it is formed, flipping over vapor barrier and not absorbed into the lining. I thought that this opinion was more common and the gap did. Although, not fully confident in its necessity.
For the organization of the gap on the frame racks, rails are stuffed. Their thickness is the size of the gap. I used the rails of 15 mm, stuck them on the racks using conventional thin nails.
On top of the rails she saw a pine clapboard. To protect against moisture and giving the color, the antiseptic composition of the Supi Saunasuoja (Tikkurila) in 2 layers was passed. The tree is perfectly kernel, the color turned out to be smooth, beautiful. It was an unpleasant smell from the antiseptic, after 3 days it would completely weathered.
Covering partition wallboard is performed on thin rails
Step 6. Fastening the board (by steam room)
The partition from the pair, I decided to sheathe not with a clapboard, and a 35 mm thick board. This board - used, once lay on the floor in the house. Now the floors are replaced, and the board is still in suitable condition. Although the species has already been isolated, spammed, acquired stains. To give blackboard new lifeI carefully squeezed her grinding machine. Half an hour and top layer removed! The board turned out almost like new.
Again, a centzorzor was formed, this time a thickness of 20 mm. The rails for it were used with a cross section of 40x20 mm. Reiki I nailed to the frames of the frame, on top of them - boards. All attachments were performed on nails.
The wooden house made on the basis of a standard log house has external wooden bearing walls and most often one, maximum two internal bearing walls made of the same material (timber, log) as the external walls. After the shrinkage of the cut in the house, it is processed to install additional internal partitions. Unlike the capital bearing walls, partitions are self-supporting partitions. Those. Partitions are designed for the zonal division of the room and at the same time for the heat and sound insulation of the separated zones, but not for the additional stability of the external walls of the house and carrying the load of the upper floors and the roof. The number of these partitions may be different. It depends on the project. You can see the projects of wooden houses on our website.
Partitions B. wooden house Must be durable, whenever possible, have a small thickness, meet the strength requirements, withstand certain console loads (that is, to serve as a support for hanging items: shelves, cabinets, sanitary equipment, etc.) and ensure reliable sound insulation.
In addition, they are obliged to meet sanitary and hygienic and fireless requirements. For example, be built from environmentally friendly materials (suitable for use in residential areas), to be moisture-resistant (if placed in wet rooms), be able to resist open fire.
From sufficiently light partitions in a wooden house, which are installed on beams or lags, without a foundation device, you can select solid wood and frame-panel.
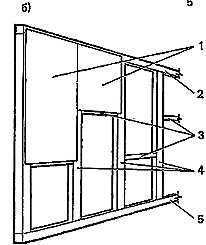
Fig. Partition designs:
a) solid: 1 - fastening bars; 2 - fiberboard; 3 - timber; 4 - plinth; 5 - clean floor; 6 - beams,
6) frame-shield: 1 - covering; 2-top strapping; 3 - horizontal strapping; 4-vertical racks; 5 - Lower strapping,
 Solid partitions In a wooden house (Fig. A) made from a bar with a thickness of 50-100 mm, shed fiberboard, plywood or plasterboard. To give the stiffness, the broom is collected on the spikes (with a diameter of about 1 cm, a length of 10 cm). To the floor and ceiling, the solid partition is fixed with triangular bars, nails are nailed to a wooden carrier wall, or a special deformation groove in the wall is selected and a partition is installed in it. Fastening the partition to the bearing wall through the deformation grooves is recommended to be used if the walls of the house have not yet given their full shrinkage.
A fairly much material is spent on solid partitions in a wooden house, and they are considered more costly in the cash equivalent, but more economical frame-shields are superior in their sound insulation qualities.
 Frame-panel partitions In a wooden house (Fig. b) most economical. The vertical frame racks are made from a 50x100 mm blackboard with a pitch of 40-60 cm, for additional stability, the vertical racks are connected by horizontal strapping. For sound and thermal insulation in the space between the racks, the insulation is laid (min wool or polystyrene) with a thickness of 50-100 mm, on both sides, the partition in a wooden house is closed with a vapor insulating film, so that the steam formed in the residential room does not penetrate the insulation and did not harm the design Partitions. The material for the obstruction of the partition is a plywood of a thickness of 8 -10 mm, the sheets of dry gypsum or drying plaster with a thickness of 10-14 mm.
You can order a project of your home with all the inner partitions on our website.
The house made of massive or glued wood is inevitably cozulated. This is the result sanding Wall Material (Shrinking)which is most pronounced in the first few years after the construction of the building. But then the linear dimensions of the wood will fluctuate, the seasonal change in the temperature and humidity regime. That is why in the design stage wooden house It is necessary to envisage special measures to compensate for shrinkage of walls, especially if we are talking about building a log of a log or bar.
Shrinkage of houses from logs and timber
Shrinkage at home due to the main property of wood to dying with a decrease in its humidity. The magnitude of the shrine shrink is determined by many factors.. First of all, the moisture content of the log or timber, its original sizes (primarily thickness), wood rock, wood processing technology (first - drying), conditions of operation of the building and its size (the higher the wall, the greater the shrinkage size), the construction season Houses (summer, winter), the quality of assembly and qualifications of workers (qualitatively and density of fitting), construction technology (method of compound and type of use).
Moreover, changes in the size of the wooden element are different in tangential and radial directions, i.e., changes in the size of a width of a bar or logs are much greater than in length. In addition, the magnitude of the shrinkage varies depending on the type building material - log, rounded log, bar, profiled bar, glued bar, etc.
In principle, data on the test of materials can be learned from, but in practice, these data may be far from the theory. On average, when calculation of the magnitude of the shrinkage can be repelled from such data:
- The log will give a shrinkage to 150 mm;
- The rounded log gives shrinkage to 100 mm;
- The planed chimney or not planed can give shrinkage to 60 mm;
- The profiled lap of the natural humidity gives shrinkage to 40 mm;
- The profiled chamber drying ram will give a shrink to 20 mm;
- The glued bar is least susceptible to the shrinkage, the shrink value is not more than 15 mm.
For example, in the assembly guide, HONKA provides the following data:
- the wall of the rounded log gives a shrink on average 30-60 mm / m,
- a wall of glued timber - about 10-30 mm / m.
The difference is noticeable, and in many cases principled, because the height of the cut in any case will decrease. So that the shrinkage does not violate the building structure, provide for a number of measures and methods of its compensation. Let's start with the fact that the form of a bar profile or log influences the magnitude of the shrinkage of the walls.
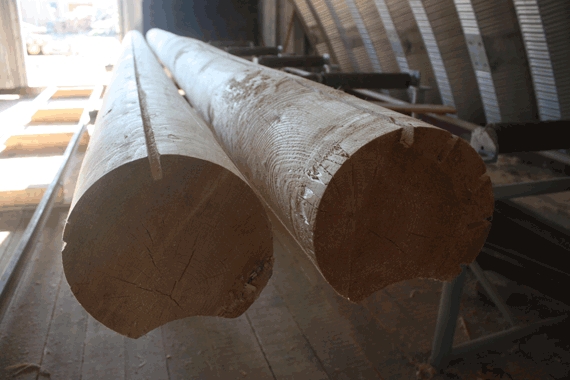
The profile of the rounded log can be complemented by narrow longitudinal compensation grooves.
For instance, the profile of rounded logs can be complemented by narrow longitudinal compensation grooves., reduced voltage in wood and avoid a strong crack cracking. The number of grooves - from one to three, moreover, one of them is located, as a rule, at the top of the log. Thanks to the grooves, the change in the shape of the profile is reduced and, therefore, the shrinkage of log walls is reduced. The higher the level of technical solutions of the manufacturer of wooden building materials, the more difficult the profile of the wall elements offered to them.
Shrinkage of walls and partitions in a wooden house
By themselves, the cuttings themselves do not require special nodes compensating for shrinkage, since the log house is a homogeneous design and all its elements will be descended to approximately the same value. However, in the building there are rigid parts that either not be aspired or coaled significantly less than the log house. Therefore, the construction of such details requires special solutions.
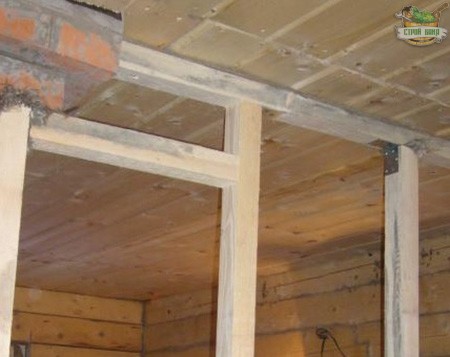
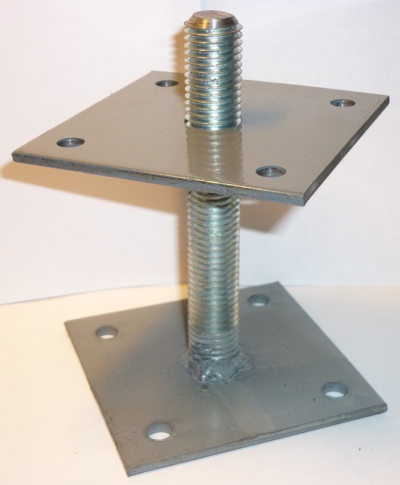
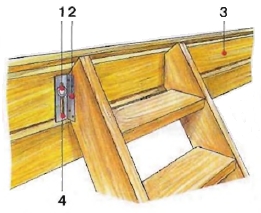
Thus, the house often provides vertical elements (pillars, columns, etc.), which serve as a support located above parts of the house. Adjustment mechanisms need to reduce the height of the posts and columns so that their height corresponds to the height of the chub walls. Most often for this Using screw mechanisms Shrink compensators, special jacks that are called - jack screw adjustable shrinkage compensator.
 |
 |
 |
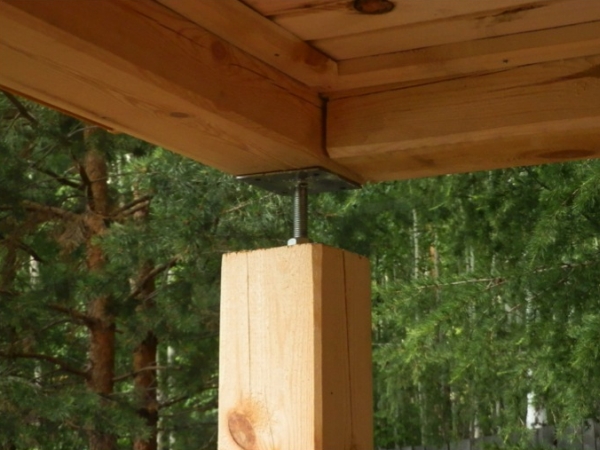 |
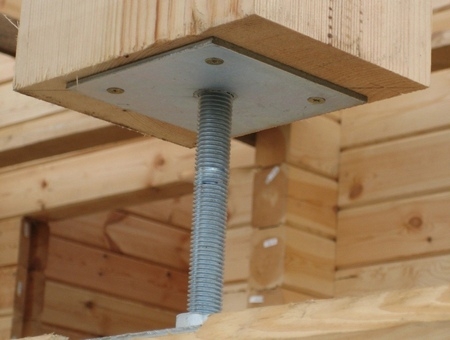
Wooden poles are hard elements. So that they do not obstruct the shrinkage of the supervised cutting designs, provide adjustment mechanisms to reduce the height of the columns.
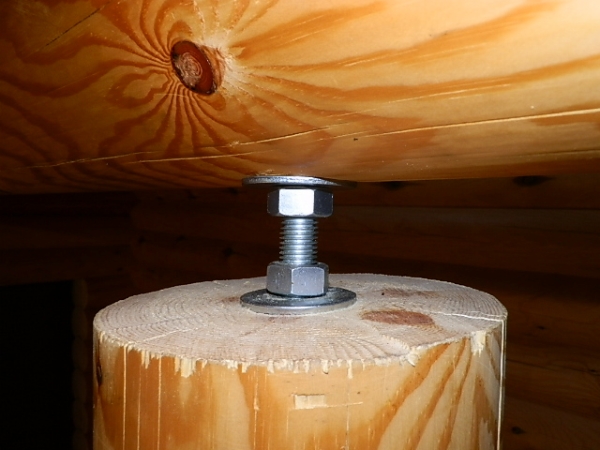
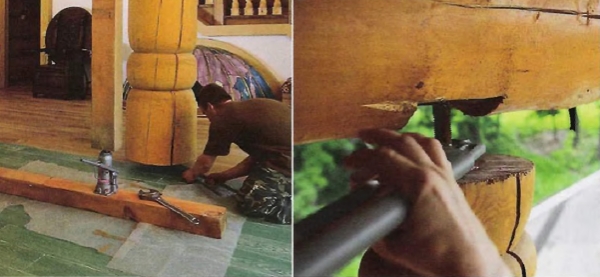
The jack is placed in the gap between vertical and horizontal elements, firmly fixing on one of them. The magnitude of the gap is chosen on the basis of calculated value Building shrinkage (usually jack allows you to change the height of the support by 8-10 cm). As the log house shook, the screw mechanism is adjusted, thereby changing the height of the column or post. The jack can be installed at the bottom or at the top of the vertical support. From the point of view of shrinkage, its location is not fundamentally. And from the point of view, the convenience of use is preferable to the jack at the bottom - then there will be no staircase or scaffolding for the work.
Adjustment mechanisms are screw jacks that are installed in the gap between vertical and horizontal elements, rigidly fixing on one of them.
The gap between vertical and horizontal elements, as a rule, is closed with a decorative casing that is removed during the adjustment time. Sometimes the screw mechanism is left open. How often do you have to reduce the gap? It depends on the type of wall material, form of profile, time of year (seasonal change in wood humidity) and cutting technology. In some companies, the interval between work is usually from two weeks to three months, in others - four to six months. Adjusting each jack takes about 15 minutes.
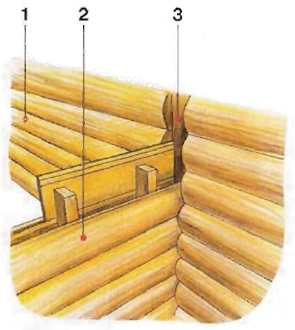
Special technical solutions will be needed and then when a wall or partition of another type (for example, a brick or frame), which is lessed by a smaller shrinkage is adjacent to the convection structure. So, the connection of it with the log cabin should be sliding. This connection can be performed in different ways. Most often it is carried out on the principle of "spike - groove", where the spike and grooves have the possibility of some movement in the vertical direction relative to each other. Usually, the grooves are made in the wall of the log house, and the spike in the form of a wooden bar is fixed to the end of the brick or frame wall. The space between the spike and groove is filled with heat-insulating fibrous material (et al.). Connection S. brick wallsThrough which the capillary moisture can be distributed must contain a layer of waterproofing.
|
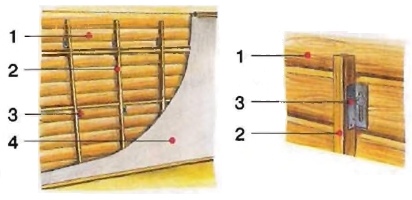
Compound frame partition with subble wall: 1. Condition 2. Frame partition 3. PAZ |
Adjunction of a brick partition to the Located Located Lubricant Design: 1. Condition 2. Brick partition 3. Decorative Nickname 4. Purpose stock 5. Screw jack |
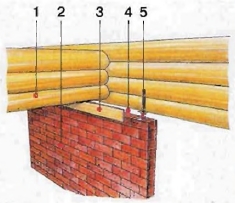
Between the upper edge of the brick or frame wall and the above part of the cut leaves the gap for the unimpeded shrinkage of the latter. The size of the gap is determined on the basis of the calculated shrinkage value (in most cases it is 8 - 12 cm).
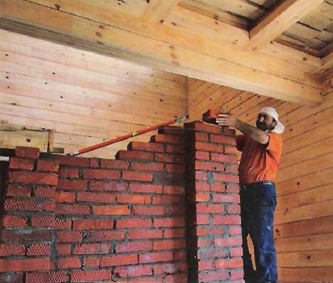
Creating an additional self-supporting partition from a brick on which the finishing material will be fixed
In order for the clearance to be noticeable in the interior, it is possible to close it with decorative nicknames attached to the cut (and, therefore, lowered with it), and you can create a niche in the partition where the log house will be placed. In the adjustment node of the upper part of the frame partition to the cut, it is usually provided with steel rod elements that provide stiffness of the structure.
Shrinkage compensation for the rafter system
While creating rafter system Also take into account the shrinkage of the cut. So, in the case of applying the sprinkling legs, the distance between the upper and lower supports may vary. Accordingly, the rafter should be the possibility of moving that does not cause voltage and deformation in the building structure.
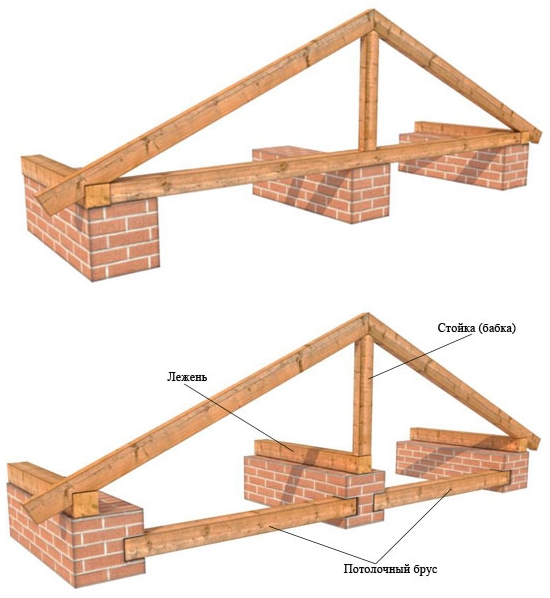
Sloping systems are used in homes where there is a medium carrier wall or bonded intermediate supports. The ends of the rafter legs are based on the outer walls of the house, and the middle part is on inner wall or support.
For this, the lower end of the leg is fixed on the wall using a sliding connection of one or another type. Most often use fasteners in the form of two brackets: one is rigidly fixed on the wall, the other - on the rafyl. These brackets allow the rafter to shift relative to the wall.
Among the specialists there is no consensus whether the sliding connection is necessary at the site of support of the upper end of the rafter foot on the ski bar. Some insist that this is a mandatory measure that helps prevent the deformation of the rafter system due to the shrink shrinkage. Such a measure lies in the fact that there are some distance between the rafters converging at the skate and attach them to the skate bruus also by means of a sliding (usually hinged) compound. Other experts believe that to compensate for the shrink shrink, quite a sliding fastener in the place where the rafter relies on the wall.
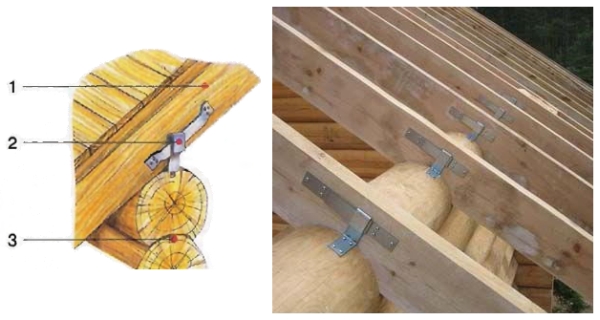
Fastening the rafter foot on the slab wall: 1. Slinge foot 2. Brackets that allow the possibility of offset of the rafter relative to the wall 3. Lubricant
In the case of rafters in the form of farms, a shruck shrink does not lead to a change in the slopes of the roof rods. However, it is impossible to rigidly connect the frontones from a log or bar with farms, since the front walls are above the facade, and the magnitude of their shrinkage will be different.
The rafter design must be designed, taking into account the shrinkage of the building. Most often use rolling rafting legs, which are based on one side to the upper element of the cut, and on the other - on the ski bar or the wall of the house (when the roofing rod is adjacent to the wall). At the skate, at the place of convergence of the rafted neighboring rods (or at the place of adjustment of rafters to the wall), it should be left a distance of about 3 cm so that when the roof is shrinking, the rafting legs could be easily descended.
The fastener of the top of the leg itself is performed using a metal hinge connection of one or another type, which allows you to change the sloping sling during the shrink shrink. The sliding mount is necessary in the node, where the lower part of the leg rests on the cutting wall. It is used here, as a rule, the moving support of the factory manufacturer, thereby giving the opportunity to the rafter foot "go" relative to the wall.
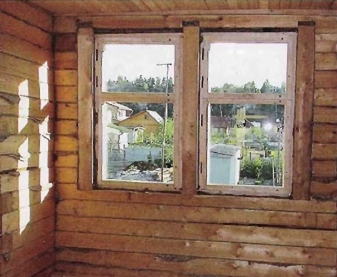
Shrinkage compensation for windows and doors
Among those who do not change their designs in the slab - windows and doors. Prevent their deformation due to drying wood allows a special system for filling the opening. The window or door frame is fixed not to a cut, but to a special casing (sowing, placked).
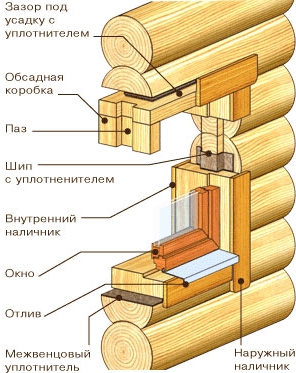
The connection of the box with the walls of the building should be sliding. The design of this node is different. As a rule, a groove is cut on the ends of the cut elements. In the grooves insert mounting bars, fixing them in the bottom of the opening. Brokes mount a casing. The gap between it and the end surfaces of the cut are filled with a fibrous insulation (linen, jute canvas, etc.) to eliminate the freezing in the opening zone. Between top Boxes and chub element, overlapping the opening, leave a gap that allows a cut to descend. Its size is determined by the magnitude of the likely shrinkage of the wall and most often is 5-7 cm.
|
Installation door box to a casing in a wooden house |
For the casing box, the window is first in the groove, made in the end of the bubble wall, insert the mounting bar. Then the box is fixed to the bar. Between it and the wall laid thermal insulation material |
To avoid heat loss in the gap, the heat-insulating material is placed - a web of flax, jute, etc., mineral wool strips, ribbons from foamed polyurethane, etc. Recommended not to use for these purposes the mounting foam, which is usually used to seal the window or door frame. It is rigid enough and can deform the window design or door when shrinking a cut. To decorate gaps in places of connection of filling items with a logberian, external and internal platforms are served.
|
|
|
There is a compensation gap (from above) between the casing and those who are above it element.
When filling windows and door openings Two types of risks are likely in homes of massive and glued wood. First, the effects of the filling wall on the elements of filling due to the sedimentation of the building. This risk is eliminated by the creation of sliding compounds with cut parts, forming the opening, the gap on the construction of the filling, fastening the platbands to the elements of filling, and not to the walls of the cut.
The second risk group is insufficient tightness of the joints in places of sliding compounds. The use of a mounting foam to fill the gaps between the casing and the logone is unacceptable, since the hardened foam will prevent the shrinkage, because of this, or the log house will "hang" over the design of the opening of the opening, or it will be deformed and damaged. The best solution is to use in the gaps of thermal insulation of plant origin in combination with film protection - a layer of vapor insulation from the inside of the house and vapor-permeable windproofing outside.
Shrinkage compensation in the construction of stairs
When designing and installing the stairs in a wooden house, we must provide a number of measures that exclude the impact of the building. The staircase is installed at the final stage of construction, when some shrinkage has already occurred. To the upper overlapping, the base of the stairs (Kosur or the tutor) is attached with the help of a sliding fastener (metal corner with a vertical groove, etc.), intermediate fixation to the walls is unacceptable.
Installing the inner staircase: 1. Screw with washer 2. Corner with vertical groove 3. Lag floors 4. Stock on shrinkage
It is necessary to take into account the shrinkage of a cut when fixing the fence and rail of the stairs.
If the marching staircase has a platform, it can also be fixed to the walls, it should be described at the expense of the racks to the lower overlap, and then the shrinkage of the walls will not affect the design. In addition, during construction work No need to remove the top, adjacent to the overlap, part of the stairs into the floor plane of the top floor. It is necessary to leave the gap on the value of the calculated shrinkage between the upper part of the staircase and the floor, which is leveled in the process of overlapping.
Wooden finish with shrinkage
Owners wooden houses Often, they want to separate some rooms (for example, lining with a tiled bathroom). In order to raise the finishing layer when shrinking, it is fixed on the base, or the sliding fastener connected to the slab walls, or completely independent of the walls. Variants of sliding fasteners a lot.
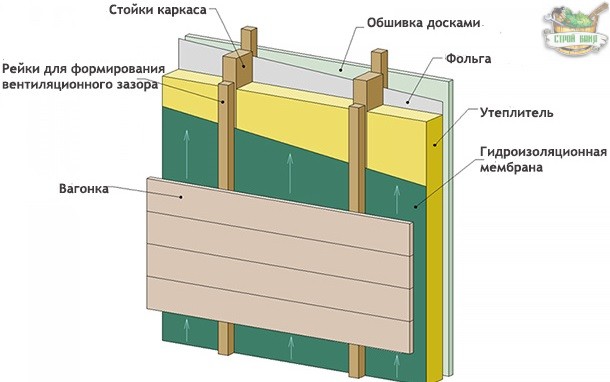
Device of the base for finishing: 1. Lubricon 2. Frame from wooden bars 3. Corner with vertical groove and screw with washer 4. Hypoxolocon or plasterboard plates
One of them suggests a frame from metal profiles Or wooden bars having longitudinal grooves. The frame is attached to the wall screws through the grooves, while the screws are tightened not tightly so that they can shift vertically when shrinking the wall. The base for decoration is rigidly fixed to the frame. Between the wall of the room and the base, the gap is formed on the size of the frame thickness (usually it is about 5 cm).
If you provide in the gap ventilation (at the bottom of the structure to provide for the possibility of air inflow, and at the top - exhaust), it will increase the durability of the wall and base. Between the top edge edge and ceiling overlap Leave a compensation gap, which decorated (for example, is closed with suspended ceiling). The undoubted plus base on the frame is a relatively small load on floor overlap. Minus - some risk of frame deformation with overly tight mounting to the wall or with an uneven shrinkage of neighboring sound walls of the room. Skot may result in damage to the finish. This drawback is more often manifested in houses of chopped and from rounded logs of natural humidity than in the houses of glued timber.
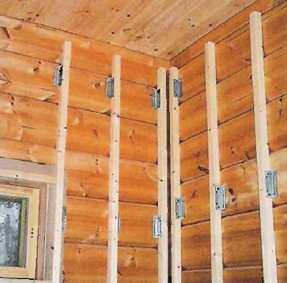
Frame in the form of wooden bars, fixed to the slab wall sliding fastener. The framework will be fixed on the frame
For rooms located on the first floors of a building with a foundation in the form reinforced concrete plateThere is another solution. The finishing layer can be mounted to additional self-supporting partitions from ceramic brick The whole clock thickness or a puzzle plaster plate (such a design is often called the "glass"). These partitions are asked at a distance of at least 2.5 cm from wooden wallsAfter performing at the bottom and at the top of the hole for the tributary and air hood. If the room is made suspended ceiling, it is fixed only to the upper overlap so that they go down together.


