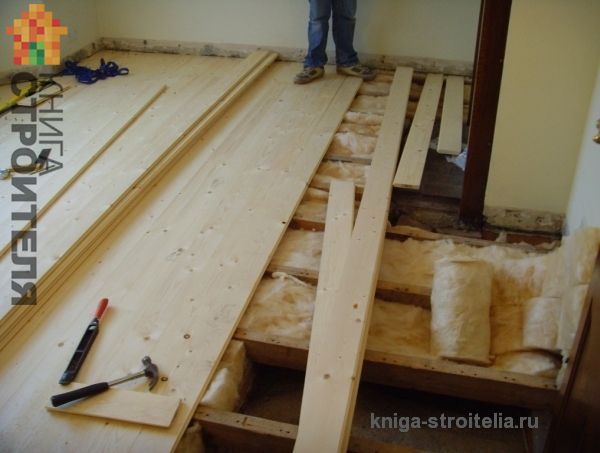
1. Wooden floor in a private house - a choice in favor of nature. (Fig. 1)
Wooden floor in a private house - a choice in favor of nature
Laying wooden logs on brick posts 5. Final stages of installing a wooden floor on logs on the ground * Installation of bars to the sides of the logs. Lower (rough) sheathing and insulation * Laying communications into the floor * Upper (finishing) sheathing of the log * Leveling and decorating the laid boards 1. Wooden floor in a private house - a choice in favor of nature. Michail RybakovThe device of the floor in a private house is an equally important part of the construction associated with the reliability and comfort of using the house in the future, after the completion of construction. Preference in favor wooden floors most often given by owners of wooden frame houses, so it is considered a completely natural continuation of the general wooden structure of the building. But when building country houses and from other materials, more and more often the choice falls on wood, and there are several objective reasons for this. ("Construction of country cottages, using frame technology", "Building a house using frame - frame technology.", "Low-rise housing construction and design basics", "Build a house yourself. We start from the foundation").
* First of all, wood is natural and natural material safe for the life and health of households. Moreover, the presence in the room of a large number of objects made of wood of some species can even alleviate the symptoms of the disease, and in some cases, permanent living in a room with wood trim contributed to the full recovery of people. There are whole sciences studying beneficial features wood. ("Wrapped up" in a wooden sheet apartment with a fireplace. "," Wooden house interior with your own hands in a rustic art st "," Wood in the floor and wall decoration. Parquet and wood fancy "," Mobile wooden house on skis with your own hands " ).
* Another positive characteristic influencing the choice in favor of a wooden floor is ease of processing. It is pleasant and simple to work with wood even for beginners. All the necessary skills are acquired very quickly, as they are passed on from generation to generation in memory at a subconscious level from distant skilled ancestors.
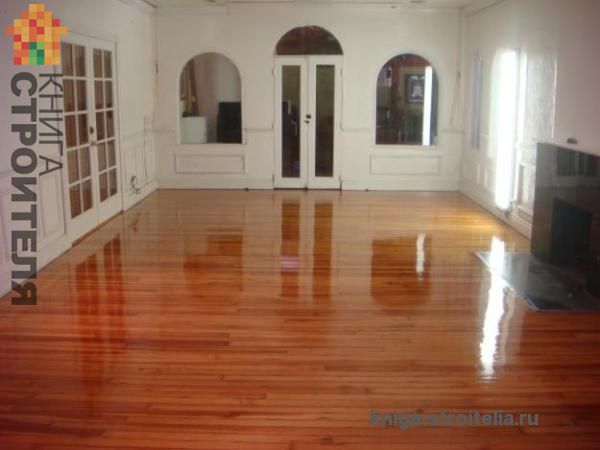
* An important point is that such floors are easily repaired, and, if necessary, can be opened without much effort and severe consequences for the overall decoration of the house. In addition, modern insulation does not allow the floors to freeze, and antiseptics and other protective substances preserve the wood, allowing it to serve for many decades. ("Antiseptic for wood price", "How to cover wood with wood stain", "Wood stain", "Types of varnishes"). (Fig. 2)
In addition, modern insulation does not allow the floors to freeze, and antiseptics and other protective substances preserve the wood, allowing it to serve for many decades (Antiseptic for wood price, How to cover wood with wood stain, Wood stain, Types of varnishes)
 There are whole sciences that study the useful properties of wood (an apartment wrapped in a wooden sheet with a fireplace, Do-it-yourself wooden interior of a house in rustic art, Wood in the decoration of the floor and walls, parquet and fancy wood, Mobile wooden house skiing with your own hands) * The next positive characteristic influencing the choice in favor of a wooden floor is ease of processing. It is pleasant and simple to work with wood even for beginners. All the necessary skills are acquired very quickly, as they are passed from generation to generation in memory at a subconscious level from distant skilled ancestors * An important point is that such floors are easily repaired, and, if necessary, can be opened without much effort and severe consequences for the overall finish houses. In addition, modern insulation does not allow the floors to freeze, and antiseptics and other protective substances preserve the wood, allowing it to serve for many decades (Antiseptic for wood price, How to cover wood with wood stain, Wood stain, Types of varnishes). Michail Rybakov
 The device of a wooden floor on the first floor of a private house, or rather directly on the ground itself, is not a simple matter, but it is quite feasible with your own hands. And how to build such a floor, insulate and even lay communication systems in it, and what points and mistakes during the installation process you need to pay attention to in this article.
2. Preparation of the soil. We choose and build a rammer for work with our own hands.
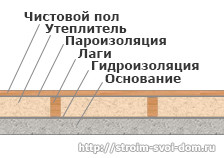
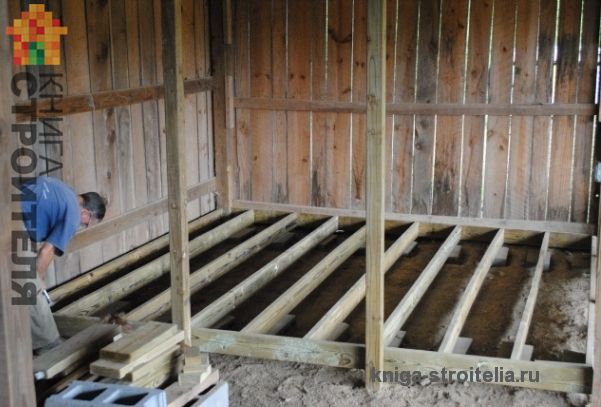
The structure of a wooden floor consists of wooden logs, on which boards are laid with further facing with a decorative layer and several layers accompanying the floor structure (compacted soil, waterproofing, insulation).
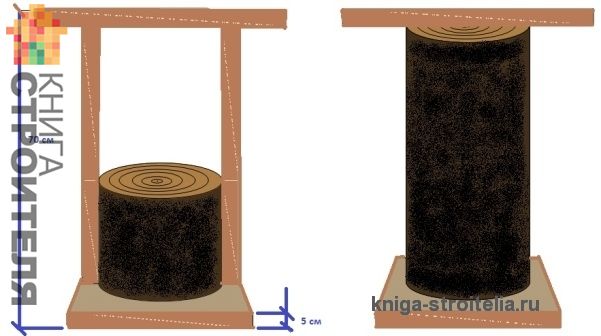
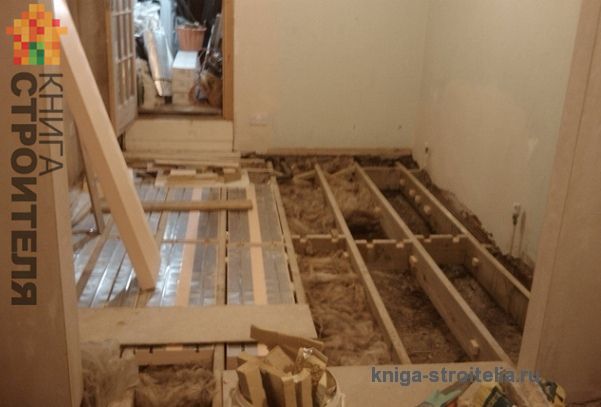
There are some differences in the lag device for floor mounting. When constructing a building box (or frame, this usually happens when erecting frame house) logs are often laid even at the stage of strapping the foundation. ("Do-it-yourself strip foundation for a house", "Column foundation", "Pile foundation"). But in this article, we will consider a more difficult point - laying a lag on a base of columns. (Fig. 3)
But in this article we will consider a more difficult point - laying the lag on the base of the columns
 The structure of a wooden floor consists of wooden logs, on which boards are laid with further facing with a decorative layer and several layers accompanying the floor structure (compacted soil, waterproofing, insulation). There are some differences in the lag device for floor mounting. During the construction of a building box (or frame, this usually happens when erecting a frame house) logs are often laid even at the stage of strapping the foundation ( Strip foundation for a home with your own hands, Column foundation, Pile foundation). But in this article, we will consider a more difficult point - laying a lag on a base of columns. Michail Rybakov
 So, let's consider the construction of a wooden floor on logs on the ground in more detail.
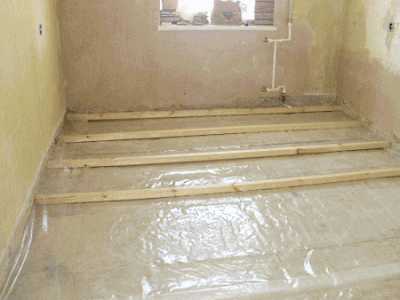
Before installing the poles under the logs, the soil must be carefully leveled and compacted. (Fig. 4, 5)
 Michail Rybakov
 So, let's consider the construction of a wooden floor on logs on the ground in more detail.Before installing the poles under the logs, it is necessary to carefully level and compact the soil
 There are some differences in the lag device for floor mounting. When constructing a building box (or a frame, this usually happens when erecting a frame house), logs are often laid even at the stage of strapping the foundation (Do-it-yourself strip foundation for a house, Column foundation, Pile foundation). But in this article, we will consider a more difficult point - laying a lag on a base of columns. So, let's consider the construction of a wooden floor on logs on the ground in more detail. Before installing poles under the logs, it is necessary to carefully level and compact the soil. Michail Rybakov
 The methods of soil compaction were described in detail in the previous article on the construction of a concrete floor on the ground in a private house. ("How to make a concrete floor on the ground in a private house"). Here we note that in addition to the tamping tools listed there, you can also make a tool for the same purposes from a wooden bar. It may happen that the rammer will come in handy more than once, so let's dwell on this in more detail. (Fig. 6)
It may happen that the rammer will come in handy more than once, so let's dwell on this in more detail.
 So, let's consider the construction of a wooden floor on logs on the ground in more detail. Before installing poles under the logs, it is necessary to carefully level and compact the soil. The methods of soil compaction were described in detail in the previous article on the construction of a concrete floor on the ground in a private house (How to make a concrete floor on the ground in a private house). Here we note that in addition to the tamping tools listed there, you can also make a tool for the same purposes from a wooden bar. It may happen that the rammer will come in handy more than once, so let's dwell on this in more detail. Michail Rybakov
 To make a manual rammer, you will need a bar with an approximate section of about 150 * 150 mm and a length of 700 mm, or a part of an ordinary round log of the same length. By the way, you can choose another length. Here you need to focus, first of all, on your growth. Further, you can simply limit yourself to nailing a piece of bar in the form of a handle to the segment on one side, and a square piece of board on the other side. Do not take too large a piece of the board, it will be used as a sole when tamping and therefore should be as comfortable as possible. ("Joiner's Tool").
The second method of making a rammer from a wooden bar or part of a log is suitable for those who like to do something once and for a long time. A metal sole is fixed to the bar on one side, and a metal handle is attached to the upper part. The metal sole can serve for a very long time, and the handle welded from the metal will prevent the appearance of splinters on the hands and possible breakage of the wooden handle during operation. And here the main thing is not to overdo it with the rammer weight. It must be heavy enough to tamp the soil, but at the same time have sufficient weight so that it can be quickly and efficiently lifted again and again.
3. Arrangement of posts under bearing logs... (Fig. 7)
Arrangement of posts for bearing logs
 The metal sole can serve for a very long time, and the handle welded from the metal will prevent the appearance of splinters on the hands and possible breakage of the wooden handle during operation. And here the main thing is not to overdo it with the rammer weight. It must be heavy enough to tamp the soil, but at the same time have sufficient weight so that it can be quickly and efficiently lifted again and again. 3. Arrangement of posts for bearing logs. Michail Rybakov
 * Layout of the area.
Having completed the compaction of the soil, it was the turn of the installation of the posts under the logs. To do this, you need to make a markup. Let's discuss the situation right away when the design of the house allows you to avoid installing additional posts. In this case, immediately proceed to laying the logs or their further sheathing. Otherwise, markup will be required, which is performed as follows:
We decide on which parts of the house the logs will rely on. It can be a bar of the lower strapping of a house or a grillage covered with a layer of roofing material. And in one and in the second case, marks are made with chalk in the places of the reference points (on the strapping beam or roofing material of the grillage).
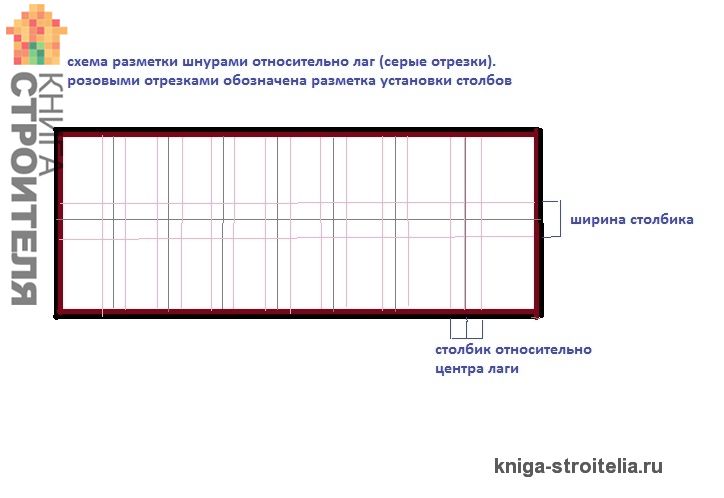
Next, a mark is made for the locations of the posts. At this stage, it is important to understand how many rows of tables there will be in total. The number of orienteering cords stretched further will depend on this. But at this stage, the number of columns with a mark on the ground of their installation sites is calculated. (Fig. 8)
But at this stage, the number of columns with a mark on the ground of their installation sites is calculated
 And in one and in the second case, in the places of the reference points, chalk marks are applied (on the strapping beam or roofing material of the grillage) - Next, a mark is made on the places where the posts are installed. At this stage, it is important to understand how many rows of tables there will be in total. The number of orienteering cords stretched further will depend on this. But at this stage, the number of columns with a mark on the ground of their installation sites is calculated. Michail Rybakov
 When marking places for a foundation for pillars, it is important to take into account both the size of these foundations and their location relative to future lags with a step between them.
According to the stretched cords, at the points of their intersection, four pegs are driven into the ground (the angles of future posts are marked). The cords can then be removed. (Fig. 9)
The cords can then be removed
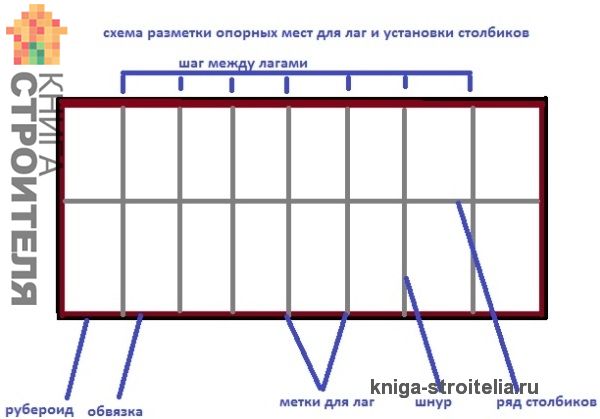 The number of orienteering cords stretched further will depend on this. But at this stage, the number of columns with a mark on the ground of their installation sites is calculated. When marking the places for the foundation for the pillars, it is important to take into account both the size of these foundations and their location relative to the future lags with a step between them - Accordingly, four pegs are driven into the ground at the points of their intersection with the stretched cords (the angles of future posts are marked). The cords can then be removed. Michail Rybakov
 * Preparation of the foundation for the posts.
At the next stage, you need to dig depressions in the ground (according to marking with pegs). The depth under the foundation is individual in each case. It depends both on the quality of the soil and on the level of occurrence of groundwater (this was written about in the previous article on concrete floorsbut having ready foundation, most likely you already know the depth of the GWL).
As a rule, pits for the foundation are dug to a depth of 15 to 45 cm.The minimum depth (15-20 cm) is suitable for places where the soil is rocky or sandy. And in this case, adding rubble is not required. It is enough to chop off and compact the walls and bottom of the pit with a shovel as carefully as possible.
The situation is different with soil of a different quality (for example, clay soil). In this case, the depth of the pit for the foundation is 40 - 45 cm and it will be necessary to pour sand and crushed stone of a coarse fraction on the bottom. Both layers are approximately 10 cm thick. The layers must be carefully compacted (to compact the sand, you can spill a layer of water from it).
For a soil with a high GWL level, there is also an undeservedly forgotten trick - a clay castle. Instead of sand and gravel, about 20 or 25 cm of soft clay is placed on the bottom of the hole, which also needs to be well tamped. The clay will close the groundwater access to the base of the foundation.
* Casting of the foundation and its reinforcement.
Having finished preparing the foundation, proceed to pouring it. To do this, you will need to make a concrete mass. Immediately, we note that these pillars are not built for a year or two, but for the entire life of the house, therefore, it is necessary to approach the production of concrete for their foundation with great responsibility. It is not recommended to replace a full-fledged concrete solution with "lean concrete" which is more like wet soil. Real concrete is similar in consistency to thick sour cream.
The proportions for mixing such concrete are as follows:
1 hour of cement + 3 hours sand + (2 or 3) tsp. crushed stone with a fraction of 5-10 mm + water \u003d thick elastic mass. (In this case, more water is added by eye. The main thing in this case is to achieve the desired consistency).
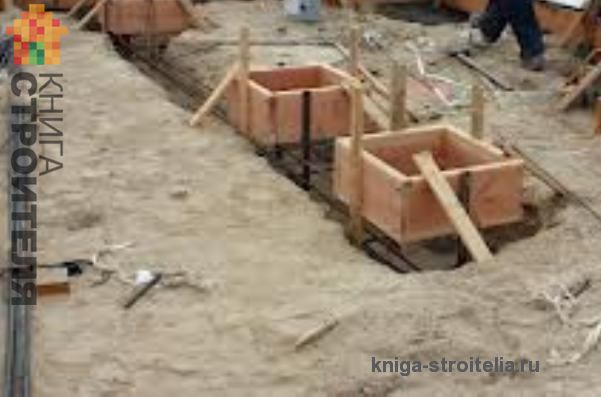
In order for the foundation to rise several centimeters (at least 5 cm) above the soil level, a formwork is made from a board around each hole (any board can be used as it will need to be removed in the future).
There is one more important nuance when pouring the foundation. In order for the binder concrete milk not to "go" into the ground, it is advisable to cover the bottom of the pits with polyethylene before pouring. This will allow concrete mortar do not "drain" into the ground, but dry out gradually thanks to fumes and get the maximum strength.
To give the foundation a fortress, it will also need to be reinforced. Reinforcing wire is laid just below the middle of the foundation, but not at its very bottom. The wire should ideally be in the form of a mesh with cells. For example, for a foundation with dimensions of 40 * 40 cm, it is recommended to lay a mesh with cells of 15 cm.
After pouring part of the concrete, lay the reinforcing mesh and pour the rest of the form prepared for the foundation. Next, you need to leave the foundation for several days to harden. The fact that the concrete has set can be verified simply visually, but, as a rule, it takes about three days for its complete hardening. Although in this case, it is necessary to take into account the individual characteristics of the climate and seasonal weather.
* Waterproofing of columns for logs.
On concrete foundation waterproofing from a layer of roofing material is laid. This is necessary to prevent moisture from entering the brickwork of the posts. Roofing material is cut out according to the size of the foundation with an allowance at the edges of 1-1.5 cm. Before laying, the roofing material can be smeared with a bituminous primer, but this is rather necessary only for your own reassurance. ("We insulate and waterproof the balcony", "Painting tools, brushes, rollers", "Spatula and additional tools for painting work").
* Construction of pillars from brickwork.
On top of the waterproofing laid on the concrete foundation, you begin to erect brick posts. Brickwork in this case, most often consists of two rows of bricks. If it is necessary to erect higher posts, you need to calculate their height so that the top row of bricks lies perpendicular to the future lags. ("Some features of brick walls", "Methods for leveling the floor").
For the binder of the mortar, you will need cement with a brand of M100 and above. The proportions for the solution are as follows:
1 part cement + 3 parts sand \u003d mortar.
As noted above, a layer of roofing material is again laid on top of the brick. On the roofing material under the future lag, it is necessary to lay a soundproofing gasket. This detail is preferably square in shape and a couple of centimeters more brick column and made of plywood, chipboard, wood (pretreated with antiseptic agents) or OSB.
4. Laying wooden logs on brick posts. (Fig. 10)
Laying wooden logs on brick posts
 The proportions for the mortar are as follows: 1 part of cement + 3 parts of sand \u003d mortar As already noted above, a layer of roofing material is again laid on top of the brick. On the roofing material under the future lag, it is necessary to lay a soundproofing gasket. This part is preferably square in shape a couple of centimeters larger than a brick post and made of plywood, chipboard, wood (pre-treated with antiseptic substances) or OSB 4. Laying wooden logs on brick posts. Michail Rybakov
 The surface of all lags should be strictly at the same level. It will hardly be possible to achieve this the first time, so you will have to resort to fitting them. Even before fixing the log, you can use all sorts of additional substrates for the logs or, if necessary, use a plane and cut off part of the upper layer of the log. ("Methods for sheathing and insulating walls of a frame house.")
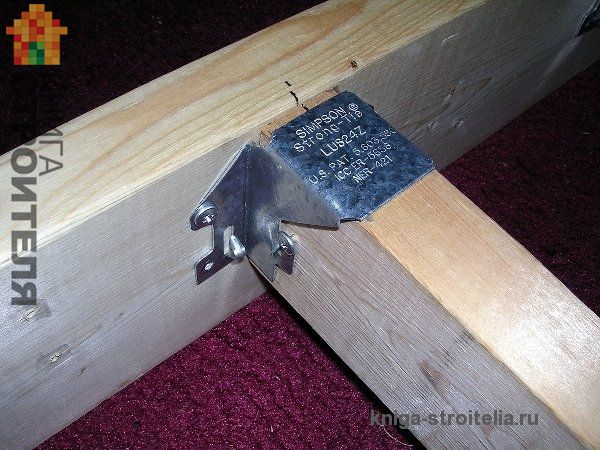
After using the level you are finally convinced of the accuracy of the position of the wooden logs, they can be attached to the posts.
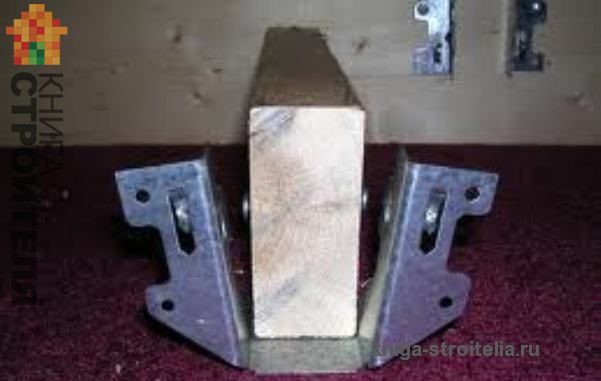
... (Fig. 11, 12, 13)
For reliable fixation of the lag to the posts, metal elements of the corners are used, similar to those used in the construction of the frame and fastening its racks or U-shaped elements
 Michail Rybakov
 For reliable fixation of the lag to the posts, metal elements of the corners are used, similar to those used in the construction of the frame and fastening its racks or U-shaped elements
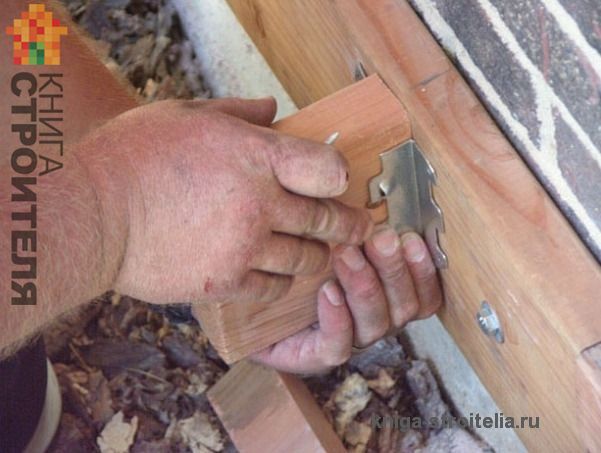 The surface of all lags should be strictly at the same level. It will hardly be possible to achieve this the first time, so you will have to resort to fitting them. Even before fixing the log, you can use all kinds of additional substrates for the logs or, if necessary, use a plane and cut off part of the upper layer of the log (Methods for sheathing and insulating the walls of a frame house) After using the level you are finally convinced of the accuracy of the position of the wooden logs, they can be attached to the posts ... For reliable fixation of the lag to the posts, metal elements of the corners are used, similar to those used in the construction of the frame and fastening its racks or U-shaped elements. Michail Rybakov
 If the edge of the log is attached to the bar of the lower strapping, then self-tapping screws can be used (the size of the screws should be such that when connecting the log with the bar, the self-tapping screw would enter it to a depth of 3-4 cm).
In the case of fixing the timber to the concrete base of the grillage, holes are pre-drilled in it, into which the dowels are inserted when fixing. The same applies to brick, with the only difference that a hammer drill cannot be used to drill holes in the brick. This can break the brick, so use a drill. ("Jigsaws, reciprocating saws, planers, milling machines", "Drill and screwdriver", "Power tools. Perforator, jackhammer").
Lags, of course, it is better to use whole and the desired size without additional build-up. But sometimes it does not work out as intended and there is a need to lengthen this element. In this case, you can use a butt joint or by cutting, with additional reinforcement of the bearing capacity of the built-up log by fixing it to the junction of a piece from a board or other log. In this process, there are also two rules that affect the quality of the floor:
You can increase the logs by at least a meter. Smaller pieces will not last long;
When building up several lags, the displacement of the line of their building up in the structure should be at least 50 cm. (Fig. 14)
Pieces of smaller size will not last long; - when building up several lags, the displacement of the line of their building up in the structure should be at least 50 cm
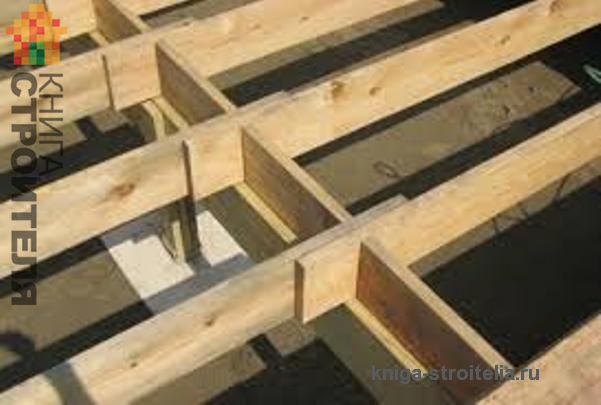 But sometimes it does not work out as intended and there is a need to lengthen this element. In this case, you can use a butt joint or by cutting, with additional reinforcement of the bearing capacity of the built-up log by fixing it to the junction of a piece from a board or other log. In this process, there are also two rules that affect the quality of the floor: - logs can be increased by at least one meter. Pieces of smaller size will not last long; - when building up several lags, the displacement of the line of their building up in the structure should be at least 50 cm. Michail Rybakov
 5. The final stages of installation of a wooden floor on logs on the ground. (Fig. 15)
The final stages of installing a wooden floor on logs on the ground
 In this process, there are also two rules that affect the quality of the floor: - logs can be increased by at least one meter. Pieces of smaller size will not last long - when building up several lags, the offset of the line of their building up in the structure should be at least 50 cm. 5. The final stages of installing a wooden floor on the lags on the ground. Michail Rybakov
 Having laid and fixed the logs, you can proceed to their rough sheathing and insulation. The further construction of the floor may differ in accordance with the purpose of the house, the surrounding climate and many other factors. The floor can be single plank, double and with insulation.
We will consider the most difficult option - a floor construction with insulation.
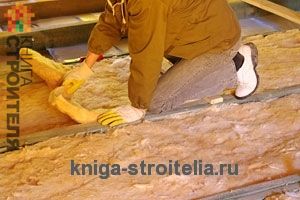
* Installation of bars to the sides of the log. Bottom (rough) sheathing and insulation.
First of all, bars with a section of 50 * 50 or 30 * 50 are attached to the sides of the laid logs with self-tapping screws or nails. Further, the distance between these bars (lags) is sewn up with an unedged board (you can use a board of any quality, the main thing is that it is not contaminated with any microorganisms and is pre-treated with antiseptics).
A vapor barrier membrane must be laid on the cladding (do not use an ordinary film, it is better to leave the insulation without anything at all, if it is not possible to lay the membrane itself). ("Insulation of the ceiling", "Insulation of walls", "We insulate and waterproof the balcony").
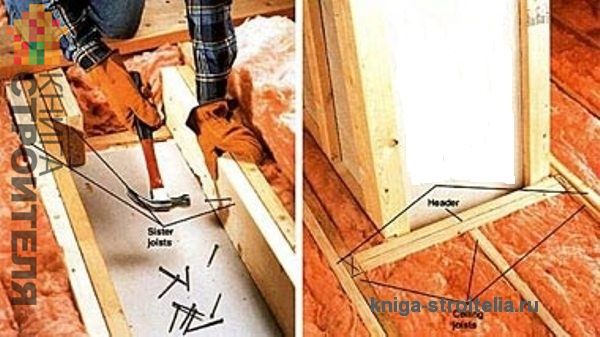
Installation of floors on logs photo. (Fig. 16)
A vapor barrier membrane must be laid on the cladding (do not use an ordinary film, it is better to leave the insulation without anything at all, if it is not possible to lay the membrane itself). (Ceiling insulation, Wall insulation, We insulate and waterproof the balcony). Installation of floors on logs (photo 16)
 We will consider the most difficult option - a floor structure with insulation * Installation of bars to the sidewalls of the log. Bottom (rough) sheathing and insulation. First of all, bars with a section of 50 * 50 or 30 * 50 are attached to the sides of the laid logs with self-tapping screws or nails. Further, the distance between these bars (lags) is sewn up with an unedged board (you can use a board of any quality, the main thing is that it is not contaminated with any microorganisms and is pre-treated with antiseptics). A vapor barrier membrane must be laid on the cladding (do not use an ordinary film, it is better to leave the insulation without anything at all, if it is not possible to lay the membrane itself). (Ceiling insulation, Wall insulation, We insulate and waterproof the balcony). Installation of floors on logs (photo 16) Michail Rybakov
 Use breathable material as insulation. Styrofoam options for insulation in this case are not suitable. It is best to use soft wool construction options for insulation. Cotton wool is easier to lay and there will be no special need for cutting it. Cotton does not fit to the very top. ... (Fig. 17, 18)
It is imperative to leave a couple of centimeters from the wool layer to the upper plank sheathing for the ventilation gap
 Michail Rybakov
 It is imperative to leave a couple of centimeters from the wool layer to the upper plank sheathing for the ventilation gap
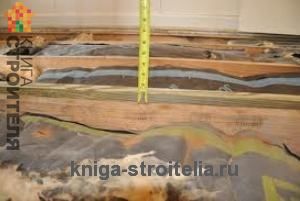 It is best to use soft wool construction options for insulation. Cotton wool is easier to lay and there will be no special need for cutting it. Cotton does not fit to the very top. It is imperative to leave a couple of centimeters from the cotton wool layer to the upper plank sheathing on the ventilation gap. Michail Rybakov
 One should not overlook the fact that in some buildings (for example, small seasonal country houses, cabins and other small buildings for temporary residence), they sometimes insulate the old fashioned way with such natural materials as expanded clay, dry algae or other dry plants, sawdust and other cheap ( and sometimes free) improvised fillers.
* Laying in the floor of communications. (Fig. 19, 20)
 Michail Rybakov
 One should not overlook the fact that in some buildings (for example, small seasonal country houses, cabins and other small buildings for temporary residence), they sometimes insulate the old fashioned way with such natural materials as expanded clay, dry algae or other dry plants, sawdust and other cheap ( and sometimes free) improvised fillers * Laying in the floor of communications
 Cotton wool is easier to lay and there will be no special need for cutting it. Cotton does not fit to the very top. It is imperative to leave a couple of centimeters from the cotton wool layer to the upper plank sheathing on the ventilation gap. One should not overlook the fact that in some buildings (for example, small seasonal country houses, cabins and other small buildings for temporary residence), they sometimes insulate the old fashioned way with such natural materials as expanded clay, dry algae or other dry plants, sawdust and other cheap ( and sometimes free) improvised fillers * Laying communications on the floor. Michail Rybakov
 Wooden floors are very convenient for installing various communications. Whether it's tap or sewer pipes they are quick and easy to fit between the floors. A feature of this installation is the fact that when installing a removable cover over a niche with decoupling of communication nodes, you will always have access to them for replacement and revision, without damaging the finishing flooring. ("Installation of a water supply using metal-plastic and pvc pipes"). It is very easy to make such a cover, and communications will remain hidden in the floor and will not disturb the aesthetic appearance of the room.
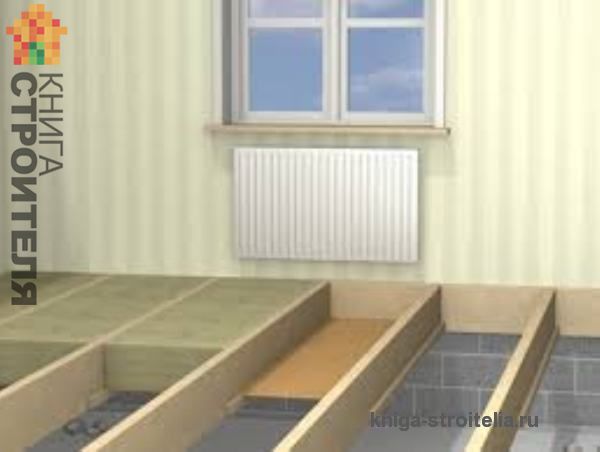
* Upper (finishing) lagging. (Fig. 21)
It is very simple to make such a cover, and the communications will remain hidden in the floor and will not disturb the aesthetic appearance of the room * Upper (final) lagging
Having laid the insulation between the logs, you start covering the floor with a board. We note right away that the board should be with a moisture content of no more than 12% and lie in the room for some time before installation. An unsecured board deforms very quickly and therefore must be stored horizontally on a flat surface. (Fig. 22)
An unsecured board deforms very quickly and therefore must be stored horizontally on a flat plane
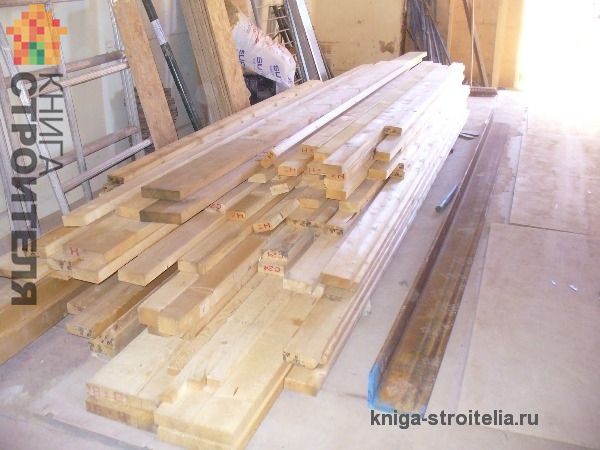 It is very easy to make such a cover, and the communications will remain hidden in the floor and will not disturb the aesthetic appearance of the room * Upper (final) lagging. Having laid the insulation between the logs, you start covering the floor with a board. We note right away that the board should be with a moisture content of no more than 12% and lie in the room for some time before installation. An unsecured board deforms very quickly and therefore must be stored horizontally on a flat plane. Michail Rybakov
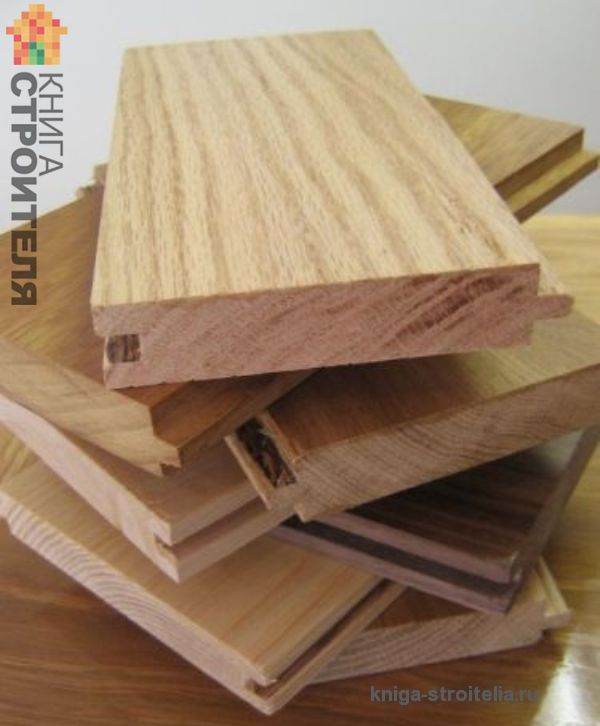
 For floor cladding, it is more convenient to use a grooved board (according to a similar, but modified principle, the locking device of the laminate flooring is also arranged). ("Laying laminate with your own hands", "Laminate in the interior", "Cork underlay for laminate", "How to properly lay laminate", "Tool for laying laminate, carpet, parquet"). (Fig. 23, 24)
Michail RybakovFor floor cladding, it is more convenient to use a grooved board (according to a similar, but modified principle, the locking device of a laminated floor covering is also arranged) (Laying laminate with your own hands, Laminate in the interior, Cork underlay for laminate, How to properly lay laminate, Tools for laying laminate, carpet, parquet )
 Having laid the insulation between the logs, you start covering the floor with a board. We note right away that the board should be with a moisture content of no more than 12% and lie in the room for some time before installation. An unsecured board deforms very quickly and therefore must be stored horizontally on a flat surface. For floor cladding, it is more convenient to use a tongue-and-groove board (according to a similar, but modified principle, the locking device of the laminate flooring is arranged) (Laying the laminate with your own hands, Laminate in the interior, Cork backing under the laminate, How to lay the laminate correctly, Tools for laying laminate, carpet, parquet ). Michail Rybakov
 The board is laid at the final sheathing according to how the joists were laid. Therefore, this moment must be thought out even at the stage of planning the installation of the lag and marking the soil for the foundations for the posts. If the final planking from the board will be later faced with another finishing material, then in which direction the board will be laid is not important. In the same case, when the board will also perform the function of the decorative layer, then it is customary to place the board perpendicular to the flow of light (window in the room). But there is also a small nuance here. With the help of the direction of the laid board, you can visually expand or narrow the room. Therefore, they rely more on their own tastes and on the area of \u200b\u200bthe rooms. Laying a wooden floor with your own hands. A photo. (Fig. 25, 26)
A photo
 Michail Rybakov
 A photo
 With the help of the direction of the laid board, you can visually expand or narrow the room. Therefore, they rely more on their own tastes and on the area of \u200b\u200bthe rooms. Laying a wooden floor with your own hands. A photo. Michail Rybakov
 And further important point... It is better to finish the wall decoration (plaster, putty, painting) before the upper floor sheathing. ("Painting walls with water-based paint", "Putty walls", "Plastering correctly", "Decorative plaster in the interior").
Now directly about the process of mounting the board.
... (Fig. 27, 28)
Wooden floors do it yourself photo
 Michail Rybakov
 Wooden floors do it yourself photo
There are no particular difficulties here. Here are a couple of rules to follow in order to produce fast and quality styling:
The first board is laid with a spike to the wall, respectively, all subsequent ones are inserted into the grooves;
The first plank must not be placed close to the wall. During the operation of the house, wood will narrow and expand, precisely in order for this process to become invisible and provide for an indent from the wall at a distance of 1, or preferably 2 cm;
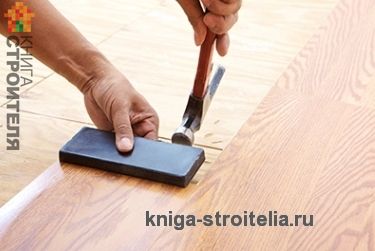
Laying the board "thorn in the groove" will require sealing the entry of the thorn into the groove of the board. For this, the laid board is tapped with a hammer. But if you hit the board with a hammer, then due to the unevenly distributed impact force, the spike is easy to break. To avoid this, as well as for a better and more uniform compaction, always use an intermediate block with the same spike. Nested in the groove, such a bar with a spike compensates for the difference in impact load and makes the board installation safer. (Fig. 29)
Nested in the groove, such a bar with a spike compensates for the difference in the impact load and makes the board installation safer
 For this, the laid board is tapped with a hammer. But if you hit the board with a hammer, then due to the unevenly distributed impact force, the spike is easy to break. To avoid this, as well as for a better and more uniform compaction, always use an intermediate block with the same spike. Nested in the groove, such a bar with a spike compensates for the difference in impact load and makes the installation of the board safer. Michail Rybakov
 The board is attached to the joists with self-tapping screws. There are two ways to fix the board.
* The first method is to insert self-tapping screws into the countersunk slots at an angle of 45 degrees. This is not a very convenient method and requires some skill to implement it. But the screws will be completely hidden, and the surface will remain smooth and beautiful.
For the construction of wooden floors, the final flooring of which is installed on logs, there are many technological variations. The choice of the optimal scheme depends on climatic and geological conditions, on the financial capabilities of the owners. The type of base, the operational specifics of the structure or a separate room affects the way the floor is constructed with lags. However, no matter what principle the wooden floor is arranged along the logs, the construction of the structure is based on classical techniques and options, which will be discussed.
The main types of floors with logs
Lags are a rather capacious concept that includes not only the well-known wooden bar with a rectangular section. The technical definition of lag extends to:
- plates created from logs with a cross-section in the thinnest part of at least 160 mm;
- logs hewn from both sides with cut dimensions of at least 150 mm;
- paired in two, installed on the edge of the board, with a width of 100 mm and more with a thickness of 25 mm or more;
- directly a rectangular beam, the size of which determines the forthcoming load. The dimensional minimum is considered to be 100 × 150 mm with a step of installing the lags of 60 cm;
- slats used for dry alignment and for insulation;
- i-beam metal channel, which is used extremely rarely in the case of floor construction on reinforced concrete beams;
- long plastic products included in the complete set of factory systems for the formation of a dry screed.

Regardless of the material from which the logs are made, they have one function: they serve as the basis for the future subfloor flooring and finishing coating. They can rely on a crown, on support pillars, on wooden beams, concrete slabs or on previously tamped, prepared soil.
Do you need a sub-floor or not?
Depending on the geological characteristics of the site chosen for construction, it is determined whether the space between the soil and the log system is required or it can be eliminated in order to reduce costs and labor costs.
The dictator of the mandatory presence or permission for the absence of a subfloor is the indication of the seasonal level of groundwater:
- with a low occurrence of hot water, simple, extremely cheap, but rather cold floors without an underground are arranged. The logs in this version are supported on a soil base. This type is ideal for suburban construction, for the construction of baths for seasonal use. In the middle lane and southern regions, it can be used if the permanent building has a high basement;
- with a high occurrence of HS, which is a serious threat to wood, the log system must be raised above the soil surface. For the installation of the frame system, the lag will need to build pillars made of bricks, monolithic concrete or foam concrete blocks.
The values \u200b\u200bof the GW level should be found out with the local meteorological service before designing a bath.
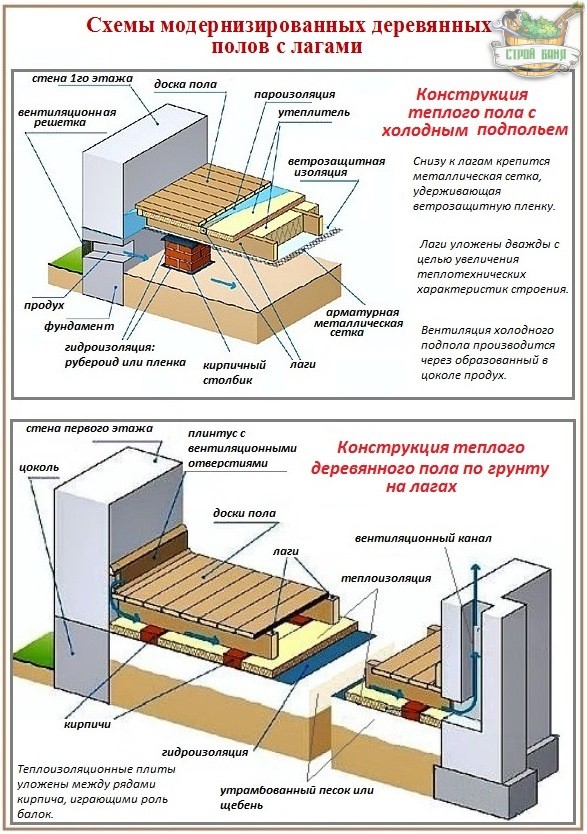
Classic flooring schemes with lags
The presence of underground space divides all existing schemes into two classes: floors with and without underground. Structures without an underfloor are considered cold, but there are ways to insulate them. Underfloor floors have significantly more varieties. They can be cold and insulated. In insulated floors, a layer of thermal insulation can be located between the logs or between the supports.
The easiest cold floor
This is a structure erected on dry ground. In order to arrange it:
- completely remove the soil and vegetation layer;
- after removing all the "consequences" of the growth of organic matter, the natural soil must be carefully tamped;
- the area freed from plant residues is covered with sifted sand, which can be replaced by crushed stone or construction waste with sand aggregate;
- the covered pillow is rammed again. A home-made tool for compacting soil and backfill can be built from a weighty log by nailing a transverse bar to its upper plane as a handle;
- then comes a new backfill layer of calcined sand, slag or dense clay. This layer will become the medium and basis for installing the frame from wooden logs, which means that it should not create conditions for wood decay. The thickness of the backfill should be two to three times the thickness of the bar selected for the arrangement or a plate made of half of the log;
Note. If it is planned to use slag to create a pillow, you need to buy and bring it to the site a year before starting work. The slag needs to "mature".
- logs are "immersed" in the last layer of backfill, the upper line of which should be flush with the plane of the base being constructed. Before immersion in the ground, lumber must be treated with an antiseptic.
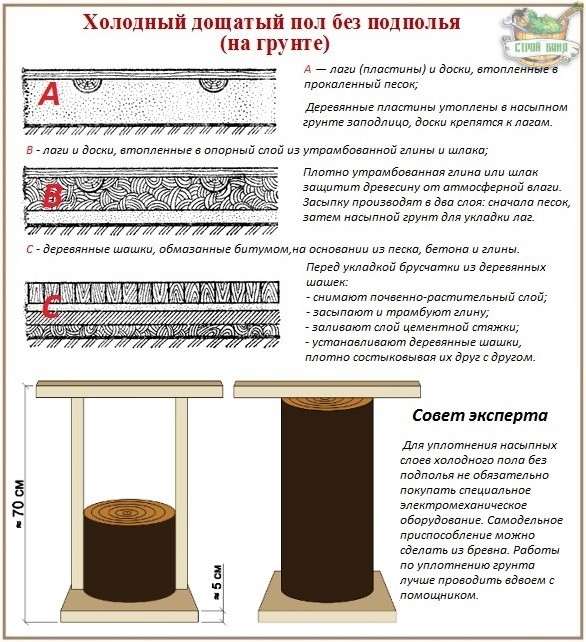
Laying of the logs is done with a step depending on the width of the floorboards. Since the construction of wooden floors in saunas is mainly completed with a 37 mm grooved board, the optimal distance between the logs will be 60 cm.Too wide boards are undesirable for arranging a bath, because wood in a humid environment will deform, and wide boards will make warping especially noticeable and inconvenient for movement.
Important. The annual rings of adjacent floorboards must be directed in different directions, so that adjacent elements will spontaneously prevent deformation.
Insulated floor option on the ground
- The bottom of a kind of pit for the subsequent filling of a multi-layer pillow is rammed and covered with insulation, which can be used as bags of lime or cement mixture, laid in two rows.
- Then crushed stone is covered with a layer of 8 cm. It also needs to be tamped and filled with lime milk.
- Roofing material is laid on top.
- Then fiberboard 3 cm thick.
- An interlayer of expanded clay of fine or medium fraction is about 8 cm.
At the end, a multilayer insulating base for the floor is poured with lean concrete, which is dominated by sand. After the solution grasps, the area of \u200b\u200bthe floor to be constructed is covered with sand and then proceed according to the above scheme.
Cold type of floor with insulated underground

Initially, a standard preparation of the base is carried out. The difference is that the prepared surface is not filled with calcined sand, but support pillars are built from solid brick or foam concrete blocks. Each support post is a separate structure with its own foundation, for the filling of which it is necessary to carry out preliminary marking.
Please note: finishing boards are mounted "in the cross" of the joists.
The best option for installing plank floorboards is:
- parallel direction to the luminous flux in the rest room;
- parallel direction to the long wall in the wash compartment and in the steam room;
- perpendicular to the movement in the dressing room.
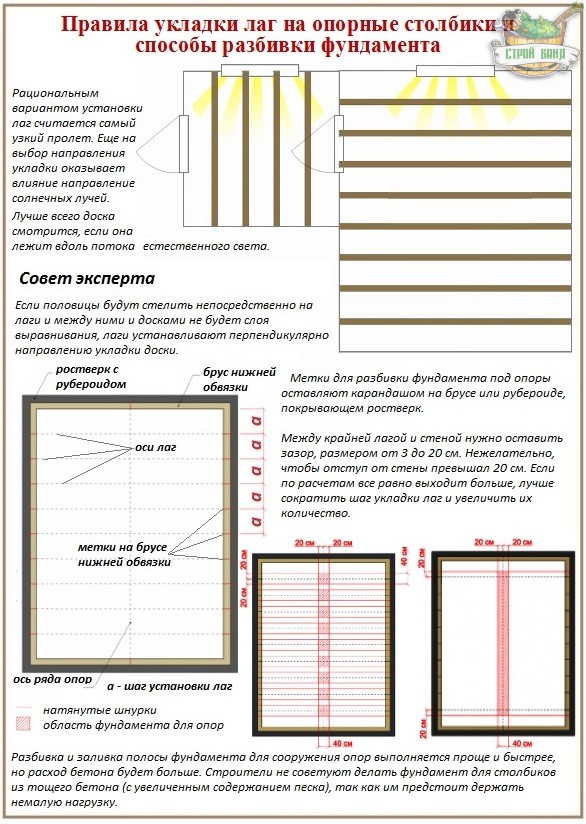
If an additional crate is not arranged above the logs, the logs should be laid across the direction of the board. All distances must be measured, planned and calculated, focusing on the central axes of the columns and the lag. Marks must be left on the structural element on which the ends of the lag are to be supported: on the roofing material covering the grillage, on the lower strapping bar.
The first log from the wall must be positioned so that a gap of 3-20 cm remains between its lateral surface and the wall, and in the same way from the opposite side. That is, an independent builder has the ability to slightly move the intended rows of columns when breaking down. The foundation for the supports can be poured entirely under the entire row or under each of the posts separately. It should be noted that the foundation for the post should protrude at least 1 cm, preferably 5 cm around the entire perimeter beyond the support contour. This means that the formwork for pouring a strip for a number of supports must be constructed so that the foundation strip is wider and longer than the row by 2-10 cm. The foundation for a separate support should be just as wide and long as possible.
Council. According to the axis marked on the harness, half the width of the future foundation should be set aside in both directions and pegs projected onto the ground should be hammered into the points. Pull the cord between the pegs and repeat all the same steps in the perpendicular direction. To fill the foundation with a strip, it is enough to break only the corners of the future local foundation.
![]()
The sequence of actions for pouring a concrete base is extremely simple:
- soil compaction;
- formwork device with a side height of 10 cm;
- laying on the bottom of the reinforcing mesh;
- pouring concrete itself, waiting for hardening for 3 days;
- then the foundation is covered with polyethylene or roofing felt for waterproofing and supports are built.
Note. The upper plane of the supports should be at the same level. The alignment of the row is done by applying cement mortar. If a layer of more than 5 cm is required for leveling, reinforcing mesh is "recessed" in the cement.
On top of the leveled support, there should again be a waterproofing layer, on which a 3 cm thick wooden gasket soaked with an antiseptic should be placed.That is where the logs will be placed, by the way, also treated with an antiseptic, and a boardwalk on top.

The underfloor space of cold floors is covered with expanded clay or slag, leaving 5 cm of void on top. For ventilation of the subfloor, a technological gap is left around the perimeter. The skirting boards must be equipped with holes for ventilation of the subfloor. According to building codes, 15 m² of floor space is provided with two ventilation holes formed in the plinth of opposite walls. The total area of \u200b\u200bthe holes is 20-30 cm². They are covered from mice with a thin non-ferrous mesh.

Underfloor heating construction with cold subfloor
Fundamentally, this technology for arranging wooden floors differs from the previous scheme only in that the insulation is placed not in the underground, but in a frame constructed from logs.
- To lay the insulation, a rail is nailed to the lower edge of the timber on both sides, which will support the cranial floor.
- The cranial flooring is covered with polyethylene, mineral wool is laid on it or expanded clay is poured.
- A ventilation gap is left between the insulation and the upper line of the log.
- Cover with a vapor barrier material.
- Planking the floor.
Another difference is the way of organizing ventilation. warm floors with non-insulated subfloor. For ventilation, in this case, vent holes are made in the basement, every 5 m. During the frosty period, the vents are closed.

The described types of structures are a kind of basis for developing your own wooden floor project. All other types are modernized variations on the basic classic theme. Depending on the upcoming load and climatic features just changing or adding components.
A wooden floor in an apartment or private house is one of the most affordable and environmentally friendly floor coverings. It has good heat and sound insulation, therefore it is widely distributed in suburban construction... Wood has always created coziness and comfort for any person.
The best woods for floors are walnut, mahogany or oak. But they are very expensive and cheaper to buy imitation of these breeds.
The most widespread are boards made of conifers such as pine, spruce, fir, larch. They are practically not inferior in quality to their expensive counterparts and have an affordable cost.
When installation of a wooden floor boards are used, which must be dried in special chambers, to prevent the drying process and deformed. If you have the opportunity to check the moisture content of wooden boards, then it should be no more than 12%. In order for the wooden floors to be like a monolithic sheet, they are grooved i.e. on the one hand, a recess is made, and on the other, a protrusion, the same shape as a recess, due to which the boards are tightly connected to each other.
After purchasing the material, it should lie down for about 3 days in the place where it will be laid. This process is necessary in order for the wood to gain the same humidity and temperature as in the room and to curl and bend less.
When buying, pay attention to the appearance. The board of the premium class has no knots on the surface, and for the first class healthy ingrown knots are allowed. It is convenient to buy about 30% of the board of the first grade, the rest is of the highest quality, because the wooden floor under furniture or in remote corners of the room is hardly noticeable. If you only need a part of the board, then the first grade is excellent for this, because you can cut a piece of small length. It should also be taken into account that the material must always be taken with a margin of about 15%.
Laying a wooden floor is practically the final stage in the interior design. By this time, windows and doors should be installed, the ceiling made, the walls plastered and primed and the base prepared.
Installation of a wooden floor on a concrete base
When installing directly on a slab, it is necessary to prepare the base. For this, the surface must be flat. If this is not the case, then an additional leveling layer is made with a screed. Then they are cleaned of debris and dust, primed. After that, waterproofing is done and laid slab material, such as plywood, OSB, chipboard.
Laying should be done in a checkerboard pattern with a gap of 0.5 cm. On such a surface, you can arrange a wooden floor with a thickness of 25 mm.
To install a wooden floor on logs, the thickness of the board must be at least 40 mm, otherwise it can bend and the floor will turn out to be wavy.
Wooden floor on logs is not sensitive to unevenness of the base. Lags can be laid directly on concrete base, and large irregularities can be leveled with the height of the log.
Additional insulation can be done with mineral wool or other similar materials. This is especially true when installing a wooden floor on the ground. Many communications, wires can be easily mounted directly under the flooring, which is very convenient, especially for country houses, where the number of different wires and pipes is huge.
If you decide lay the wooden floor with your own hands, then the first step is to check the quality of the base. If this is a monolithic base or a concrete floor, then in principle there is nothing to check. The only thing that can be done is cement screed, but you can do without it. If the tie is already present, then it is necessary to examine it by tapping and visual inspection. There should be no cracks on it. If they are, then you need to clean this area from the screed and fill in a new one.
The next stage is the installation of waterproofing. To do this, an ordinary plastic film is laid on the cleaned surface with an overlap of 20 cm, which is fastened with tape or you can purchase polyethylene equal to the size of the room.
Lags are wooden blocks. They must be dried and covered with special compounds to prevent decay. There should be no bark on them. If there is bark on the bar, it must be removed, and this place must be cleaned and treated with an antiseptic.
After that, logs of 50x100 mm in size with a step of 50-60 cm are laid, leveled and attached to the base. Nowadays there are adjustable lags, which are very convenient to install, but they are more expensive. Additionally, the space between the bars can be filled with any heat-insulating material, which is covered with a vapor barrier on top.
Then you can proceed directly to the construction of the wooden floor. They spread perpendicular to the lags, usually in the direction of the light falling from the window. The first row should move 1 cm away from the wall. This gap is necessary so that the tree can expand freely to the sides when the temperature and humidity in the room change, otherwise the floor may bend somewhere in the middle.
Then, using self-tapping screws, the floor boards are attached to the joists. For a more aesthetic look, self-tapping screws are screwed into the end of the board at an angle of 45 0. Next, the next board is attached and the whole process is repeated. Laying takes place in a checkerboard pattern.
The next step is sanding. If the difference between the flooring boards is large, then these places are leveled using an electric planer. Then they take a sander, which is cheaper to rent, and bring the surface to a perfect surface by reducing the grain size of the sanding belt from coarse to fine. When sanding indoors, a lot of fine wood dust is generated, therefore it is necessary to curtain doorways and wear a special protective respirator.
Often, after the grinding stage, you can find small chips, cracks, depressions on the surface. They must be repaired with wood putty, allowed to dry and once again walked with fine sandpaper.
The final stage will be wet cleaning of the entire room, varnishing or painting the wooden floor and installing the skirting boards.
Base for a wooden floor on the ground
It is often necessary to lay a wooden floor directly on the ground. This situation is typical for the basements of country houses. The main thing here is to isolate it from moisture, which is inevitably present in the soil, otherwise the floors will be cold and quickly rot.
There are two most common options for preparing the foundation:
The first is the pouring of a concrete slab, and the second is the installation of a floor on brick or concrete pillars. Pouring a concrete slab is considered the best option.
Why?
Watch the video at the end of the article where you will find the answer to this question.
Monolithic concrete slab devices for wood floor
To do this, it is necessary to remove all plant soil, if any, and cover it with a layer of sand about 20 cm, which must be well tamped. On top of this layer, 10 cm of crushed stone is poured, it is also compacted and poured with liquid cement mortar, which is leveled with a level and a rule.
 The next layer will be waterproofing. Now there is a huge selection of such materials, but if you want to save money, you can put a regular plastic wrap in 2 layers. Then comes a layer of insulation, which can be granulated slag, expanded clay or more modern extruded polystyrene foam. If expanded clay or slag is chosen as insulation, then it must be leveled with cement mortar.
After that, another layer of plastic film should be spread, on which concrete is poured monolithic slab... The thickness of the slab should be at least 5 cm. It is advisable to reinforce it with a reinforcing mesh.
At this stage, the preparation of the base ends and you can proceed directly to the construction of the wooden floor as described above.
By the way, there is another article on our website, where the device of the insulated monolithic base for the floor on the ground is described in more detail (link).
Wooden floors on the ground on brick bedside tables
I must say that this design has been used for a long time. First, make a base in the form of bedside tables. As a material, red baked brick is used, which is not afraid of moisture. The distance between adjacent bedside tables should not exceed 2 m. After that, the remaining area between the supports is covered with polyethylene and covered with expanded clay or slag.
 Next, two layers of roofing material or other waterproofing are placed on the support pillars, on which wooden beams with a section of 150x50 are installed. The next step in preparing the base is the so-called filing, in order to hold the insulation between the logs. Then a vapor barrier is laid on which the insulation will lie. The entire structure is covered with another layer of vapor barrier.
If you stack parquet board, you will have to make the flooring from a wooden sub-floor. If not, then you can immediately arrange a fine wood floor.
Wooden floors are very popular in low-rise construction: they are equipped both in living rooms and in technical rooms (sheds, summer kitchens, verandas, etc.). Note that wooden floors do not have the best characteristics and service life, but they compare favorably with flooded floors in efficiency, environmental friendliness, ease of installation and low load on the base.
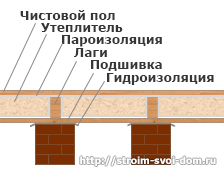
A classic wood floor consists of several key elements:
- base;
- supporting columns;
- logs for the floor;
- boardwalk.
General diagram of a wooden floor on the ground
Lags
The basis for the wooden flooring are logs - thick beams stacked on posts. Most often they are made of wood, but there are also plastic logs and reinforced concrete ones. At the same time, it is wooden ones that are considered the most practical, since they are inexpensive, easy to install, and if properly processed, they can serve for decades.
The main advantages of wooden logs include:
- Environmental friendliness of the material.
- Good level of heat and sound insulation.
- A fairly simple installation of wooden flooring.
- Uniform load distribution.
- The possibility of arranging a ventilated underground.
- Excellent performance properties of the material.
- Availability and ease of repair.
As a rule, logs are made from inexpensive wood, common in the region. For example, logs from pine and birch, spruce and larch have proven themselves well. You can use second-grade and third-grade wood, the moisture content of which is less than 20 percent, as lags.
Note:logs must have the correct shape (smooth edges). With increased loads, the height of the bar should be approximately twice its thickness.

Logs laid on blocks and waterproofing
Which plank to use for the floor?
It is necessary to select the width and height of the logs depending on the design of your floor and the coverage you have. The device of a wooden floor on logs provides for the following standards: for boards with a thickness of 20 mm, the distance between the edges of the lags should not be more than 30 cm, for a 30 mm board - 50 cm, for a 40 mm board - 70 cm, 50 mm - 100 cm.If spans more, the board will bend, which will cause discomfort during use. The distance between the supports on which the logs rest is usually 100-150 cm.
Decking material is usually inexpensive wood. Often the same pine and spruce are used, covered with special substances that prevent rotting. But it should be borne in mind that this wood is considered soft and can be easily damaged by heavy furniture and even heels.
If high traffic is planned in the room, then instead of pine it is necessary to use larch or oak. The price of these materials is significantly more expensive, but you have to pay for the durability. Alder or aspen can be an excellent option for a bedroom and a nursery - this wood has a beneficial effect on health.
Think in advance how you will design the floor. There is no need to buy first grade wood if you will be painting it with enamels. The first grade is usually covered with transparent varnishes that do not spoil the texture and appearance of the tree. For sheds and utility rooms, the third grade of wood is quite suitable.
Note:for flooring, you must use a board with a moisture content of no more than 12 percent. If the board is wet, it will tear or gaps will appear at the joints.

It is more convenient to lay the boards together, pressing them together
Laying and handling
Before buying, be sure to measure the dimensions of the room and compare them with the maximum possible length of logs and boards. Ideal when materials are laid in one piece, without joints. If you still have to splicate them, then do it with an offset (the connection should be done alternately from left to right in each row). Be sure to place the seam on the post. Buy materials with a margin of at least 15 percent.
Before laying, treat the logs with special chemicals that will protect it from mold, pests and mildew. It is allowed to process the logs with old engine oil - it is perfectly absorbed into the wood and protects the material from decay. Also, without fail, the lower layer of the boards is treated with various antiseptics. It is recommended to impregnate all bearing parts at least twice, waiting for the previous layer to dry completely. Additionally, all wooden surfaces can be treated with fire retardants, which protect the material from open fire.
Types of wood floor
Installation of a wooden floor on logs can be carried out in two main options:
- Wooden floor on the ground.
- Wooden floor over the existing base.
Ground flooring is most often laid in private one-story houses - This is the most economical option of all the existing ones. Base floors can be installed in apartments, offices and industrial premises - they are equipped on top reinforced concrete slabs or concrete surface.
Note:if you cannot find the logs for the required thickness, then you can use boards sewn together. Flooring in this case, the floor is laid on the edge of the bonded boards.

Floor leveling can be done with an electric plane
Floor installation on the ground
It is best to equip a floor on the ground in a new house when the box is built and the roof is made (precipitation will not interfere with your work). The finishing is usually carried out at the very end, when the final wall thickness has already been determined and the dirty painting and plastering work has been done. Installation of a wooden floor on joists takes place in the following sequence:
- Preparation of the base. For this, the top fertile soil layer is removed, the earth is well compacted and covered with rubble 5-7 cm thick.
- Creation of platforms for supports. You must calculate the number of posts for the lags, mark them and pour the foundation in place of the proposed posts (40 by 40 cm).
- Construction of columns. Usually they are laid out from red brick, since silicate can crumble from moisture. A layer of waterproofing is placed under the column and on it (usually resin and several layers of roofing material are used).
- Installing lag. It lies on the surface of the posts, if necessary, its height can be adjusted by placing a solid material. The tree is attached to the posts with special corners or metal strips.
- Final boarding. The boards are tightly pressed against each other and nailed (the lag must include at least ⅔ of the length of the nail). You can press the boards either with the help of a partner or with a special spacer.
Note: such floors can be additionally insulated with expanded polystyrene. But between it and the board, it is imperative to leave a gap of 2-4 centimeters for free air movement.
After all the boards have been laid, if necessary, the existing drops and surpluses are shaken off with a plane. There should be a gap of 15-18 mm between the boards and the wall around the entire perimeter for additional ventilation and thermal expansion. Subsequently, this seam will be covered with skirting boards.

Floor installation on the base
In some cases, it is necessary to lay the floor log on an already existing base (concrete surface). If the surface is perfectly flat, then the logs can be laid with ribs directly on it. If it has obvious differences, then it is recommended not to make linings, but to fill the base sand-cement screedaligning the floor. The fact is that the linings can eventually pop out from under the lags, as a result of which the floor in this place will begin to sag. Laying is recommended as follows:
- Creation of a waterproofing layer. The most common plastic wrap can be used as waterproofing.
- Laying the log. Try to use solid strips, if you need to splic them, then make joints from different sides.
- Creation of a heat-insulating and sound-insulating layer. Absolutely any material can act as a heater: mineral wool, expanded polystyrene, polystyrene and even expanded clay.
- Laying boards. Fasten them with nails or self-tapping screws, fitting tightly to each other.
Sometimes the basis is not concrete slab, and wooden logs or beams. Even in this case, the boards are recommended to be laid on logs, as in other options. It will be most convenient to screw them to the existing base from the side with strong self-tapping screws (at least 6 mm in diameter). To prevent your blocks from splitting, drill holes in them with a 4 mm drill.
Note:try to alternate tree rings on the boards. Lay them so that in one row they go to one side, in the second to the other. So the boards will independently prevent deformation.
This is all the information that can be useful to you when installing the floor along the logs. In principle, there is nothing difficult in this - one person can completely cope with this work if minimum set tools. The main thing is to calculate everything correctly. To do this, we recommend that you sketch the room at the desired scale, and calculate the required number of lags, boards and columns in a visual form.
Wood floors are a timeless classic that, despite the emergence of numerous new technologies and materials, remains popular today. For the construction of wooden floors, the boards are laid on wooden blocks, which are called "logs". And the floor is also called: "floors on logs" or "on logs". The essence does not change.
Lags include a wide range of sawn timber:
- a log cut in half;
- bars of rectangular cross-section, in which one side is at least 1.5 times longer than the other;
- one thick board or two spliced \u200b\u200bor glued together;
Lags are wooden blocks, planed logs, spliced \u200b\u200bboards
These are the materials that can be used in the manufacture of a wooden floor on logs with your own hands. There are also metal and polymer ones, but they come with industrial systems and are not used in private housing construction.
If we talk about wood, then conifers are more often used for laying under the floor. They have low prices, and due to the significant content of resins, they are less prone to decay.
Any wood must be antibacterial before laying. For baths, it is also desirable to treat with fire retardants - compounds that reduce the flammability of wood. Whether you choose ready-made impregnations for processing or impregnate with hot wax or linseed oil is not so important, but this stage cannot be skipped.
Lags can be laid on concrete, but only under them you need to spread a waterproofing film
These bars are supported by specially made structures - columns. This is when it comes to a private house or a bathhouse built on or columnar foundation... They are also laid directly on the concrete base. This is possible if:
- slab foundation;
- previously made as a base for the floor;
- the dimensions of the foundation allow you to make hanging logs;
- the floor is installed in apartments in multi-storey buildings.
What lags to use
You need to choose the size and number of bars based on the load and thickness of the floor boards. The section of the lag and their thickness depends on the length of the span - the distance between the two supports. The greater the distance between the supports, the more powerful the beam is required. For lags installed on a concrete base, there are no such requirements. Here, most often, the dimensions are selected based on the dimensions of the insulation, and of the thickness of the board that will be laid on the floor.
The step for the lag (the distance between two adjacent bars) is chosen from 30 cm to 100 cm. It depends on the thickness of the floor board. The correspondence is shown in the table. Optimal for baths is considered to be a step of 50 cm. The thickness of the board is 25-30 mm.
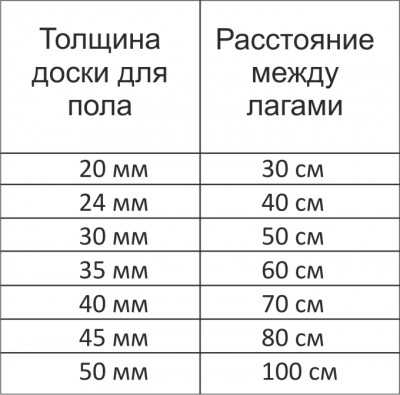
Table of the dependence of the thickness of the floorboard on the step of installing the lag
There are also some recommendations on the width of the floorboard - do not take a too wide one into the bath - when the humidity rises, it will warp more, which can even create difficulties when moving. Average width - the best choice for baths.
It is advisable to lay the lags in one piece, without joints. But if necessary, they can be spliced. To do this, either cut out a dowel in half a tree, or connect them end-to-end, securing at least two sides with pieces of boards at least 1 meter long.
Location rules
The first and last lag from the wall should be at a distance of no more than 20 cm. If, while observing the calculated step, the extreme lags are further away, their number is increased, and the step is reduced.
They are placed either along the wall in which the door is located, or perpendicular to it. If one wall is much longer than the other, then it is along this long wall that the logs are placed. If the room is square or close to it in shape, then the location of the window can influence the choice: floorboards look best if they are located along the stream of light. That is, in this case, the logs are placed along the wall, which has a window.
Floor device on logs
The wooden floor can be with or without subfloor. The type of floor device is determined by the water table. If they are located closer than 2 m, the subfloor is required. In all other cases - at will.
With deep groundwater, you can make wooden floors on the ground. There is a very cheap option, but it is also the coldest: there is no insulation, so this option is either for houses of seasonal residence (summer cottages and baths) or for regions with a very warm climate. The only requirement is a high base.
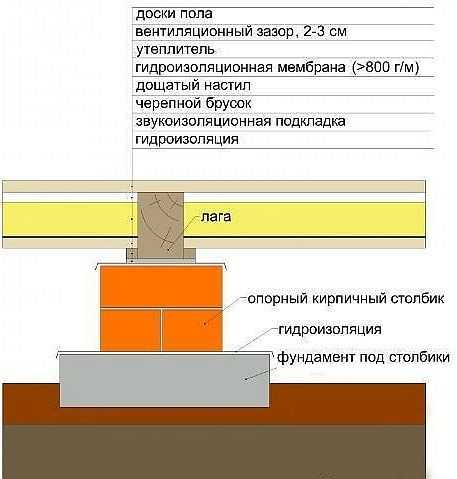
Floor installation on logs with a cold subfloor
If the waters are close to the surface, wooden structures must be lifted. Then they arrange special bases-posts, on which lags are already laid. In this case, additional measures for moisture insulation are required.
Lags on the concrete floor
If there is already a concrete base - floor slab, screed or slab foundation, make wood flooring easier. Mounting a lag on a concrete floor takes a little time, exactly how much depends on the height difference and the required adjustments. The order of actions and layers is as follows:

For baths, the choice of material depends on the type of room. For a steam room with its high temperatures, it is advisable to choose heat insulators that are not afraid of high temperatures. But they shouldn't be afraid of moisture either.
On the other hand, in the area of \u200b\u200bthe floor, the temperature rarely rises above 30 °C, and under the boards it will be even less, so the question of temperatures can be removed. Remains moisture resistance. These conditions are met by expanded polystyrene and expanded clay. You can also use mineral wool mats, but they are afraid of dampness, so it is advisable to insulate them well. Alternatively, each mat should be hermetically sealed in a thick film.
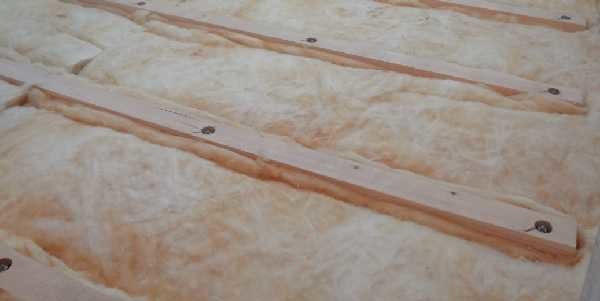
Sometimes, for convenience, additional jumpers are installed between the lags. Such a frame for laying floorboards requires more materials, but allows you to save on the floorboard: it can be taken of a smaller thickness, since the supports are located more often.
There is a quick installation option - the installation of adjustable lags. Adjustable lags are wooden or plywood bars with studs and an adjustment system (nuts) mounted in them. Rotating the nut to one side or the other, you change the level of the log relative to the floor. The studs themselves are walled into the floor.
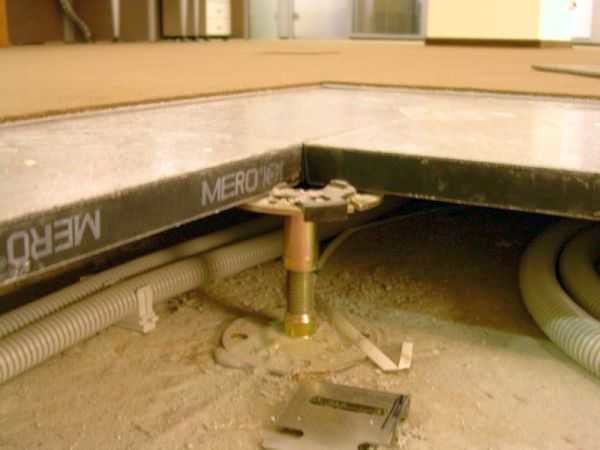
This is what the adjustable lags look like.
It takes 3-5 days to install such a floor, but its cost is about 15-20% more expensive than the usual version. But boards with a sufficient degree of moisture insulation will serve for a long time: there is no direct contact with a humid environment and they will not be damaged. Among the disadvantages: they “eat up” the extra centimeters of the ceiling height. For some it is not critical, but for others it is very important.
Wooden floor on the ground
For private houses, dachas and baths, it is often necessary to make the cheapest floor. And this is a floor on logs on the ground. There is a minimum of material costs, but the floor is cold. So is it or for summer houses, or for the southern regions. In other regions, heating costs will be very high.
For the device of such a floor on the logs, the following work is carried out:
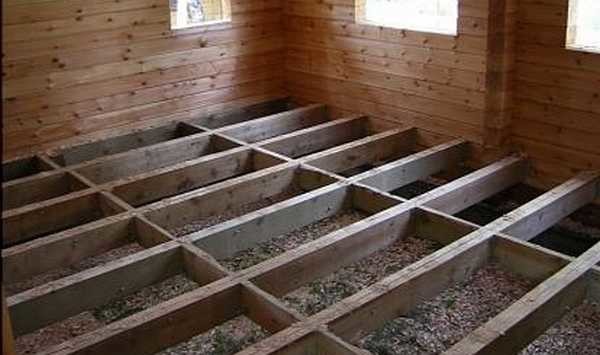
Installation of such a cold floor does not require a lot of time. You also need a little money.
Insulated option
Underfloor heating is expensive, but it still remains an inexpensive option. The preparation of the pit is exactly the same: removing the fertile layer and tamping the remaining clean soil. Further differences begin:
- The bottom and walls of the pit are lined with waterproofing materials.
- Crushed stone of the middle fraction is poured with a layer of 8-10 cm, compacted well, then spilled with cement milk. Drying and setting of the layer last at least a day, then work can be continued.
Cement milk - cement diluted with water. In consistency, it resembles rather liquid kefir. Most often, the proportions are as follows: for one part of the cement, three or four parts of water are taken. This operation serves to interlock the bedding. A fairly solid foundation is formed.
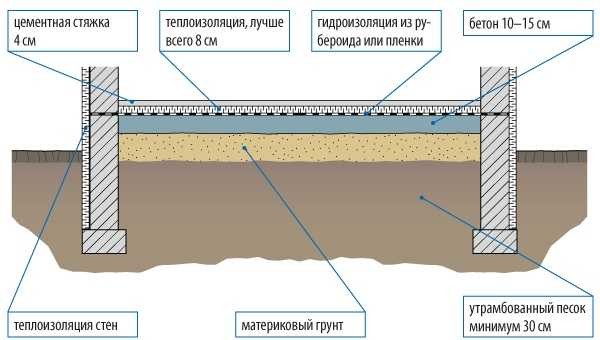
In order not to bother with setting a lag - it's a long and troublesome business - level it up. It is easier to do this with exposed lighthouses.
Pillar floor
When installing a wooden floor, there is a subfloor on the posts. It can be insulated or not. The floor can also be cold or insulated in any of the options.
Floor posts
Floor posts are made of bricks, small concrete blocks, or use the "FL" type. It is possible to use wooden blocks impregnated with bitumen as posts. Some place boulders of a suitable size with a flat top on the base. Boulders are a good support, but it is problematic to attach logs to them.
Each column has its own foundation. The size of the base is 2-10 cm larger than the column. The depth of the foundation depends on the type of soil, but usually 10 cm is enough.
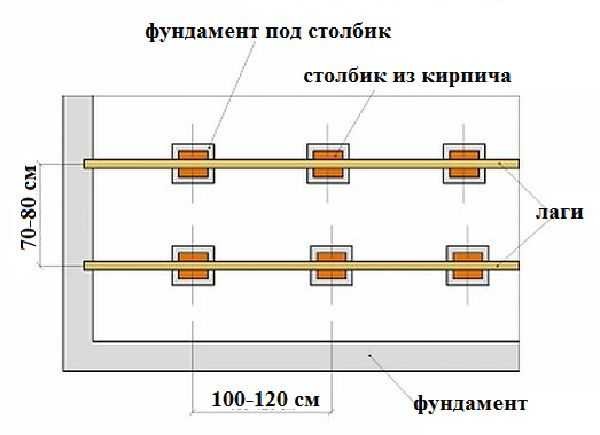
If the subsoil waters are close, the logs are raised. Supports are made for them - brick posts
There are two options for making the bases for the posts: make the formwork separately for each one, or fill it with a single tape. The first method is more economical in terms of material consumption, but the second takes less time: to make one or two general formwork faster than many small ones.
The location of the supports is marked with a pencil on the foundation or on lower crown (on the element to which the logs will be attached). Then the threads are pulled between the marks, and the formwork under the posts is already knocked down along them. There are other ways to mark up, but this one is the fastest and most accurate.
The dimensions of the formwork for the posts are 2-10 cm more than the post itself, the height is 10 cm. Inside, on the compacted soil, several bars of smooth reinforcement are laid, they are filled with a standard cement-sand mortar. They wait for the mortar to set for at least 3 days, then columns can be laid out on the base.
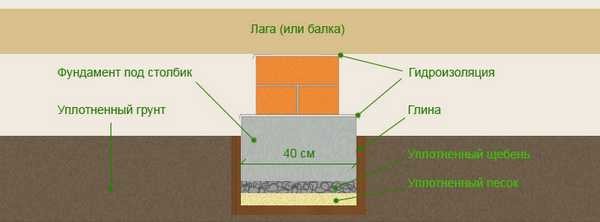
When pouring, it is necessary to monitor the height of the foundations: it must be the same. In principle, it can then be corrected by adding a solution, but again you will have to wait 3 days. Therefore, try to immediately make them the same height.
On ready base roofing material is laid, it can be in two layers. Then the columns are folded. On top of them, it is recommended to put also roofing material, and then also a three-centimeter wooden board soaked in antibacterial compounds. Lags will already fit on it.
As you can see, it takes a long time to make floor posts. If you need to speed up the process, you can put ready-made concrete blocks or beams, you can lay asbestos-cement pipes on a well-rammed bed. Some put boulders or tarred logs. There is another option - to drive pieces of metal or asbestos-cement pipes into the ground, stick several reinforcement bars into them and pour concrete. There is, probably, more than one option, because our craftsmen are famous for their ingenuity.
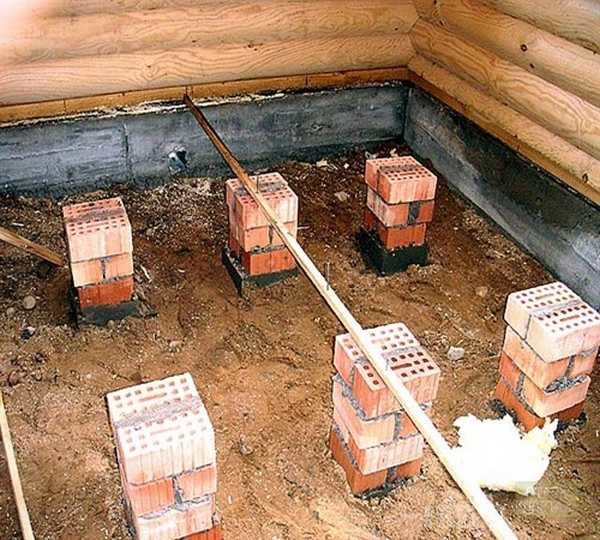
This is how ready-made columns look for lags
By the way, there is another option, but without support: hanging logs. Such a device of a wooden floor is possible in narrow rooms, which is far from always the case (do the lag laying step a little more often than in options with supports).
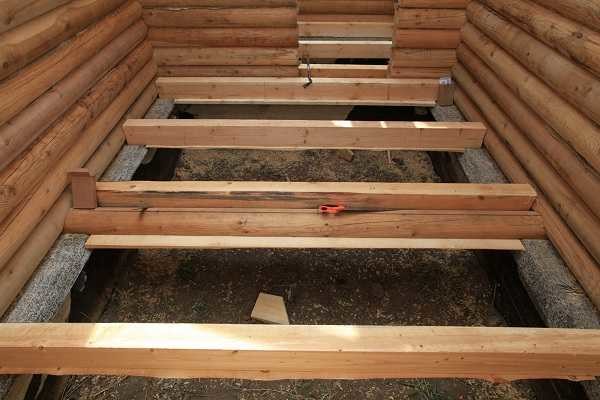
Hanging lags are a super fast option
Warm and cold underground
If the logs are raised above the ground, there is free space under them. There are two ways out. Leave the subfloor uninsulated or insulate it. At the same time, in each of the options, it is still possible to insulate the floor structure or not, and it itself can be single or double. So there are a lot of options.
The non-insulated subfloor can be made with a single or double plank floor. Some options are shown in the figure. Moreover, the insulated floor is only in one version - at the bottom right.
![]()
Floor options for logs with subfloor
It is possible to insulate the subfloor very simply: put any non-hygroscopic insulation on the waterproofing layer (roofing felt, roofing felt, film, etc.). Expanded clay is often used, from modern materials, foam board expanded propylene has proven itself very well, behaves a little worse, but it costs less, so it is also used often. Sometimes the space is filled with foamed polyethylene - all the insulation takes several hours, but this is done only with special devices, so you either have to rent them or pay a specialist for the work.
When using any of these heaters for ventilation of a wooden floor, it is necessary to leave a gap of at least 5 cm to the rough or finish coating.
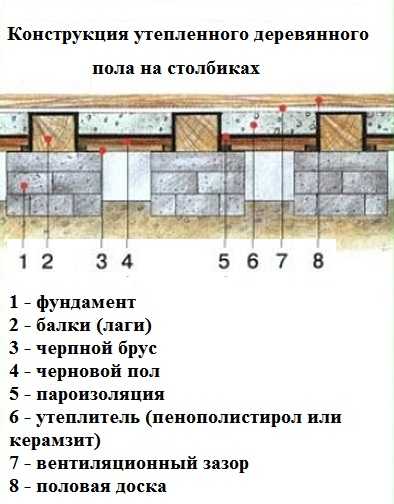
Warm and cold floor
Cold plank floor along the logs can be single or double. Warm - only double: the insulation needs to be laid on something. One of the options is shown in the photo.
A cranial bar is attached to the lags on the sides below, and the boards of the rough (cranial) floor are laid on it. The blocks should be thick enough to easily nail the deck. On the rough floor, you can use an unedged board, but just be sure to remove the bark and soak it well with antiseptics: woodworm larvae often nest under the bark.
Next, a waterproofing (membrane or film) is laid, and a heater on top. Here you can use all the same materials as for insulating the subfloor, plus (if you are satisfied with their ecology). But in the case of laying mineral wool on top, they also need to be covered with waterproofing - they do not like water very much, and when wet they lose their properties. The whole cake should take up enough space so that 5 cm is left to the floor boards.
Ventilation of wooden floors on joists
It is also necessary to provide for the presence of ventilation holes in the baseboards. According to the standards for a room up to 15 m 2, two vents are required, the total area of \u200b\u200bwhich is at least 20-30 cm 2. They are arranged in the baseboards of the opposite walls, covering with metal decorative grilles.
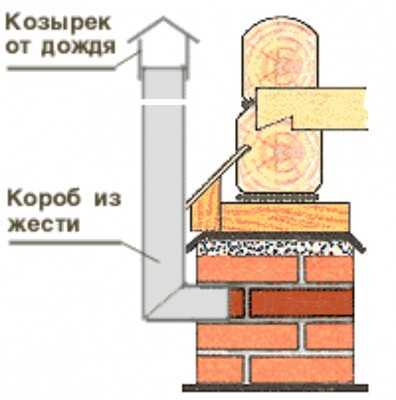
To improve traction and protect the subfloor from rodents, you can install a tin pipe in the duct, on top of which you can install an umbrella
For normal ventilation of the floor of the basement part of the foundation, ventilation ducts must be provided. To be able to somehow regulate the air intake, you can make dampers. You can withdraw ventilation pipe outside the foundation, raise it above the base, and on top of which make an umbrella so that precipitation does not fall into it.


